
This post may contain affiliate links. For more information, see our privacy policy.
Do you ever run across something that you think is just too good to be true?
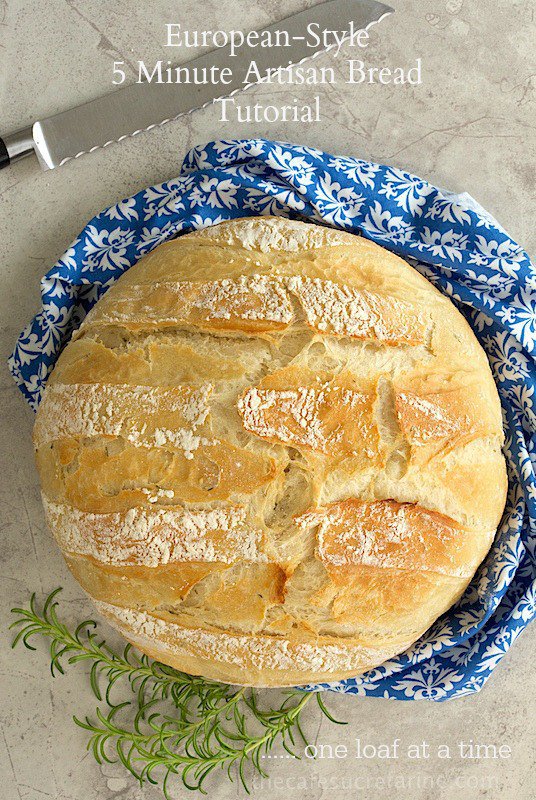
I'll never forget the first time I read about 5 Minute Artisan Bread. The loaves in the pictures looked like the came from a wonderful French or Italian bakery, the process sounded simple and the whole thing seemed way too good to be true. I'd made bread the traditional way for years, and knew it was a labor-intensive process requiring a fair amount of hands-on time. To say I was a skeptic was an understatement.
I also knew that yeast was a bit tricky and a bread recipe's success or failure was often dependent on a baker's "yeast competence". So when I read the recipe and discovered that you basically just throw everything in a large container, give it a stir and set it aside .......... well .... let's just say I was sure it wouldn't work.
I tried it and was shocked when, 45 minutes later, the dough had doubled in size. I followed the rest of the instructions carefully and before long the most wonderful aroma was emanating from my little (non-European) kitchen. When I pulled the rustic, golden-crusted loaf from the oven I did a happy dance because too-good-to-be-true was true!
I've made this delicious bread quite frequently since then and, over the years, simplified and refined the process. The original recipe made a huge batch, requiring either baking three loaves at a time or having a fairly large refrigerator space to store the extra dough. I've scaled down the ingredients to yield just one nice size loaf and have adjusted the technique to make it easier.
Are you skeptical? It's okay, I understand. Nothing can be that easy, right? That's why I had Scott click some photos of the process so you could see for yourself. Try it, you'll become a believer, I promise. You can find the original recipe and method in the Artisan Bread in 5 Minutes book. Below is my simplified method.
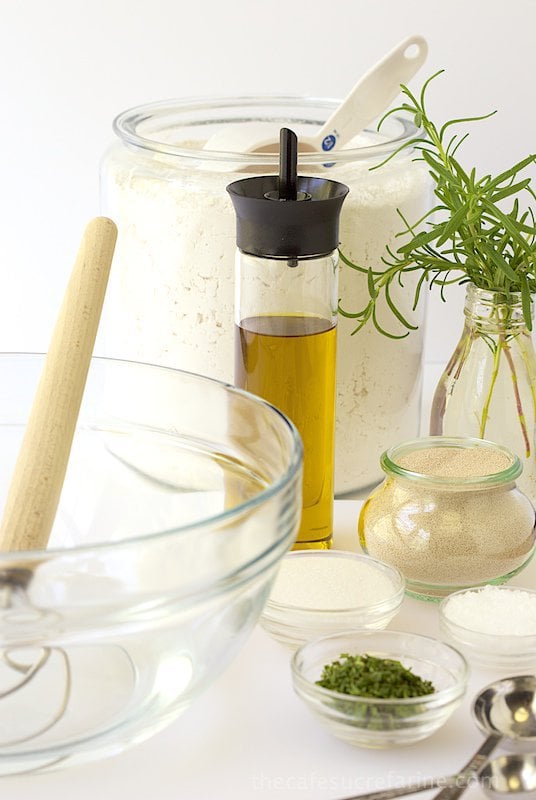
Gather the ingredients; a large bowl, some measuring spoons and cup. Be sure you have a sturdy wooden spoon or a whisk.
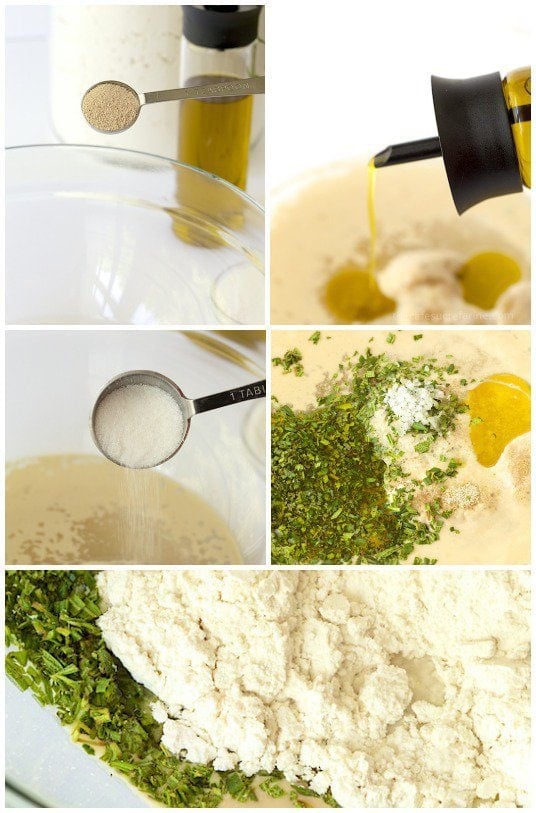
Add warm water to a large bowl. Stir in yeast and sugar. Let it sit for a few minutes, then add remaining ingredients.
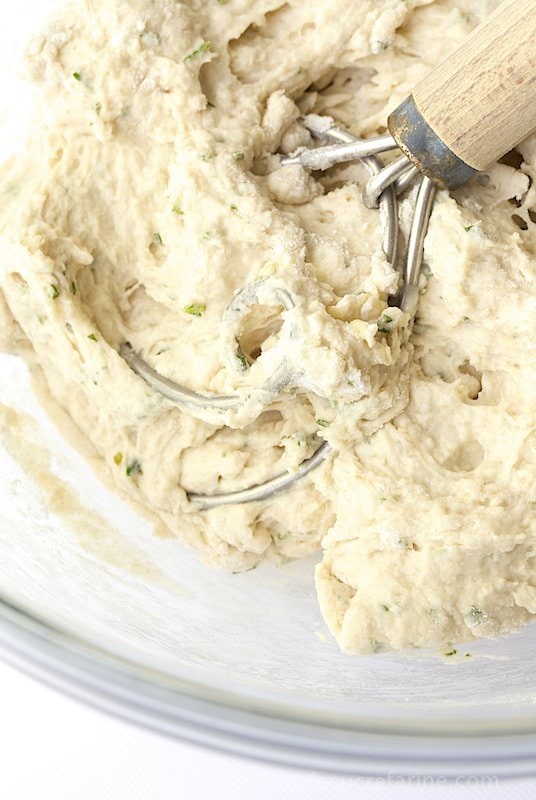
Mix until all of the flour is incorporated.

Cover loosely with plastic wrap and set aside.
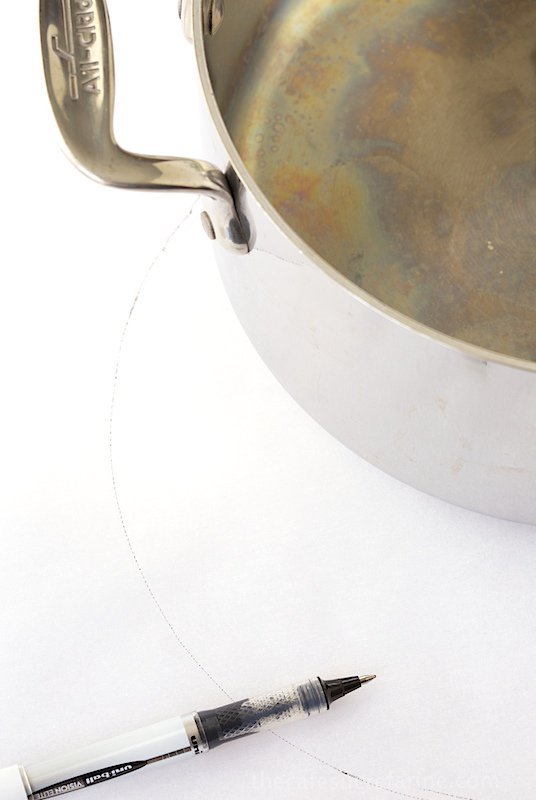
While the dough is rising, take a 3-4-quart pot (with or without a handle*) and place on top of a piece of parchment paper. Trace a circle, slightly bigger than the bottom of the pot. Cut out the parchment circle and set aside.
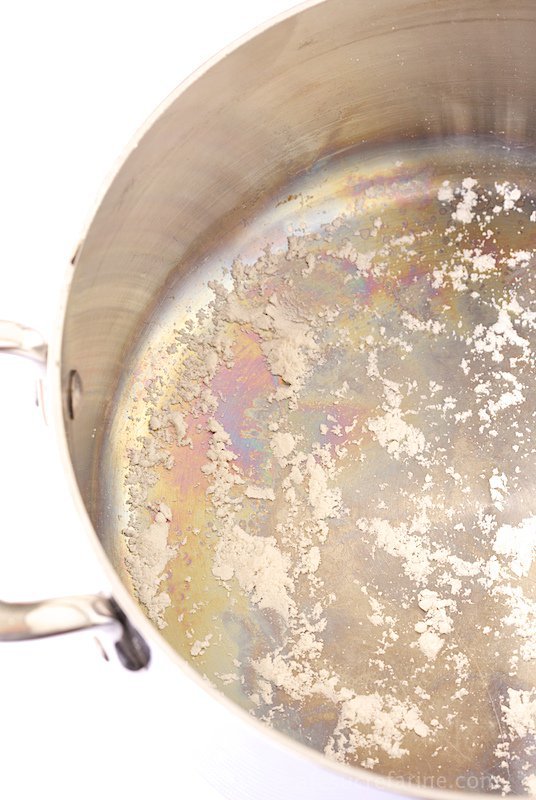
Sprinkle the bottom of the pan with 2 teaspoons of flour.
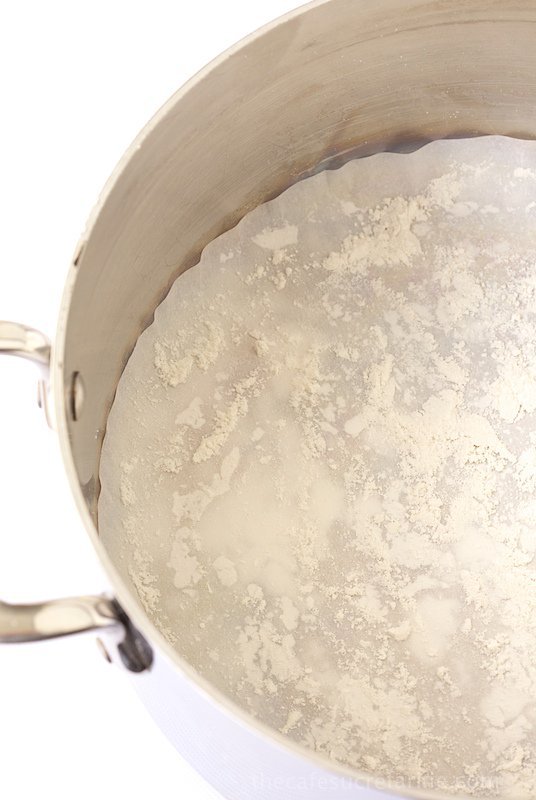
Fit the parchment circle into the bottom of the pan and sprinkle another teaspoon of flour over the paper. This will keep your bread from sticking to the pan and parchment paper. Set pot aside.
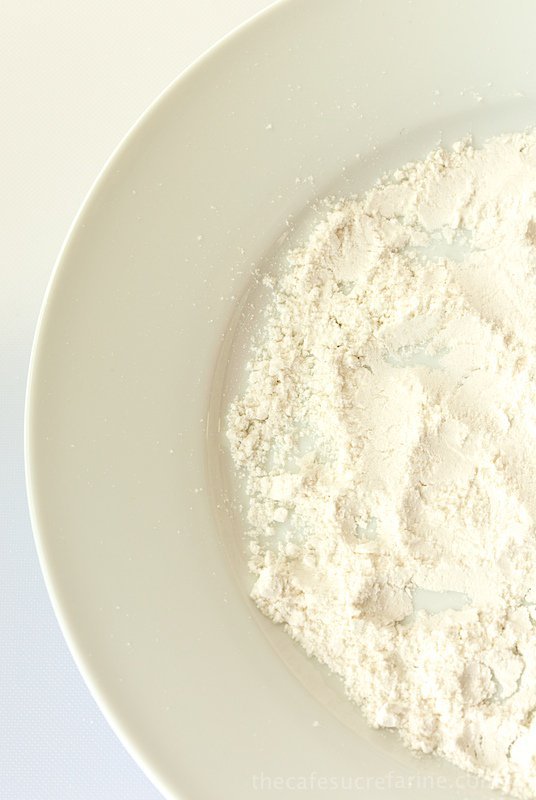
Spread out ¼ cup flour on a dinner plate.

Transfer dough to the floured plate. Flip several times to thoroughly coat dough with flour.
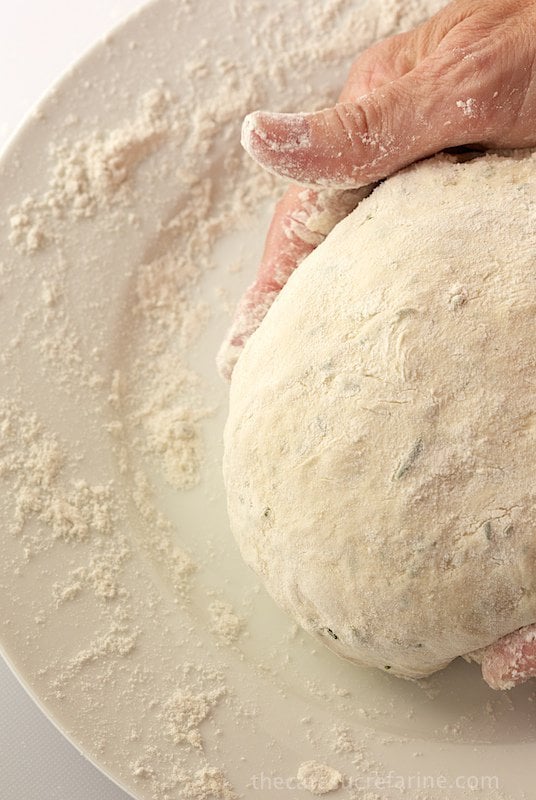
Shape into a smooth, flat ball by stretching the surface of the dough and tucking it underneath with the palms of your hands, rotating a quarter of a turn as you go.
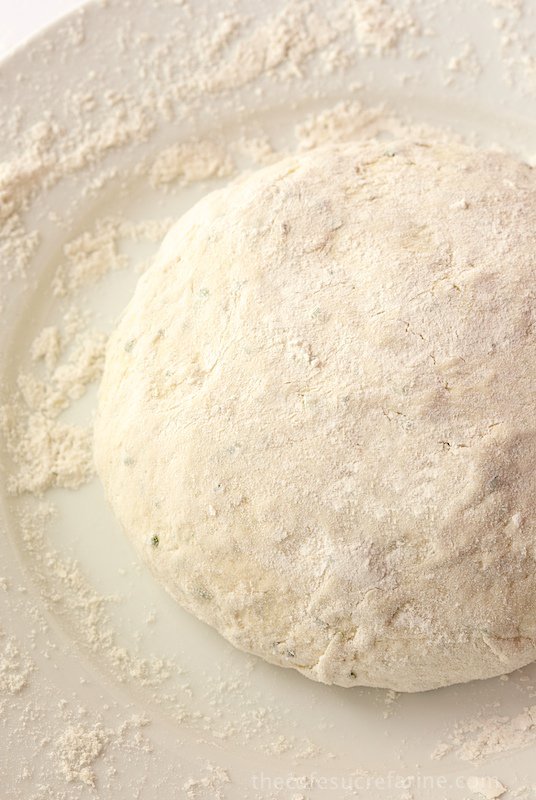
Dust with more flour from the plate as needed to prevent stickiness.
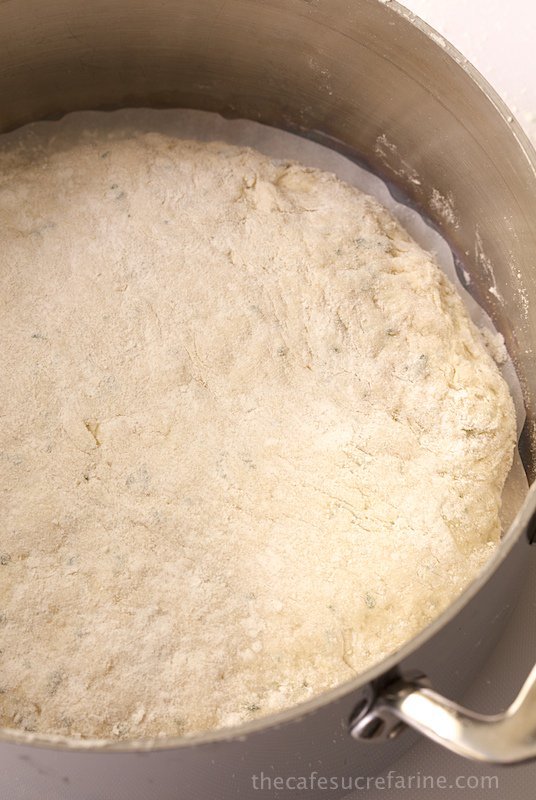
Transfer the ball of dough to the prepared pot and cover.
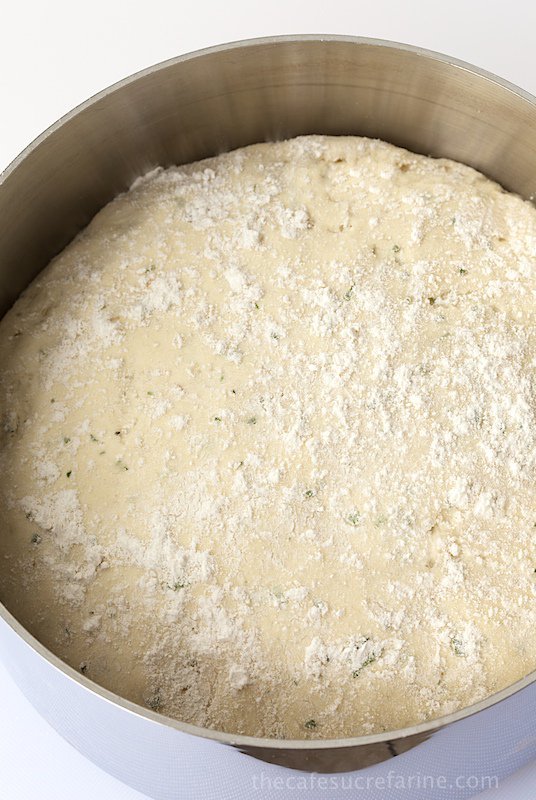
Let it rest for 30-40 minutes or until doubled in size. (Rising time will depend on how warm your kitchen is.) Then sprinkle the top with a bit more flour.
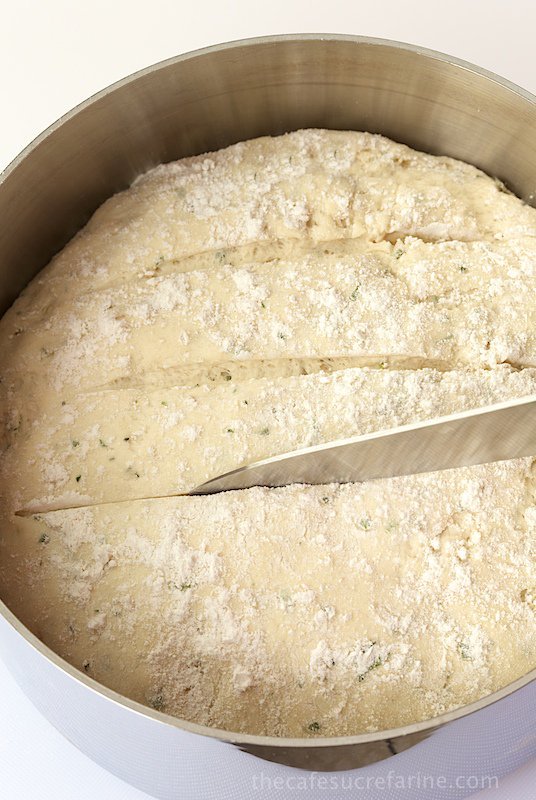
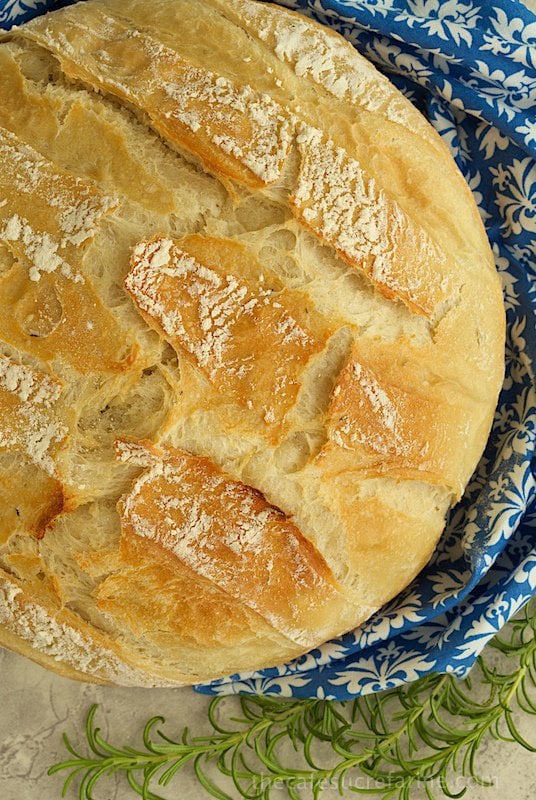
With a sharp knife make horizontal cuts across the top of the loaf. You can also cut an x (or just make little random cuts with a kitchen shears all over the top of the bread for a fun whimsical look.)
Now, cover on the pot and pop the whole thing in the oven.
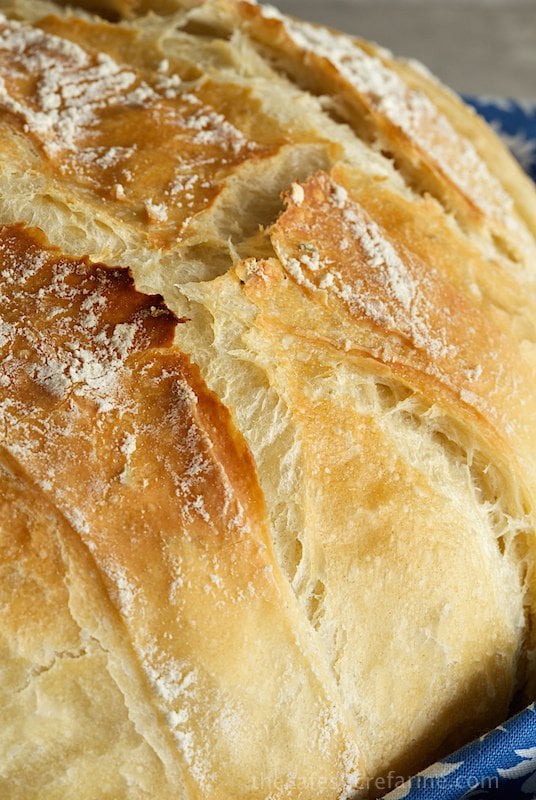
Before long, unbelievable aromas will fill your kitchen. You'll flip when you open the oven door and see the rustic rounded top of the golden loaf peeking out of the pot. I'm quire certain you'll be doing a little happy dance too!

- 1 ⅓ cups warm water 320ml at 100-110˚F
- 2 ¼ teaspoons granulated yeast*
- 1 ½ teaspoons sea salt or 1 teaspoon regular salt.
- 1 tablespoon sugar
- 2 tablespoons extra virgin olive oil
- 1 tablespoon finely chopped fresh finely chopped herbs optional
- 1 cup 130g whole wheat flour**
- 2 ⅔ 330g cups all-purpose flour
-
Add warm water* to a large bowl. Stir in yeast and sugar and let sit for 4-5 minutes till mixture begins to bubble a bit and get foamy.
-
Add remaining ingredients and stir with a sturdy wooden spoon. (A Danish whisk works wonderful for mixing this dough and can be purchased online very inexpensively.) Stir vigorously until all flour is incorporated. This will only take a minute or two.
-
Cover bowl loosely with plastic wrap or a kitchen towel and allow to rest at room temperature until dough rises and collapses (or flattens on top), anywhere from 45 minutes to an hour. (It could take a little longer if your kitchen is cooler.)
-
While the dough is rising, take a 3-4-quart pot**** (with or without a handle******) and place on top of a piece of parchment paper. Trace a circle, slightly bigger than the bottom of the pot. Cut out circle and set aside.
-
Sprinkle the bottom of the pan with 2 teaspoons of flour. Spread out with your fingers if needed. Fit the parchment circle into the bottom of the pan and sprinkle another teaspoon of flour over the paper. This will keep your bread from sticking to the pan and parchment paper. Set pot aside aside.
-
Place ¼ cup flour on a dinner plate. Spread with your fingers to cover surface of plate with flour.
-
After dough has risen and collapsed, dump it out onto the floured plate. Flip several times to thoroughly coat dough with flour.
-
Shape into a smooth, flat ball by stretching the surface of the dough and tucking it underneath with the palms of your hands, rotating a quarter of a turn as you go. Dust with more flour from the plate as needed to prevent stickiness, but don't try to incorporate a lot of extra flour into the dough.
-
Preheat oven to 400˚F.
-
Transfer the ball of dough to the prepared pot and cover with lid. Let it rest for 30-40 minutes or until doubled in size.
-
Remove cover and sprinkle top of dough lightly with flour.
-
With a sharp knife make parallel cuts, 1 ½ inches apart across the top of the loaf. You can also cut an x (or just make little random cuts with a kitchen shears all over the top of the bread for a fun whimsical look.)
-
Place pot in oven with cover on. Bake for 30 minutes, then remove cover and continue baking another 15-25 minutes, or until bread is golden brown.
-
Allow to cool on a cooling rack, uncovered for 15 minutes. Remove bread by inverting onto a cooling rack. (If bread sticks to pan at edges, use a sharp knife to loosen any areas that are stuck.) Cool bread, right side up.
*The small yeast packets from the grocery store work fine but I prefer the yeast that you can purchase in bulk at the big box stores like Sam's, Costco, Bj's, etc. It's infinitely cheaper than buying yeast in the small packets and it's professional grade. I keep a small jarful in the refrigerator and freeze the rest. I've kept it in the freezer for up to a year and it will keep well in the refrigerator for several months.
** You can make this bread with entirely all-purpose flour. The whole wheat flour makes the loaf a bit more rustic. If you want to use all whole wheat flour, check out the Artisan Bread in 5-minutes website for adjustments that need to be made.
*** I use warm tap water. It should feel fairly warm to the touch but not so hot you need to pull your hand back.
**** Don't worry about the depth or width of the pot. As long as it will hold 3-4 quarts, you'll be fine. If it's a deep pot, your bread will be smaller and taller. If the pot is shallower and has a larger circumference, the finished loaf will be larger and not as tall.
***** If using a pot with a handle, be sure it's oven-safe to 400˚F.
I like to slice the bread then place it in a zip lock bag. You can pull out a few slices at a time or, for a wonderful dinner bread, place the whole loaf back into the same pot you used to bake it. Cover the pot and rewarm in the oven for 30 minutes at 350˚f. The bread will be wonderful crisp on the outside with a soft and chewy center.
Kim S. says
This bread recipe is spectacular! I made it today exactly as directed to accompany Thanksgiving dinner (except I left out the optional herbs and used active dry yeast). Absolutely rave reviews. We are so looking forward to making it again! Thank you so much!
Chris Scheuer says
Awesome! Thank you, Kim!
Diane says
OMG this turned out perfect and can't wait to try different herbs. Thank you for this wonderful recipe.
Chris Scheuer says
I'm so glad! Thanks, Diane!
Carol says
Hi, instant yeast or active yeast? The tutorial/recipe looks very easy.
Thank you
Chris Scheuer says
Hi Carol, I use instant yeast.
Diane says
all of the artisan bread recipes tell you to pre-heat the dutch oven or large pot then put the dough in but you do not say to do that. Just wondering why? I am intending on trying your recipe this weekend.
Chris Scheuer says
Hi Diane, it's not necessary for this recipe. You could do that but this one comes out nice and crisp without that step.
Debbie says
Is it ok to leave it to rise in the final stage for several hours?
Chris Scheuer says
Yes, but then let it warm up a bit before baking. Enjoy!
Debbie says
Thank you. I left it to rise in the baking dish, on the counter, until time to bake. In the oven now and smells so good. Thank you so much. Blessings
Maggie says
Thank you so much for sharing this recipe, the bread turned out amazing. ❤️🇨🇦
Chris Scheuer says
Yay! That's awesome, Maggie! Thanks for sharing your results! 💕
Jennifer says
I love this recipe! I am the head cook of a camp and always make this bread to go along with stew. Of course I have to more than triple the recipe because the kids love it! I've baked it in large rectangle aluminum pans with lids (lined with parchment like the recipe recommends) and this last time I made a "log" of aluminum foil under the parchment so as to make 2 long loaves in one large pan. Great results every time! Making a loaf for home as I write 🙂
Chris Scheuer says
Wow, I wish I would have had a cook like you at camp! You are definitely spoiling them (in such a fun way) 🥰 Thanks so much for sharing your review, Jennifer!
Sherie Rodrigues says
Dear Scott and Chris. I messaged you back a few years ago about this fab bread recipe. My name is Sherie. Boy, you have just a few more fans since then. I am so happy for you both. You work so hard to bring us these great recipes. I started making bread again, and last night, instead of sleeping, all I could think about were you both. I remembered saying to you I had people waiting at the gate with money in their pockets, it smelt soo good. Tasted even better. I wanted to go to the kitchen at 2am to bake bread. I resisted, just. I would like to tell you again, I have had the same success with your recipe. Thank you for sharing your knowledge and time. I made a vow to bake one recipe from your collection every day. I love you both so much and I do hope you and your beautiful family are all safe. Hugs from Sherie Rodrigues in Australia. 🥰🤗
Chris Scheuer says
Thank you, for writing, Sherie! Greeting all the way to Australia! Hope you are safe and doing well.
I’m so happy you’ve enjoyed our recipes and appreciate your kind thoughts and wishes.
Kind regards,
Chris 💕💕
Liz says
Can I bake this on a pizza stone?
Chris Scheuer says
Yes, that would work!
Beverly funk says
How long would u say u kinda kneaded dough in ur hands.b Until it was smooth all the way around? I turned maybe 5-6 turns. Tasted good, maybe add a little salt and next time I will try whole wheat flour. Hubby liked it
Chris Scheuer says
You did it just right, Beverly! I'm happy you enjoyed it!
Becky T says
It was fun to bake ! Result was puzzling, and maybe you can send advice. Followed recipe exactly, added fresh rosemary. Loaf looked great and had a good rise, texture and fragrance. I might have underbaked slightly.
However, it tasted bland, desperately needed more salt and some flavor. Has anyone added additional herbs, salt, nuts?
Chris Scheuer says
Hi Becky, you can defintely increase the salt and rosemary, to taste. It's always good to follow a recipe precisely the first time and then adapt to your taste.
Lisa says
Fantastic recipe! I used all all-purpose flour and added rosemary and dehydrated garlic slices and it was delicious. Thank you!
Chris Scheuer says
Thanks so much, Lisa! I'm so glad you enjoyed it. Your version sounds wonderful!
Samantha says
Hi There! Thank you so much for sharing all of your delicious recipes! I wonder if I am doing something wrong - I've tried this one a couple of times and it's not working for me. I wonder if my kitchen is not warm enough? Do you think I could let the dough rise maybe in a 100 degree oven instead? My dough didn't seem to rise enough, and it wasn't very sticky after it did do its little rise. It seemed to separate as well, not really stick together when I was kneading it afterward. Any advice you can think of would be awesome! I will definitely keep trying it because it is too tempting to not, especially if I can end up with an amazing loaf of bread at the end 🙂
Chris Scheuer says
Hi Samantha, sometimes yeast can be a little tricky. That's why I've switched to instant yeast in many of my newer posts. It's so much easier to work with.
To answer your question, yes you could definitely try the oven. Sometimes I just preheat the oven for 1 minute, then turn it off and leave the light on. This makes a great place for proofing bread dough. Another option is to boil a cup of water in the microwave for several minutes. Leave the water cup in there and add your bowl of dough. It makes a nice "steamy" environment that yeast loves.
Sam says
I burned myself bc this looked so good right out of the oven! I'm on my third slice and seriously reconsidering my low carb diet. Thank you for this recipe and the step by step tutorial. They made it easy to succeed!
Chris Scheuer says
Hi Sam, I never like to laugh at someone else's misfortune but your comment made me laugh right out loud! I"m so happy you've enjoyed the bread. Thanks for taking the time to share your results!
Sas says
Hello, can I use bread flour for this recipe?
Carrie says
I thought this was going to be time consuming but it worked out great. I had laundry and other chores to do around the house as well so coming back to my baking was a nice break
I added an extra tablespoon of olive oil and some fresh rosemary. Smells delicious! New family favourite.
Chris Scheuer says
Yay! So happy you had good success with this bread, Carrie. Thanks for sharing your results!
Mim says
This is a great recipe, came out really well apart from the bread sticking to the paper. Next time I'll grease the pan and flour it rather than use the paper.
Chris Scheuer says
Thanks, Mim! So happy you enjoyed it! You can also spray the parchment paper a bit which will solve the problem!
Mim says
I tried this again the other day greasing and flouring the paper and it still stuck. Making it again today and just greasing the pan instead line I normally do with bread.
Chris Scheuer says
Hi Mim, I have sprinkled a little flour on the parchment and that worked well.
Norma says
What herbs do you suggest?
Chris Scheuer says
Rosemary is delicious as is thyme. But you could also use a little garlic and some oregano for a fun twist. Basil and sundried tomato would be great too!
Rob says
Just made this loaf today. I've been making okay bread for years, but never quite managed the perfect crusty loaf, this is easily the best I've made yet. Needless to say it won't last long in my house!! I'll be making it again for sure.
Wanted to attach a photo, but I can't. 🙁
Chris Scheuer says
Yay! So happy you enjoyed it, Rob. I'd love to see a picture of your bread. You could send it via email.
Lydia says
Being the poor college student I am, I dont have any pots that are oven safe. However your recipe is the best I've found yet. Would a 9"x3" metal circle cake pan work with the same technique?
Chris Scheuer says
Hi Lydia, I don't think that pan would work for this recipe as it's not heavy enough and wouldn't have a cover but you could definitely use it for this recipe: https://thecafesucrefarine.com/ridiculously-easy-focaccia-bread/
It's wonderful!
Terri Butts says
My granddaughter (age 5) and I made this today. It is delicious and she is so proud. Thanks for your detailed instructions. It was so simple to make. Thanks for sharing.
Chris Scheuer says
That's just awesome! I love it!!
Lesley says
Hi. I don't have a round pot that big.
Chris Scheuer says
You could divide it in two and make it in two smaller pots.
Marilee Reyes says
I'm confused. In the intro you said everything gets tossed together, then in the directions you proof the yeast in water before adding to the other ingredients. Please clarify. I'm not an accomplished baker.
Chris Scheuer says
Hi Marilee, technically you can just throw it all together. I do like to spend just a few minutes proofing the yeast to ensure good results.
Cris says
Just came across your site. First question, could this be baked in a cast iron skillet covered with foil? Second question, could this dough be divided in half and baked in bread pans?
Thanks
Chris Scheuer says
Hi Cris, I think you could do the skillet if it was deep enough. I honestly haven't tried it in bread pans, but I know this one works in bread pans and it's actually easier: https://thecafesucrefarine.com/ridiculously-easy-rosemary-bread/
Enjoy!
Pat K says
Do you actually cover the pot to bake? Seems it wouldn't get brown and cristy?
Chris Scheuer says
You do cover it Pat - and then remove the cover just for the last 15 minutes. It comes out perfectly golden brown!
Maggie says
The very best artisan bread Ive made so far, hubby is demolishing it !!!
Chris Scheuer says
Awesome! Enjoy and grab a bit for yourself! 🙂
Kayleigh says
Would this fit into a rectangle loaf pan? Or would there be too much/enough to make two loaves? Im not sure i have an oven safe pot to use.