
This post may contain affiliate links. For more information, see our privacy policy.
These tall, flaky, Ridiculously Easy Buttermilk Biscuits take less than 10 minutes to throw together. They're also ridiculously delicious!
"Brilliant, simply brilliant!" That’s what I said, right out loud, when I read the unbelievably easy directions for preparing these buttermilk biscuits.

The technique was created by the super-smart folks over at Cook's Illustrated. When I read their method for making drop biscuits, I figured it was too good to be true. But being a curious cat when it comes to all things culinary, I couldn't resist giving it a try.
You would have probably laughed if you saw me just after I read the article. I ran to the kitchen, turned on the oven and pulled out a bowl, along with measuring tools and the necessary ingredients. All super basic ingredients that I had in my pantry and fridge (you probably do too!). The simple cast of characters includes flour, baking soda, baking powder, salt, sugar, buttermilk and butter, that's it!
Classic Technique
Why did this sound too good to be true? Well, buttermilk biscuits can be a bit tricky. The technique usually calls for combining the dry ingredients, then “cutting” in cold butter with a knife, a pastry cutter or between your fingers. The liquid is then added and everything is gently combined.
If done correctly, the tiny pieces of butter, evenly distributed throughout the flour mixture, are what give classic buttermilk biscuits their lightness, flakiness and layers of peelable, buttery deliciousness. It’s not a difficult technique, just a bit time-consuming, and the results are not always consistent. The Cook's Illustrated technique is totally different... and ridiculously easy!
Ridiculously Easy Technique
How does it work? Well, I'm glad you asked... start by placing a cup of buttermilk in the freezer for a few minutes while you melt the butter in the microwave. Let the melted butter sit while you prep the other ingredients. Then, it's just a matter of combining all the dry ingredients in a bowl and giving them a good stir. The melted butter is then combined with the super-cold buttermilk. And this, my people, is when the magic begins!

When the warm butter hits the cold liquid, small, buttery globules form as you can see in the picture below.

Do you see where this is going? When this buttermilk mixture is added to the dry flour mixture and it's all stirred together, you'll notice tiny pieces of pale yellow butter dotting the simple dough. Yep, it will look just as if you spent the time to cut them in!
Would this technique work for traditional, rolled biscuits?
The Cook's Illustrated recipe is for simple drop biscuits, meaning you just drop spoonfuls onto a sheet pan, then bake. Would this technique work for a more classic, cut-out style biscuit, I wondered? You never know until you try, so I decided to give it a whirl!
I turned out the dough onto a floured work surface, kneaded it a few times, then patted it into a small, square. Dipping a round biscuit cutter in flour, I cut four circles, then rerolled the scraps and cut two more for a total of six. (Since then, I've also used a smaller cutter, yielding 8 biscuits.)

It was easy enough; actually ridiculously easy! The biscuits rolled out of the oven tall and golden brown with a heavenly aroma. But you're probably wondering how this version tastes and how they stack up to traditional buttermilk biscuits, right?
The results?
When Scott and I took the first bite, we looked at each other incredulously. The biscuits were light, tender, buttery, flaky and crazy-delicious. "Wow, these are amazing!" Scott said. I agreed.
In fact, we ate far too many that day, smothered with melted butter and strawberry jam. You'd probably frown on us if I told you these biscuits also ended up being dinner that night, so I won't share that bit of information. I guess I'll just say, it wouldn't have been a good day for counting calories!

I've had quite a few happy taste-testers since then, and everyone is shocked when they hear how easy these wonderful buttermilk biscuits are to make. In fact check out the video below, to see for yourself!
Try it! You'll be shocked (and delighted) too... you might even have the inclination to exclaim "Brilliant, simply brilliant!"
Bon Appétit!

Café Tips for making Buttermilk Biscuits
- If you don't have buttermilk, make your own. Place 1 tablespoon of fresh lemon juice or vinegar in a measuring cup. Fill to 1 cup level with milk and stir well. Allow to sit for 5-10 minutes or until slightly thickened. The mixture may curdle a bit, that's okay! Use in recipes in lieu of buttermilk.
- Don't skip chilling the buttermilk (step 2). It will definitely make a difference. If the buttermilk isn't really cold, the little butter globules won't form.
- I made these biscuits when I was in London visiting my daughter. I learned that all-purpose flour (Plain flour) is a bit different there and it seemed like I needed more, probably closer to 2 ¼ cups.
- These biscuits freeze well, both unbaked and baked. To freeze them unbaked or baked, place biscuits on a sheet pan or a plate spaced at least a half-inch from each other. Freeze till frozen, then transfer biscuits to a ziplock bag or air-tight storage container. If you've frozen them unbaked, bake them as directed in the recipe right from the freezer. Give them a couple extra minutes in the oven to compensate for the fact that they were frozen.
- If you freeze these buttermilk biscuits after baking, allow them to thaw when you're ready to use them and then warm in the oven for 5-8 minutes at 300˚F.
- If I'm feeling a bit pinched for time or just lazy, I'll pat the dough into a 6-inch circle and use a bench scraper to cut the dough into wedges. I either put these wedges on a sheet pan lined with parchment paper or in a 9-inch cake pan lined with parchment.
- Another shortcut is to simply scoop up the dough, right from the bowl onto a sheet pan and bake as directed.
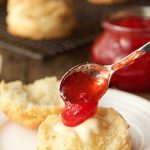
- We love to serve these biscuits with our Easy Strawberry Freezer Jam or this Overnight Raspberry Freezer Jam.
Love these biscuits? Then you'll also go crazy over these Ridiculously Easy Cheddar Chive Biscuits, made with the same easy technique!

Thought for the day:
Show me your ways, Lord,
teach me your paths.
Guide me in your truth and teach me,
for you are God my Savior,
and my hope is in you all day long.
Psalm 25:4&5
What we're listening to for inspiration:
- 1 cup buttermilk
- 9 tablespoons butter divided
- 2 cups all purpose flour more for counter
- 1 tablespoon sugar
- ½ teaspoon baking soda
- 2 teaspoons baking powder
- ¾ teaspoon table salt
-
Adjust oven rack to middle position and heat oven to 450°F. Line a sheet pan with parchment paper or spray a sheet pan with cooking spray.
-
Measure 1 cup of buttermilk and place in the freezer for 10 minutes while prepping other ingredients.
-
Place butter in a microwave-safe bowl, cover and heat on high for 30 seconds. If not completely melted, return to microwave for 10-second intervals till melted. Set aside while prepping other ingredients.
-
Whisk flour, baking powder, baking soda, sugar,and salt in large bowl.
-
After buttermilk has been chilled in the freezer for 10 minutes, combine it with 8 tablespoons of the melted butter. (Reserve the last tablespoon for brushing on the baked biscuits.) Stir with a fork until butter forms small clumps or globules. (See picture in the post.)
-
Add buttermilk mixture to dry ingredients and stir with a rubber spatula just until all flour is incorporated and batter pulls away from sides of the bowl. The dough should be stiff and not super wet. If the dough is wet, add more flour 1 tablespoon at a time, stirring to combine, until fairly stiff.
-
Generously flour a work surface. Dump biscuit dough from bowl onto prepared work surface and turn to coat all surfaces with flour. Knead on counter 5-6 times (about 30 seconds). Flip over on the work surface to coat with flour then pat into a 6-inch square. It should be a 1½-2-inches in height.
-
Cut four biscuits with a 2 ½-inch biscuit cutter. Place biscuits on the prepared sheet pan. Knead scraps a few times till they hold together, then pat into a small rectangle and cut two more biscuits. Transfer last two biscuits to the sheet pan, spacing about 1 ½ inches apart. (See Café Tips in the post for an even easier cutting technique).
-
Place in oven and bake until tops are golden brown and crisp, 8 to 18 minutes. (start checking them after 8 minutes as ovens vary. You want them to be a nice golden brown, but not too brown - check the pictures above for correct color.)
-
Re-melt remaining tablespoon of butter in the microwave, if necessary and brush tops of hot biscuits with melted butter. Serve and enjoy!

Katlin says
Hi! I am planning to make these for a bridal shower (probably a mini version, so I know I will need to watch them carefully).
However, I am wondering--have you had any luck making them a day ahead? Do they hold up well? Would they be best stored in the fridge or room temperature in a sealed container?
I appreciate your help!
Chris Scheuer says
Hi Katlin, I love to make them way ahead and then freeze them before baking. On the day you want to serve them, just pull them out of the freezer and bake right away, don't thaw. They will take just a bit longer but will be fresh and delicious!
Jan says
Best Buttermilk biscuits I ever made. Your recipe is going to the head of my recipes…I’ll be eating these all the time.
So easy and delicious I won’t be afraid to make biscuits any more!! Thank you!
Chris Scheuer says
I love that, Jan! Thanks for sharing your review!
yvette says
Hello Cris,
I'm Dutch and biscuits and scones aren't available and known here in the Netherlands...I knew about them from the movies and I was always curious though how they would taste.
I tried to make them ones from a traditional recipe from an English cookbook and never tried it again since they didn't really rise and were hardly edible.
When I read your recipe and comment in the middle of the night (I enjoy reading about food ánd eating it) I jumped up right up and baked them, since I happened to have al the ingredients including buttermilk. I made them ánd ate them (almost all) afterwards since it was almost morning anyway... They were fantastic! I didn't make pictures but I should have, so tall and flaky as the were.. no one saw them because I ate the last ones for breakfast later in the morning.. I don't really watch my calories, haha. I made them often ever since.
But now my reason for writing again: I always wondered if a pie crust couldn't be made the same way (I sometimes make an american lemon merinque pie for a birthday) and I finally tried it! I used your exact recipe for the scones with a little less buttermilk, and pressed the dough into a pie dish, pre-baked the crust blind. It was simply wonderful! I'd like to know if you or any of the readers ever tried that?
Chris Scheuer says
Thank you so much for taking the time to leave a comment, Yvette! I'm so glad you enjoyed this recipe. I have not tried this method for pie crust, but yours sounds delicious!
ann Barker says
I'm not crazy about biscuits but I had some buttermilk that needed to be used up. I researched recipes and found a buttermilk cake but also saw these "Ridiculously Easy Biscuits" I didn't have any eggs so I opted for the biscuit recipe. I'm not much of a cook and after I mixed everything together, I discovered I couldn't find my rolling pin and I didn't want to dump everything out on the counter and make a bit mess either. So, I didn't even knead these. I grabbed a large ice cream scoop, sprayed it with oil and scooped out 8 biscuits, thinking I'd probably wasted a lot of butter and time. They turned out GREAT!!! I couldn't contain myself and immediately ate one straight out of the overn and then had a second! I'm a believer! Really, really good - I'm going to freeze the rest and hope I forget about them before I eat them all!
Chris Scheuer says
Hahaha! You made me laugh right out loud, Ann when I read your comment. SO happy these turned out well for you. Who knows, you might become famous for making biscuits in your circle of family and friends. 💕
Beverly says
Lol you sound like me!! I'm going to make these biscuits today. I'm so very excited!!
Chris Scheuer says
I hope you enjoy them, Beverly!
Tommie says
I too just made these with an ice cream scoop. Next time I will roll them out as they did not hold together very well, but my oh my do they taste delicious! I didn't have any buttermilk so had to "make" some with milk and cream. Baked at 425 degrees for 14 minutes in my oven.
Looks like you are having a wonderful trip Chris!!
Chris Scheuer says
Thanks, Tommie!
Cindy Macolini says
I made your Rosemary Parmesan Biscuits earlier in the month and my husband loved them. Today I tried these. His reaction was the same! 42 years of marriage and I've only attempted biscuits once before, not very successfully. These are so good and so easy! Thank you much for sharing your method!
Chris Scheuer says
Yay! Thanks for letting us know, Cindy!
Richard Brewer says
Tried for years to make decent biscuits, but reading your recipe gives me hope again. One question, though. Anyone try these without the addition of sugar?
Chris Scheuer says
Give them a try, Richard!
Joan says
Love these! Have made several times and frozen then uncooked. Then just defrost or pop in the oven frozen - can't tell the difference. This way I have them ready whenever anyone wants just one (or 2 or 3!).
Tamara says
I've not had much luck with biscuit making, but your recipe ended the flat, dense run of the last several years. Added bonus...my husband & son, who typically aren't fans of biscuits (unless laden in my bacon gravy), LOVED these w/ just butter and jelly. This will definitely be my go-to recipe!
Chris Scheuer says
I'm so glad, Tamara! Thanks for letting us know!
Lauren M. says
I love this recipe. I moved to New Zealand about 10 years back and miss biscuits like crazy. Scones just don't cut it. Is Americans love this easy method. Minus the chilling of the milk, I can have these ready in just a few minutes. Also an excellent substitute for recipes like monkey bread and such that call for refrigerator biscuits. We don't have those here either. As a mom of 2 littles, I'm desperate for easy shortcuts!
Chris Scheuer says
I'm so glad to hear that, Lauren! Thanks for letting us know!
Zane says
Chris, thank you for taking the time to put this easy recipe for buttermilk biscuits on the internet. After a few tries I'm getting better after each attempt. I took to a batch over to mom and dads for the taste test. Moms not able to stand and make biscuits anymore. She said there's nothing wrong with these biscuits. Thank you for taking the time to post this recipe. Now I can make biscuits for my parents. Thank you for sharing and making this possible.
Chris Scheuer says
Haha! I love this so much, Zane! Thanks for sharing your story 🥰 Only if you've lived in the south would you understand if an older person says "there's nothing wrong with these biscuits" that it's a great compliment! So happy you've all enjoyed these and that you've become the "little family biscuit maker". 💕
Yvette says
If you don’t have buttermilk, can you use milk and vinegar? Real buttermilk is so much thicker and creamier and I’m afraid the biscuits won’t turn out as good.
Chris Scheuer says
Hi Yvette, you can definitely use the milk and vinegar trick. I've tried it and, although I prefer the real deal, there's not a ton of difference.
Shirl says
You’re right, simply brilliant!!! I have come across this recipe on your site for quiet some time now. Never tried it because it just seems more simple to continue doing things as usual. Although your recipes never disappoint. I made them this morning & will probably never go back to the old way of cutting in the butter. Thank you so much for sharing this simple technique.
Amy says
What a brainchild! I personally don't enjoy the butter-cutting-in step, and this makes it so much easier. Clever, clever you! Thanks for the fantastic recipe!
Chris Scheuer says
Thanks, Amy!
Anita says
I made the recipe today using almond milk (adding TBSP of vinegar to create buttermilk). Used a plant based butter. I did this because of milk allergy our son has. They turned out so amazing! Such great flavor & texture. Today was practice run for Easter meal. Thank you! Delish!
Chris Scheuer says
Awesome! Thanks so much for sharing your results, Anita. I know other readers will find this helpful!
Bernice P says
Hi Chris, these were wonderful! First time in my life ( and that is a long time) that I made homemade biscuits. I think they intimated me before . These were just wonderful and so easy... and didn't take much time at all! I used a medium size cookie scoop and just dropped them on the cookie sheet... Thank you for such a wonderful recipe
Chris Scheuer says
I'm so glad you had success with these, Bernice! Thanks for letting us know!
Anne-Marie says
Hi again, Chris!
Sorry for not leaving a star rating - please click 5 stars from me! Thank you for sharing your wonderful recipes!
Chris Scheuer says
Thanks!
Anne-Marie says
Hi Chris,
My family loves your biscuits. I have made them many times and they are so delicious! I am enjoying exploring all of your Cafe recipes and always learning from your helpful tips. My two teenage boys are interested in getting in the kitchen and I hope to guide them with some help from your easy-to-follow recipes!
Chris Scheuer says
I love that! Thanks so much, Anne-Marie!
Carole says
Deliscious and super easy! I hate cutting butter into flour for recipes and this technique works great. Very ingenious of you!
Chris Scheuer says
Thanks, Carole!
Bernice P says
Hi Chris, These sound wonderful... How would I reheat these if necessary? Thanks...
Chris Scheuer says
Hi Bernice, I just pop them back in a 325˚F oven until warmed through, 5-10 minutes.
Wynd says
This is the second time I have made these delicious biscuits! I love this recipe for eliminating the "cut the butter into the flour mixture" part. My only question is judging when they are done. Mine look kind of - dusty - and not golden brown like the pics. Am I using too much flour when I knead and cut them out? No kneading them enough? Should I give them a light egg wash on the tops before baking? I want them to look as delicious as they taste!
Chris Scheuer says
If you can use a little less flour, that would be great. Also leave them in the oven a little longer. Sometimes I brush them with a little melted butter to enhance the flavor and golden color.
Audrey says
Do you use salted butter or unsalted ?
Chris Scheuer says
Hi Audrey, I'm in agreement with Christopher Kimbal who started Cook's Illustrated. I always use salted butter. https://www.177milkstreet.com/discussion/discussion/73/salted-vs-unsalted-butter
Virginia Allen says
I loved these biscuits! I've had trouble in the past getting my biscuits to rise, but these rose beautifully. We enjoyed them with sausage gravy. To note, I used a 2" biscuit cutter and got 9 biscuits out of the dough. Well, I did eat a FEW scraps of the dough. Bread dough is my weakness!
Chris Scheuer says
I'm so happy you enjoyed them, Virginia!
Jocelyn says
I have been looking for a go-to biscuit recipe for years but never found one I loved. These are hands down the easiest and best biscuits I have ever made! I am so glad I stumbled upon this recipe. The freezing fro 10 minutes of the buttermilk is genius. Thank you!
Chris Scheuer says
Yay! I'm so glad, Jocelyn!
Dee says
I’ve made these a couple of times. So good and love how easy they are to make. I made a different recipe before which did not come out well. My family was expecting their Grandmother’s biscuits, who whipped them up with ease. That’s not what they got. But when I found this recipe my husband said they were pretty close, so I’ll take it! However, I try to watch my calories so how many calories per biscuit?
Chris Scheuer says
Thanks, Dee! It's 252 calories per biscuit. You can always find that information at the bottom of the recipe card.
Dee says
Thank you!
Debra says
OH.MY.GOODNESS - Melt in your mouth deliciousness. S-o-o-o much quicker than traditional biscuit recipe. I hate cutting butter into dry, never seems like I get it right. But these are just so WOW!
Thank you
Chris Scheuer says
Thanks, Debra! So glad you enjoyed them!
Martha says
Hello! I am so happy to have found this recipe! I have been searching for what in my mind is the best biscuit. Great news is that this is the one! Mine rose perfectly and they were wonderful on the inside...so tender and fluffy!
Chris Scheuer says
Thanks so much, Martha!
Jen says
Could I make ahead and refrigerate just prior to baking?
Chris Scheuer says
Hi Jen, these are fine to refrigerate for a few hours before baking. If it's going to be longer than that, it's better to freeze them. You can bake them right from the freezer, just give them a few extra minutes.
Stephanie says
I just made these and they are delicious! They reminded me of the ones from McDonalds, which I love! No shame here. They are not flaky, but tender, which is what I was hoping for. One thing is that mine didn't rise very much. Can you clarify how high the dough should be before cutting the biscuits? The recipe says "It should be a 1/2-2-inches in height," but that looks like a typo. Should it be 1 and 1/2 inches to 2 inches?
Thanks again for a great and easy recipe!
Chris Scheuer says
Hi Stephanie, yes the dough should be 1½-2 inches in height. Thanks for noticing that typo. I have corrected it. They biscuits should rise up nicely. Don't handle the dough too much and be sure your biscuits are still cold and the oven is hot for maximum rising.