
This post may contain affiliate links. For more information, see our privacy policy.
These tall, flaky, Ridiculously Easy Buttermilk Biscuits take less than 10 minutes to throw together. They're also ridiculously delicious!
"Brilliant, simply brilliant!" That’s what I said, right out loud, when I read the unbelievably easy directions for preparing these buttermilk biscuits.

The technique was created by the super-smart folks over at Cook's Illustrated. When I read their method for making drop biscuits, I figured it was too good to be true. But being a curious cat when it comes to all things culinary, I couldn't resist giving it a try.
You would have probably laughed if you saw me just after I read the article. I ran to the kitchen, turned on the oven and pulled out a bowl, along with measuring tools and the necessary ingredients. All super basic ingredients that I had in my pantry and fridge (you probably do too!). The simple cast of characters includes flour, baking soda, baking powder, salt, sugar, buttermilk and butter, that's it!
Classic Technique
Why did this sound too good to be true? Well, buttermilk biscuits can be a bit tricky. The technique usually calls for combining the dry ingredients, then “cutting” in cold butter with a knife, a pastry cutter or between your fingers. The liquid is then added and everything is gently combined.
If done correctly, the tiny pieces of butter, evenly distributed throughout the flour mixture, are what give classic buttermilk biscuits their lightness, flakiness and layers of peelable, buttery deliciousness. It’s not a difficult technique, just a bit time-consuming, and the results are not always consistent. The Cook's Illustrated technique is totally different... and ridiculously easy!
Ridiculously Easy Technique
How does it work? Well, I'm glad you asked... start by placing a cup of buttermilk in the freezer for a few minutes while you melt the butter in the microwave. Let the melted butter sit while you prep the other ingredients. Then, it's just a matter of combining all the dry ingredients in a bowl and giving them a good stir. The melted butter is then combined with the super-cold buttermilk. And this, my people, is when the magic begins!

When the warm butter hits the cold liquid, small, buttery globules form as you can see in the picture below.

Do you see where this is going? When this buttermilk mixture is added to the dry flour mixture and it's all stirred together, you'll notice tiny pieces of pale yellow butter dotting the simple dough. Yep, it will look just as if you spent the time to cut them in!
Would this technique work for traditional, rolled biscuits?
The Cook's Illustrated recipe is for simple drop biscuits, meaning you just drop spoonfuls onto a sheet pan, then bake. Would this technique work for a more classic, cut-out style biscuit, I wondered? You never know until you try, so I decided to give it a whirl!
I turned out the dough onto a floured work surface, kneaded it a few times, then patted it into a small, square. Dipping a round biscuit cutter in flour, I cut four circles, then rerolled the scraps and cut two more for a total of six. (Since then, I've also used a smaller cutter, yielding 8 biscuits.)

It was easy enough; actually ridiculously easy! The biscuits rolled out of the oven tall and golden brown with a heavenly aroma. But you're probably wondering how this version tastes and how they stack up to traditional buttermilk biscuits, right?
The results?
When Scott and I took the first bite, we looked at each other incredulously. The biscuits were light, tender, buttery, flaky and crazy-delicious. "Wow, these are amazing!" Scott said. I agreed.
In fact, we ate far too many that day, smothered with melted butter and strawberry jam. You'd probably frown on us if I told you these biscuits also ended up being dinner that night, so I won't share that bit of information. I guess I'll just say, it wouldn't have been a good day for counting calories!

I've had quite a few happy taste-testers since then, and everyone is shocked when they hear how easy these wonderful buttermilk biscuits are to make. In fact check out the video below, to see for yourself!
Try it! You'll be shocked (and delighted) too... you might even have the inclination to exclaim "Brilliant, simply brilliant!"
Bon Appétit!

Café Tips for making Buttermilk Biscuits
- If you don't have buttermilk, make your own. Place 1 tablespoon of fresh lemon juice or vinegar in a measuring cup. Fill to 1 cup level with milk and stir well. Allow to sit for 5-10 minutes or until slightly thickened. The mixture may curdle a bit, that's okay! Use in recipes in lieu of buttermilk.
- Don't skip chilling the buttermilk (step 2). It will definitely make a difference. If the buttermilk isn't really cold, the little butter globules won't form.
- I made these biscuits when I was in London visiting my daughter. I learned that all-purpose flour (Plain flour) is a bit different there and it seemed like I needed more, probably closer to 2 ¼ cups.
- These biscuits freeze well, both unbaked and baked. To freeze them unbaked or baked, place biscuits on a sheet pan or a plate spaced at least a half-inch from each other. Freeze till frozen, then transfer biscuits to a ziplock bag or air-tight storage container. If you've frozen them unbaked, bake them as directed in the recipe right from the freezer. Give them a couple extra minutes in the oven to compensate for the fact that they were frozen.
- If you freeze these buttermilk biscuits after baking, allow them to thaw when you're ready to use them and then warm in the oven for 5-8 minutes at 300˚F.
- If I'm feeling a bit pinched for time or just lazy, I'll pat the dough into a 6-inch circle and use a bench scraper to cut the dough into wedges. I either put these wedges on a sheet pan lined with parchment paper or in a 9-inch cake pan lined with parchment.
- Another shortcut is to simply scoop up the dough, right from the bowl onto a sheet pan and bake as directed.
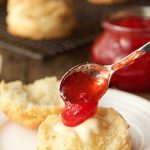
- We love to serve these biscuits with our Easy Strawberry Freezer Jam or this Overnight Raspberry Freezer Jam.
Love these biscuits? Then you'll also go crazy over these Ridiculously Easy Cheddar Chive Biscuits, made with the same easy technique!

Thought for the day:
Show me your ways, Lord,
teach me your paths.
Guide me in your truth and teach me,
for you are God my Savior,
and my hope is in you all day long.
Psalm 25:4&5
What we're listening to for inspiration:
- 1 cup buttermilk
- 9 tablespoons butter divided
- 2 cups all purpose flour more for counter
- 1 tablespoon sugar
- ½ teaspoon baking soda
- 2 teaspoons baking powder
- ¾ teaspoon table salt
-
Adjust oven rack to middle position and heat oven to 450°F. Line a sheet pan with parchment paper or spray a sheet pan with cooking spray.
-
Measure 1 cup of buttermilk and place in the freezer for 10 minutes while prepping other ingredients.
-
Place butter in a microwave-safe bowl, cover and heat on high for 30 seconds. If not completely melted, return to microwave for 10-second intervals till melted. Set aside while prepping other ingredients.
-
Whisk flour, baking powder, baking soda, sugar,and salt in large bowl.
-
After buttermilk has been chilled in the freezer for 10 minutes, combine it with 8 tablespoons of the melted butter. (Reserve the last tablespoon for brushing on the baked biscuits.) Stir with a fork until butter forms small clumps or globules. (See picture in the post.)
-
Add buttermilk mixture to dry ingredients and stir with a rubber spatula just until all flour is incorporated and batter pulls away from sides of the bowl. The dough should be stiff and not super wet. If the dough is wet, add more flour 1 tablespoon at a time, stirring to combine, until fairly stiff.
-
Generously flour a work surface. Dump biscuit dough from bowl onto prepared work surface and turn to coat all surfaces with flour. Knead on counter 5-6 times (about 30 seconds). Flip over on the work surface to coat with flour then pat into a 6-inch square. It should be a 1½-2-inches in height.
-
Cut four biscuits with a 2 ½-inch biscuit cutter. Place biscuits on the prepared sheet pan. Knead scraps a few times till they hold together, then pat into a small rectangle and cut two more biscuits. Transfer last two biscuits to the sheet pan, spacing about 1 ½ inches apart. (See Café Tips in the post for an even easier cutting technique).
-
Place in oven and bake until tops are golden brown and crisp, 8 to 18 minutes. (start checking them after 8 minutes as ovens vary. You want them to be a nice golden brown, but not too brown - check the pictures above for correct color.)
-
Re-melt remaining tablespoon of butter in the microwave, if necessary and brush tops of hot biscuits with melted butter. Serve and enjoy!

Penny says
The name says it all. This is my first time to bake biscuits. They turned out so gorgeous. My neighbor thought it was an old family recipe.
Chris Scheuer says
I love it! Thanks for sharing your results, Penny! 💕
Tami Goley says
Super good and they are ridiculously easy.
Chris Scheuer says
Yay! So happy you enjoyed them, Tami! 💕
Cindy Cox says
I went through every single emotion you mentioned in your intro to these biscuits! Brilliant...simply brilliant technique. I like biscuits but never made them because I absolutely hate cutting in the fat to the dry ingredients (in ANY recipe). When I saw your recipe I couldn't wait to try it...on my!
So, I'm wondering...would the same technique work for pie dough?
Chris Scheuer says
Hi Cindy, I love that you love this recipe and technique.
Sadly it wouldn't work with pie crust because there's not enough liquid to work with and achieve the little butter globules.
Beverly says
Hey Cindy -
To add to what Chris said ...
Like she said, it won’t work due to the lack of liquid. HOWEVER! I’m also one who absolutely dislikes cutting any fat into dry ingredients, but I found it’s truly not hard to FREEZE the butter, then GRATE it! It’s easy to do, and all you then do is blend it with your flour mixture (And liquid, of course). Or you could use your food processor to blend it in with the dry ingredients, it’s just more of a pain to drag out the processor, plus more cleanup. Lol
A lot of bakers pre-grate butter, and keep it in the freezer for a quick add in. Just make sure you Mark the bag with the quantity.
Good luck, and Happy Baking!
Chris Scheuer says
Thanks, Beverly!
Paula Bredewater says
This recipe is genius!! The biscuits came out tender, flaky and golden brown without the laborious task of cutting in the butter or grating the butter like I have tried before. This is the one and only biscuit recipe for me from now on....Many thanks!!
Chris Scheuer says
Thanks so much, Paula. I really appreciate you sharing your results! 💕
Mama Baker says
Tried the recipe and it turned out great!
Used a trick I use when I make scones -Freeze the butter!
Freeze your butter and then use a cheese grater and grate it right into the dry ingredients, mix, then add the butter milk-will turn out perfect doing it this way!
Chris Scheuer says
Thanks Mama! I'm so happy you enjoyed these biscits. I used to make biscuits that way but I've found it's easier to make these scones the way this recipe directs and you don't have to grate all that butter. The biscuits come out just as flaky and delicious!
Kathleen says
This is not my first time making these biscuits. They are just fabulous with little work. Making them today to put on top of a chicken pot pie. My recipe had their own biscuit recipe and then thinking what am I thinking I'll use Chris's recipe! I think will bake them and then just put on the pot pie. Sometimes they can get soggy when baking them on top of the pie. Am glad I remembered your recipe!
Chris Scheuer says
What a great idea, Kathleen! I bet that wil be one delicious chicken pot pie. You're making my mouth water 😂
Cendi says
All I can say is "WOW!" I made these this morning for breakfast and they did not disappoint! Incredibly delicious! They just melt in your mouth. I now have a go-to biscuit recipe. Thank you so much for this perfect recipe.
Chris Scheuer says
That's awesome, Cendi! So happy you enjoyed these biscuits. Thanks for taking the time to share your results!
Keeley says
This has become my go to recipe for biscuits! I always feared making them but your recipe guarantees success every time!
Chris Scheuer says
Thanks, Keeley! I used to be the same way about biscuits, I never could get them right either. I appreciate you sharing your results!
Colleen says
These are amazing! Wonderful recipe and so easy to make. I just baked them this evening for an early morning get together with my bible study gals. Should they be refrigerated overnight or can I wrap them and leave them on the counter overnight? Thank you in advance!
Chris Scheuer says
You can either leave them on the counter or pop them in the freezer, then thaw first thing in the morning. Either way, warm them briefly in the oven before serving. ENJOY! 💕
Colleen says
Thank you so much!
Cheryl Smith says
Absolutely delicious! I will bake these again and again. Wonderful recipe.
Chris Scheuer says
Thanks, so much, Cheryl! I'm so happy you enjoyed these biscuits and appreciate you taking the time to leave your review! 💕
Sai says
This was really easy and tasty. I watched until the tops were brown like the recipe said.
Fun fact: I put a grass-fed beef hot dog piece in each one, without altering any of the rest of the recipe. Turned out yummy! I might try stuffing them with other things like cheese or honey.
Chris Scheuer says
I'm so happy you enjoyed them, Sai and I love your rendition of the recipe with the gourmet hot dogs, sounds so fun!
Chong says
I am ready to bake your recipe but I noticed you already have a salt in the recipe so do I still need to use more salt because I am using unsalted butter? Thanks
Chris Scheuer says
Yes, use the salt. There's not enough salt in the butter.
Larry Gist says
So I roll/pat my dough out to a rough 8x8 shape and use my pizza cutter to cut into 9 equal biscuits, then put them into an 8xi greased and, touching yes I know, then bake. No waste and still absolutely perfect!
Chris Scheuer says
Great idea, Larry! Thanks so much for sharing!
Tessa says
I Googled “easy buttermilk biscuits” because I have a gallon of buttermilk and a 5 week old baby. I also don’t have a pastry blender, and that’s why I chose this recipe. This recipe was so easy and fast to throw together, and the results were amazing!! The biscuits came out buttery and in flaky layers - I couldn’t believe it was so easy. So much time was saved not having to cut in the butter, I was done making these from start to finish in about 30 mins, just enough time for my new babe to get in a quick snooze!
Chris Scheuer says
I love this, Tessa! Welcome to The Café!
I'm so happy you enjoyed these biscuits. I remember the days of having young babies and how precious the time is, bravo to you for making biscuits in between naps!
Patti says
I have tried and failed with a zillion biscuit recipes until I came upon this one! So simple and easy that I now have a freezer full to pull out whenever I want. They really are no fail!!
Chris Scheuer says
That's so awesome, Patti! Thanks for taking the tie to leave a comment 💕
Cate says
We just moved to London from the US and since we have started to miss some of our favorite foods, I decided to give these a whirl. I was worried when my melted butter mixed perfectly into the cold buttermilk, leaving no yellow globs, but I carried on and the final result are delicious, buttery-rich yet light and fluffy with a crispy top. Thanks so much, these will now be our go-to biscuits!
Chris Scheuer says
Hi Cate, lucky you! We love London and I know you will find some wonderful culinary delights while you're living there. Our daughter lived in London for 7 years and we visited frequently. We miss it so much!
Regarding the biscuits, I'm so happy you enjoyed them! Just a note for next time. If your buttermilk/butter mixture didn't form the "globs", your buttermilk was probably not quite cold enough. Leave it in the freezer a little longer and make sure the butter has cooled down a bit after being melted.
SAN ROD says
I baked these this morning 2day and, WOW! they REALLY ARE SO RIDICULOUSLY EASY! thanks so much for this recipe. I'm a believer.
Chris Scheuer says
Thanks, San! So happy you enjoyed them 💕
Chris Scheuer says
Wonderful! I'm so happy you enjoyed them San!
Kim says
Do you use salted or unsalted butter?
Chris Scheuer says
Hi Kim, I use salted butter.
Ian Stewart says
I'd call, the scones, not biscuits. What I call biscuits, you call cookies. That doesn't mean that aren't good eating!
Cheers,
Ian (in Australia)
Chris Scheuer says
😂 I think we came into all this a little later in the game, Ian! That might be why we're a little confused. But you're right, whatever you call them, they're definitely delicious!
Diane Brown says
So quick and easy to make, delicious!!!!
Chris Scheuer says
Thanks so much, Diane!
Alison says
Indeed ridiculously easy, light, and fluffy. Only the knowledge that I had just put 9 TBSP of butter in them held me back from eating them all in one go hot from the oven.
Chris Scheuer says
Haha! I totally get what you're saying, Alison! 😂💕
Mirjam says
So I just made these and froze all of them in. How do I prepare them when I am ready to bake? Can't wait to try them!
Chris Scheuer says
Hi Mirjam, just pop them in the hot oven as directed. Don't thaw. They'll need at least 5 minutes extra time. Bake them until they're nice and golden.
Joan says
So are you saying you can freeze the biscuits uncooked then take the frozen uncooked biscuits and bake? Or cook them first?
Chris Scheuer says
You can acutally do both of those, Joan. But for freshly baked biscuits, freeze the biscuits, unbaked, then pop them in the oven frozen and bake. Give them a few extra minutes if they're frozen.
Joan says
Thank you Chris!
Tried the frozen unbaked method worked great and they were delicious !
Laurie says
These were fantastic! The dough was easy to work with. They didn't take long. Great flavor. I did need to add a little more flour to stiffen the dough(which it says to do). Definitely making again! Great with homemade jam. FANTASTIC!!!
Chris Scheuer says
Yay! Thanks for sharing your review, Laurie!
Larry says
Thumbs up! They were easy and awesome!
Chris Scheuer says
Awesome! Thanks for sharing your results, Larry!
Tracy says
Very easy to make, even for someone who doesn't like to bake. My husband LOVED these. We received Georgia Peach Butter as a gift and made these to enjoy together. I am trying them tomorrow with fresh rosemary.
Chris Scheuer says
You may end up becoming the little biscuit maker of the family, Tracy! I'm so happy you enjoyed them. Love your ideas of using fresh rosemary and pairing them with peach butter.
Mavis Beacon says
These are ridiculously easy! My husband loves biscuits, me - not so much. But I made these for Father's Day today and even I loved them! LOL! I am a baker, so even with my more expanded knowledge - these are super to easy to make! I did not have the biscuit cutter or even a cookie cutter big enough, so I just used my pizza cutter and made 6 square biscuits. And they ended up in my oven for about 13 minutes, so very good advice about starting to check them at 8 minutes!
Chris Scheuer says
That's so awesome, Mavis. I'm so happy you and your husband enjoyed them 💕 Thanks so much for sharing your results. Happy Father's Day!