
This post may contain affiliate links. For more information, see our privacy policy.
With less than 10-minutes of hands-on time and no-kneading, the name Ridiculously Easy Focaccia Bread says it all! Almost. It's also ridiculously delicious!
I feel like I'm introducing you to an old friend, as I write about this fabulous, super easy focaccia bread. I've been making it for years now and no one ever seems to grow tired of it. It's perfect to accompany a nice dinner, for lunch sandwiches, for dipping in oil, for the best pizza ever, even for breakfast (yes, we even have a fabulous breakfast adaptation with cinnamon and raisins!).

The Ridiculously Easy label
The first time I made this easy focaccia bread I was thrilled with the results and knew that it had to go into our Café Ridiculously Easy Series. How does a recipe get labeled “ridiculously easy”? Well, here at The Café, it has to have certain characteristics to earn that prestigious label:
- A recipe that takes minimal effort and minimal hands-on time to put together. (Resting, rising or chilling time is not taken into consideration.)
- It’s also one that produces fabulous, super delicious results, ie, results that “appear” to have taken lots of time, talent, prowess and/or hard work.
- Ridiculously easy recipes have to work well on those busy days when time is short and expectations are high.
- And last, ridiculously easy recipes are perfect for entertaining, mostly because of the first two characteristics. They take the stress out of dinner parties and gatherings of families and/or friends and allow you more time to enjoy your guests. Bottom line? They are super simple, something anyone can do. (Shhhh! We’ll keep that part our secret.)
To sum it up briefly, these are the recipes that make you look like a kitchen rock star with minimal effort on your part!

An easy technique
I know, you might be looking at the pictures of this Ridiculously Easy Focaccia Bread and thinking that I'm spoofing you about the "easy" part, right? I don't blame you - but it's true! Let me convince you by sharing (in a nutshell) how it comes together:
- Combine flour, instant yeast, and salt in a large bowl. Add warm water and stir until the flour is well incorporated. Cover it up, pop the bowl into the refrigerator and forget about it until the next day.
- About two hours before baking time, lightly grease two pans with a bit of soft butter, line them with parchment paper and give each a drizzle of olive oil. Remove the bowl from the refrigerator, divide the dough in two and plop it in the prepared pans. Now forget about it again as you putter around the house, catch up on emails, make some phone calls or whatever it is you need to do.
- After two hours, the dough will have filled the pans and be almost ready to bake. Top the dough with another drizzle of olive oil and have some fun with your fingers, poking holes in the soft dough (for that classic dimpled focaccia texture). Sprinkle the top with sea salt and/or herbs and you're done on your end.

- Now the oven does the magic, transforming the fluffy dough into crisp, golden circles of deliciousness that are perfect for sandwiches, with soups or to fill your dinner bread basket.

If you're still a bit dubious about how easy this bread is to make, we've put together a little video to demonstrate it:
See what I mean, so easy! Ridiculously easy!

Did you notice there's NO KNEADING? In the past, I always thought that you had to do a lot of work, including kneading to achieve a beautiful, rustic, richly flavored bread with lots of big, irregular holes.
In fact, the folks at King Arthur Flour have reported that one of the most common questions they get on their baker's hotline is "How do I get those big, irregular holes in my bread?" They devote a whole article to the complexity of how to achieve this texture - but guess what? With this Ridiculously Easy Focaccia Bread it (magically) just "happens".
Another thing I love about this easy focaccia bread - in comparison to every other focaccia bread that I've made; this one has minimal fat. Each loaf (which makes 6-8 sandwiches or 8 generous bread servings) has only 2 tablespoons of olive oil. If you google "focaccia bread" you'll see that most recipes have much more oil. One popular recipe from The Food Network includes a whole cup of olive oil - yikes!
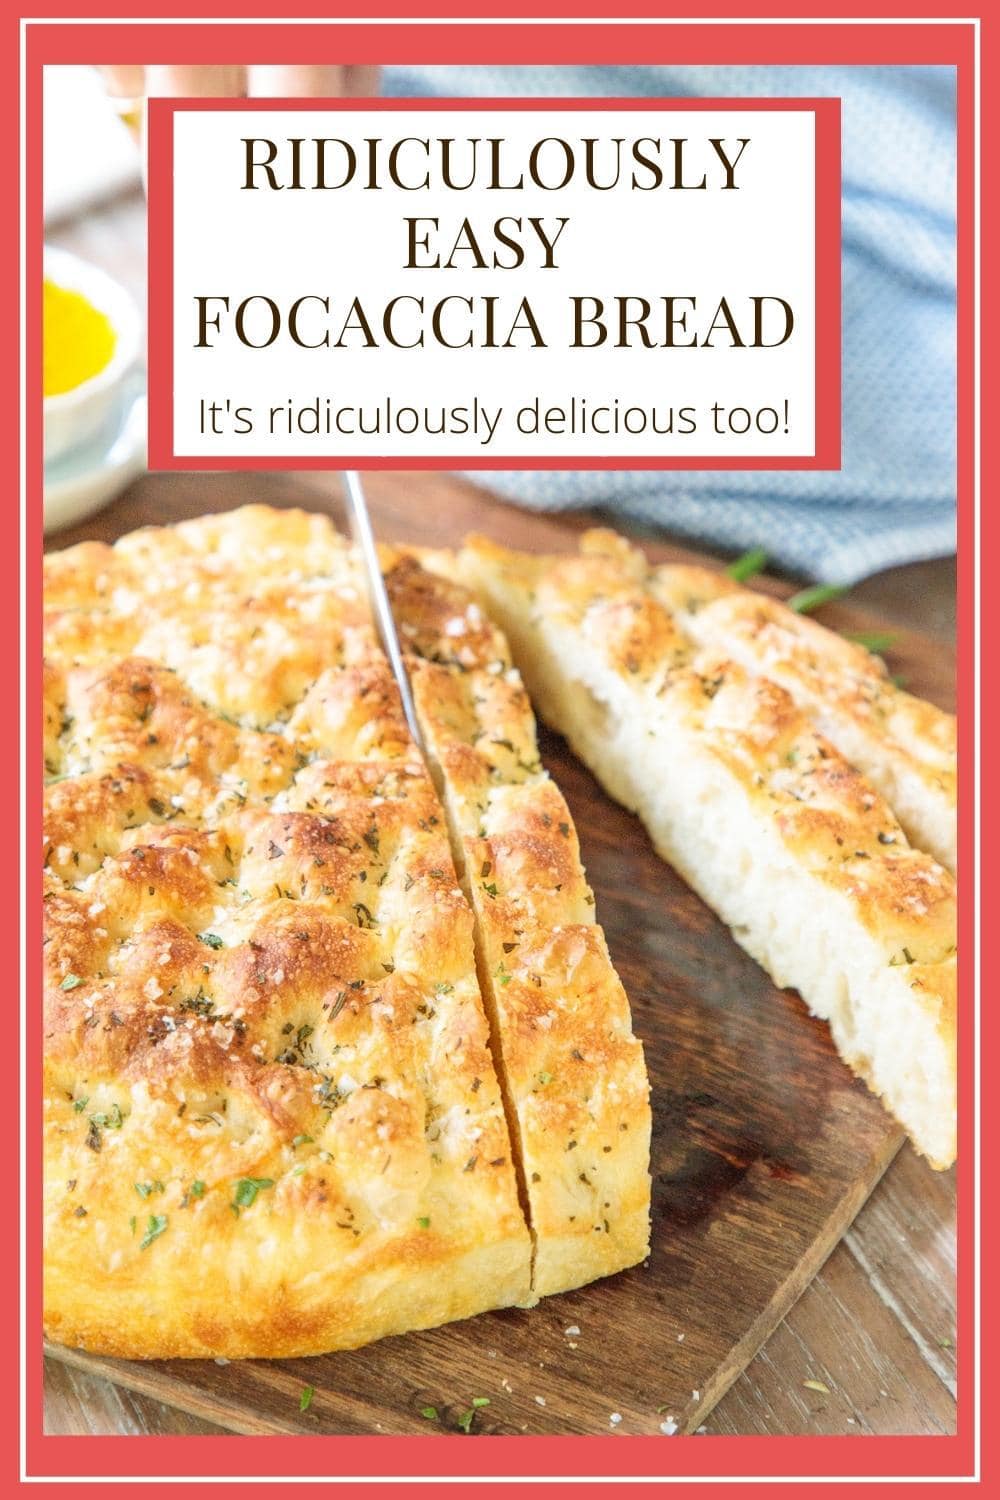
How do you cut focaccia?
This is a question that people often ask. Since this Ridiculously Easy Focaccia bread is made in round baking pans, there are several options for cutting. I like to cut it in long strips which are perfect for dunking in oil, sauces or soups.

You can also cut it into wedges like a pie. One other suggestion is to cut it into three wide strips in one direction then turn the round loaf 90 degrees and cut it again in 3 wide strips yielding varying sized pieces.
Expect rave reviews!
Have I convinced you? Are you ready to feel like a little Italian breadmaker? You probably have everything you need to make this Ridiculously Easy Focaccia Bread. Whip up a batch of dough tonight and tomorrow your family just might think they've been transported to a wonderful Panificio (the Italian word for bakery) as the incredibly delicious fragrance of baking bread wafts through the house!
Café Tips for making this Ridiculously Easy Focaccia Bread
- I like to use bread flour if I have it - but it isn't necessary. Bread flour is higher in protein and is supposed to create more stability, form, and rise in the dough, allowing it to lift and hold shape. I have used both bread flour and all-purpose flour with good results.
- I use one of these Danish Whisks to easily mix up my dough. They're inexpensive and make whipping up any dough super simple. With this particular brand, you get two professional-grade whisks. Keep one for yourself and give the other to a baking friend. He/she will think quite fondly of you every time they mix a batch of dough!
- While we're talking about mixing the dough, make sure all of the flour is well incorporated and there are not any little pockets of dry flour. I always stir it up until I think it's well mixed and then stir a little more.
- You can cut this easy focaccia bread into wedges or crossways, into strips. I love cutting it in strips, crisping it up in a pan with a drizzle of olive oil and serving it with soup. Just brush the cut sides of the bread lightly with olive oil then heat a non-stick pan over medium heat. Add the bread and cook on both sides until golden. Delish!
- Be sure to grease your pan (with butter) and line with parchment paper. An easy way to line your pans with parchment? Take a piece of parchment slightly larger than the diameter of your pan. Fold it in half and then in quarters. Fold the quarter in half and then in half one last time. You will end up with a long skinny triangular-shaped wedge. Turn the pan you want to line upside down. Place the tip of your parchment paper triangle at the approximate center of the pan and lay it flat so the unfolded edges are lying over the edge of the pan. Trim the paper with a scissors, about a quarter inch in from the edge of the pan. Unfold and line your pan with the circle you created.

- This recipe calls for Instant Yeast which is also called Rapid Rise Yeast. It's quite magical as it doesn't require proofing like regular yeast does. Don't try to use regular yeast in this recipe. You can find Instant or Rapid Rise Yeast at most grocery stores, right next to the regular yeast. You can also buy it in bulk and store it indefinitely in the freezer. It's infinitely cheaper buying yeast in bulk vs purchasing it in the little packets.
- Don't worry about exact time with the initial rising of this easy focaccia bread. I have done as little as eight hours and as much as 24. Your results will be wonderful as long as it rises at least 8 hours. The second rise (in the pan) should be at least 2 hours (or until the dough has nicely risen). If your kitchen is really warm, it may take a bit less time. Rather than using an exact time, use the appearance of the dough as your guide - it should be close to filling the pan.
- Don't be shy when you "dimple" the dough, just before baking. You want to poke your fingers in all the way to the bottom of the pan and actually make little holes with your fingers. This will ensure nice deep dimples that won't disappear in the oven.
- Dry or fresh herbs can be used to top this bread. I like to use dry Italian seasoning or fresh rosemary or thyme. Chives and sage would also be delicious.
- Use flaky sea salt to top this bread. It gives a nice little crunch and a pretty presentation. I like Maldon. It's more expensive than kosher or regular salt but a box will go a long way. Use it as a "finishing" salt rather than using everyday salt.
- As mentioned above, this Easy Focaccia Bread is fabulous as a dinner bread, with salads, for sandwiches, for a dipping bread... Sometimes I drizzle a little oil in a sauté pan, add the focaccia and let it cook over medium heat until it's golden and crisp. So good! It's fabulous to serve with soup, like this Roasted Red Pepper Soup.

- And if you love focaccia, I've adapted this recipe a bit to result in a little healthier version with a portion of whole wheat flour and lots of delicious, nutritious seeds. You can check the recipe out here: Ridiculously Easy Seeded Focaccia.

- And last but definitely not least, we have a sweet version of this focaccia that takes only 2 hours, start to finish with 10 minutes of hands-on time. Check out this Ridiculously Easy Cinnamon Raisin Focaccia for an incredibly delicious breakfast/brunch treat!

Thought for the day:
I will meditate on the glorious splendor of Your majesty,
and on Your wondrous works.
Men shall speak of the might of Your awesome acts,
and I will declare Your greatness.
They shall utter the memory of Your great goodness,
and shall sing of Your righteousness.
Psalm 145:5-7
What we're listening to for inspiration:

If you enjoyed this recipe, please come back and leave a star rating and review! It’s so helpful to other readers to hear your results, adaptations and ideas for variations.
With less than 10-minutes of hands-on time, the name Ridiculously Easy Focaccia Bread says it all! Almost. It's also ridiculously delicious!

- 4 cups all-purpose flour
- 2 teaspoons kosher salt
- 2¼ teaspoons instant yeast (1 packet)
- 2 cups warm tap water
- 1 teaspoon soft butter for greasing pan
- 4 tablespoons olive oil divided
- Italian seasoning or finely chopped fresh herbs
- flaky sea salt I like Maldon
-
In a medium-large bowl, combine flour, salt, and instant yeast. Stir well. Add the warm water. Using a Danish Whisk, sturdy wooden spoon or a rubber spatula, mix until all of the flour is well incorporated (there should be no small pockets of flour. Cover the bowl with a plastic wrap and refrigerate for at least 8 hours and up to 24 hours.
-
Lightly butter two 9-inch cake pans. Line pans with parchment paper. Pour one tablespoon of olive oil into the center of each pan. Divide dough in half with a large spoon or rubber spatula and place one piece of dough in each pan, turning to coat with oil. Tuck edges of dough underneath to form a rough ball.
-
Cover each pan tightly with plastic wrap and allow the dough balls to rest for 2 hours (it may take as long as 3 hours, depending on the warmth of your kitchen). The dough should cover most of the pan.
-
Preheat oven to 450˚F with a rack positioned in the center of the oven.
-
Drizzle another tablespoon of oil over each round of dough. With oiled fingers, using both hands, press straight down and create deep dimples that go all the way through the dough (in other words, you'll actually be making deep holes.) If necessary, gently stretch the dough as you dimple to allow the dough to fill the pan.
-
Sprinkle tops with Italian seasoning (or fresh herbs) and flaky sea salt.
-
Transfer the pans to the oven and immediately reduce the temperature to 425˚F. Bake for 22 to 28 minutes, until the tops are golden and the undersides are crisp. Remove pans from the oven. With a metal spatula remove bread rounds from the pans and transfer to a cooling rack.
-
Serve warm or allow to cool completely then store in a zippered bag.
-
To freeze, allow bread to cool completely, then transfer to a ziplock bag and freeze. Thaw and enjoy at room temperature or warm for 10 minutes in a 350˚F oven.
Quyen says
Hi there,
Is it okay if I don't use a 9-inch pan and just put the dough on the normal rectangle baking pan to make a longer oval shape?
I'll try the recipe and leave a review soon!
Thank you! Have a good day!
Chris Scheuer says
Yes, that should work fine, Quyen. It will probably come out rectangular though, rather than oval. I make it sometimes in a 9x13-inch pan and it comes out great.
Quyen says
Hello again!
I made it and this is the best foccacia I've ever tasted. The dough's texture is amazing and I love to handle it! The recipe is very easy to follow with simple ingredients. It tastes so good when the top is still crunchy.
I'd make it again and again <3
Thank you so much for sharing the recipe!
Have a good day!
Quyen says
I forgot to mention. I added fresh figs and thymes, and poppy seeds. They're still perfect with the same baking time and °C 🙂
Valerie Jarvie says
Thank you for a wonderful recipe. Turned out perfect and was so yummy! Have to admit I nearly polished off one by myself.
Chris Scheuer says
Haha! I totally get it! Thanks for sharing your results Valerie 🙂
Grace says
We can’t stop eating this. It’s so so good and very easy to make. I added black olives to one and minced garlic to the other along with the salt and herbs . Thank you for sharing this.
Chris Scheuer says
Thanks for sharing your results, Grace. I know what you mean when you say you can't stop eating it. I have to freeze it to remove the temptation! I love your adaptations!
Judi says
Big fail for me! Sadly mine didn't turn out. It was dense and did not have any of those lovely holes. I would love to try and figure out what went wrong as the recipe is simple enough. If you have any ideas I'd love to hear them as I will happily try again. It tastes good but it isn't like focaccia, just like regular squatty bread. I struggle with most bread recipes and thought this might be THE ONE that would work.
Chris Scheuer says
Hi Judi,
Don't give up! I can't say exactly what went wrong since I wasn't right with you in the kitchen but I have made this so many times and it's always been a win-win. Make sure you have instant yeast that's not too old. Your tap water should be warm, not lukewarm. It should feel quite warm when you stick your finger in it. Not so hot you have to pull it out but definitely nice and warm. Let it sit in the fridge for at least 8 hours or longer. Then make sure you give it the two-hour rising time. If your kitchen is cool, it might need a little longer. Look for a nice cozy, warm spot. I think you'll be happy with the results if you give it another try. 🙂
Vivian says
P.S. The "oily" dimpling was very therapeutic!
Vivian says
Oh Wow, Chris...you were not kidding! So easy, not much hands-on and yet a superior product! Friends raved and I just sat back and beamed. Truly, from my perspective, it is one of the very best recipes I have discovered on the net! I cannot thank you enough. It is also very adaptable, as without the garlic and herbs (though divine) it is also very adaptable for sweeter applications. Having some now with chokecherry (recently renamed "black cherry") jelly.
Donna says
Hi Chris—- I know that there are differences in Kosher salts, with some recipes calling for a specific brand. Which brand did you use for this recipe?
Chris Scheuer says
Hi Donna, I use Diamond Crystal although I have used Morton's in the past. Diamond is a little lighter than Mortons but I don't think if you're using less than a tablespoon that it makes a lot of difference.
Jeff the Chef says
I love this kind of bread, and I love that you'd paired it with a soup that looks perfect for dunking.
Chris Scheuer says
Thanks, Jeff! The soup is perfect for dunking! 🙂
Karen says
I am curious why you refrigerate the dough rather than let it rise at room temperature.
Chris Scheuer says
Hi Karen,
Good question. The refrigeration helps the dough to rise slower which actually helps develop flavor and those wonderful "holes" that are characteristic in artisan breads.
Trisha Smith says
I made your ridiculously easy focaccia bread and I had to drop you a note to say it turned out beautifully! Just like your picture. I have been taking pictures and sending to my friends and sister to show off these beauties.
Your recipes are truly a gift.
Thanks for sharing!
Trish S
Tricia @ Saving room for dessert says
This focaccia looks perfect Chris. I truly can’t wait to give it a try - especially with a nice bowl of soup. And can’t wait for the soup recipe too!!
Susan says
Your focaccia looks delicious and I am really looking forward to trying it, Chris! I just made homemade soup yesterday and this would be perfect with it!
John / Kitchen Riffs says
Such a wonderful bread, and one I've never made for some reason. And should -- and use your recipe! -- because it's, well, ridiculously easy. 🙂 Thanks!
Jenna says
I have a very similar recipe that I haven't made in ages, you have me drooling! I will try making it in a round pan like you did, mine always comes out very flat like a thick flatbread, so I can't wait to try yours, thanks Chris
Jennifer @ Seasons and Suppers says
Love bread like this! So easy to whip up to have with whatever is for dinner 🙂 Looks perfect!
angiesrecipes says
Can't resist any homemade bread! Great with soup or salad for a wonderful lunch.
2pots2cook says
Love your frequent flyer note ! LOL
Judy says
Hi Chris, thank you for posting this marvelous sounding and looking bread and also for the tip on sizing the parchment paper - genius !!
I have been noticing your nail polish and I love it! Could you tell me the brand and color? Thank you.
Chris Scheuer says
Hi Judy, thanks so much. I really love the pre-cut circles of parchment but this is super easy too!
You're going to laugh (or think I'm dense) but I don't know the color of my nail polish. I do know it's OPI but I usually just let my nail girl pick it out. I'm going tomorrow so I'll check the name and let you know 🙂
Liz says
There's nothing better than the smell of a yeast bread baking in the oven--except for eating it! I'm long overdue to make some homemade bread---and how could I not try this beautiful focaccia??
Maggie says
Chris
How does this bread differ in taste and texture from your older tomato and parmesan focaccia recipe? It certainly takes less work.
I’ve always loved your other focaccia
Thanks
Maggie
PS we love Curate in Asheville.
Chris Scheuer says
Try this one Maggie, you might not go back to the other. 🙂 This one is a little thinner but super crisp with a tender and chewy interior. I love the tomato and parmesan one too but I'm quite smitten with this one now!
Carol says
This looks delicious and I’m delighted to see you posting again. Looking forward to many more great recipes!
sue | the view from great island says
Your bread has the perfect texture! And I love seeing your posts from the previous years, I want to make a meal of all of them together!
Chris Scheuer says
Thanks, Sue - I wish we could sit down and eat that meal together 🙂
Donna B Oliphint says
Just mixed up a batch. Can't wait to try it tomorrow night! So glad you got moved. Looking forward to pics of your new place.
Chris Scheuer says
Haha! That sounds like something I would do, Donna! Hope you enjoy it as much as we have!
Cassi stagner says
Chris, I really enjoy all your fabulous recipes. Thank you for making them available. I was recently diagnosed as gluten sensitive. Can the focaccia bread be made with king Arthur gluten free all purpose flour? Thank you
Cassi Stagner
Chris Scheuer says
Hi Cassi,
I have checked with a friend who is gluten-free and she thinks that it should work fine with the KA all-purpose flour. If you try it, let us know!
Monique says
Thank you!Pinned..you can never have too many recipes:)
Chris Scheuer says
True, true, true 🙂