Print
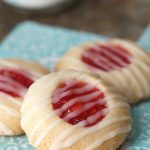
Peach Raspberry Thumbprint Cookies
With only 5 ingredients, these buttery, melt in your mouth cookies are super easy and incredibly delicious!
Prep Time 9 hours 12 minutes
Cook Time 9 hours 12 minutes
Servings 42 cookies
Ingredients
- For the cookies:
- 1 cup butter* softened
- ⅔ cup sugar
- ½ teaspoon almond flavoring
- 2 cups all-purpose flour
- ½ cup Peach Raspberry Freezer Jam or your favorite jam
- For the glaze:
- 1 cup powdered sugar
- 2-3 teaspoons half & half or milk
Instructions
-
Combine softened butter, sugar and ½ teaspoon almond flavoring in bowl of a stand mixer.
-
Beat at medium speed, scraping bowl often, until soft and fluffy
-
Add flour; beat at low speed, scraping bowl often, until well mixed. Cover; refrigerate at least 1 hour or until firm.
-
Preheat oven to 350°F. Line two sheet pans with parchment paper for easy clean up.
-
Scoop and shape dough into 1-inch balls. I use a small ice cream scoop.
-
Place cookies 2 inches apart onto prepared cookie sheets. Make an indentation in center of each cookie with thumb (edges may crack slightly) or a round-ended utensil. Fill each indentation with about ¼ teaspoon jam.
-
Bake 14-18 minutes or until edges are lightly browned.
-
Let stand 1 minute on cookie sheets then remove to cooling rack. Cool completely.
-
Combine all glaze ingredients in bowl with whisk until smooth. Drizzle over cookies.
-
You can also serve these cookies plain or with a dusting of powdered sugar.
Recipe Notes
*The recipe does not call for salt. I used salted butter but it you use unsalted butter you might want to add a pinch.
Two little decorating tricks:
1.) If I want the cookies to look super pretty, I add the ¼ teaspoon of jam (as in the instructions, step 6) before baking and then I remove them from the oven after 10 minutes and add a teeny bit more jam to fill the craters. I finish baking them for the remainder of the time as instructed in step 7.
2.) When I make these with the children we just drizzle the icing on with a spoon or the prongs of a fork. If I want them to look really pretty and professional, I pour the icing into a little plastic squeeze bottle and drizzle it on that way for straight, perfect drizzling.