
This post may contain affiliate links. For more information, see our privacy policy.
If you're ever out and about, perhaps at the grocery store, the park, maybe even at the dentist or doctor's office - and you see someone that looks a bit untidy, someone with...
a strange white powdery stuff smeared on their shirt or pants (or both), that could very well be me. And if it is me, that white stuff would most likely be flour. It seems I spend half of my life with flour somewhere on myself. Often it's on my clothing, but you might also see it on my cheeks, in my hair or even on my shoes!
That's because lots of days you'll find me in the kitchen, baking. It's been a love of mine for as long as I can remember. I've been forever fascinated with the magical transformation that occurs when simple ingredients like flour, sugar, oil, butter, milk, etc. are stirred together and given a stint in a hot oven. The aroma is intoxicating, the results; crazy delicious and... baked goods are a super great way to make friends.
And don't even get me going on yeast. Talk about magical, think about it... it doesn't look like there's anything remotely alive about it. Yeast is dry, granular and incredibly drab in appearance. But combine it with a little water and and a sprinkle of sugar... POOF! It starts g-r-o-w-i-n-g! Before you know it, it's bubbling, foaming and getting ready to talk to you. In bread, rolls, sticky buns, even some crackers, it makes the difference between flat, dry, hard AND tall, tender, fragrant. Did you know when you smell the incredible aroma of baking bread it's mostly the yeast that is driving you crazy?
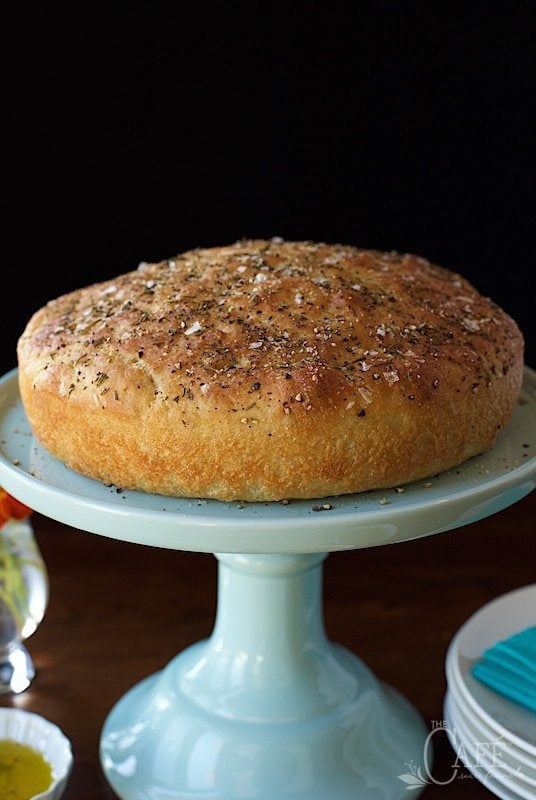
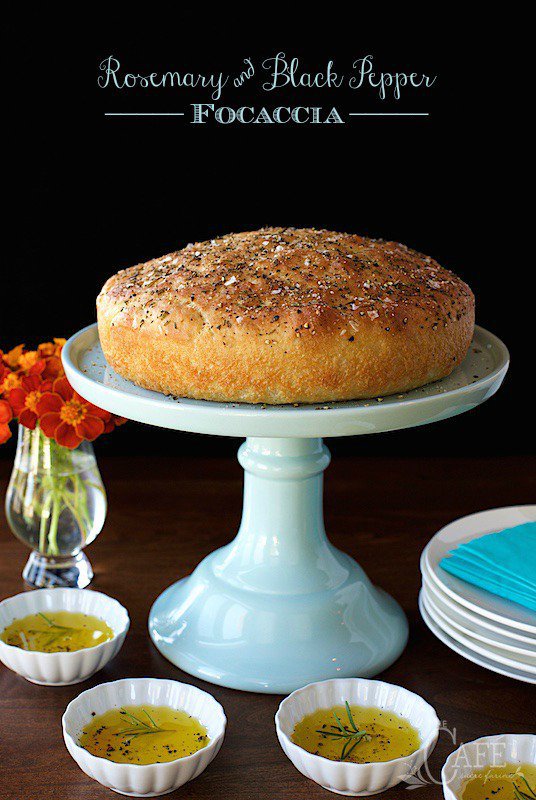
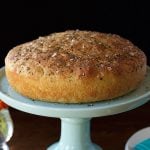
I'm hoping to convince you (or maybe just reinforce) that baking is easy and so much fun! And this delicious, artisan style Rosemary and Black Pepper Focaccia is a perfect place to start. Why? Well, because, though it might look fancy and like you need a culinary degree to pull it off, it's really not difficult, you just need a bit of time.
I love that there's no yeast fussiness to worry about with this recipe. The yeast is simply thrown in a bowl with all the other ingredients and mixed by hand or with the dough hook on your mixer. Once that's done, the dough is transferred to the fridge for a slumber party and a long, slow rise. In the morning you'll be ready to roll. Let the dough slowly warm up and then plop it into two oiled pans and poke it into place with your fingers. It's fun! One more rise before it's baked; but again, there's minimal hands-on time. And when the fabulous aroma starts wafting through your kitchen and begins to permeate the entire house, you'll be thrilled with yourself - and so will family, friends, neighbors ... you name it!
This focaccia bread is adapted from Fine Cooking, one of my favorite magazines. I've found that it's hard to go wrong with one of their recipes and this one is no exception. I had a focaccia recipe I loved for years, but once I tried this one, I never looked back. There's lots of way to adapt it with herbs, spices and add-ins; according to the season or what we're in the mood for.
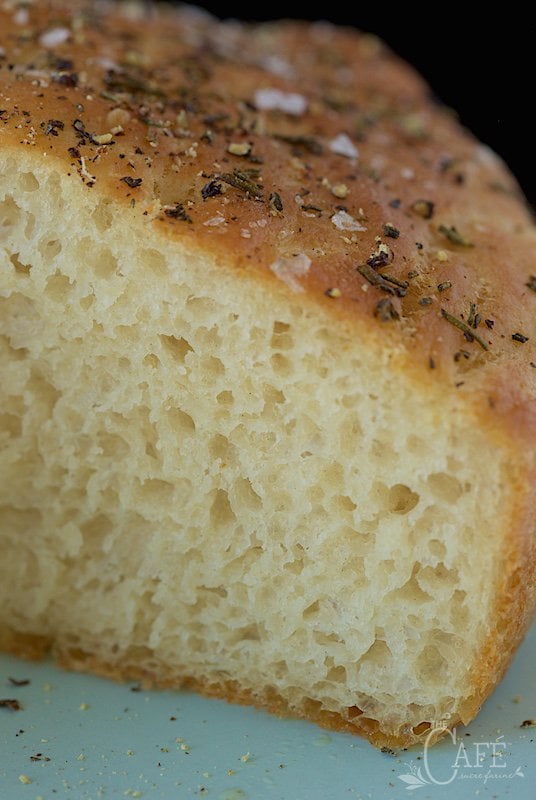
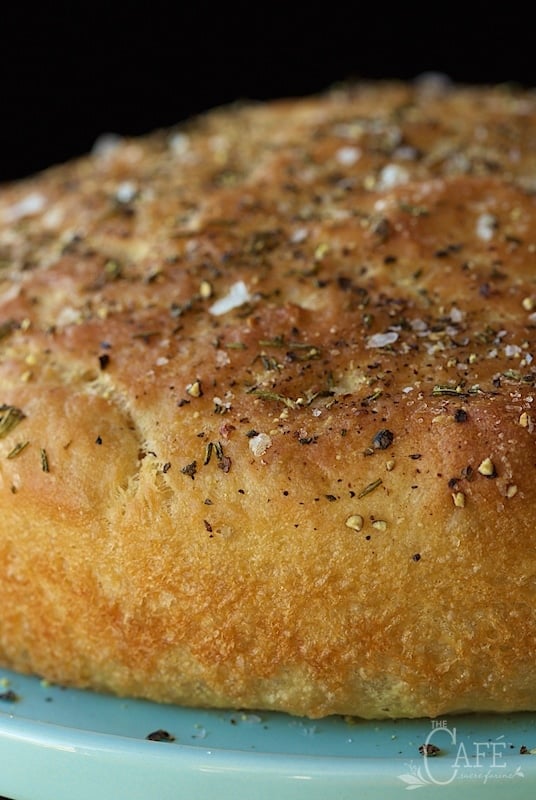
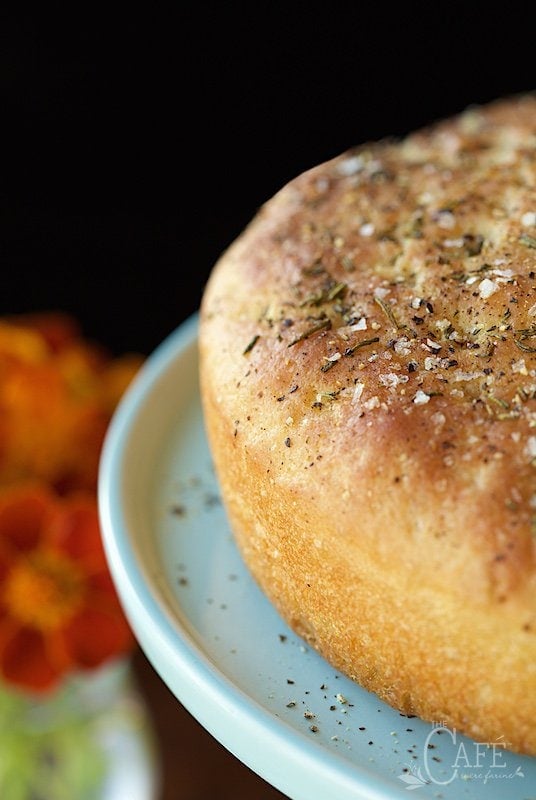
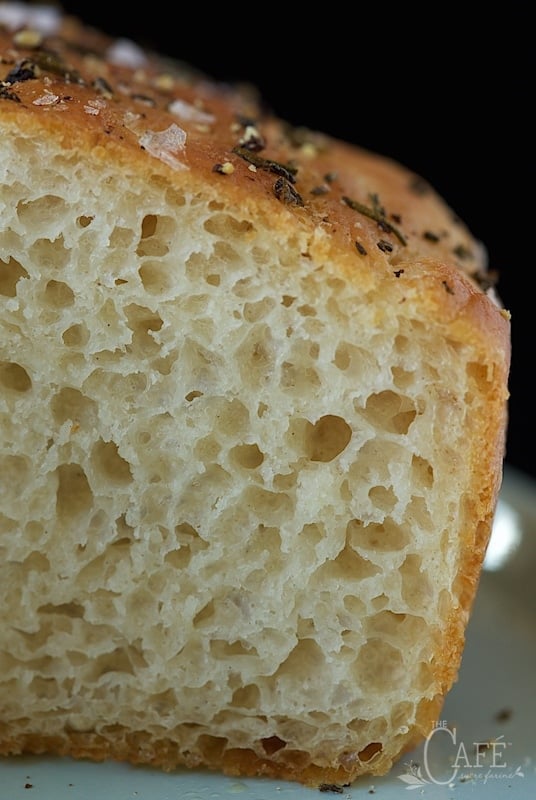
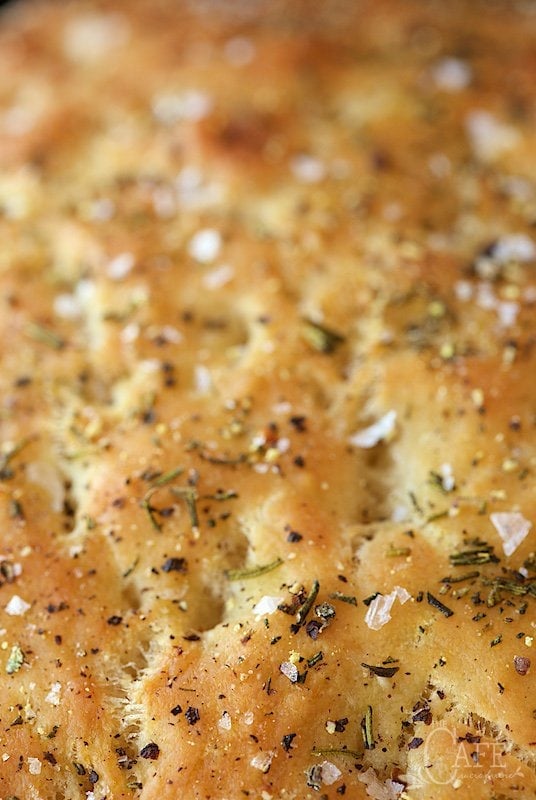
I'm serving an Italian dinner this weekend and decided that rosemary would work well. For something a little different and fun, I added a generous sprinkle of freshly ground black pepper. It's a delicious combination I know I'll be making again.
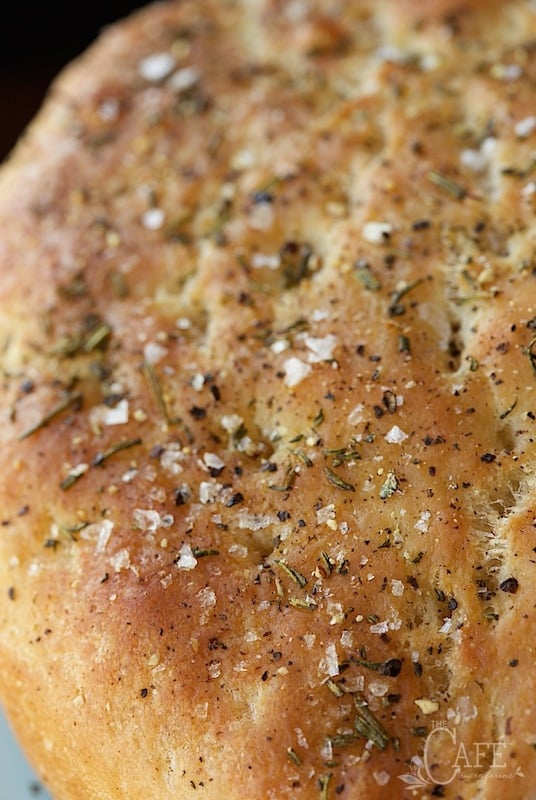
I like to serve this type bread with European-style butter or individual size bowls of good olive oil, so each person can dip their own. A sprig of rosemary and one more tiny grind of black pepper makes for a pretty presentation.
Oh, and this Rosemary and Black Pepper Focaccia makes a wonderful sandwich too. Just slice it horizontally, add your favorite meat, cheese, spread, etc. then slice it into wedges like a pie. I'm dreaming up one with thinly sliced turkey breast, Havarti cheese, applewood bacon, avocado slices and basil aioli. What would you like on yours? There are so many combinations that would be delicious!
So now you know how to spot me in a crowd, right? Just look for the flour-y one. I'd love to meet you, so please speak up and say hello. Until then, Bon Appetit and happy baking!
P.S. If you check out the Fine Cooking version, you'll see that I've definitely made some adaptations. They make theirs in a sheet pan, resulting in a large, low, rectangular bread. I make mine in two 9-inch cake pans. I like the presentation and the fact that I can freeze one loaf for later. They also have an extra step of stretching the dough before it's refrigerated. Honestly, I've tried it both ways and found that it really doesn't matter with the end result, so being a bit lazy, I skip that extra step. And lastly, I reduced the amount of olive oil. I just didn't think the amount they called for was necessary. If you'd prefer to follow their recipe, it can be found here - Fine Cooking Focaccia Bread.
WANT TO SEE MORE DELICIOUS RECIPES FROM THE CAFÉ? SIGN UP FOR OUR EMAIL SUBSCRIPTION. THAT WAY, YOU’LL NEVER MISS A POST.
YOU CAN JOIN US ON FACEBOOK AND TWITTER AS WELL AS INSTAGRAM – WE HAVE LOTS OF FUN OVER THERE!
AND WE’RE FOREVER PINNING RECIPES AND INSPIRATIONAL IDEAS ON PINTEREST – JUST CLICK TO FOLLOW US.
- 5 ½ cups unbleached bread flour 1 pound, 9-ounces
- 2 ½ cups cold water about 55°F
- 2 tablespoons granulated sugar 1 ounce
- 1 tablespoon kosher salt
- 1 packet rapid-rise or fast-rising yeast
- 6 tablespoons extra-virgin olive oil plus a bit more for drizzling
- flaky sea salt
- 4 teaspoons finely minced fresh rosemary
- freshly ground black pepper
-
The evening before baking, mix the dough (see step 2) and let it spend the night in the refrigerator.
-
Combine the flour, water, sugar, salt, and yeast in the large bowl of a stand mixer with the dough hook attached. Mix on medium speed for about 5 minutes, stopping to scrape down the sides of the bowl once or twice. Let the dough rest for 5 minutes and then mix on medium low for another 3-4 minutes, until it's relatively smooth. At this point, the dough will resemble melted mozzarella and be very sticky. If you stretch a small piece, it will barely hold together.
-
Coat a bowl large enough to hold the dough when it doubles in size with 1 tablespoon olive oil. Transfer the dough to the bowl and flip the dough to coat it with the oil. Cover the bowl well with plastic and refrigerate it overnight, or for at least 8 to 10 hours.
-
Remove the bowl of dough from the refrigerator about 3 hours before you intend to bake it (2 hours on a warm day). The dough should have nearly doubled in size. Drizzle two 9-inch cake pans with olive oil and rub with a paper towel to coat. Line bottom of the pans with parchment paper. (DON'T SKIP THIS STEP OR YOUR BREAD WILL STICK TO THE PAN, EVEN A NON-STICK PAN - I learned this the hard way.) Drizzle a tablespoon of olive oil into each pan and spread it with your fingers to coat the parchment paper.
-
With a rubber spatula, divide dough in two approximately equal pieces and slide each one into a prepared pan. The dough will sink beneath its own weight, expelling some gas, but retaining enough to keep an airy gluten network that will grow into nice holes.
-
Drizzle 1 tablespoon of the olive oil on top of each piece of dough. (Don't worry if some rolls off onto the pan; it will all be absorbed eventually.)
-
Push the dough out to the sides of the pans with your fingers, creating hollows in the dough. At first you might only be able to spread the dough to cover about one-half to three-quarters of the pan. Don't force the dough when it begins to resist you. If this happens just let the dough rest for 10 or 15 minutes. The oil will prevent a crust from forming.
-
After letting the dough rest you will be able to push the dough to fill or almost fill the entire pan. It should be about ¼ to ½ inch thick. If it doesn't stay in place at the edges, don't worry; the dough will fill the corners as it rises. Drizzle the dough once more with a few teaspoons of olive oil.
-
Cover the pans loosely with plastic wrap or a clean kitchen towel, and let the dough rise at room temperature until it's about 1-½ times its original size. This will take 30 minutes to an hour or an hour and a half, depending on the temperature of the room. Thirty minutes before baking, heat your oven to 450°F.
-
Just before baking, remove the plastic wrap and sprinkle dough in pans with a few pinches of sea salt, the rosemary and a few generous grinds of black pepper. Put the pans on the middle shelf of the hot oven and reduce the heat to 425°F. After 15 minutes, rotate the pan to ensure even baking.
-
Check the dough after another 5 minutes. If it's done, it will be golden brown on top and, if you lift a corner of the dough, the underside will be golden as well. If not, return the pan to the oven for another 1 to 2 minutes and check again.
-
Use a metal spatula or table knife to release the dough from the sides of the pan. Slide the focaccia onto a cooling rack. Let cool for 20 minutes before cutting and serving.
No mixer? Just mix it by hand. Combine the flour, water, sugar, salt, and yeast in a large stainless-steel bowl; have a bowl of lukewarm water standing by. With a large wet spoon or one hand, mix the ingredients. Repeatedly dipping the spoon or your hand in the water will help keep the dough from sticking. Rotate the bowl with your free hand while stirring with the other until a wet, shaggy dough forms, 2 to 3 minutes. Let the dough rest for 5 minutes and then mix for another 2 minutes until the dough is relatively smooth but quite sticky.
LauraInVictoria says
This recipe has become a staple at my dinner table. Want to impress someone? This will do it. I have made this recipe dozens of times. One adjustment i made is to let the dough rise in 2 bowls. I’ve found it easier to split it before overnighting in the fridge. I use a scale to ensure my loaves are the same weight and bake equally.
Chris Scheuer says
That's awesome, Laura! Thank you for letting us know!