
This post may contain affiliate links. For more information, see our privacy policy.
With a super simple, dip, drip and flip decorating technique, these buttery melt-in-your-mouth Berries on the Wreath Shortbread Cookies always bring smiles of delight and rave reviews.
I'm always looking for ways to make my recipes look beautiful with minimal effort. Of course, they have to be super delicious at the same time. When my daughter Cait stopped by last week and sampled one of These Berries on the Wreath Shortbread Cookies, her response assured me that both requirements had been fulfilled!

I handed her a cookie and she said, "Wow, this is a work of art!" I smiled because I knew the decorating technique was easy and fun!
Then she took a bite. Her eyes lit up... "Yum! I thought about taking the rosemary sprigs off, but they give the cookies a delicious sweet-savory taste"!

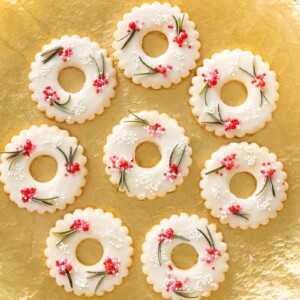
Berries on the Wreath
Since we already have a Christmas Wreath Shortbread Cookie recipe (pictured below) I decided to call this new creation "Berries on the Wreath Shortbread Cookies.

It may be a silly name, but be assured, there's nothing silly about the taste, texture or presentation of these cookies!

A Magic Rolling Pin
If you've been following The Café, you might know about my favorite rolling pin. I call it my "magic rolling pin" because it makes me look like an amazing cookie maker. In reality, I've always had trouble rolling cookie dough to an even thickness. No matter how hard I tried, some of them would be thick, others thin and some both thick and thin at the same time.
But a few years ago, I discovered this adjustable rolling pin and I've been rolling perfect cookies ever since. It's got 4 thickness rings, which means you can roll super thin, medium or thick cookies.

Dip, Drip and Flip
The easy decorating technique for these festive cookies includes our tried and true Dip, Drip and Flip method. It's a simple technique that doesn't require special ingredients or skills. You simply stir together a two-ingredient icing and, as the name suggests, dip the cookies into the icing, let the excess drip off, then flip them over... voila, for a smooth, pretty glazed top!

All that's left to do (while the icing is still wet) is to add the "berries" (pink and/or red decorating nonpareils), a sprinkle of "snow" (tiny white nonpareils) and a few little rosemary leaves. As my daughter says, "A work of art"!
See for Yourself!
To demonstrate the easy Dip, Drip and Flip method, my daughter-in-law, Lindsay, created a video. Check it out:
See what I mean, fun, easy and beautiful!

A cheery, delicious gift!
Once the icing hardens, these Berries on the Wreath Shortbread Cookies can be stored in an airtight container. They can also be packaged and/or stacked between sheets of parchment paper for a lovely gift.

For gifting, we've created a label to dress things up and add a bit of festive pizzazz! We're happy to share the PDF for these printable labels. If you'd like to receive the PDF and instructions on printing the labels yourself, just let us know in the comment section below this post. We'll be happy to email everything to you. The email will also include links for the boxes and ribbon pictured in this post.

Don't let the season pass by without making a batch of these fabulous Berries on the Wreath Shortbread Cookies. They truly are a little "work of art". Whether you enjoy them yourself, serve them to guests or give them away, I promise no one will be disappointed!

Cafe Tips for Making These Berries on the Wreath Shortbread Cookies
- Because there's no mixer used, the butter needs to be very soft when mixing up these Berries on the Wreath Shortbread Cookies. Either let the butter come to room temperature by letting it sit out overnight or you can use the microwave. A short stint in the microwave on power level 10 (10%) works like magic to soften butter. You'll need to experiment a bit with your microwave though, as they're all different. Start with 20 or 30-second increments at power level 10 until you learn how long your microwave will take to get the butter nice and soft, but not melted.
- You might wonder why these cookies need to be chilled for at least an hour before baking. The chilling helps them keep their shape in the hot oven. Also, chilling the cookies uncovered helps them to dry out a bit and that's a good thing with shortbread, as it intensifies the flavor. So it's a win-win!
- If you're in the market for sheet pans, I love these OXO Good Grips Pans. They're super sturdy and hold up well.
- A small amount of cornstarch in shortbread also helps the cookies to keep a nice shape in the oven and adds to the crisp texture.
- A few tips on rolling and cutting out cookies:
- Keep your work surface and rolling pin dusted with flour.
- I also like to rub the cutting edge of my cookie cutter in a little flour in between each cookie.
- Press fairly firmly when cutting out the cookies, but don't twist the cookie cutter as the shape will get distorted.
- If you don't have room in your refrigerator to chill the cookies on two sheet pans, just transfer all of them to one pan after cutting. Then later, once they're chilled, you can divide them between the two pans for baking.
- It's fine to reroll the scraps and cut more cookies.
- The cookies will be slightly puffed after being in the oven for a while. That's why I like to take them out after 8 minutes and give them a nice flat top by pushing gently on the tops with a metal spatula. This is also when I sprinkle the cookies with sugar, as it stays on top of the cookies better than if you sprinkle them right away.
- Rub your fingers around the edge of each cookie before glazing to remove any crumbs or uneven places before dipping, dripping and flipping.
- The glaze recipe for these cookies calls of half-and-half. If you live outside of the U.S., you might not be familiar with half-and-half. Half-and-half is an American convenience product, often used as a coffee creamer. It's simply a combination of half milk and half cream.
- While you're glazing these cookies, keep a small amount of half and half nearby. If the glaze seems to thicken, add just a few more drops and stir well.
- After flipping the cookie over, be sure to wave the cookie back and forth with the icing facing up for a few seconds to evenly distribute the glaze.
- You won't use all of the glaze, but you need enough to be able to dip the cookies. Discard the remaining glaze or use to ice some other cookies or cake.
- Here is a little troubleshooting guide for making these Berries on the Wreath Shortbread Cookies
-
- If the dough seems too sticky when you're rolling it out, add some extra flour to your work surface and knead the dough a few times to incorporate a bit more flour. Each brand of butter has a different water content so sometimes you might need that little extra flour.
- If the cookie shows through the icing and you'd like it to be more opaque add a little extra powdered sugar to the icing and stir well. You can also dip the cookie, let it drip for a few seconds then dip it again for a little thicker coating. I call this double-dipping.
- The top of the icing may form a little skin after a while. You can avoid this by simply stirring the icing in between every couple of cookies.
- If you dip your cookie in the icing and it comes out with just frosting on the edges, your icing is probably too thick. Simply add a few drops of half and half and stir well.
- If the glaze is dripping over the edges after you flip the cookie, either your glaze is too thin or you're flipping too soon. Add a little powdered sugar to the glaze in your bowl then stir well. Give the glaze a few more seconds to drip before flipping.
- If you need to take a break during the decorating process, just cover the glaze with plastic wrap. When ready to start again, add a few drops of half and half and stir well.
- If any crumbs end up in the glaze, use a toothpick to pull them out before icing the next cookie.
Thought for the day:
Lift up your eyes on high
And see who has created these stars,
The One who leads forth their host by number,
He calls them all by name;
Because of the greatness of His might and the strength of His power,
Not one of them is missing.
Isaiah 40:26What we're listening to for inspiration:

If you enjoy this recipe, please come back and leave a star rating and review! It's so helpful to other readers to hear your results, adaptations and ideas for variations.
Scroll Down for the Recipe - or Save It to Your Inbox
We’ll email you the recipe so it’s easy to save, print, or share.
Berries on the Wreath Shortbread Cookies
With a super simple, dip, drip and flip decorating technique, these buttery melt-in-your-mouth Berries on the Wreath Shortbread Cookies always bring smiles of delight and rave reviews.Ingredients
For the dough:
- 8 ounces very soft butter, (two sticks) I used salted butter
- ¾ cup powdered sugar
- 1 teaspoon vanilla extract
- 1¾ cup plus 2 tablespoons all-purpose flour
- ¼ cup cornstarch
For the glaze:
- 2 cups powdered sugar
- 4-5 tablespoons half and half
- ½ teaspoon vanilla extract
- ¼ teaspoon almond extract
For the “berries” and "snow":
- pink and red nonpareils, I like to use 1 larger red nonpareil and a tiny sprinkle of pink and red smaller nonpareils on each wreath.
- small white nonpareils
- small rosemary leaves
Instructions
For the prep:
- Pull out two sheet pans and set aside. Line each sheet with parchment paper.
For the dough:
- Place soft butter in a medium-size mixing bowl. Stir with a wooden spoon or sturdy spatula until nice and smooth.
- Add powdered sugar and vanilla. Mix together by hand for about 30 seconds until well blended.
- Add the flour and cornstarch. Stir until dry ingredients are incorporated. The dough will be a little shaggy, but will start to come together.
- Turn the dough out onto a floured work surface and gather into a ball. Knead 5-6 times until smooth and all the small pieces are worked in. If the dough seems sticky, knead it again with a tablespoon of extra flour on your work surface.
- Divide the dough into two portions. Form each portion into a ball again and flatten it with your hand to form a flat disk. Turn the disks to coat both sides with flour. Set one portion aside.
- Roll out the dough to an approximate ¼-inch thickness (see Café Tips above in the post). Move the dough several times as you’re rolling it out so there’s always a thin layer of flour beneath your dough. Also, keep your rolling pin, lightly dusted with flour.
- With a scalloped, round cookie cutter, cut out circles of dough and transfer them to a sheet pan using a thin, metal spatula, leaving 2 inches between each cookie.
- Use a mini round cookie cutter, a large pastry tip or any round hollow utensil that’s ½ -¾-inch in diameter (I use my apple corer tool) to cut out the center of each circle, forming a “wreath”.
- Re-roll scraps as many times as needed to use up the dough. Repeat with the second portion of dough.
- Place cutouts in the refrigerator, uncovered, for at least one hour or up to 24 hours.
When ready to bake:
- Preheat oven to 350˚F.
- Remove the cutouts from the refrigerator and bake for 14-18 minutes, or until just beginning to turn golden at the edges. Repeat with the second pan of cutouts. If the center opening has spread a bit in the oven, you can use the same small cutter and reinforce it right when the cookies come out of the oven and are still hot. If you wait to do this, the cookies will crack.
- Cool completely on a wire rack before icing.
For the glaze:
- Combine powdered sugar, 4 tablespoons half-and-half, vanilla extract and almond extract (if using) in a medium-size bowl. Mix until smooth. The glaze should be fairly thick, but pourable. Add a little more half-and-half if too thick. Add more powdered sugar if it’s too thin. (See the picture above in the post.)
- Transfer the glaze to a small shallow bowl (a little larger than your cookies).
- Hold onto the edges of a cookie and dip the top surface into the glaze, being sure all of the surface touches the glaze. Pull the cookie straight up out of the glaze and allow the excess glaze to drip into the bowl for about 15-20 seconds. (You can gently shake the cookie back and forth and up and down to get it to drip a little faster.) Then quickly flip the cookie to the right side up and give it a gentle jiggle to allow the glaze to flow evenly over the surface. Repeat with the remaining cookies. See pictures and a video in the post above, demonstrating this Dip, Drip and Flip technique.
- Transfer each cookie to a wire rack after dipping. While the glaze is still wet, add the “berries” and “snow”. I like to dip 3 or 4 at a time then add the berries and snow before dipping more cookies.
For the “berries” and “snow”:
- Using a small spoon or your fingers, give each wreath, 3 sprinkles of red and pink nonpareils, forming clusters of berries. I like to use 1 larger red nonpareil and a sprinkle of the tiny red and pink nonpareils for each cluster but feel free to be creative here.
- Add a small sprinkle of white nonpareils in between the berries, for the "snow:
- For a pretty look, add 1 small rosemary leaves to each cluster of berries, if desired.
- Allow the icing to dry before serving.
For storage:
- I like to let these cookies sit out for 12-24 hours before layering or stacking them in an airtight container. If gifting these cookies, I also let them dry for 12-24 hours before stacking them between parchment paper in a gift box.
Notes
See Café Tips above in the post for more detailed instructions and tips to ensure success. If you prefer to use Metric measurements there is a button in each of our recipes, right above the word “Instructions”. Just click that button to toggle to grams, milliliters, etc. If you ever come across one of our recipes that doesn’t have the Metric conversion (some of the older recipes may not), feel free to leave a comment and I will add it. The yield for this recipe will depend on the size of your cookie cutter. I use a 2½-inch cutter and get around 24 cookies.Nutrition
Calories: 160kcalCarbohydrates: 22gProtein: 1gFat: 8gSaturated Fat: 5gPolyunsaturated Fat: 0.3gMonounsaturated Fat: 2gTrans Fat: 0.3gCholesterol: 20mgSodium: 61mgPotassium: 13mgFiber: 0.3gSugar: 14gVitamin A: 236IUCalcium: 4mgIron: 0.4mg -
Shop Our Café Loves
We’ve gathered our favorite kitchen tools, tableware, and entertaining treasures in one place, the Café Loves store. It’s a wonderful spot to find something special for yourself or the cooks and hosts you love!


My favorite time of the year because we get to bake for many family and friends. Thank you so much for the free cookie labels. If you could please send me the Berries on the Wreath. Thank you so much Chris for gifting such a wonderful gift this time of year. Many Blessings and Enjoy this beautiful, magical season. Happy Holidays to you and your family.
PLEASE SEND ME Labels of the shortbread cookies.
Thank you!
I would love the labels for the berries on wreath shortbread cookies.
If you are able to send all the labels from this email, I am printing out all the recipes.
They all look so delicious and visually stunning.
Thanks so much!!!
Super cute wreath cookies and decoration!!!!
I would love a pdf of the labels please!
Thanks so much
PS I LOVE the scripture notes with all of the recipes!
So glad to hear that, Kathy! We are happy to send the labels.
Planning to make these today! May I please have the label!
Thanks!
Hi, I'm Dida. Excellent work dear Chris. Love the attention to detail and how humble and polite you are all the time. You are a perfectionist and an absolute wonderful, delicate cook. Following your, Oh! So detailed instructions, never failed any of the recipes I prepared for my family, friends and for 3 charity organizations I'm involved with: CWA( in Australia, Country Women Association), that supported the soldiers in both old wars but with big success, the "modern" ones as well, with knitted garments and simple cookies to last the long way, by plane or boat, till they reach the destination. We support single mothers in distress, homeless people, communities that have been affected by fire or floods, even go as far as North Africa, to support the doctors(Medicine sans Frontiers) in their free work to heal the poor and sick population from these countries. I crochet and knit blankets and beanies for babies and adults in 2 hospitals here in Melbourne, and one is Peter Mac - the biggest Cancer Center in the Southern Hemisphere.
You are an inspiration with your work and dedication, and I have only admiration for everything you do.
I would love to prepare these cookies for New Year's Eve. May I have the PDF for the labels, please? Absolutely gorgeous and very festive. Thank you in anticipation. Best regards and a prosperous New Year 2025, filled with the most beautiful things to come your way.
Love, Dida Hobbs
Melbourne, 28 December 2024
Aww, thanks so much, Dida! I really appreciate your very thoughtful comment 💕
Lindsay, my daughter-in-law, will be sending out the labels.
Beautiful! May I please have the pdf for the labels? Thank you
Sure, Nicole!
Please may I have the labels for these Berries on the wreath shortbread cookies.
You work so hard doing all these recipes that we can all share, thank you.
Wishing you Chris, and all your family a Very Happy Christmas and New Year, also hope Santa puts something nice in your stocking.
Happy Holidays, HO, HO, HO.
Meryl
All requested labels as of 6 pm 12/15/24 have been sent out. If you requested labels before this and didn't receive them, please let us know. ENJOY!
May I have the labels please. Thanks
These are gorgeous! May I please have the labels PDF? Thanks!
Merry Christmas. Can you please send me a set of labels. thank you.
I’d love the labels please. We make the wreath cookies every year with the red fondant bows. So festive and these are beauties too!
Please send me these labels. Thanks
One more cookie for the Cookie Exchange! I will box them up. Please send me the label.
Thank you!
Sandra Lee
Please send the labels for the shortbread wreath cookies.
I made the cookie recipe for Valentines they were so good and making them again for Christmas. Thank you.
I would love the labels please!
These look great! Another way to flatten the cookies some after they come out of the oven….take another sheet pan, place in top of cookies, lightly press down all over, then remove. I had a bakery and made a LOT of decorated cookies. Saved a lot of time and cookies were all even and flat.
That's a wonderful idea, Catherine. Thanks for sharing!
This is an amazing recipe, a winner every time.
Last week made a triple batch, rolled and cut them out, then froze the unbaked cookies. A few days later, for a family cookie party, thawed them in the fridge for about an hour while I made Royal icing.
They baked beautifully, and were every bit as delicious as when baked the same day.
Thanks so much, Victoria! So happy you've enjoyed this recipe!
Yes, please. I would love to have the labels. Thank you very much! I’m excited to try this recipe. 😃
I'd like the labels please. The cookies are beautiful.