This post may contain affiliate links. For more information, see our privacy policy.
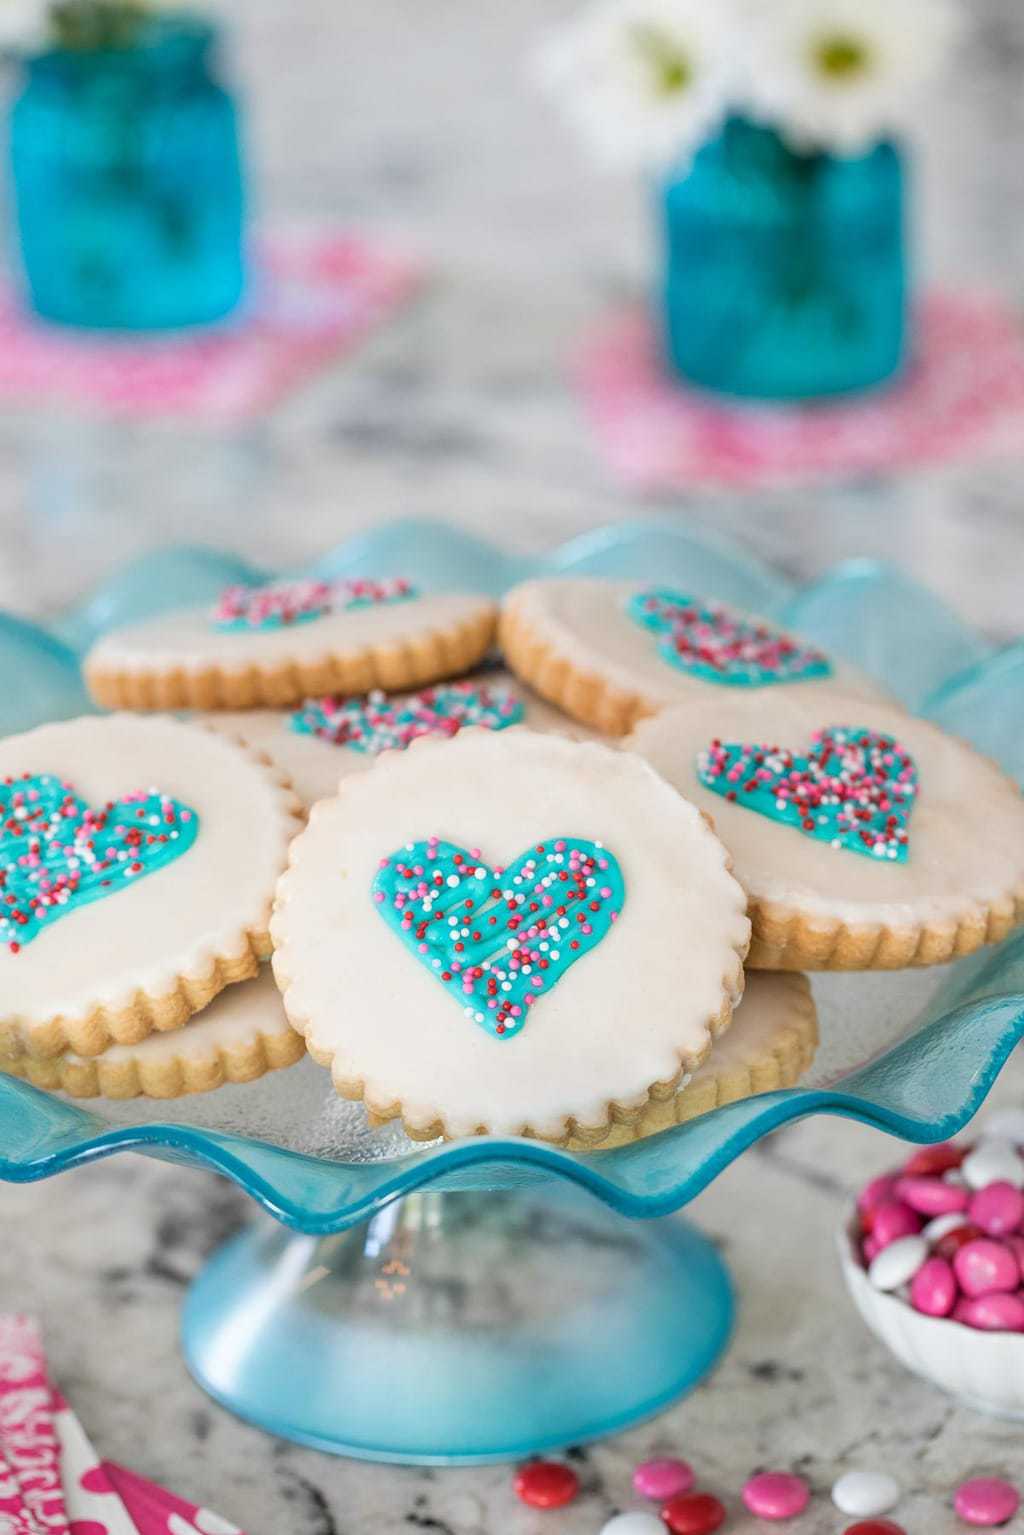
These Easy Decorated Valentine Cookies are not only delicious and look like they come from a fine bake-shop, but the dough recipe is one-bowl and no-mixer!
If you're like me; not a fancy cookie decorator, these Easy Decorated Valentine Cookies will make you look like one! And I'm going to show you exactly how to pull off this little confectionary magic trick.

Have you ever noticed that the prettiest cookies aren't always the most delicious? I've purchased beautiful cookies from fancy bakeries and have been so disappointed with the first bite. A cookie that tastes like cardboard with flavorless icing - and for a crazy expensive price! You won't find that problem with these Easy Decorated Valentine Cookies.

Pretty and delicious!
The buttery-crisp shortbread is melt-in-your-mouth delicious and the simple powdered sugar icing can take on a myriad of flavors. I've done almond, lemon, raspberry, mint, orange and vanilla bean - with just a half teaspoon of extract. One thing to note, be sure to use a pure extract, not one with artificial ingredients for the best flavor.
The cookies are modeled after my Christmas Shortbread Cookies and are simple to put together. The dough comes together easily with just a bowl and a sturdy spatula or wooden spoon. Yes, it's a wonderful one-bowl, no-mixer recipe!
The dough does not need to be chilled initially, just flour your work surface and rolling pin and you'll be ready to go. I like to use an adjustable rolling pin to roll my cookies to a nice even thickness. The one pictured below is a dream, since it can be adjusted to four different accurate heights by simple unscrewing the green handles on the ends.

I used a fluted cookie cutter to make my cookies, but you could also use a simple round cutter. I really like this fluted cookie cutter set.

It comes with nine fluted cutters and nice little acrylic case to store them in. When I make cutout cookies, I like to make a few different sizes for different size appetites. Being able to use a few different sizes also helps use up the scraps of dough, so I don't have to re-roll so many times.

The decorating technique is not difficult. Dip the baked cookies in a simple powdered sugar icing and allow the icing to dry.

Then pipe a simple heart and fill it in with back and forth lines. The finishing touch is a quick sprinkle of nonpareils and you're done! See why I call them Easy Decorated Valentine Cookies?

You can mix up both the dipping icing and the piping icing in bowls without a mixer. For the piping, you'll need a small decorating tip (I use a Wilton #5) and a decorating bag. I love these inexpensive but sturdy decorating bags. They come in a flat box so they're easy to store and they'll last forever.
Oh, one last thing! Making these Easy Decorated Valentine Cookies is much more fun if you have a sweet little friend to help you. Our granddaughter, Emmy was with us last week and Papa (Scott) had fun catching some shots of her rolling the dough and decorating the cookies. Her little mantra when she's helping in the kitchen is, "Cooking makes me happy!". Me too! I guess she got it honestly.

Café Tips for making these Easy Decorated Valentine Cookies
- Don't roll the cookies too thin if you're going to ice them, as they won't be sturdy enough for the icing technique. I used the rolling pin mentioned above in the post to roll my cookies to ⅜-inch. You can also use ⅜-inch wooden dowels on either side of a regular rolling pin to achieve a nice even dough.
- If you enjoy baking with kids, there's an adjustable rolling pin available that's just their size!
- Allow enough time for the unbaked cut out cookies to chill in the refrigerator. You want to cool them at least an hour. If it's longer they'll be fine. I've left my unbaked cookies in the fridge for as long as 24 hours.
- There are lots of wonderful varieties of pure extracts available, so you can switch out the flavor of these Easy Decorated Valentine Cookies to just about anything flavor you might fancy. I've used almond, lemon, raspberry, mint, orange and vanilla bean extracts with delicious results.
- If your dough seems to stick to the counter or to the rolling pin, just flour the counter and rolling pin with some extra flour. Roll the dough ball around in the flour, so it's coated on all sides and lift up the edges to scoot a little flour under the dough as you roll.
- These cookies will harden nicely so they can be stacked on a platter, but not so hard that they would ship well.
- If you're not using a mixer (which I usually don't), the butter needs to be very soft when mixing up these cookies. That can be difficult during the colder months, even if you let the butter sit out for hours. A short stint in the microwave on power level 10 (10%) works like magic to soften butter. You'll need to experiment a bit with your microwave though, as they're all different. Start with 20 or 30-second increments at power level 10 until you learn how long your microwave will take to get the butter nice and soft, but not melted.
- A few tips on rolling and cutting out cookies:
- Keep your work surface and rolling pin lightly dusted with flour.
- I also like to rub the cutting edge of my cookie cutter in a little flour in between each cookie.
- Press fairly firmly when cutting out the cookies, but don't twist the cookie cutter as the shape will get distorted.
- If you don't have room in your refrigerator to chill the cookies on two sheet pans, just place them all on one pan after cutting. Then later, once they're chilled, you can divide them between the two pans for baking.
- When re-rolling the scraps, incorporate as little of the flour on the work surface as possible.
- Occasionally, some of the cookies will be slightly puffed on the top when removed from the oven. You can give them a nice flat top by pushing on the top gently with a metal spatula.
- Know someone who's getting married? These cookies would make such fun wedding favors at each place setting. Put them in a clear cellophane bag and tie it with a pretty ribbon. Use the wedding colors for the piping and nonpareils. The cookies could be made weeks in advance and stored in the freezer. They come out as if they've never been frozen!
- I use these fluted cookie cutters to make my Valentine cookies. They come in a variety of sizes and have a nice storage container.
The Café Sucre Farine is a participant in the Amazon Affiliate Program. Affiliate programs are designed to provide a means for sites to earn advertising fees by advertising and linking to products on Amazon. The price you pay as a consumer does not change, but if you make a purchase we will receive a small commission - and we continue delivering delicious recipes to you!
Want to see more delicious recipes from The Café? Follow us on FACEBOOK where every day we share new dinner ideas, entertaining ideas and everything in-between!
We're also on Instagram and would love to meet with you there!
Scroll Down for the Recipe - or Save It to Your Inbox
We’ll email you the recipe so it’s easy to save, print, or share.

Easy Decorated Valentine Cookies
Ingredients
For the cookies:
- 8 ounces very soft butter, (2 sticks)
- ½ cup powdered sugar
- 1 teaspoon vanilla extract
- 1 ¾ cups all-purpose flour
- ¼ cup corn starch
For the glaze:
- 2 cups powdered sugar
- 4 tablespoons half and half, maybe more
- ½ teaspoon vanilla or other flavored extracts
For the buttercream piping:
- 1 tablespoon very soft butter
- 1 cup powdered sugar
- 1 ½-3 tablespoons half and half, you might need more
- ¼ teaspoon vanilla or other flavored extracts
- 3-4 drops food coloring
- nonpareils
Instructions
- Line 2 sheet pans with parchment paper. Set aside. Place soft butter in a medium-size mixing bowl. Stir with a wooden spoon or sturdy spatula until nice and smooth. Add powdered sugar and vanilla. Mix together by hand for about 1 minute, until fluffy and well blended.
- Add the flour and corn starch. Stir until dry ingredients are incorporated and the dough is shaggy.
- Generously flour a work surface. Turn the dough out onto the floured surface and press into a ball. Knead 5-6 times times until fairly smooth, then form into a ball again and press with your hands into a flat disk. Turn the disk to coat both sides with flour.
- Roll out the dough to an approximate ⅜-inch thickness (see tips above in post). Keep work surface, dough and rolling pin dusted with flour. Cut desired shapes and place on prepared pans. Re-roll scraps as many times as needed to use up the dough.
- Place cutouts in the refrigerator for at least one hour or up to 24 hours. When ready to bake, preheat oven to 375˚F. Remove 1 pan of cutouts from the refrigerator and bake for 12-14 minutes, or until just beginning to turn golden at the edges. Rotate pans halfway through for even browning. Repeat with second pan of cutouts. Cool completely before icing.
- For the glaze, combine powdered sugar, half and half and extract in a medium-size bowl. Mix until smooth. Glaze should be thick, but pourable. Add a little more half and half if too thick. Taste the glaze and add more extract, if more intense flavor is desired.
- Transfer the glaze to a shallow bowl. To glaze the cookies, hold onto the edge of a cookie and dip the top surface into the glaze, being sure all of the top surface touches the glaze. Pull cookie straight up and out of the glaze. Allow excess glaze to drip back into the bowl for about 15-20 seconds. When glaze stops dripping, quickly flip the cookie to the right side up and give it a gentle jiggle to allow the glaze to flow evenly over the surface. Repeat with remaining cookies. Allow glaze to dry for 15-30 minutes.
- For the buttercream piping, place butter in a medium-size bowl and stir until smooth. Add powdered sugar, 1 ½ tablespoons half and half and extract and stir vigorously until smooth, adding a bit more half and half if needed to achieve a thick, but smooth consistency. Add food coloring, a drop at a time, to reach desired shade.
- Place buttercream in a pastry bag fitted with a small round icing tip (I used a Wilton #5 round tip).
- 10. Make an outline on the top of each cookie with a small heart-shaped cookie cutter. Pipe around the outline with buttercream. Then, starting at the top, fill in the heart with diagonal, back and forth lines (see pictures above). Immediately sprinkle with nonpareils of choice. Set aside to dry.
Notes
Nutrition
Shop Our Café Loves
We’ve gathered our favorite kitchen tools, tableware, and entertaining treasures in one place, the Café Loves store. It’s a wonderful spot to find something special for yourself or the cooks and hosts you love!


Perfect timing. I was planning of giving Valentine cookies to my friends. May I please have the cute labels, please.
Hi DoLee, Thanks for your review! Unfortunately, we do not have a label for these cookies at this time. Some of our other Valentine treats do have labels, so please feel free to request those if you're interested. Hope you enjoy the cookies!
Hi Chris, can you ice the cookies and freeze, or is it better to thaw and then do the icing? I love the new picture of you and Scott. Thank you.
Hi Diane, I've done it both ways and it works either way!
I can't wait to try these-they look great. Just wanted to let you know both the rolling pin w/adjustment rings and the cookie cutters aren't available anymore. I found alternatives, but thought you might want to change your suggestions (or not *grin*). Thanks for your great recipes. Also, I love the new pic of you and Scott.
Thanks, Brenda, I have updated those links! I appreciate you letting me know 💕
Please may I have the PDF labels for these cookies? Thank You.
Hi Susan, we do not have labels for this recipe at this time.
Can the glaze be colored?
Hi Gina. Definitely, just a few drops of food coloring till you get your desired color.
Great recipe! I needed shortbread cookies that wouldn’t puff or spread because I was using a custom cookie cutter with someone’s face on it. I’m happy to say the cookies turned out great and the design didn’t get distorted. I used Earth Balance buttery sticks in place of butter to make them vegan, and it worked perfectly.
Thanks, Stephanie! So happy you enjoyed them!
WHAT IS HALF AND HALF ON TH RECIPE? THANKS
Hi Xiomara Loo, half and half is an American convenience product that is half whole milk and half cream. You could use whole milk for this recipe in its place.
I am having trouble getting my cut out cookies to my pan without loosing shape. What is the best utensil to use to do this?
Hi Sara Beth,
I use a thin-bladed spatula to transfer the cookies. Also, you can dip the spatula in a little flour to make it easier to slide under the dough.
Chris, just completed my Halloween Cookies! Fantastic recipe and so much easier than what I used before. The taste is crisp and delicious!
Can't wait to decorate and get them to the children!!! Thanks so much!!!
Thanks for sharing your results, Mary! Now you've got me wanting to make them again 🙂
I am about to make these for the grandchildren. Just needed to know for sure that this is not mixed in a mixer but completely by hand??
Love all of your recipes Chris!
Nope, this recipe does not require a mixer. I like that you don't have to dirty extra dishes and it's kind of like grandma used to do it!
I just made my first batch of these cutout cookies for Halloween. It is a beautiful dough to work with and produced a very tender cookie which held its pumpkin shape, stem included, in the oven. It will be my new go-to recipe for cutouts! And I am betting it would make a good tart crust too!
Thanks for sharing your results, Rhona - we love these cookies too!
These are excellent. The cookies are tender, melt-in-your-mouth, crisp and "short", and have a nice flavor. I added a pinch of salt, a tsp of lemon zest, and 1/4 tsp almond extract. The dough is soft before chilling, but easy to work with after it has firmed up in the fridge. I use a pastry cloth dusted with powdered sugar instead of flour when rolling shortbread or sugar cookie dough to ensure that no additional flour is added to the dough. The cookies baked at 350° for 13 minutes. They were firm when lightly pressed, light golden on the bottom, but had not started to turn golden around the edge when I took them out of the oven.
Hi! If I wanted to triple the recipe..should I just do it in batches or go ahead and triple each ingredient?
Thank you!
Hi Anna, yes it should work fine to just triple the ingredients. Enjoy!
What a charming cutout cookie! Given it’s a buttery shortbread, I have high hopes for this cookie. The standard sugar cutout cookies leave so much to be desired.
I plan to bake two batches for an Easter eggs and cookie decorating party. I bake by metric weight as volume measurements vary significantly depending on the method used to fill the measuring cup. It would help greatly to know if you use the dip and sweep or spoon and level method to measure the flour and cornstarch.
Also what brand of flour do you recommend? Since national brands like Gold Medal and Pillsbury are bleached and contain about 2% less protein than unbleached King Arthur Flour, my
thinking is to use a lower protein bleached flour.
Thank you for your thoughts. Your website is really lovely.
Hi Cate, hope you enjoy these cookies as much as we have!
Regarding your questions, I stir my flour to "lighten" it up, then dip and sweep.
I have used both Gold Medal and King Arthur for these cookies, both with great results. I always use unbleached flour.
Thanks for your kind words, don't hesitate to contact us with any other questions.
I love these cookies and have made them several times. However, the ratio of milk to powdered sugar in the frosting recipe never seems to be right. 2 Tbsp of milk or cream is never enough, and I have needed to use 4-6 Tbsp to get the frosting to the right consistency. Suggestions?
Thanks for sharing that Carleen. I think that powdered sugar and cream an vary on density and thickness 2 tablespoons was perfect for me but I will adjust the recipe a bit to also reflect your results.
How beautiful these cookies are! Love the tips but one place you say roll out to 3/8 and in another paragraph 5/8 . Which is it
Thanks for noticing that Carol. It should e 3/8. I've corrected the recipe. I appreciate having extra eyes out there! 🙂
Oh, my goodness, Emmy has grown so much and she's a cutie pie. I bought the bands for my rolling pin but I like yours better. Thanks for the decorating tips also.
So pretty, Chris! You know I love shortbread and these cookies are just perfect!
Cutie Emmy! Before I got to the bottom of this tutorial I was already thinking of doing this with my daughter, bet she'll not only love doing this but the taste as well. Great for family Valentines and family bonding 🙂
Do these pack and mail okay without the frosting getting messed up?
Hi Linda, like I said in the post, I'm not sure they would get hard enough to pack in the mail. I serve them stacked up on a platter with no issues but it's not like a royal icing that gets really hard.
Adorable helper 🙂 I love her little chef's hat ♥ You do such a great job of decorating cookies, Chris. Wish I were so talented!
I'm decorating-challenged so these cookies are definitely for me! Love shortbread -- such wonderful stuff. Thanks!
Oh, I love your little helper!!! AND these wonderful cookies. Think I need to get some of those fluted cookie cutters!!
She is beautiful!!!❤️Her little face is still the same.
Such pretty cookies too!Not to mention the oh lala French canisters❤️
These are so pretty and I'm just in love with that blue colour! Great tips for cookie making, too 🙂
Definitely need that rolling pin~ And a granddaughter wouldn't hurt either!
How adorable is Emmy!! You're so lucky to have such a wonderful assistant in the kitchen Chris! I love shortbread, and these are the cutest!
Lovely cookies and adorable assistant chef! I've enjoyed watching Emmy grow up in your kitchen on the blog. She used to sit on the counter! Your cookies are always so pretty and you make them approachable for everyone.
These cookies are really beautiful and perfect with that decorative heart shape in the center. Emmy surely hat lots of fun in your kitchen 🙂
Oh I can't wait until my granddaughters are big enough to help! Such fun in the kitchen. These are lovely little cookies Chris - so perfect for everybody on our Valentine's Day list!
❤️these! I think I can handle the decorating too. Clever 😁
If I can, you can Deb! 🙂
SUOER cute Chris, sharing all around, and I hope you have a wonderful Valentine's Day with your cute little helper!
Emmy is adorable! She is so beautiful and photogenic. And she looks like you! Your grandchildren are so blessed to have you; and all the memories in the kitchen that you will give them. Each one should become a really good cook. And now i will never forget how to pipe a heart!