This post may contain affiliate links. For more information, see our privacy policy.

Does it sound like a oxymoron to talk about juicy, tender, and baked chicken in the same sentence? Nope! Check it out!
After reading the title of this post, you're probably thinking that I'm giving you a lesson in oxymorons today instead of a recipe, right?
That's what I would have thought too, just a month ago. I was sure that "juicy and tender" did not belong in the same sentence as "baked, boneless chicken breasts". I know I'm a gullible guppy (that's what I'm told) at times, but "juicy, tender, baked chicken breasts" was taking things a little too far! To me, it would have been like saying "minor crisis" or "exact estimate", words that are in definite conflict with each other.
Guess who's had to eat their words?
It all started with this article I ran across from The Kitchen website. The author is a trained chef and talked about a technique she learned in culinary school called "dry poaching". That term piqued my interest, so I read on. Her explanation is what really intrigued my little culinary brain:
There is so little fat in a boneless skinless chicken breast that it's hard to cook it without the meat ending up dry or just plain tasteless. With this method, we take advantage of the steady, all-surrounding heat of the oven, but just before putting the breasts in to bake, we cover them with a piece of parchment paper. The paper acts almost like the chicken's missing skin, protecting the chicken and preventing it from drying out.
Think of this method as a cross between braising and roasting. The chicken bastes in its own juices and the result is tender, juicy chicken breasts that are succulent and never dry.
Brilliant! The paper acts almost like the chicken's missing skin, protecting the chicken and preventing it from drying out. That made so much sense because when you bake skin-on chicken breasts they're wonderfully moist and delicious, not dry.
I loved the idea of an easy, non-messy technique for juicy, tender boneless breasts. I have a zillion recipes that call for diced or shredded chicken breast: soups, chilies, pizzas, paninis and on and on. Plus chicken breasts are lean and perfect for healthy salads and light, low calorie meals (if they're not dry and tough).
I read lots of comments and reviews of the technique and they were overwhelmingly positive, so I gave it a try. I'm happy to say, I was super impressed with the results. Since then I've played around a bit with the recipe, adapting a few things and adding a little seasoning mix that enhances the flavor. I also sent the instructions to my daughter-in-law, Lindsay for her to test the technique, knowing ovens differ and can produce varying results. She loved this easy method, and offered a few additional tips from her experience. Last time we visited, she had baked a few chicken breasts this way and shredded them. For dinner that evening, she made a delicious pizza with a pesto base, topped with the tender chicken, as well as roasted tomatoes and red peppers. Schmakala!!
So I asked Scott to photo document the technique in order to share it with you. Ready? Here goes...


So that's it! Pretty cool huh?
So, whether you're looking for a healthy, delicious dinner entree...

Or you need a bowl full of shredded chicken for chicken salad, sandwiches, pizza etc...

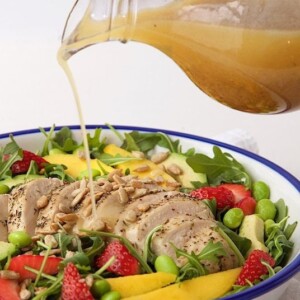
Or you're in the mood for a fabulous, fresh salad - like this delicious Arugula Chicken Salad with Mango and Strawberries. Paired with a vibrantly fresh honey-lime dressing, it's a perfect way to chase away the winter blues! Recipe's coming up Wednesday!

Until then, have fun trying this technique for Juicy, Tender, Baked Boneless Chicken Breasts - I promise it's not an oxymoron!
P.S. If you read the article from The Kitchen on baking the boneless breasts, it doesn't include brining. I've tried it both ways and brining definitely adds flavor and juiciness to the meat. The brine only takes a minute to put together and 20 minutes of hands-off time while the oven preheats, so don't skip this step!
Scroll Down for the Recipe - or Save It to Your Inbox
We’ll email you the recipe so it’s easy to save, print, or share.
Juicy, Tender, Baked Boneless Chicken Breasts
Ingredients
- For the brine:
- 1 quart cool water
- 2 tablespoons kosher salt
- 1 tablespoon sugar
- For the seasoning:
- ½ teaspoon kosher salt
- 1 teaspoon italian seasoning
- ½ teaspoon freshly ground black pepper
- For the chicken:
- 4 bonelss skinless chicken breasts, use any number of pieces you want
- extra virgin olive oil
Instructions
- Most chicken breasts won't need to be pounded, but if yours are quite thick on one end with a much thinner opposite end, place chicken breasts, one at a time in a large zippered bag or between two sheets of plastic wrap and pound gently on the thickest part to create even thickness. You're not trying to make the breasts super thin, just evening them out so thinner parts don't cook quicker than the thicker areas. Repeat with all 4 breasts, if needed.
- Combine brine ingredients in a medium-large bowl. Stir for about 30 seconds until salt and sugar have dissolved. Add chicken breasts and allow to brine for 20 minutes while oven is preheating and you're preparing seasoning mixture.
- Preheat oven to 450˚F. Prepare seasoning mix by combining all ingredients in a small bowl.
- Remove breasts from brine and rinse with cool water. Pat dry with a paper towel and place in baking pan, leaving space between them. Drizzle with 1 tablespoon olive oil and sprinkle lightly with seasoning on both sides. You may have some seasoning left over. Be generous, but don't season too heavily, as chicken will have already absorbed salt from the brine.
- Cover chicken with a piece of parchment paper and tuck down at edges. Place in preheated oven and bake for 15-20 minutes.
- Check internal temperature after 15 minutes with a digital thermometer (for very small pieces of chicken, bake for 10 minutes, then check temperature). Insert thermometer probe from one side into the center. You want temperature to read 160-165˚F. You may need to remove smaller pieces first, as they will reach optimal temperature quicker than larger pieces.
- When 160-165˚F temp is reached, remove pan from oven and tent with foil for 10 minutes before serving. This will allow juices to reabsorb and not run out when meat is cut. Serve and enjoy!
Notes
Shop Our Café Loves
We’ve gathered our favorite kitchen tools, tableware, and entertaining treasures in one place, the Café Loves store. It’s a wonderful spot to find something special for yourself or the cooks and hosts you love!


I’m gonna try this recipe today! I’m making breast topped with onions, bell pepper, mushrooms, and melted provolone cheese
Yum, sounds wonderful!
Tasty recipe! I use your recipe for dinner, of course, but also for my husband's lunch sandwiches. It is way cheaper than buying grilled chicken breast at the store. Last night I baked the chicken breasts and chicken tenders. The tenders had been sitting for a while (I was waiting for the breasts to finish baking). They had absorbed all the juices and were super moist, tender, really delicious! After I check the internal temperature, it's really hard to tuck the parchment paper under the chicken again. I try to re-cover the chicken the best I can. If you have any suggestions on this, let me know.
Thanks, Annie! Just placing the parchment paper over the chicken is fine after checking the temp.
If you buy Kirkland Individually Wrapped Boneless, Skinless Chicken Breasts, they contain an 8% solution of water and Kosher salt. No need to brine. These babies never dry out in your freezer and are always tender and moist. Caveat: don't overcook them.
Thanks, Figaro!
Looking forward to trying this recipe. My box of Kirkland parchment paper states safe to 420F. Have you had a problem with cooking the chicken covered in parchement at 450F? Thanks
Good question Donna! I haven't had any trouble. I think if you were baking for a longer period, the paper might get brown, but not with this recipe.
I am definitely making this!!!
Easy and delicious, Chris! It's versatile recipe too since one can use these breasts in salads, tacos, pastas, and many other dishes.
I have chicken breasts in the freezer just waiting for this, thank you! Thanks to you also Scott for the wonderful pictures.
I always have a hard time cooking chicken breast as it tends to dry out. I love how juicy and tender yours looks! Great tutorial, I'll be trying your tips!
Such a brilliant idea. I missed that post on The Kitchn. It makes sense that the parchment would act like the skin. I poach my chicken when I am using it in chicken salads but definitely like this mentiod. I'll be sure to test it out soon. Thanks for sharing it.
Love this idea! And can totally see why it works. So simple, but I can see what a difference it makes. Thanks for introducing it to us. And what a great tutorial -- love the pictures. Thanks!
Does the proportion of brine to meat matter? If I am cooking two breasts would I have the brine or does it matter? I've always wondered about that when brining.
What a great post, I love everything about it, chicken is my favorite and tender chicken is key!
I made these tonight!!!! They truly are tender and juicy. I will be using this technique often for many recipes that call for cooked breasts. And with the brining they were flavorful as well. Thank you so much for this great recipe.
You're very welcome Victoria! It's fun to find a recipe (or technique) that you can use over and over, isn't it?
I am not over fond of chicken breasts though my husband loves them. This though does sound very tasty and I will give it a try. Hope you are well Diane
I am defrosting chicken breasts right now so that l can use this recipe. Thanks for sharing Chris. I am usually not a fan of chicken breast meat because it can be overcooked and dry. This recipe shows promise!
Great post, Chris. This is a simple method that I will be trying at my house. The chicken looks very moist!
Wow Chris, you've outdone yourself, this is so interesting and useful! That sliced breast looks so juicy and perfectly cooked!!
Perfect timing for your post! I brined and baked and it did produce positive results. My husband was impressed also. This will be my go to recipe for skinless boneless chicken breasts.
That's so great that it worked well for you Debbie! We just love easy, successful food prep techniques!
This is great Chris - thanks so much! There are so many uses for skinless boneless chicken breasts - this is perfect!
Chicken really is the ultimate "Swiss Army knife" of cooking, isn't it Tricia?
I love learning new things about cooking! Great lesson how to bake boneless chicken! Beautiful salad and the dressing sounds delicious too.
Thanks Susan! I'm such a sponge, when it comes to new foods, preparation techniques and culinary ideas! I love to learn, like you too!
The chicken breast looks indeed very tender and juicy! Gotta give it a try next time. Thanks for sharing, Chris.
You bet Angie, it's definitely standard practice now in our kitchen!
Hi Chris, will definitely be trying this method, yours looks perfectly cooked. Sometimes I pound my poor chicken too pieces trying to get it as flat as possible. lol! Thanks for the great tips!
You're so welcome Cheri I have also been known to pound a poor chicken into submission too!
I cook chicken breast all the time for using on salads. I will be trying this method very soon!
It may become your, "go-to" way of preparing chicken Jenn!
Love this and very useful. I'm always cooking chicken breast off for use in something or other. Will definitely try!
So glad you liked it Jennifer! It's fun to share "aha!" tips, isn't it?
Very interesting indeed! I intend to give this method a try - and I love that you added the bit about the brining step making a difference, because I immediately wanted to try and skip it... yeap, always the stubborn me.... Now I won't skip it, you are absolutely right, 20 minutes time is no big deal, my oven takes that amount of time easily to reach 450 F.
Me too Sally, I mean the stubborn part! i'm always looking for quick and easy, and sometimes, just a few extra minutes can make all the difference in the world! In this case, it really does!
Glad I am not alone! 😉
I have to try this technique, the chicken breast looks tender! Thanks for sharing Chris 🙂
They really are Muna! So juicy and delicious!
wow - this recipe looks like a keeper - and it certainly does make lots of sense - am giving this a try this week - thanks!
It's made all the difference in the world on any recipe that uses boneless, skinless chicken breasts, Betty!