This post may contain affiliate links. For more information, see our privacy policy.
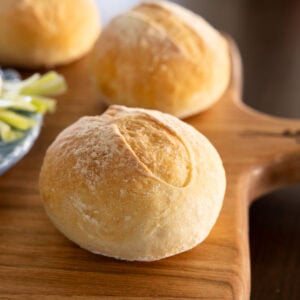
There's nothing quite like the magic of good European bread... that shatteringly crisp, golden crust giving way to a tender, chewy, wonderfully airy interior. I'm a huge fan, but it's not something I can always track down here in our little North Carolina mountain town… nor is a full-sized French loaf always what I want to tuck into a dinner basket. These No-Knead Crusty Dinner Rolls solve all of that.

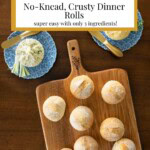
They offer that same European bakery-style experience in individual form, with a crisp, crackly exterior and a soft, flavorful crumb. Even better? They come together with just three simple ingredients (four, if you count water!) and no kneading. Perfect for serving alongside soups and salads or slicing open for the most delicious little sandwiches - these rolls are effortless enough for everyday and special enough for company!

Stretch and fold (and hopefully, a lesson finally learned!)
I have a long (and slightly embarrassing!) history of being skeptical about new things. Back in 1997, when our son Nick came home from high school talking about this new thing called "Google," I remember saying, "Google?? That is the dumbest word I've ever heard!" Then in 2009, when our daughter announced she was going to start a blog to share photos and stories of her kids with the family (long before Instagram), I shook my head again. "Blog?? Now that's the dumbest word I've ever heard!"
Fast forward a few decades… and here I am, a self-proclaimed Google Queen with a blog of my own. You'd think I would have learned my lesson by now, right? Well, I'm still working on it.
Maybe it's true, what they say about "old dogs"... when I first heard about the "stretch and fold" technique for bread dough, I had that same reaction. "Stretch and fold? That's ridiculous! What good is pulling on the dough going to do?"
Well, once again, I was wrong. It took a while to convince me, but this simple little technique is actually pure magic! It eliminates the need for kneading and helps develop the most beautiful air bubbles, the hallmark of great European bread. It's amazing how much structure and texture you can build with just a few stretches.
I'm such a believer now that I asked our daughter-in-law, Lindsay, to create a video to show you exactly how it's done. Check it out:
A few easy steps...
Even though the results look (and taste!) European bakery-worthy, the process couldn't be simpler.

This dough does most of the work on its own, with just a few minutes of hands-on time and the magical stretch-and-fold technique you just learned about. Once everything is mixed, it's really just a matter of resting, folding, shaping, and baking. Here's a quick overview, but check the recipe card below for detailed instructions and measurements!
- Mix the Dough
Combine flour, yeast, and salt, then stir in hot tap water until everything is fully incorporated. - Stretch & Fold
Let the dough rest for 20 minutes, then perform one set of stretch-and-folds. Repeat this rise plus stretch-and-fold cycle two more times. After the third set, let the dough rise again until doubled. - Portion & Shape
Turn the dough onto a well-floured surface, dust generously, and divide into 20 portions. Shape each one into a tight, round ball.

- Second Rise
Place the rolls on parchment-lined sheet pans, dust lightly with flour, cover, and let rise until almost doubled.

- Prep the Oven
Add a pan of water to the bottom of the oven for steam and preheat to 450°F. - Slash & Bake
Use a razor blade (my preference), sharp knife or baker's lame (pictured on the right below) to create a shallow slash on each roll, then bake until beautifully golden and crisp.

- Cool & Serve
Transfer to a cooling rack. These rolls are wonderful warm, perfect on their own, or with our Orange Honey Butter or Que Sera Butter!
A fabulous finishing touch!
If you really want to take these rolls over the top, pair them with one (or both!) of these fabulous compound butters. First up is Orange Honey Butter... it's bright, buttery, and just sweet enough to make every bite taste like citrus sunshine.

Then there's Que Sera Butter, a delicious copycat from one of our favorite local restaurants. It's a savory butter with a touch of heat and everyone goes crazy for it.

Both butters are incredibly easy to make, wonderfully giftable, and downright irresistible served with these crusty rolls. Put together a basket of these , tuck in our free printable labels, and you've got a gourmet gift that friends and neighbors will swoon over.
I'll be sharing both butter recipes in a separate post coming up this next week, because... honestly, they deserve a spotlight of their own!
I'm going to wrap up this post, as I've just taken a pan of these rolls out of the oven for a dinner we're hosting tonight. Let me tell you... the aroma is so intoxicating that it's probably a good thing our neighbors are spaced far apart on our little mountain road or there might not be anything left for dinner. I'm about to sit down with one while it's still warm, add a generous smear of Que Sera Butter, and pretend I'm tucked into a tiny European bake shop. I hope you'll bake a batch soon and enjoy that same little moment of delicious magic.

Scroll Down for the Recipe - or Save It to Your Inbox
We'll email you the recipe so it's easy to save, print, or share.
No-Knead, Crusty Dinner Rolls
Ingredients
- 4 cups all-purpose flour
- 2 ¼ teaspoons instant dry yeast
- 2 teaspoons kosher salt
- 1 ¾ cups hot tap water, plus more as needed
Instructions
Prep the pans:
- Line two sheet pans with parchment paper and set aside.
Mix the dough:
- Combine the flour, salt, and yeast in a large mixing bowl. Make a well in the center. Add the hot tap water and stir with a sturdy spatula, wooden spoon, or Danish whisk until all the flour is incorporated. This is a stiff dough, so if needed, add an additional tablespoon of water to bring it together. Make sure there is no dry flour at the bottom of the bowl.
Stretch & fold - Set 1:
- Cover the bowl with plastic wrap and let it rest in a warm spot for 20 minutes. Lightly wet your hand, grab a portion of the dough, stretch it up, then fold it over onto itself. Rotate the bowl a quarter turn and repeat 3 more times to complete one set of four stretch-and-folds (see video in the post).
Stretch & fold - Sets 2 & 3:
- Repeat the 20-minute rest plus the stretch-and-fold process two more times. After the third set, cover the dough again and let it rise until doubled, about 30 minutes in a warm spot.
Portion the dough:
- Generously flour a work surface (about ⅓ cup). Turn the dough out and use a dough scraper to turn it several times until coated. Divide into 20 portions (about 45g each) for dinner rolls or 60g each for sandwich rolls. Roll each portion lightly in flour.
Shape the rolls:
- With each piece, stretch the edges toward the center and pinch to create a seam. Place the dough seam-side down on an unfloured area of the counter. Cup your hand around it and drag in tight circles to form a smooth, taut ball. (If it sticks, dust lightly with more flour.) Here is a short video from America's Test Kitchen demonstrating how to do this.
Second rise:
- Arrange 10 rolls on each prepared sheet pan. Dust lightly with flour using a fine-mesh sieve. Cover with clean kitchen towels and let rise until almost doubled, about 30 minutes.
- Prep the oven:
- While the rolls are rising, place a pan filled ⅔ with water on the lowest oven rack to create steam. Position another rack in the center and preheat the oven to 450°F. (Let the oven preheat for at least 15 minutes to get the steam going.)
Slash the rolls:
- When the rolls are almost doubled, use a baker's lame, razor blade, or sharp knife to make a slash down the center of each roll, about ¼-½ inch deep. (I like to start at the center and slash towards one edge the repeat going towards the other edge.)
Bake:
- Bake the first pan for 14-18 minutes or until lightly golden brown. Check at 14 minutes, then every minute until done. Repeat with the second pan, ensuring the water pan still contains water.
Cool:
- Transfer the rolls to a wire rack to cool. Enjoy warm with butter!
- To store:
- Store in a ziplock bag or an airtight container. I like to re-warm them in the oven for 8-10 minutes at 300˚F. These rolls also freeze well - thaw then re-warm to serve.
Notes
Nutrition
Shop Our Café Loves
We’ve gathered our favorite kitchen tools, tableware, and entertaining treasures in one place, the Café Loves store. It’s a wonderful spot to find something special for yourself or the cooks and hosts you love!


How hot should the water be?
thank you,
Hi Ed, Your water should be between 100-110 degrees Fahrenheit. Hope these turn out well for you!
Easy, fast and delicious! I will definitely make these again.
Thank you for the great review, Carol! So glad to hear how much you enjoy this recipe - thanks for letting us know!
So quick and easy. brought these to a luncheon, all were devoured. Will definitely make again.
Hi Linda, Thanks for the excellent review! It's great to hear how well the rolls turned out for you and what a hit they were at your luncheon. We appreciate you taking the time to let us know how much you enjoyed this recipe!
Can I use golden wheat flour for this recipe?
Hi Anita, I haven't tested this recipe with golden wheat flour, so I can't say for sure. If you were going to try it, I would start with 25% and see how that goes. The more WW flour you add, the more the recipe will have to be altered to accommodate the heavier flour. At some point, you will need to add vital gluten so the rolls don't end up too heavy.
Hi, I am going to make these today but I would like to know if I can use bread flour.
They look wonderful and I have already made 2 of the 3 butters.
I am so glad that I found your website!! I have made so many great recipes.
Thank you, Shirley
Thanks for you kind words, Shirely! In regards to your question, yes, bread flour will work great for this recipe!
These turned out great! I made both butters, and served the rolls straight out of the oven as an appetizer with butter tastings before we sat down to dinner. Everyone loved both butters, and had more rolls with dinner. In fact 6 people ate 15 rolls! I will say they’re small, but that’s nice. Only problem is I now have to make another batch for my next dinner party!
Ha, that's great! Thank you for the review, Linda!
Chris
Do these rolls keep their ‘crustiness’ after wrapping and packing? Or do you have any tips for helping preserve that wonderful artisanal crust? I am looking forward to making these as a secret Santa gift this weekend and am trying to come up with the best way to package and present them.
Thank you again for sharing the recipe. Also, as a long time follower, I am waiting (somewhat impatiently 😄) for your signature holiday cookie recipe this year.
Hi Bev, I usually freeze them, then thaw and pop them in the oven at 300˚F for 8-10 minutes and they come out beautifully crusty. It they're not frozen, it's also nice to reheat them to get them nice and crusty again.
your links for the 2 butter dont work
Hi Erika, those recipes are coming later this week!
oh ok thanks god bless
Hi Chris,
These rolls look absolutely perfect. My problem is that I have a very small (electric) wall oven that came with only 1 rack. Do you think it would work if I just spritzed some water from a spray bottle into the oven immediately before putting the rolls in to bake? I know that steam is really necessary for achieving the crisp crust and fluffy interior. Any suggestions for what I should do?
Many thanks
Annette
Hi Annette, I think that will work. I would spritz it with water every 5 minutes.
I'm sorry to bother you again, Chris. The free printable label link isn't working either.
Hi Leslie, the printable labels are coming soon in another post later this week 🙂
Hi Chriss. I use Chrome, but there isn't a video or video link. I have disabled my ad blocker, but there is still no video.
Hi Leslie, not sure what's happening, I will check with our host and ad company.
Wondering if this would work with freshly ground whole wheat flour?
Hi Kathy, I've only tried this recipe with unbleached AP flour so I can't say for sure without further testing.
Chris, what brand of flour did you use in this recipe? I ask b/c King Arthur flour has a high protein content and I usually use it for breads. I think baking success has every to do with ingredients used. Many thanks.
Hi JK, I use King Arthur unbleached all-purpose flour. I do like their bread flour, but decided to try this recipe with all-purpose (since not everyone has access to bread flour), and the rolls came out great. I think it will also work with bread flour.
Can I replace AP flour with 00 Italian flour?
Hi Barb, I'm not an expert in baking with 00 Italian flour. I know it's finer than AP flour, so it may not result in the same texture.
Recipe for the Que Sera Butter? Didn't come up when I did a search. Thanks!
Hi Cat, the orange butter and Ques Sera butter post will be coming up this week!
These look incredible! I get the stretch and fold, but there's no video, just so you know!
Looking for the video on stretch and fold
Thanks!
Pat
Hi Pat, I'm looking into this. For some reason, the video is not showing up on Safari but if you are on Chrome, it's there!
Thanks, Cat! Do you use Safari? I just looked and didn't see it with Safari but it shows up on Chrome. Not sure what's going on.
Can’t wait to try these! Would you mind sharing which type of kosher salt? I see fine and coarse ground options when shopping. Would Maldon flakey work? Thank you.
Hi Kim, I use Morton's kosher salt as that's what's available in our area.
I like all your recipes how do I get the labels. Thank You
Hi Theresa, the labels are available on this post- https://thecafesucrefarine.com/gourmet-compound-butters/