This post may contain affiliate links. For more information, see our privacy policy.
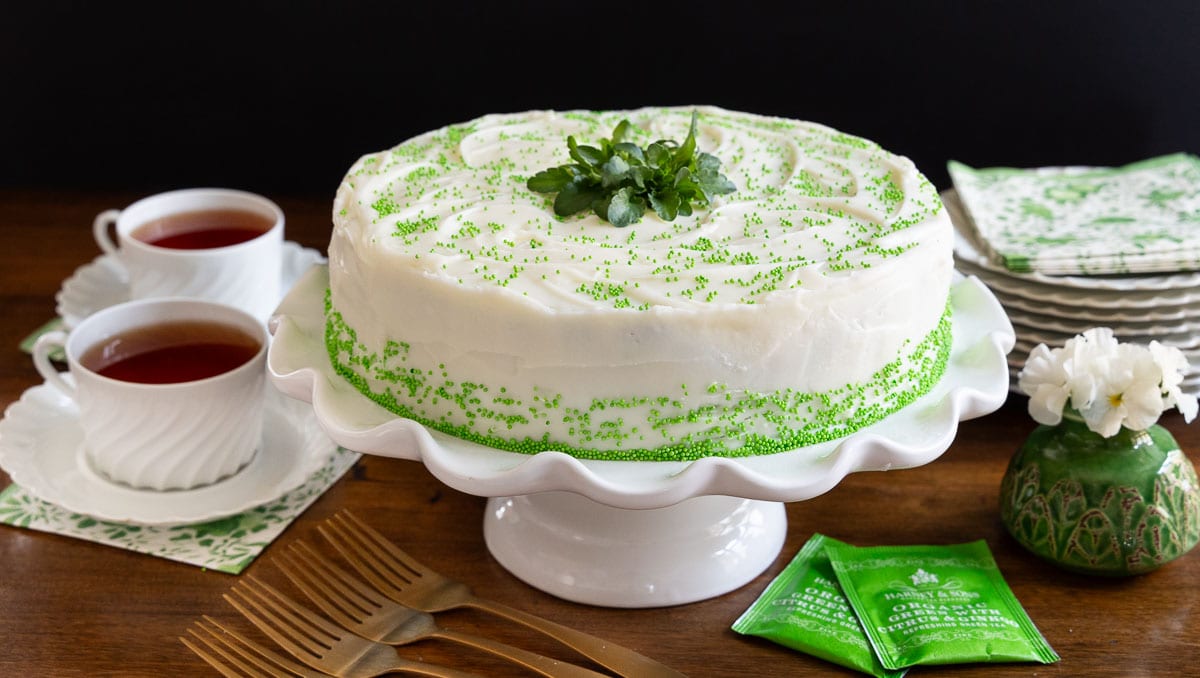
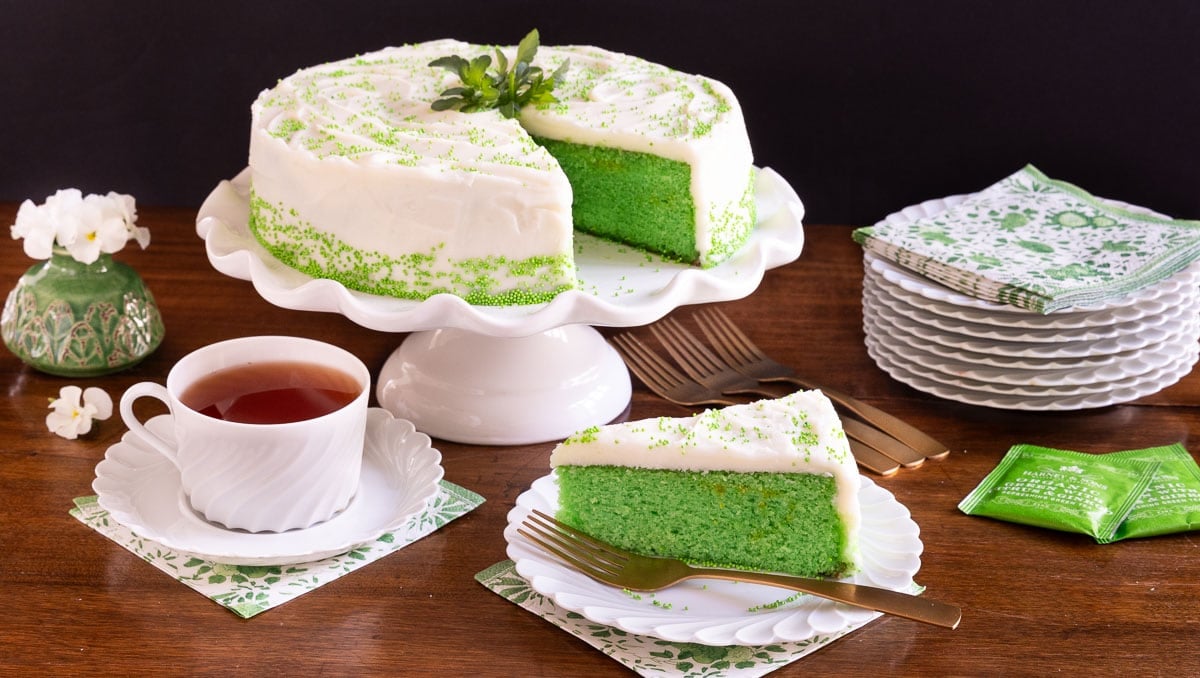
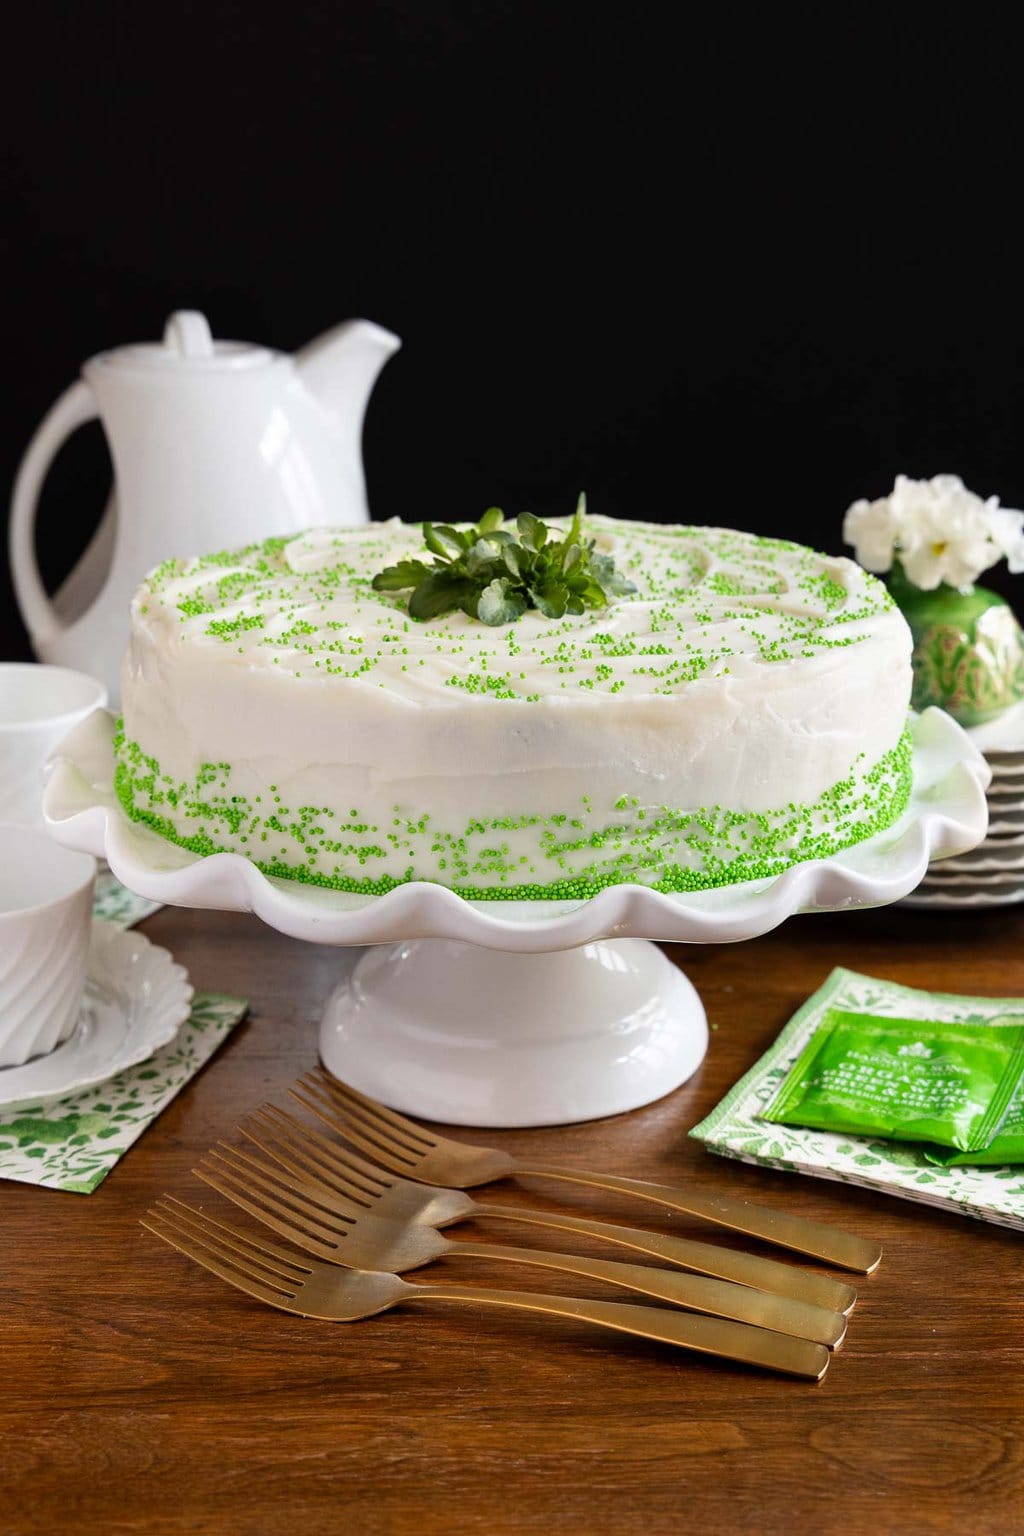
This Green Velvet Cake boasts a gorgeous color but the fine, smooth tender crumb and almond cream cheese buttercream are the delicious stunners!
You've probably heard of Red Velvet Cake but I'd like to introduce you to this delicious Green Velvet Cake. They're similar but different at the same time. This green rendition has a tender, velvety, fine crumb and a buttery cream cheese icing with a hint of almond. It's perfect for a St. Patrick's Day celebration and will make any spring occasion quite special. It also works for the Christmas season. I guess you could just say it's a fabulous, year-round dessert!
What is a "velvet" cake?
The experts at The Sun Flour Baking Company explain that "Velvet cakes first came into existence during the Victorian Era. It was during the 1800s that recipes would frequently call for the use of cocoa for luxury cakes. They would call the cakes "velvet" cakes and serve them at fancy dessert parties. The word velvet lets guests know the cake will have a smooth and soft texture."
Red Velvet Cake is known for its soft, tender texture and its deep cocoa-red color. In addition to the traditional cake ingredients of flour, sugar, eggs and butter, most Red Velvet recipes call for buttermilk, a splash of vinegar, cocoa powder and lots of red food coloring, often a whole bottle!
Green Velvet Cake
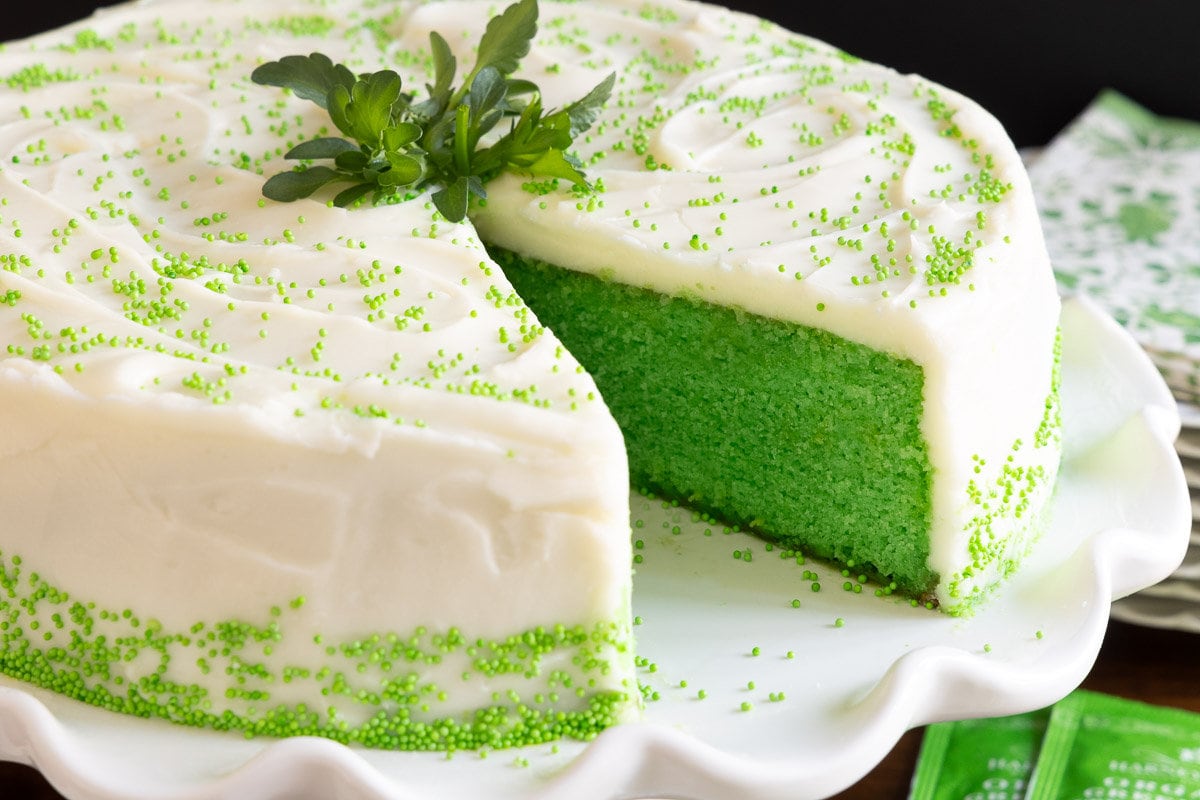
Similar to its red-hued cousin, this Green Velvet Cake has the same soft, tender crumb. The recipe includes buttermilk but there's no cocoa involved and just a few drops of green food coloring.
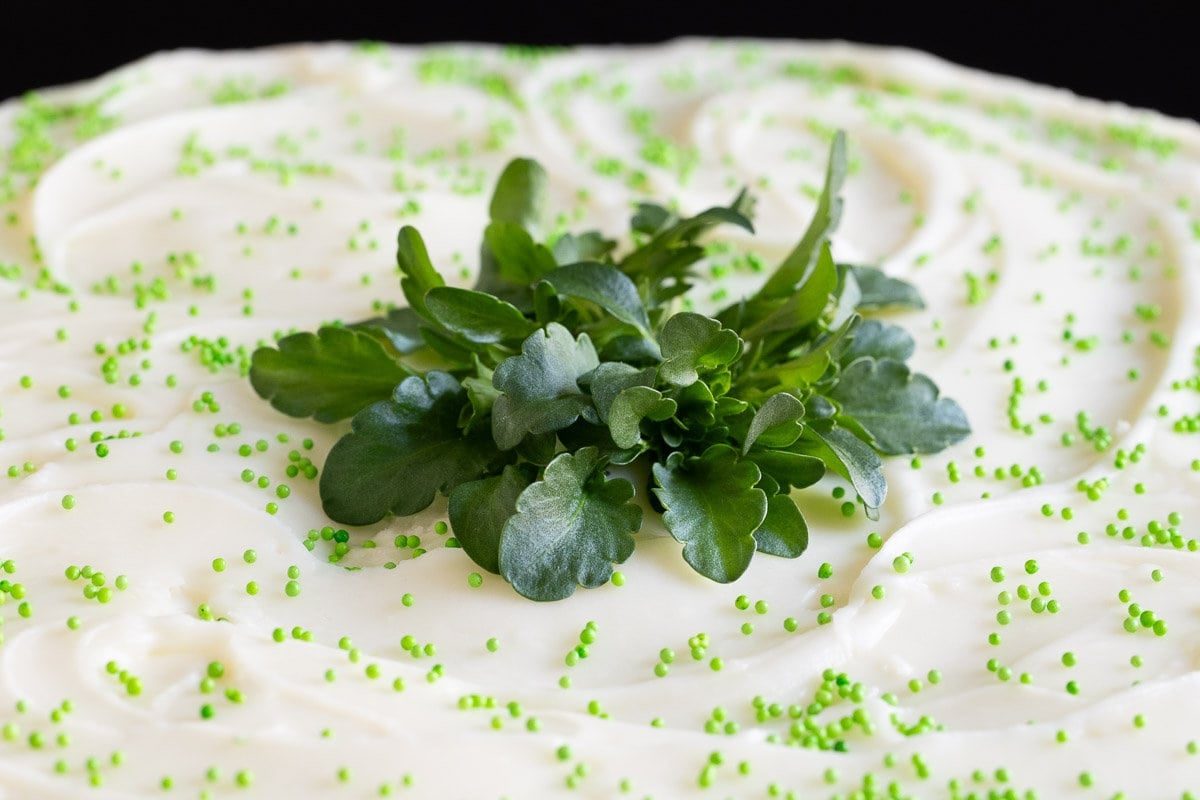
To me, this cake itself tastes like a really fine wedding cake, delicately sweet, with a soft, tender, velvety crumb. The silky almond buttercream... well let's just say it's the crowning glory!
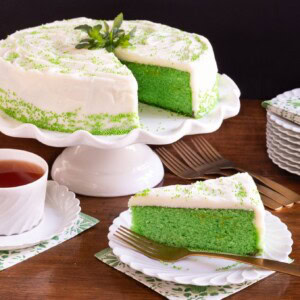
It's super fun to see the delight all around the table when you slice this Green Velvet Cake and guests get their first peek of the cake's beautiful grassy green interior. Of course, it's the first delicious bite that totally seals the deal!
What is cake flour?
This Pink Velvet Cake recipe calls for cake flour. Cake flour is a low-protein flour (7-9% protein vs. all-purpose flour, which has 10-12% protein. According to Food 52, "It's made by milling soft wheat that's low in gluten (not gluten-free) and sifting it until extra fine in texture". Because of its super fine texture, using cake flour instead of all-purpose yields deliciously tender baked goods with a super soft, super tender crumb."
Cake flour is available at most larger groceries in the same area as the other flour. Probably the most popular and widely available cake flour in the U.S. is Swans Down. Like all-purpose flour, if kept in an airtight container, cake flour is good for up to one year. If you store it in the fridge or freezer, it's good indefinitely!
I recommend using cake flour for this Green Velvet Cake but if you can't find cake flour or don't want to purchase it, there is a substitution. To lower the protein content of all-purpose flour, a small amount of cornstarch replaces an equal amount of flour. To make one cup of cake flour, add 2 tablespoons of cornstarch to a 1-cup measuring cup then spoon in all-purpose flour to mound over the top. Level any excess flour off with a flat-bladed knife and you've got yourself a cup of DIY cake flour!
Happy campers
Surprise your family, friends, guests, etc. with this out-of-this-world delicious Green Velvet Cake. You can whip up the cake batter quickly with just one bowl and a whisk. The same is true for the silky smooth almond buttercream.
Everyone will think you spent hours and you'll be sure to hear lots of "oohs", "aahs" and "mmms" from all around the table!
Cafe Tips for making this Green Velvet Cake
- You'll need a 9-inch cake pan with (at least) 2-inch tall sides. Most cake pans that are made these days have nice tall sides. If your pan has sides that are less than 2 inches tall, just fill the pan ¾ full and use a small loaf pan for the rest. There's a little bonus as you can freeze the small one or give it away!
- If you're in the market for a new cake pan, I LOVE these OXO Good Grip Cake Pans. I've had mine for several years, use them all the time, put them in the dishwasher and they still look like new.
- To ensure easy removal from the pan, be sure to spray your cake pan generously with baking spray (different than cooking spray as it includes flour to prevent sticking) then rub it with a paper towel to coat the pan. I like to then give the pan one more light spray.
- I also like to line the pan with a circle of parchment paper. This may seem like overkill but, you'll be super happy when you flip it out of the pan and the cake is perfectly intact and beautiful!
- I love these pre-cut parchment paper circles. They're reasonably priced, come in a pack of 100, last forever and save lots of time!
- Before baking this Green Velvet Cake, the last step is to add the egg whites to the batter, one at a time and whisk for 30 seconds after each addition. This is super important for a soft, tender cake texture. I set a timer with my Alexa so I don't cheat.
- Since this recipe calls for just the whites of 3 large eggs, I like to make this Ridiculously Easy Lemon Curd with the extra yolks.
- A good whisk is an essential kitchen tool, especially when making cakes, cookies, etc. that don't require a mixer, like this Green Velvet Cake. I love this whisk - it's a three-in-one and stores nice and flat.
- The buttercream recipe for this cake calls for half and half. For those of you living outside of the U.S., half and half is an American convenience product often used as a creamer for coffee. Half and half is half milk and half heavy cream.
- I use clear vanilla for this recipe. Clear vanilla is not pure vanilla extract but this one tastes good and has great reviews. It isn't necessary although it keeps the green color nice and pure.
Thought for the day:
In my vision at night I looked,
and there before me was one like a son of man,
coming with the clouds of heaven.
He approached the Ancient of Days and was led into His presence.
He was given authority, glory and sovereign power;
all nations and peoples of every language worshiped Him.
His dominion is an everlasting dominion that will not pass away,
and His kingdom is one that will never be destroyed.
Daniel 7:13-14
What we're listening to for inspiration:

If you enjoy this recipe, please come back and leave a star rating and review! It's so helpful to other readers to hear your results, adaptations and ideas for variations.
Scroll Down for the Recipe - or Save It to Your Inbox
We’ll email you the recipe so it’s easy to save, print, or share.
One-Bowl, No-Mixer Green Velvet Cake
Ingredients
For the cake:
- ½ cup very soft butter, I use salted
- 1½ cups granulated sugar
- 1 tablespoon vanilla extract
- ½ teaspoon baking soda
- ½ teaspoon baking powder
- ½ teaspoon kosher salt, I use Morton's
- 1 cup buttermilk
- 2 cups cake flour
- 3 large egg whites
- green gel or liquid food color, I use Wilton Leaf Green Gel
For the buttercream:
- 4 ounces butter, 1 stick
- 4 ounces cream cheese
- 1 tablespoon half and half , (or cream) maybe a bit more
- 1 teaspoon vanilla extract
- ¼ - ½ teaspoon almond extract
- 3 ½-4 cups powdered sugar, maybe a bit more
- nonpareils, for garnish, if desired
Instructions
For the prep:
- Preheat the oven to 350°. Spray a 9-inch cake pan (with sides at least 2 inches tall with baking spray.
- Line the pan with a circle of parchment paper. Line a sheet pan with foil. Set both pans aside for now.
For the cake:
- Stir the butter until light and creamy.
- Add the sugar and vanilla and stir again until well combined. (It will not be smooth and creamy at this point but instead thick with a sandy texture.)
- Add approximately ⅓ (doesn’t have to be exact) of the buttermilk and stir to combine. Then add approximately ⅓ of the flour and stir again. Repeat x 2 until all of the buttermilk and flour have been added.
- Add the baking soda, baking powder and salt and stir to combine.
- Add egg whites, one at a time and whisk vigorously for 30 seconds after each addition. Don’t cheat! I like to set a timer. After the egg whites have been whisked in the batter will be smooth and satiny.
- Add green food coloring, stirring after each drop until the desired shade of green is reached. (I used 5-6 drops.)
- Pour the batter into the prepared pan and smooth the top to an even layer with an offset knife or spatula.
- Pick the pan up, lift it a few inches above the counter and let it drop. Repeat this 3-4 times to bring any air bubbles to the surface. Let the pan sit for a minute or two then proceed with the next step.
- Bake for 35 minutes then pull up the foil around the edges of the pan to prevent the crust from getting too brown. Bake for an additional 10-15 minutes or until a toothpick inserted into the center comes out clean OR (best way to determine doneness) until an instant thermometer inserted into the center of the cake registers 200-210˚F.
- Cool for 20 minutes in the pan, then invert the cake onto a cooling rack. (The flat bottom of the cake now becomes the top.)
- Cool the cake completely before icing with the buttercream. While the cake is cooling, make the cream cheese buttercream (directions below).
For the buttercream:
- Combine the butter and cream cheese in a microwave-safe bowl. Cover with a damp paper towel or plastic wrap and cook on high power for 60-90 seconds or until the butter is melted and the cream cheese is very soft.
- Whisk the butter and cream cheese together until well combined and very smooth.
- Add one tablespoon of half and half (or cream), the vanilla extract and ¼ teaspoon of the almond extract. Whisk again until smooth. Taste and add more almond extract, if desired.
- Add 3 cups of powdered sugar. Whisk until smooth. Add more powdered sugar till you have a spreadable consistency. I usually go with a little looser consistency as it will thicken up a bit as you spread it on the cake.
To ice the cake:
- Transfer the cake to a serving plate or platter. Spoon out ½-¾ of the icing onto the top of the cake. With an offset knife spread a very thin layer of icing all over the top and sides of the cake. Add more icing as needed to cover the entire cake. Sprinkle with nonpareils while the icing is still wet, if desired.
- Spoon or scrape most of the remaining icing onto the top of the cake. With an offset knife, spread the icing to cover the top and sides of the cake. Smooth the sides and swirl the top with the back of a spoon, if desired. Sprinkle with nonpareils (optional). Allow the icing to set for 30-45 minutes before serving.
Notes
Nutrition
Shop Our Café Loves
We’ve gathered our favorite kitchen tools, tableware, and entertaining treasures in one place, the Café Loves store. It’s a wonderful spot to find something special for yourself or the cooks and hosts you love!


Chris, how did you get the decorations so neatly on the sides?
Hi Summer Day, here's a great video that demonstrates how to do that:: https://www.youtube.com/watch?v=fSbbjYDuQI8
Cake is festive and very moist. Recipe seems to stop mid-sentence. More?
Not sure what you mean, Maria?? The recipe is all there when I look at it.
Hi can I use all purpose flour instead
Hi Abbyloo, I recommend using cake flour for this cake as it creates a beautiful texture. That being said, if you check the post I share a sub for cake flour, using corn starch and all-purpose flour.
Can I reduce 1 1/2 to only 1 cup
Hi Abbyloo, You can try, however, the recipe was created and tested with the measurements provided so to ensure a successful result, it's best to stick to the recipe as given.
What can I sub the green dye for?
Hi Annie, you can leave it out if you prefer.
WOW! This cake is my new "go to" recipe. I made it this weekend and it got a thumbs up from my grandson and girlfriend. I didn't make the frosting because he prefers either a light glaze or pow square. It took longer to bake and because of that the rim of the cake was not as moist as the center although it was still delicious. Can I double the recipe and bake it in a 9 x 13 pan or three 8 inch round pans? I really have to make this for Easter. Thank you for all your recipes and most of all thank you for being such a wonderful person.
Hi Ann, so happy you enjoyed this recipe!
Regarding your questions, yes, either of those options will work!
I made this cake for St. Patricks Day dinner. My cake was light but dry. Not moist like I expect a cake to be. Although it baked up great and I used the buttercream recipe. Also I floured the sides of the pan after I coated it with butter instead of cooking spray which I think helped to protect the sides of the cake from getting too brown. I could hardly wait until after dinner to have a piece but I was disappointed, I wont be making this recipe again.
Hi Beth, sorry this recipe didn't work out for you. It's difficult to say what went wrong without having been there in the kitchen with you as this cake shouldn't be dry at all. I suspect something went awry.
This is a bit long but Hallelujah! I finally found a quick and delicious”homemade” cake recipe that is beautiful, versatile, and easy! I decided to make this after getting home late from work Wednesday night to take the next day for an employee who’s last day was the next day and thought it would be something a little festive for a sad day. Since it was late when I started it, I was tired but read the instructions first and made sure I had all the ingredients then threw on the apron. Everything was going well until I looked in the oven at the “2 cake pans” and and the 2 short layers and thought it was weird until I reread the instructions and realized it was a one cake pan recipie. Got them out of the oven a little early and thought shoot! It’s gonna be dry, Being tired and distracted I’ve found don’t always mix but made the best of it and when the cakes cooled, I had some leftover Dragon Fruit frosting I made the previous weekend for some macarons and used that for the layers and white Buttercream/cream cheese frosting on the top and sides and decorated it like yours and some Shamrock decorations on top. It was beautiful but prayed it wouldn’t be dry. Took it to work and placed it by the two beautiful and professionally decorated cakes that were already there, and guess what? That was the best cake there and it was gone before the luncheon was over, only one piece was taken from the other two cakes. This was the best ever and not one bit dry! The flavor was great ( I did add a tablespoon of the chocolate extract I had on hand to give it a little hint of green velvet flavor to make the Leprechauns happy) and the magenta color on the inside was great. Thank you for always posting recipes that are consistently easy and tasty. I can’t figure out how to attach the pic to this message so sent it separately.
Thank you for your review, Esther!
Should the egg whites be room temp or cold when adding to the batter? Thanks.
Hi MB, I take them out when I start the cake so they warm a bit but they're probably not room temp.
I had to smile reading the recipe instructions where it says: add green food coloring mixing after each drop until the desired color of pink is reached.” Sounds like a lovely Easter dessert. I’ll give it a try!
Haha! Thanks for the heads up, Olive! I will fix that now. We do have a Pink Velvet Cake as well!
This sounds delicious! I think I will make it for Easter meal we have after Church, I might decorate with some bunnies or something to tie it in to the Easter theme. The surprise everyone will have when it is cut open will be worth the wait I believe. I love a Red Velvet so am sure this will be just as wonderful! Thanks for all your recipes, I have made quite a lot of them for gatherings and they have all been so wonderful!
That's great, Cindy! So glad you're enjoying the recipes!
My grandson is allergic to eggs. Could I substitute egg replacer for the egg whites or do you think I should try another recipe? If substituting, thoughts on quantity?
Thank you! I love making your single layer cakes. They are perfect for our weekly family dinners!
Hi Judie, this cake really relies on the egg whites that are whipped in for its lightness and texture. To ensure success, it might be better to go with a different recipe.
Hi cafe sucre I have not made this recipe yet but I’m wondering if I could use a spring form pan?
Hi Karen, I think that you could use a springform pan if it has a good seal.
I want to make this cake for St. Patrick's Day, but I am not a good buttercream maker. I'm going to use a glaze instead. I was thinking about powdered sugar and citrus juice. Lemon or lime. Any other suggestions?
Hi Donna Jo, this buttercream is simple if you want to try something new! If not, this cake has a glaze recipe that would work- https://thecafesucrefarine.com/french-grandmothers-lemon-yogurt-cake/