This post may contain affiliate links. For more information, see our privacy policy.
If you think these festive Red, White, and Blue Shortbread Cookies look difficult, check out the video and you'll be a believer! They're one-bowl, no-mixer and super delish!
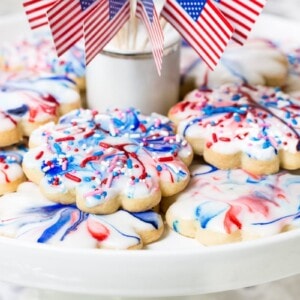
These Red, White and Blue Shortbread Cookies have to be one of the most fun and festive cookies to ever roll out the door of The Café! They're a perfect way to celebrate any of the American patriotic holidays, but can also be adapted to school colors, team colors or simply your favorite colors. They're much easier than you might think, making them a wonderful project to do with kids.

5 ingredient cookie dough
The cookie recipe is simple, with just 5 ingredients; butter, vanilla, powdered sugar, flour, cornstarch. The dough comes together in just a few minutes, in one bowl, with no mixer needed! The cutout cookies are chilled and then baked. When they roll out of the oven they're crisp, buttery and melt-in-your-mouth delicious!
The glaze is easy, but even more important, it's also super delicious! I'm not a big fan of pretty cookies that don't have good flavor.

Fun and easy decorating technique
Oh, and the decorating technique for these Red, White and Blue Shortbread Cookies? I know it looks a bit fancy and time-consuming, but that's not true on either count. I figured you might think I was spoofing, so Scott and I made a video of both the cookies and the icing technique, so you could see for yourself!
See what I mean? Easy peasy! And, as I said, they're a super fun activity to do with children (of all ages). Each cookie turns out totally unique, so everyone will be thrilled with their own personal creations.

Not American? Not a problem! You can make these fun cookies too and make them the colors of your flag. Or your school colors. Or your best friend's favorite colors. Or whatever colors you fancy!

Even easier!
Pinched for time? Although these shortbread cookies come together fairly quickly and are melt-in-your-mouth delicious, you could also use this decorating technique on plain store-bought sugar cookies. No one has to know you cheated just a bit! Ready to celebrate? Make the occasion beautiful with these Red, White and Blue Shortbread Cookies and wait for the ooohs and aaahs!

Café Tips for making these Red, White and Blue Shortbread Cookies...
- Because there's no mixer used, the butter needs to be very soft when mixing up the dough for these cookies. Just let the butter sit out for a few hours. If you forget, a short stint in the microwave on power level 10 (10%) works like magic to soften butter. You'll need to experiment a bit with your microwave though, as they're all different. Start with 20 or 30-second increments at power level 10 until you learn how long your microwave will take to get the butter nice and soft, but not melted.
- I used fresh lemon juice in my glaze. Feel free to use other flavorings. Almond, vanilla, orange, lemon and coconut extracts are also delicious.
- Flavor extracts can vary in intensity. It's better to start with a small amount in the icing, then take a little taste. You can always add more, but you sure can't remove it!
- A few tips on rolling and cutting out cookies:
- Keep your work surface and rolling pin lightly dusted with flour.
- I also like to rub the cutting edge of my cookie cutter in a little flour in between each cookie.
- Press fairly firmly when cutting out the cookies, but don't twist the cookie cutter as the shape will get distorted.
- If you don't have room in your refrigerator to chill the cookies on two sheet pans, just transfer all of them to one pan after cutting. Then later, once they're chilled, you can divide them between the two pans for baking.
- When re-rolling the scraps, incorporate as little of the flour on the work surface as possible.
- Occasionally, some of the cookies will be slightly puffed on the top when removed from the oven. You can give them a nice flat top by pushing on the top gently with a metal spatula.
- Sometimes the glaze for these cookies will have lots of bubbles. These bubbles will cause imperfections in the surface of the glazed cookies. Simply stir the glaze very slowly to get rid of the bubbles.
- I use red white and blue sprinkles AND red white and blue nonpareils on my cookies. Feel free to use one or both of these fun decorations.
- I love these pre-cut parchment paper sheets when making cookies. They are the perfect size for a cookie sheet pan and also come in a nice flat box for easy storing. This 100-pack will last forever - and save you some time and hassle.
- Don't roll these Red, White and Blue Shortbread Cookies too thin, otherwise, they will be difficult to dip into the glaze when decorating. I roll mine to a ⅜-inch thickness and use an adjustable rolling pin. How do you roll them to the desired thickness? This reasonably priced rolling pin is a super-easy way to achieve the same perfect thickness for all your cookies. It has 1/16, ⅙, ¼, and ⅜-inch removable discs, making it easy to flatten your dough to a uniform thickness. Have a baker on your gift shopping list? This would make a lovely present that can be used year-round.
- When dipping the cookies in the glaze, let them drip in a separate bowl. That will keep your glaze from getting murky and your patterns less dramatic. (See drip bowl on the right in the image below.)

- Allow these cookies to dry on a wire rack for an hour after glazing, then store in an airtight container.
- Cookies can also be frozen. Thaw on a sheet pan for an hour or two before serving.
- We've got lots of other glazed shortbread cookie recipes for other holidays and occasions. Check all of them out here.
Thought for the day:
No one is like you, Lord;
You are great,
and Your name is mighty in power.
Jeremiah 10:6
What we're listening to for inspiration:

If you enjoyed this recipe, please come back and leave a star rating and review! It's so helpful to other readers to hear your results, adaptations and ideas for variations.
Scroll Down for the Recipe - or Save It to Your Inbox
We’ll email you the recipe so it’s easy to save, print, or share.
Red White and Blue Glazed Shortbread Cookies
Ingredients
For the cookies:
- 8 ounces very soft butter, (2 sticks)
- ½ cup powdered sugar
- 1 teaspoon vanilla extract
- 1 ¾ cups all-purpose flour
- ¼ cup cornstarch
For the lemon glaze:
- 2 cups powdered sugar
- 2 tablespoons half and half or milk, maybe more
- 2 tablespoons fresh lemon juice
- red, white and blue sprinkles, optional
Instructions
For the cookies:
- Line 2 sheet pans with parchment paper. Set aside.
- Place soft butter in a medium-size mixing bowl. Stir with a wooden spoon or sturdy spatula until nice and smooth. Add powdered sugar and vanilla. Mix together by hand for about 30 seconds, until fluffy and well blended.
- Sprinkle the flour and cornstarch evenly over the top. Stir until flour is incorporated and the dough is shaggy.
- Turn out onto a lightly floured surface and press dough in a ball. Knead a few times until smooth, then form into a ball again and press with your hands into a flat disk.
- On a lightly floured work surface, roll out dough to a ⅜-inch thickness. Keep work surface, dough and rolling pin lightly dusted with flour. Cut out cookies and place on prepared pans. Re-roll scraps as many times as needed to use up the dough.
- Place cutouts in the refrigerator for at least one hour or up to 24 hours.
- When ready to bake, preheat oven to 350˚F. Remove cookies from the refrigerator and bake for 12-16 minutes or until just beginning to turn golden at the edges. Rotate pans halfway through for even browning. Cool completely before glazing.
For the glaze:
- Combine powdered sugar, half and half and ¼ teaspoon lemon (or your favorite flavor) extract in a medium-size bowl. Mix until smooth. The glaze should be thick but pourable. Add a little more half and half if too thick. Taste the glaze and add more extract, if needed (see the note above in the post).
- Transfer half of the glaze to a small bowl. With a toothpick, add a small amount of red and blue gel food coloring and swirl it just a bit. Don’t swirl too much or the icing will become murky. Use a light hand with the gel food coloring. A little goes a long way!
- Dip one cookie at a time into the glaze. Let the cookie sit on the top of the glaze and gently push down at all the edges to ensure the surface of the cookie is covered with the glaze. With your thumb and forefinger, pull the cookie out of the glaze and allow the excess icing to drip off into a separate bowl. Then quickly flip the cookie right side up and give it a gentle jiggle to allow the glaze to flow evenly over the surface. Repeat with remaining cookies. (See video above for a demonstration of this technique>)
- Add more of the white glaze to the bowl when needed. Repeat adding more gel coloring as needed.
- Sprinkle with red, white and blue sprinkles (or other colors) while wet, if desired.
- Allow the cookies to dry on a wire rack for at least 2 hours after glazing, then store in an airtight container.
Video
Notes
The recipe makes 15 large (3-inch) or two dozen smaller (2-inch) cookies.
Once cookies have been dried for several hours, they can be stacked in an airtight container.
Nutrition
Shop Our Café Loves
We’ve gathered our favorite kitchen tools, tableware, and entertaining treasures in one place, the Café Loves store. It’s a wonderful spot to find something special for yourself or the cooks and hosts you love!


I love this dough recipe! I've used it for the Christmas shortbread and everyone raved about how great they tasted and pretty they looked. Just wondering if I make these and put the glaze on, can I then freeze them before travelling with them? Thank you
Hi Jennifer, I'm so happy you have enjoyed this recipe!
Regarding your question, yes, I have made them and frozen them with good success after thawing.
Where do you get the sticks that helps you roll the dough so it’s all the same depth? Thanks
Hi Laurel. you can buy different size dowels at hardware stores or big box stores like Lowe's and Home Depot. A while back, I discovered this rolling pin which I like even better: https://amzn.to/3wZzlZD
I have enjoyed so many of your recipes, and this ranks right up there with my all-time favorites. You are so very right about pretty cookies with no taste. Such a waste. However, these shortbread cookies really do taste as good as the cookies look. For our family reunion, I made an "H" cookie cutter to represent our last name and also had a cookie cutter in my stash in the shape of West Virginia, our beloved home state. Using yellow and blue gel coloring - our state colors - for the icing complimented the theme perfectly. The hint of fresh lemon was so very good. I made these two days prior to the reunion, kept them frozen until the day of the reunion, packed them well and then drove two hours to the picnic. These cookies traveled well and held up to the July heat - - although they didn't last long because they were such a hit! If I could attach a photo, I would certainly do so. Please keep your wonderful recipes coming!
That's awesome, Julie! Thank you for letting us know!
Help! I have made these before and they were great. But today they are not coming together at all. They just stay crumbly. I have made two recipes and both are the same. Thoughts?
Hi Mary, I'm sorry you've had trouble with these cookies but it's difficult to say why the dough is crumbly without having been right there in the kitchen with you. With two sticks of soft butter and just 2 cups of flour, the dough should not be crumbly. I'm honestly not sure why they're not coming together this time.
The recipe calls for 1-3/4 cups of flour, should I have sifted the flour and then measured? I am so disappointed. I have 200 cookies to make and wanted so badly to use this receipt. I Have it in the fridge thinking it may come together.. It is is in a ball, sort of, but when I try to roll it, it falls back to crumbs.
That is so strange. I've made this recipe dozens of times and never had it be crumbly. When I said 2 cups of flour, I was including the cornstarch. I do not sift the flour.
I would try kneading it a bit and see if it doesn't come together. You could even add a tiny bit of water and see if that helps.
Hi Chris, I just love your blog. I have never made a recipe of yours that has been a dud! Did you purchase your pretty cookie cutter for these cookies on amazon? I love the scalloped shape.
Thank you, Donna! That makes me happy 🥰
Regarding your question, this is the cookie cutter: https://amzn.to/3w3CIwm
Delicious cookie. I have made them several times with a variety of color combos. For the 4th last year i put each cookie on a long candy stick and tied r,w & b ribbons on each. They were a huge hit.
What a delicious cookie! I decided on orange extract for the icing. Fantastic. Not sure if I made my icing too thick but it doesn't really harden. Like another reviewer, I did not achieve the crispness of color but more a marbling effect. Still pretty though. I used a star-shaped cookie cutter which made them super patriotic. I chilled the dough overnight and needed sprinkling of flour throughout the rolling process. I absolutely love everything about this recipe. Thank you.
Your cookies sound beautiful, Maria. You might need to just let them sit out a little longer to harden
I am super excited to try these as Valentine's Day cookies with my 11 year old niece. I was just hoping for some clarification, please. In the printed directions, there is no mention of chilling the dough when it's in the ball. In the video, it reads to chill while it's in the ball. Also, the printed version reads to chill after the cut outs are made, but the video does not call for chilling after the cut outs have been made. In an older post for your Glazed Shortbread Cutout Cookies, you wrote to chill in the ball form and after the cut outs are made. If you could please clarify, it would be most appreciated!
Thank you!
Hi Valerie,
You're very observant! 🙂 You're totally right, the video does show chilling the dough as a ball. This was one of the earlier swirled shortbread recipes I posted. Since then, I've done many more and found that this dough is easy to roll without chilling. But it does really help the cookies to keep their shape in the oven if you chill them after they're cut out. So I've switched my technique but I couldn't really change the video yet. Hope that helps and have fun making these cookies. You're creating wonderful memories for your niece!
Thank you for the extremely fast response and the clarification!
You're welcome! One last thing, if your dough is soft when you're trying to roll it, just knead it with a little extra flour on the counter and it will roll just fine. Some butter has a little more water content than others so it can vary a bit.
Thanks for the tip!
Wow, wow and wow!!! Great taste, clear instructions, and a ton of fun! My niece and I enjoyed making, baking and decorating these cookies. She actually preferred dipping the cookies in plain glaze and then decorating by hand using cocktail sticks dipped into gel food coloring. I preferred dipping into glaze with the food coloring added, as your video instructed. I would like to add a picture so you can see our finished product, but I don't see an option for doing so. We are already planning on doing these for upcoming holidays. Thank you for a wonderful recipe!!
Made this a few years ago (using your recipe) and there was no cornstarch in the recipe. Also, it was mixed in electric mixer. Will this recipe be much different?
Love your recipes and thank you.
Hi Rosemary, you are very observant! You're right, I did change the recipe. My recipes are ever-evolving and I discovered that these cookies could be even easier to make without a mixer. And a little cornstarch helps the cookies to keep their shape in the oven better and it makes the cookies crisper!
We made these cookies for our July 4th celebration. My niece and granddaughter had lots of fun decorating them. Though they didn't look as pretty as yours, everyone enjoyed. This was another great recipe of yours to add to our collection. Thanks so much.
That's awesome, Linda! I love that the children enjoyed decorating them. I'm sure they were beautiful!
I love all your cookie recipes, and am requested to bake them for all family gatherings, as I was again for the Fourth of July. However, I have a problem with the icing. I made it just as you said, and showed in the video, careful not to add too much food coloring and not to swirl it too much. I did use the gel food coloring. I also had a separate bowl for dripping. However, when I put the cookie down into the bowl, the color seemed to drop down into the frosting. I could not get the vibrant streaks of color that you produced. I thought maybe my frosting was too thick, so I thinned it some. No luck. Thought maybe it was too thin, so I thickened it some, no luck. I ended up with more of a marbling effect. They were pretty and tasted great, and everyone loved them, but they didn't look like yours and I was wondering if you might know what I did wrong? Thanks so much, and I love all of your wonderful recipes!
LOVE shortbread! And these are just gorgeous -- terrific decorating job. Perfect for the 4th! Thanks.
They look delicious and also very easy to make. Thanks, for sharing the recipe, will definitely try them.
Thanks, Vandana! Enjoy!
So fun! And so perfect for the 4th of July holiday Chris! I've never met a shortbread cookie I haven't loved!
These are beautiful and look so easy! I love a one-bowl, no mixer cookie! Thanks for another great recipe!
What size cookie cutter did you use, 3 3/4 or 2 1/2??
Hi Linda, I use different sizes, depending on my mood 🙂 but for these, I used a fluted 3-inch cutter.
Hi! These cookies are beautiful I wanted to ask if you use salted or unsalted butter in this recipe?
I know this might sound sacrilegious to some, but I almost always use salted butter. I'm with Christopher Kimball in this article: https://www.facebook.com/cpkmilkstreet/posts/1881169672116091:0
These are a great way to end summer along with the other great recipes you shared. It's been a delicious summer at the Cafe and I'm looking forward to lots of fall inspiration!
I can't believe it's July 8 already! I am definitely pinning these for future reference, Chris! So adorable and festive!
So adorable and festive for the 4th! Hope you had a great holiday! 🙂
Aren't these cookies festive. They remind me of Spin Art with all the swirls - how fun!
These are stunning, and perfectly executed, of course, because they come from
the cafe'! I love how you've customized the concept for different occasions!
These are the prettiest patriotic cookies I've seen. The video is wonderful, what a helpful tool! Happy 4th to you!!
What beautiful cookies, perfect for your celebration!
Oh Chris, your cookies are so red white and blue pretty!! I just LOVE the abstract glaze! I just made the ugliest red white and blue monkey bread concoction, it looks like a hot mess but it tastes good so you might see it referred to as the exploding firecracker cake in the future! Happy 4th!
Such a fun decorating technique! I'm glad there's no piping or flooding involved plus they're so pretty! I bet Scott has a bunch of fun patriotic songs that he sings to/with all your grandchildren 🙂
These are just perfect, festive cookies and I love the video that shows just how easy they are to make! Happy July 4th Chris!
They are so pretty and festive!
Thank you so much for all your wonderful recipes.
I have to have these cookies for the 4th of July.
I love your blog. It is always my go-to when I need
something special. Also, loved hearing your travel
stories. Ps. Will make them for all special occasions!
Beautiful! They look just like bite-sized fireworks! I was awed by the single color swirls you did earlier this year and am even more impressed with these multi-colored patriotic swirls!
Hi! want to try these....have a grandson allergies to eggs, so no eggs in recipe....he is also
gluten intolerant....could I sub another flour and have same results?? thanks!!!
Hello Suzanne, you will have so much fun making these cookies. I haven't tried them with a gluten-free flour but this recipe looks wonderful and you could use the same icing technique on them. http://www.glutenfreebaking.com/how-to-make-gluten-free-shortbread/
Happy 4th! How cute:) Thank you!
They are gorgeous! And I would never have thought of dipping them! Perfect!
How long does this frosting take to set up? Will I be able to stack them?
Hi Karen!
You can definitely stack them once they're dry but I would let them sit on a wire cooling rack for at least 2 hours before stacking.
How fun!!!! I want to make these 🙂 I bet they are tasty too. Have a wonderful July 4th weekend Chris!
You beat me to it Chris! These look delicious. I'm hoping to make some with the neighborhood kids at the beach over the holiday weekend! Love shortbread! Yours are gorgeous!
I'm will make these cookies with my eight year old granddaughter this week when she visits, but have question about dowel size, 3/8 inch or 1/4 inch as mentioned in recipe. Is 3/8inch just your preference?
Hi Sandy,
For these cookies, a 3/8-inch dowel is actually better. You want a little thicker cookies so you can keep a grasp on it while dipping the cookies in the glaze. I will change that in the recipe, thanks!