This post may contain affiliate links. For more information, see our privacy policy.
Need a fabulously festive holiday dessert? This ridiculously easy, ridiculously delicious Candy Cane Sheet Cake never fails to bring "WOWS"!
Everyone who tries this Candy Cane Sheet cake has a similar reaction with the first bite. There's a brief moment of silence and then a little murmur... "Oh my!" or "Wow!" or "This is amazing!". What's amazing to me, is that something so delicious, fun and festive could be so easy throw together with just one bowl, no mixer in less than 10 minutes.

No leftovers
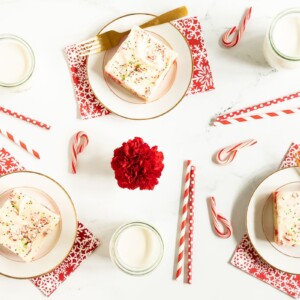
This Candy Cane Sheet Cake is the perfect dessert to take to a party, potluck or work gathering as it's easy to transport and it feeds a crowd. Just a little warning - don't promise to bring leftovers back home as this cake will disappear in the blink of an eye!

A sheet pan cake aficionado
If you've been following The Café for any length of time, you will probably recognize this recipe. It's our classic buttermilk sheet pan cake recipe that we've simply dressed up in new holiday clothes. I'm a big fan of this one-bowl, no-mixer recipe as it takes less than 10 minutes to throw together and the results are always fantastic. It's the basis for our Caramel Buttermilk Sheet Cake, our Lemon Poppyseed Sheet Cake, our Butterscotch Sheet Cake, our Funfetti Sheet Cake and our Vanilla Bean Sheet Cake with Fresh Strawberry Icing.
I guess you could call me "a repeat record", "a stick in the mud", "the queen of sheet pan cakes" and/or "a sheet pan cake aficionado" but, as my mom used to say, "If the shoe fits, wear it!". I'll take all of those names as it's totally true, I am a HUGE fan of these ridiculously easy, ridiculously delicious, no-fuss cakes.
Ridiculously Easy
Speaking of ridiculously easy, we actually have a whole collection of recipes here at The Café that proudly boast this descriptive name. You can read more about our Ridiculously Easy recipe here and check out the whole collection in this post but my super condensed description of this category of recipes is "recipes that make you look like a kitchen rock star with minimal effort on your part".
What size pan should I use for this cake?
For years, I made my sheet pan shakes in a standard half-sheet cake pan (13x18 inches) but a while back, I noticed that most recipes for sheet pan cakes called for a smaller pan (15x10) often called a jelly roll pan. Although my cakes turned out great in the half-sheet cake pans, they were always quite thin.
I decided to try the smaller pan and loved the slightly taller results. Now I always use a jelly roll pan to make my sheet pan cakes as the smaller pan is also a little easier to transport. All this to say, both size pans work, so don't feel like you need to run out and purchase a new pan. But if you prefer a thicker cake, go with the 15x10, it works great!

Lots of peppermint flavor
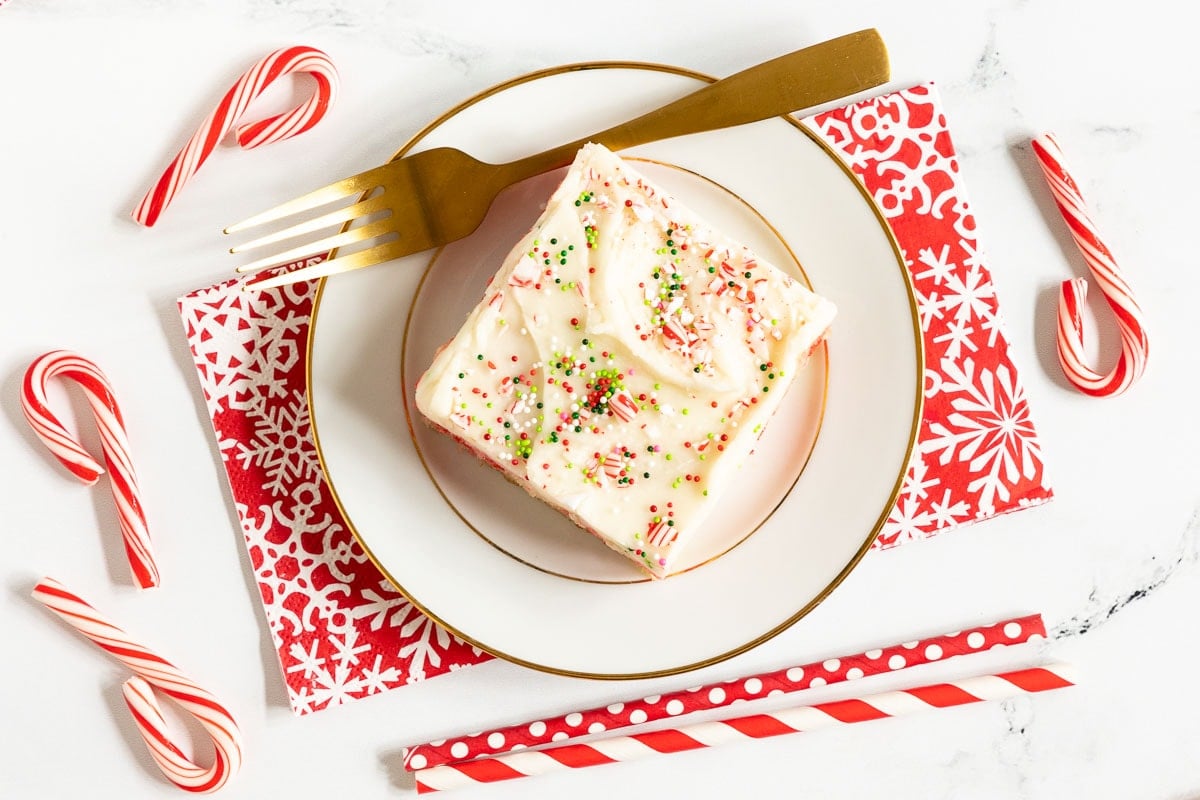
This delicious Candy Cane Sheet Cake has several layers of peppermint flavor. There's a dash of peppermint extract in both the cake batter and the icing. The cake is also sprinkled with crushed peppermint for a crunchy, pretty garnish.
Just a little warning though... some peppermint extracts are quite strongly flavored so be cautious when using it. A little goes a long way! I call for a half teaspoon in both the cake batter and the icing. I would advise to start there, take a little taste and add more if you prefer a stronger mint flavor.
A swirl of candy cane
I like to add a swirl of red to the batter when making this Candy Cane Sheet Cake.

It's an optional but easy step; simply remove a half cup of the batter before pouring the rest into the pan. Add a half teaspoon (or more) of red food color then drop spoonfuls of this red batter on top of the batter in the pan. Swirl it a few times with a table knife for a festive candy cane presentation. Again, this is an optional step. If you're in a hurry, just skip it. The cake will still be fabulously delicious!

Put this Candy Cane Sheet Cake on your holiday baking list. I promise you won't be disappointed!

Café Tips for making this Ridiculously Easy Candy Cane Sheet Cake
- This recipe calls for buttermilk. If you don't want to purchase buttermilk, just for this recipe, you could substitute an equal amount of yogurt or sour cream.
- You can also make your own buttermilk. Just add 2 teaspoons of white vinegar to a measuring cup and fill the cup to the one-half marking with milk. Stir well, then wait 5 minutes and stir again. Use this in place of the buttermilk.
- I use salted butter to make this Candy Cane Sheet Cake. If only have unsalted butter, add an extra ¼ teaspoon of salt.
- Although you can use any type of stirring implement for this Candy Cane Sheet Cake, a whisk works really well. If you don't have a whisk in your cooking collection, it's a really handy kitchen tool to add. A good whisk is not expensive and can be used for quickly stirring lots of things and gets the lumps out with minimal effort.
- As mentioned above, you can use a standard half sheet pan for this recipe OR a jelly roll pan. I really prefer using a jelly roll pan as it yields a thicker cake and thicker icing.
- As mentioned above, be cautious when using peppermint extract as it can be quite strong. Start with less, you can always add more.
- The batter for this Candy Cane Sheet Cake is quite thin in comparison to other cake batters. I really like this LorAnn Peppermint Emulsion/Extract.
- As you may have noticed in the pictures above, I like to add a few green and red non-parleils in addition to the crushed candy cane for a festive garnish. If you prefer, just use the crushed candy cane.
Thought for the day:
But the angel said to them,
"Do not be afraid. I bring you good news
that will cause great joy for all the people.
Today in the town of David
a Savior has been born to you; He is the Messiah, the Lord."
Luke 2:10-11
What we're listening to for inspiration:

If you enjoy this recipe, please come back and leave a star rating and review! It's so helpful to other readers to hear your results, adaptations, and ideas for variations.
Scroll Down for the Recipe - or Save It to Your Inbox
We’ll email you the recipe so it’s easy to save, print, or share.
Ridiculously Easy Candy Cane Sheet Cake
Ingredients
For the cake:
- 1 cup butter, I use salted butter
- 1 cup water
- 2 cups sugar
- 2 large eggs
- ½ cup buttermilk
- 1 teaspoon vanilla extract
- ½ teaspoon peppermint extract
- 1 teaspoon baking powder
- 1 teaspoon salt
- ¼ teaspoon baking soda
- 2 cups all-purpose flour
- ½- 1 teaspoon red food coloring, optional
For the icing:
- ½ cup butter
- 1 teaspoon vanilla
- ½ teaspoon peppermint extract
- 3 ½ cups powdered sugar, maybe more
- 3-4 tablespoons half and half, maybe more
- ¼ cup crushed candy canes or peppermint candy
- red and green non-parleils
Instructions
For the cake:
- Preheat oven to 375˚F. Spray a 10 x 15 jelly roll pan or a sheet pan generously with baking spray and rub with a paper towel to coat all surfaces. Set aside.
- In a medium-large microwave-safe bowl, combine the cubed butter and water. Microwave on high for 2 minutes. Most of the butter should be melted. Remove from the microwave and stir until the butter is completely melted.
- Add the buttermilk and sugar, then whisk until well combined. Add the eggs and whisk again.
- Add the vanilla and mint extracts, baking powder, baking soda and salt, and stir to combine.
- Add flour and whisk until smooth and lump-free. It will seem lumpy at first, but keep stirring. It will get nice and smooth. The batter will be thin.
- OPTIONAL If making the optional red candy cane swirl (pictured in the post above), remove ½ cup of the batter to a small bowl. Add ½-1 teaspoon of red food color to achieve the hue desired. Stir well. Transfer the remaining batter to the prepared pan. Drop the red batter over the top in spoonfuls. Swirl a few times with a table knife. Don’t swirl too much or the cake will turn pink. Proceed with steps 9 and 10.
- If not using the optional swirl technique (step 7 above) transfer all of the batter to the prepared pan.
- Bake until golden brown and a toothpick inserted in the center comes out clean, 18-25 minutes.
- Cool on a wire rack for 30 minutes before icing:
For the icing:
- While the cake is cooling, make the icing. Place the butter in a medium-large microwave-safe bowl. Microwave on high power for 1 minute or until the butter is melted.
- Remove from the microwave and add the vanilla and mint extracts, 3 tablespoons of the half-and-half and 3½ cups of powdered sugar. Stir until well combined. Add more half-and-half or powdered sugar if needed to make a smooth, spreadable icing.
- After the cake has cooled for 30 minutes, transfer the icing to the center of the cake and spread to the edges (an offset or angled cake spatula works well for this). While the icing is still wet, use the back of a small spoon to make pretty swirls. Sprinkle with crushed candy cane and green and red non-parleils, if desired.
Notes
Nutrition
Shop Our Café Loves
We’ve gathered our favorite kitchen tools, tableware, and entertaining treasures in one place, the Café Loves store. It’s a wonderful spot to find something special for yourself or the cooks and hosts you love!


Chris,
I love all of your Ridiculously Easy cakes. They are all so delicious. Can this Candy Cane Cake be frozen after baking?
Thanks so much, Jo! That makes me happy 🥰
Regarding your question, yes, this cake freezes well!
I made this delicious and “oh so easy” cake with my 8 year old granddaughter. Not only was it fun to make and incredibly good, but also easy enough for her to do most of the cake filling and frosting herself. She frosted and decorated it paying very close attention to the picture. It was a winner, and made for a very happy baking experience together. Everyone loved it. I can’t wait to make more of your sheet cakes! Oh, and I purchased the jelly roll pan you recommended and love it. Thanks so much!
I love that, Sandra! Thanks for taking the time to let us know!
After baking and icing the cake should I put it in the refrigerator or is it best to leave it on the counter? If on the counter, how long can the cake sit out? I made the cake for an event tomorrow.
It can sit out until tomorrow! Enjoy!
Thanks for your reply to my question.
The cake was so easy to make and it was delicious! My 4 yr old grandson's comment "Yum! Grammy this cake is good!".
I love that!
I saw the "goof on #4...no biggy.. we all make little goofs once in a while.bbWe re all human...
Donna
PS
I goof up on adding my stars!!! Alot
I too saw the step 4 mix up. But figured it was just that, a mistake. We are all human and computers even make 'goofs' no biggy!!1
Donna
Hi Chris, I can’t see the toggle button above instructions? Thanks for all your recipes and hope you have a lovely Christmas with your family!
Thank you, Karen! I will do that now.
Since it sounds like you cook with metric measurements, I have a question for you. Is it better to go with milliliters or grams for the liquid measurements? I'm never sure which one is more helpful since I don't cook with metric for the most part.
I'm not Karen but am a metric cook. I find grams more helpful (more precise) - milliliters can work also, especially if it's just small amount like 5ml (=1 tsp) or 30ml (=2 tbsp) but if something is for example like 135ml then it becomes a bit tedious.
Lovely site btw. I will try making this sheet cake for my family.
Thanks, AK!
As noted above, step 4 is a head scratcher.
Not sure how that got in there! I have removed it, thanks!
There's something wrong with Step 4.