This post may contain affiliate links. For more information, see our privacy policy.
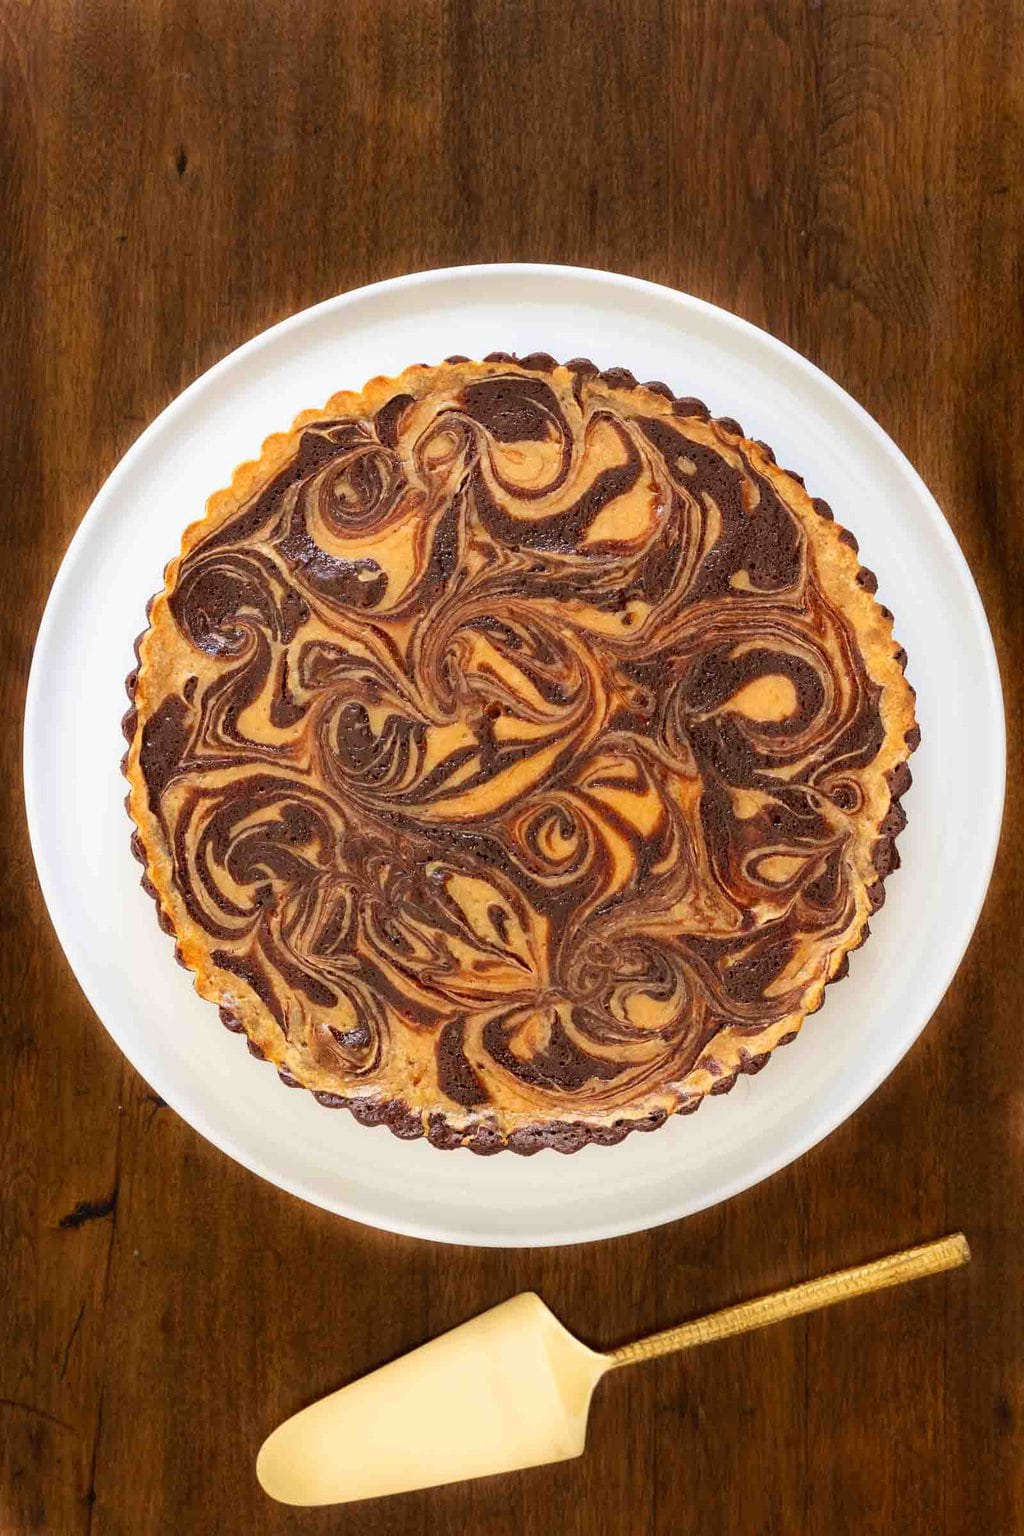
This fabulously delicious Caramel Cream Cheese Brownie Tart is ridiculously easy to make, comes together in minutes and looks like a work of art from a fancy bake shop!
Had you been a little mouse, hanging out in my kitchen a few weeks ago, I'm pretty sure you would have laughed your furry little head off. It was the first time I was testing this Cream Cheese Brownie Tart. When I peeked into the oven towards the end of the baking time, I let out a little squeal and said right out loud (even though no one else was home), "WOW, WOW, WOW"! It was so beautiful and the mouth-watering aroma that greeted me was intoxicating!

I adapted this Caramel Cream Cheese Brownie Tart from an Epicurious recipe that came through my email earlier this fall. The picture of the pretty dessert captured my attention but the name had me a little confused; Cajeta Cream Cheese Brownie Tart. Cajeta? What in the world is that? I clicked on the link to find out.
The article explained that "cajeta is related to caramel but is a much closer cousin to dulce de leche. It's luscious, sticky, and so sweet." It goes on to say that cajeta "is essentially goat's milk that has been reduced to a very thick and viscous syrup that you can enjoy as a topping on your favorite desserts." The recipe included a link for purchasing cajeta on Amazon.
A general rule of thumb for me, when creating new recipes, is that I have to be able to find the ingredients at my local, small-town grocery store. So a fancy caramel sauce like cajeta wasn't going to cut it. But still quite smitten with the beautiful brownie tart, I decided to try it with my homemade Caramel Sauce.

The result was crazy delicious and just as pretty as the Epicurious dessert! I've also tried it with a good quality grocery store-bought caramel sauce and also with purchased Dulce de Leche. Both substitutions worked well and the tarts have brought rave reviews from everyone who's tried them.
In addition to cajeta, the Epicurious recipe calls for a special Mexican chocolate. I've found that regular semi-sweet baking chocolate works great for this Cream Cheese Brownie Tart.
Lastly, after testing the recipe a few times, I found that the directions were a little more complicated than necessary so I streamlined the direction for my adaptation.
Ridiculously Easy
If you're new to our website, you might not know that Ridiculously Easy is one of our trademarks here at The Cafe. Yep, we have an entire (BIG) collection of recipes with this moniker. Why? Because we love the idea of "looking like a kitchen rock star with minimal effort". That's the definition of Ridiculously Easy in a nutshell. You can read more about the specifics of these recipes in this post and check out the whole collection here.

This Cream Cheese Brownie Tart definitely fits into the RE category!

The easy swirls
How do you get those pretty swirls? That was my question when I saw a picture of the Epicurious tart. So easy! This is how it works:
- Make the easy, one-bowl brownie batter and pour almost all of it into the pan. Reserve about ¼ cup.
- Make the easy three-ingredient caramel/cream cheese mixture (again just one bowl and a whisk - no fancy equipment).
- Spread the caramel layer over the brownie base.
- Dollop the remaining brownie batter over the top.
- Use a small sharp knife or a skewer and have at it, swirling as you work your way around the batter. So fun and so rewarding!

Your turn!
Okay, it's your turn to make any resident mice at your house laugh. Make this easy Caramel Cream Cheese Brownie Tart and when the tantalizing aromas spread through the house, open the oven and take a peek. I'm pretty sure your mouse will be laughing when he (or she) hears and exclamation of, "WOW, WOW, WOW"!

One last thing, if you need to cook gluten-free, for yourself, family or friends, my nephew, Steve, developed a delicious version of this tart just for you. Check it out here and while you're on his site, be sure to do a bit of perusing! He's an expert on all things gluten-free... and so much more!
Cafe Tips for Making this Ridiculously Easy Caramel Cream Cheese Brownie Tart
- I've used both full-fat and reduced-fat cream cheese for this recipe with good success. I don't recommend no-fat cream cheese.
- The cream cheese needs to be very soft as this recipe doesn't require a mixer. You can let the cream cheese sit at room temperature to soften but if your kitchen is cool, it would be better to use the microwave. To soften, set the microwave to 10% power then cook for 1-2 minutes until the cream cheese is nice and soft in the microwave
- You'll need a 9 or 10-inch tart pan with a removable bottom for this recipe. Tart pans are reasonably priced and can be used for lots of sweet and savory recipes.
- If you use a 10-inch tart pan the finished tart will be a little shorter in height.
- It's important to spray your tart pan with baking spray so it releases easily from the pan. Baking spray is different than regular non-stick cooking spray in that it is a combination of flour and shortening instead of oil.
- You'll also need to line the bottom of your pan with a circle of parchment paper, again to facilitate easy removal from the pan. I love these pre-cut circles of parchment. Being a little lazy, they save me time and extra effort.
- When swirling this Cream Cheese Brownie Tart before baking, don't go overboard. When you think it looks pretty, stop! It's easy to end up with a muddy-looking mess if you swirl too much.
- As mentioned above, use any good quality caramel sauce for this recipe. I like Smucker's Sea Salted Caramel Sauce, Coldstone and Trader Joe's makes an excellent caramel sauce. You can also make your own. Butterscotch sauce would also work well in this tart (you might need to change the name though).
- This recipe calls for "coffee or water". Coffee enhances the flavor of chocolate. If you use coffee, it will not have a coffee flavor but there is a slight intensity in the chocolate taste. Use whichever you prefer.
- This recipe calls for melting the butter and chocolate in the microwave. If you don't have a microwave, feel free to use a medium size pot on the stovetop. After the mixture is cooled down, you can make the rest of the brownie base, right in the pot!
Thought for the day:
Behold, a virgin shall be with child,
and shall bring forth a son,
and they shall call His name Emmanuel,
which being interpreted is,
God with us.
Matthew 1:23
What we're listening to for inspiration:

If you enjoy this recipe, please come back and leave a star rating and review! It's so helpful to other readers to hear your results, adaptations and ideas for variations.
Scroll Down for the Recipe - or Save It to Your Inbox
We’ll email you the recipe so it’s easy to save, print, or share.
Caramel Cream Cheese Brownie Tart
Ingredients
For the brownie base:
- 2 ½ ounces semi sweet baking chocolate
- ¼ cup room temperature coffee, or the same amount of water
- 1 cup granulated sugar
- ½ cup butter, I use salted
- 2 teaspoons vanilla extract
- ½ cup unsweetened cocoa powder
- 2 large eggs
- ½ teaspoon kosher salt
- ⅓ cup all-purpose flour
For the caramel cream cheese swirl:
- 8 ounces very soft cream cheese, full-fat or reduced-fat (not no-fat)
- ½ cup caramel sauce, homemade or storebought
- 1 large egg
- 1 teaspoon vanilla extract
- ¼ teaspoon kosher salt
Instructions
For the prep:
- Preheat the oven to 350ºF.
- Spray a 9 or 10-inch tart pan with a removable bottom with cooking spray, line the bottom with a circle of parchment paper then place the tart pan on a large baking sheet.
For the brownie base:
- Place the coffee (or water), chocolate sugar and butter in a medium size microwave-safe bowl. Cook on high for 1 minute then stir well. Cook on high for another minute and stir. Continue cooking, checking every 30 seconds until the butter and chocolate are melt and the mixture is smooth. Set aside to cool for 5 minutes.
- After the 5 minutes, add the cocoa powder and stir to combine, then whisk in the eggs, vanilla extract, and salt.
- Stir in the flour and set aside.
For the caramel cream cheese swirl:
- Whisk the softened cream cheese until it’s nice and smooth and lighter in texture, about 30 seconds. Add the caramel sauce and stir well to combine.
- Add the egg and vanilla extract and stir until combined.
To put together and finish:
- Pour the brownie batter into the prepared pan, reserving about ¼ cup. Spread the cream cheese caramel layer over the top, try to cover the sop as well as you can.
- Dollop the reserved batter over the top of the cream cheese layer. Using a skewer or sharp knife, swirl the tart all around until the brownie and cream cheese are swirled and marbled together.
- Bake in the preheated oven for 22 to 28 minutes, until slightly puffed and the tart is set and no longer jiggly.
- Let the tart cool to room temperature,. Remove the tart from the pan before serving.
- I like to serve this dessert with a dollop of whipped cream and sprig of mint. For a delicious splurge, you can also add a drizzle caramel sauce!
Notes
Nutrition
Shop Our Café Loves
We’ve gathered our favorite kitchen tools, tableware, and entertaining treasures in one place, the Café Loves store. It’s a wonderful spot to find something special for yourself or the cooks and hosts you love!


What size pan works best for a half recipe? I am a single senior in a retirement community.
Hi Anne, One possibility would be to make mini tarts using a standard sized muffin tin. Though we haven't tested this method, the recipe should yield about 12 muffin sized brownie "tarts". As they may be a bit tricky to remove from the tins, you could consider using muffin liners, or be sure to coat the cups well with baking spray. They can bake at the same temperature, but will bake more quickly, so you might want to start checking for doneness around the 15 minute mark. Hope these turn out well for you!
Heading to the store now to buy the ingredients! This looks amazing and I can’t wait to taste it. My husband told me I need to stop making all your recipes because he’s “getting fat as a pig!” (He’s not-he’s actually very thin.) 😉. Thank you for sharing all your stories and wonderful recipes.
Haha, this made me laugh so hard, Jan! I always say the same thing to Scott as I'm testing recipes. I say, "Let's just try a bite, as we are getting fat as pigs!" 😂
What time and temp would you recommend id i wanted to so this in a cupcake pan instead?
Hi Kathryn, Though we haven't tested this recipe in cupcake form, it probably would work. One issue to watch out for is how to remove these from the cupcake pans - you might want to use cupcake liners or at the very least be sure to coat the cups well with baking spray. They should bake at the same temperature, but will bake more quickly. Maybe start checking for doneness around the 15 minute mark. Hope these turn out well for you!
Loved this recipe. Tastes as wonderful as it looks. It’s not overly sweet and a small piece is sufficient. This will be one of my go to desserts to impress guests. I used a cake tester to swirl and kept my design delicate. A few perfect berries on the individual plates makes a baker into a rockstar. Ridiculously easy!
Awesome! Thank you for the kind review, Sally!
I'm glad you have metric/weight measurements as volumetric measurements are not accurate nor consistent. Do you measure your ingredients by volume and weigh it out or how do you do it. I weighed out my 1/2 cup caramel sauce and it was 150g as appose to your recipe calls for 113g. I did use 113 g but was wondering how you came up with that weight. I am a food scientist and appreciate the weight measurements. Thank you
Hi Wiwid, with a majority of our readers being from the United States, I use US Customary measurements when I cook as that's what most people here use. You are correct in saying that metric measurements are more accurate. However, even metric measurements can vary, as is true with flour. Different resources have varying gram amounts for a cup of flour, anywhere from 125g to 140g.
Regarding your question of how I convert the US Customary measurements to metric - my recipe plugin does that. It's integrated with an API to help calculate these values. Like any technology, there are sometimes errors.
Actually, flour weights are typically between 120g and 150g, depending on who designed the recipe but id say as someone that ALWAYS weighs my flour, most bakers/recipe designers use 120g or 125g. I generally use 120g and most of the recipes I follow also use 120g/cup.
One thing I've noticed in your recipes is that the metric conversions are not consistent between some of your recipes. This has been something ive commented on, and others have as well, but you haven't responded or addressed the inconsistency.
Hi Jody, thanks so much for taking the time to share your thoughts. I understand how important consistent metric measurements are, especially for those who bake by weight.
You're right about differing weights regarding a cup of flour. King Arthur says that 1 cup of flour is 120 grams, All Recipes states it's 125 grams, and America's Test Kitchen says 143 grams. That's quite a difference.
That said, I use a recipe plugin (WP Recipe Maker) that automatically calculates the metric conversions for each ingredient. I try to be diligent about double-checking, but in the midst of recipe development, multiple rounds of testing, and getting a post ready to go, discrepancies can slip through.
Your feedback is helpful, and I’m always working to improve accuracy. If you ever notice a specific recipe that seems off, please feel free to point it out. I’m more than happy to review and update it!
This recipe came together quickly, looked great and was very yummy! Everyone at our dinner party enjoyed it! Thank you!
Wonderful! Thank you for the review, Susan!
I have a question. The original Epicurious recipe called for 50 g of sugar and 50 g of cocoa powder. 50 g translates to a quarter cup. Your recipe calls for a cup of sugar and a half a cup of cocoa powder. Does it really need that much sugar and/or Cocoa powder given that there’s also grated chocolate?
Many are adapting this recipe without realizing that the original recipe had issues in their metric to cup translations.
Hi Karen, the original recipe calls for ¾ cup of sugar. My taste-testers felt that the flavor was a little too bitter so I increased the sugar to 1 cup. The original recipe also called for ½ cup cocoa which I kept the same. I'm really not sure where they got their metric measurements as they don't reflect the recipe as its written. Feel free to adapt the recipe the way you prefer. This version was much better to our taste.
Will it work ok to make this in a springform pan instead of a tart pan?
Hi Kim, that should work fine!
I have never had so many compliments on anything I have made until I made this dessert. It is a show stopper. Thanks for sharing it with us!
Wonderful! Thank you for the review, Joye!
I'd really like to try this recipe - it sounds amazing! Thank you for sharing! I have a couple of questions: 1) I always understood that mixing water with chocolate when trying to melt it makes the chocolate bind? Did this not happen in this recipe? and 2) I saw a similar recipe using Mexican cajeta for the caramel sauce - do you think this would work? Thanks for you help.
Hi Karen, the water and chocolate are no issue in this recipe!
Yes, you can definitely use cajeta!
The tart was made for the holiday season and it got rave reviews. Some even said it came from a gourmet bakery!!
I made it using a spring form pan since I didn't have a tart pan and also doubled the recipe! I added 20 minutes extra for baking
and also made it gluten free and dairy free using 1 to 1 flour and dairy free cream cheese made with almond milk . This recipe is definitely
a keeper and give it 5 stars.Thank you for all of your delicious recipes.
Awesome! Thanks for letting us know, Sandy!
can you use a brownie mix like Ghirardelli
Hi Fiona, I can't see why that wouldn't work but you would need to have the correct proportions.
I have made it the only disappointing part was it didn’t marble like yours . Do I refrigerate? Serving it tomorrow evening
Hi Jacquie, keep working at it, you'll get the marbling technique!
The tart can sit out for 24 hours but I would refrigerate it if it's going to be longer. Bring it back to room temp before serving.
This was a show stopper. I prepared it for my senior living group tea time and there was quite a discussion about whether it can’t from a bakery. I cut it into 16 slim slices as it is quite rich. A few folks came back for seconds. I’m making it again right now (Sunday) for a Tuesday potluck and hope it holds in the refrigerator.
Awesome! Thanks so much for your review, Katherine!
I was very diappointed in the outcome. I followed the reciepe to the letter. Baked for 28 min and another 13 minutes after I discovered that, though the brownie was well cooked on the perimeter, the inside was undercooked and was the consistancy of a mousse rather than a cake. The extra time didnt help. I am confident that this had nothing to do with my oven as I haven't had problems with other recipes.
Hi Sheila, I'm really sorry you had difficulty with this recipe. It's hard to say what went wrong without having been right there in the kitchen with you. I've made this recipe numerous times with good success with the time given for baking. Again, sorry this didn't turn out for you. I hate wasting good ingredients.
Hi Chris - can you please advise on which kosher salt you use? The “saltiness” between Diamond and Morton is different so would appreciate your response! Looking forward to making this recipe! Thanks
Hi Pat, good question! I always use Morton kosher salt as Diamond isn't even available at the stores where I shop.
Hi Chris...Could this recipe be doubled? I plan on making this gluten free and dairy and using spring form pan.Thank you for all the recipes
Hi Sandy, I've only made this recipe in a tart pan and haven't tried doubling it. I would think it would depend on the size of your springform pan.
Hello, what are your thoughts on using gluten free all purpose flour?
Thanks, Jenny
Hi Jenny, I'm not sure since I haven't tested this with GF flour.
Hi Chris - this recipe looks amazing and I can’t wait to try it. Just a heads-up - the “metric” toggle button doesn’t appear to be working on this one. (Have never had any trouble using it before on your recipes)
Regards,
Fiona
Hi Fiona, not sure what the glitch was but I just tried it and it seems to be working now. Let me know if you have trouble.
Looking forward to trying this. Came in my email just as I'm planning to bake something special for my sister-in-law's 70th birthday next month.
Awesome, hope you enjoy it, Christine!
This looks perfect for Christmas Dinner. Can I make ahead and freeze ? Thank you.
Yes, that works, Christine!
Do you recommend baking this ahead of time? I'm thinking of making it on a Monday for a Friday event. Thank you!
Hi Sprocket, if you make it on Monday, I would freeze it until Friday morning.
I have it in the oven now! Just wanted to confirm the cream cheese part... there are 5 ingredients listed, but the recipe description says "three-ingredient" ... just a little typo? Thank you!
Hi Elena, you are correct. It's 3 main ingredients plus the flavoring ingredients of vanilla and salt! Sorry if that was confusing.