This post may contain affiliate links. For more information, see our privacy policy.
With less than 10-minutes of hands-on time and no-kneading, the name Ridiculously Easy Focaccia Bread says it all! Almost. It's also ridiculously delicious!
I feel like I'm introducing you to a dear old friend. This no-knead focaccia recipe has been a staple in our kitchen for years, and it never fails to earn rave reviews. But don't just take it from me, here's what a few of our readers have said:
This was the best focaccia I have ever had. It was super easy to make.
We had it with tomato soup and it was delicious!
My husband could not get enough of it. I will have to make more!
I've made this bread multiple times. A family favorite. So simple to put together and bake. Thank you!
I have literally made this bread 20 times, almost all variations. It is delicious!! I use it to make sandwiches, cutting the loaves into quarters.
It makes a great Italian non-sub sandwich.

Whether you serve it alongside soup, with a cozy dinner, slice it up for sandwiches, dip it in good olive oil, make the best pizza ever, or turn it into a breakfast treat, toasted, buttered and spread with jam (try our Strawberry Freezer Jam 😋), it's one of those homemade breads you'll want to make again and again.
Made with just a handful of pantry ingredients and an easy overnight rise in the fridge, this focaccia proves that bakery-quality bread doesn't have to be complicated.
What you'll find in this post:

What makes this focaccia ridiculously easy?
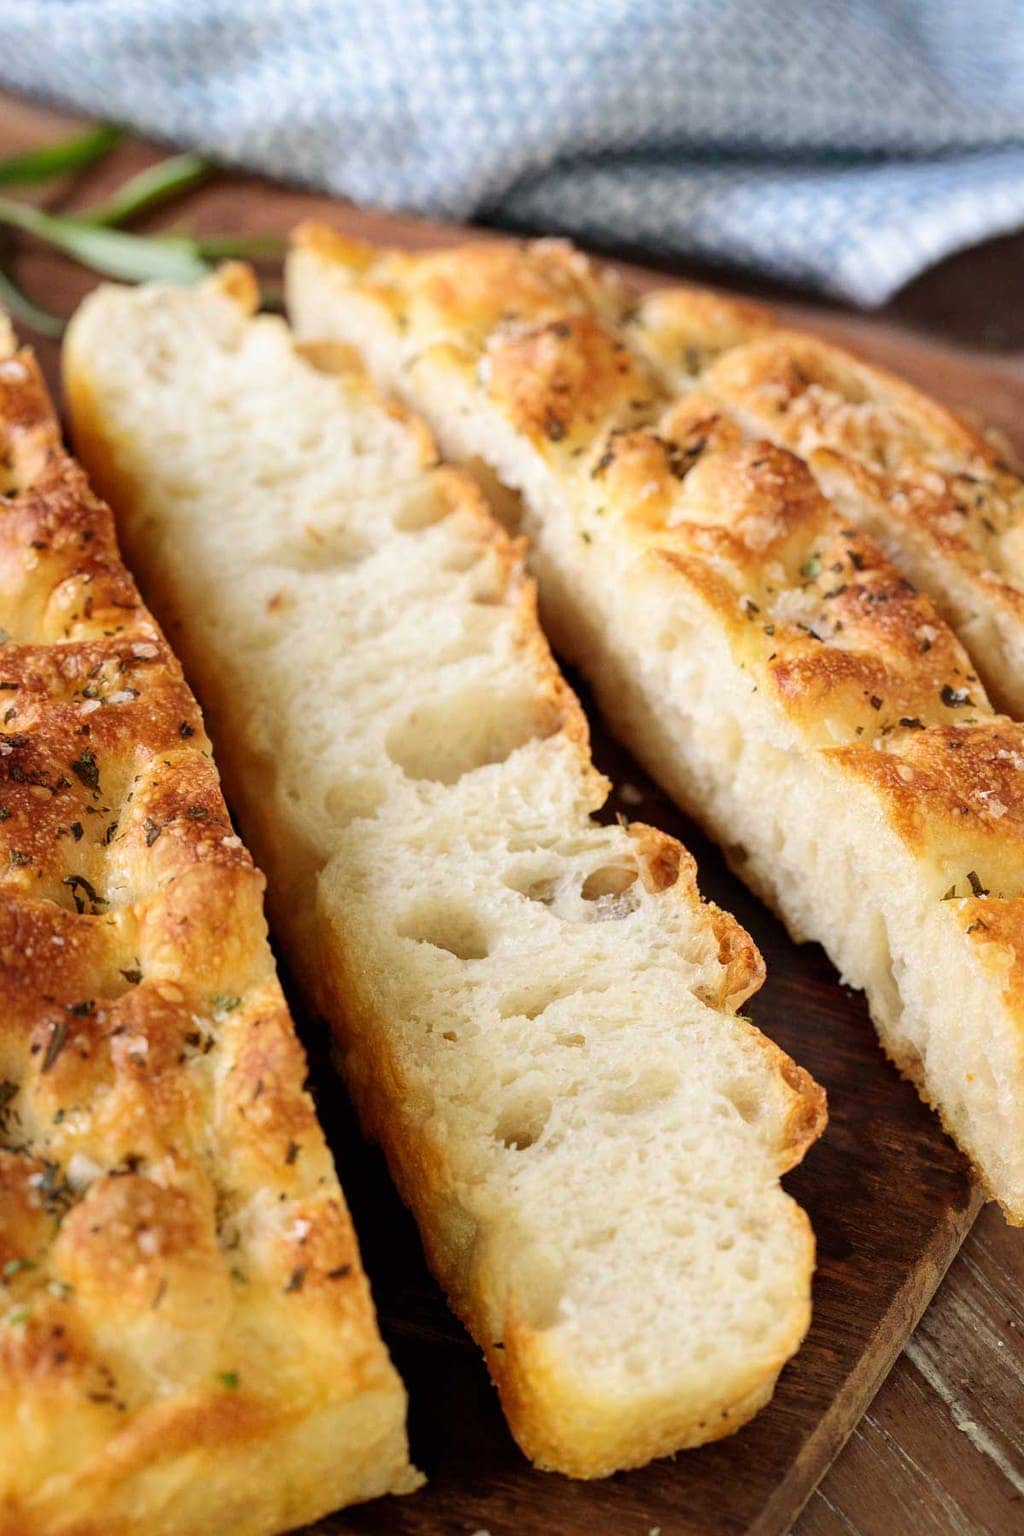
The first time I made this no-knead focaccia bread, I was amazed at the results... super crisp on the outside, soft and chewy inside and those beautiful air bubbles you find in artisan bakery loaves. All this with barely any work on my part! I knew right away it deserved a spot in our Ridiculously Easy recipe collection.
What qualifies a recipe for that label? Well, here at The Café, it has to have certain characteristics to earn that prestigious label:
- Minimal effort and hands-on time. (Rise time doesn't count!)
- Delicious, impressive results. Results that look like they took hours of effort or expert skills.
- Perfect for busy days . Those days when time is short, but expectations are high.
- Entertaining-friendly. These recipes take the stress out of hosting, so you can enjoy your guests and still serve something fabulous.
How to make this easy focaccia
Looking at the golden, dimpled crust, you might be thinking I'm spoofing you about the "easy" part... but I promise, this is truly an easy focaccia recipe. Here's how it works:
Day One: Mix and Rest
- Combine flour, instant yeast, and salt in a large bowl.
- Add warm water and stir until no dry flour remains.
- Cover it up, pop the bowl into the refrigerator and forget about it until the next day (or for at least 8 hours). That's it for day (or part) one!
Day Two: Prepare Your Pans, Rise, Dimple, and Bake
Prepare your pans:
- About two hours before baking, grease two pans with butter, line them with parchment paper, and drizzle with olive oil.
- To cut perfectly sized parchment circles: Fold a square of parchment into quarters, then again into a triangle. Place the point at the center of an upside-down pan and trim along the edge.Unfold, and you'll have a custom-fit liner!

Rise and dimple:
- Remove the dough from the fridge, divide it between the pans, and let it rest at room temp for 2 hours - it will rise and fill the pans on its own.
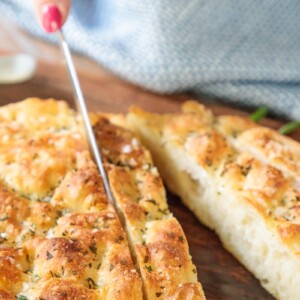
- Just before baking, drizzle a bit more olive oil on top, then use your fingers to press deep dimples into the dough (this is the fun part!).
- Sprinkle with flaky sea salt and your favorite herbs.

Bake Until Golden:
- Pop it in a hot oven and let the magic happen!
- In no time, your kitchen will smell like an Italian bakery and you'll pull out crisp-edged, golden focaccia that's practically begging to be torn into.
- It's perfect for sandwiches, with soups or to fill your dinner bread basket!

Video
Here's a quick video to demonstrate the easy technique:
See what I mean, so easy! Ridiculously easy!
Ingredients you'll need to make this no-knead focaccia
You only need a few simple pantry staples to create this amazing no-knead focaccia bread. Here's what to gather:
- All-purpose flour or bread flour - Either works well! Bread flour will give the dough a slightly chewier texture, but all-purpose flour produces delicious results too.
- Instant yeast (a.k.a. Rapid Rise yeast) - This recipe relies on instant yeast for a slow, overnight rise that develops flavor and texture without the need for kneading. 💡 Note: You can find instant yeast at most grocery stores (often right next to active dry yeast), however, I really like buy it in bulk and store it in the freezer. It lasts a long time and is so much more economical!
- Kosher salt - Essential for seasoning the dough.
- Warm water - Helps activate the yeast and bring the dough together.
- Olive oil - Adds flavor and helps create that signature golden, crispy crust. You'll need a little for the pans and a bit more for drizzling over the top.
- Flaky sea salt (like Maldon) - A finishing touch that adds crunch and visual appeal.
- Optional toppings - Think dried Italian seasoning, fresh rosemary, thyme, or even chives - each one will give a unique herby twist. Or use a combination!
Ridiculously Easy Focaccia FAQs
This recipe is designed for instant yeast (also called rapid rise yeast), which doesn't need to be proofed and works beautifully with an overnight rise. Active dry yeast may not yield the same results, so we recommend sticking with instant for best texture, rise and ease of preparation.
You can refrigerate the focaccia dough for anywhere from 8 to 24 hours. A longer rest helps develop flavor, but even a shorter chill will still give you delicious results.
Yes, focaccia freezes beautifully! Let the baked focaccia cool completely, then wrap it tightly and freeze for up to 2 months. To reheat, thaw and warm in a 350˚F oven for 8-10 minutes until crisp.
Yes! Simply cut the recipe in half and proceed as written. You'll still get that amazing golden crust and airy interior, just in a smaller batch.
The secret is time and hydration. This overnight focaccia dough is high in hydration and gets a long rest in the fridge, which naturally creates those beautiful, irregular holes - no kneading needed!
Café Tips for making this Ridiculously Easy Focaccia
These helpful tips will ensure focaccia success, even if you've never baked bread before!
Flour and Baking Tips
- You can use either bread flour or all-purpose flour. Bread flour gives a slightly chewier texture, but both work beautifully.
- Make sure to mix the dough well. Stir until all the flour is fully incorporated, make sure there are no dry pockets! I usually stir until it looks well combined, then give it another good mix just to be sure.
- I love a Danish dough whisk for dough mixing, especially sticky, high-hydration doughs like this one.
Yeast and Rising Tips
- This recipe uses instant yeast (a.k.a. rapid rise yeast), which requires no proofing. Regular active dry yeast is not recommended here.
- For great flavor, give the dough at least 8 hours in the fridge and up to 24 hours. The flavor just gets better with time! That said, if you're pinched for time, checkout our Same Day Focaccia recipe (still ridiculously easy)!
- For the second rise, let the dough rest in the pans for 2 hours, or until it fills the pans nicely. If your kitchen is warm, it may take a bit less time.
Pan Prep
- Grease your pans with butter and then line them with parchment for easy release and crispy edges.
Topping and Finishing Ideas
- Flaky sea salt (I love Maldon!) adds a beautiful crunch and finishing touch.
- Top with dried herbs (like Italian seasoning) or fresh rosemary, thyme, chives and sage are all delicious options.
How to Serve Focaccia
- Slice into long strips for dipping in oil, soup, or sauce.
- Cut into wedges or squares for serving with salads or as a side dish.
- Pan-toast slices in olive oil for extra flavor and crunch, especially delicious with soup!
- Makes fantastic sandwiches, just slice horizontally and layer the ingredients.
A few other variations
- Potato Focaccia, aka Focaccia Pugliese - a beloved bread from the sunny heel of Italy with fluffy interior, large artisan air holes and a crisp, golden crust.
- Ridiculously Easy Cinnamon Raisin Focaccia - a sweet twist perfect for brunch or breakfast.
- Ridiculously Easy Seeded Focaccia - a whole grain version loaded with nutritious seeds.
- Carrot Focaccia with Honey and Thyme - as beautiful as it is delicious! It's also a no-knead focaccia that's super simple to put together!
Expect Rave Reviews!
Are you ready to feel like a little Italian breadmaker? You probably have everything you need in your pantry to make this Ridiculously Easy Focaccia Bread with no kneading, no stress, just incredibly delicious results!

Thought for the day:
I will meditate on the glorious splendor of Your majesty,
and on Your wondrous works.
Men shall speak of the might of Your awesome acts,
and I will declare Your greatness.
They shall utter the memory of Your great goodness,
and shall sing of Your righteousness.
Psalm 145:5-7
What we're listening to for inspiration:

If you enjoyed this recipe, please come back and leave a star rating and review! It's so helpful to other readers to hear your results, adaptations and ideas for variations.
Scroll Down for the Recipe - or Save It to Your Inbox
We'll email you the recipe so it's easy to save, print, or share.
Ridiculously Easy Focaccia Bread
Ingredients
For the dough:
- 4 cups all-purpose flour, or bread flour
- 2 teaspoons kosher salt
- 2 ¼ teaspoons instant yeast, 1 packet
- 2 cups warm tap water
- 1 teaspoon soft butter, for greasing pans
- 4 tablespoons olive oil, divided
For topping:
- Italian seasoning or finely chopped fresh herbs
- Flaky sea salt, like Maldon, for finishing
Instructions
For the dough:
- In a medium-large bowl, combine flour, salt, and instant yeast. Stir well. Add warm water and mix with a Danish whisk, wooden spoon, or spatula until no dry flour remains. Cover the bowl with plastic wrap and refrigerate for 8 to 24 hours.
To shape and rise:
- Lightly grease two 9-inch cake pans with soft butter, then line with parchment paper. Pour 1 tablespoon of olive oil into the center of each pan.
- Remove the dough from the refrigerator and divide it in half. Place one portion in each pan, turning to coat. Tuck edges under to form rough balls.
- Cover with plastic wrap and let the dough rise at room temperature for 2-3 hours, until it fills most of the pan.
To dimple and bake:
- Preheat the oven to 450˚F with a rack in the center of the oven.
- Drizzle each dough round with 1 tablespoon of olive oil. With oiled fingers, press deep dimples all the way to the bottom of the pan. Stretch dough gently if needed to fill the pan.
- Sprinkle with Italian seasoning or fresh herbs and finish with flaky sea salt. Let rest for 30 minutes while the oven preheats.
- Place pans in oven and immediately reduce temperature to 425˚F.
- Bake for 22-28 minutes, or until tops are golden and bottoms are crisp. Remove from oven, lift bread from pans, and transfer to a cooling rack.
To serve and store:
- Enjoy warm, or let cool completely and store in a zip-top bag.
- To Freeze Let focaccia cool fully, then transfer to a zip-top freezer bag. Freeze for up to 2 months. Thaw at room temp or warm in a 350˚F oven for 10 minutes.
Notes
Nutrition
Shop Our Café Loves
We’ve gathered our favorite kitchen tools, tableware, and entertaining treasures in one place, the Café Loves store. It’s a wonderful spot to find something special for yourself or the cooks and hosts you love!


This is truly a delicious foccacia! Love how the recipe is so easy and so rewarding, already made it three times since discovering it about a month ago! I am wondering though, to get a thicker foccacia (for making sandwhiches), could I double the recipe and use the same size tin or does it not quite work like that?
Thanks!
Thanks for the great review, Sarah! It's encouraging to hear how well this focaccia has turned out for you several times in a row! This recipe does double well, though it would probably work best in a half sheet pan (11x17). Hope this turns out well for you!
I followed your recipe to the letter. It came out AMAZING! Clear, simple instructions, so easy to follow. Now I'm mad I didn't buy more bread flour when I went food shopping. Wondering if it will come out as good with regular unbleached AP flour?
I was looking for a recipe that may fit what I grew up eating, Nonno used to make the best Focaccia. This is definitely close! Thank you for sharing, I know this will be at least a weekly bake in my house.
I am not sure my friends and family will love it since there won't be any left by the time anyone else gets home! Not even sure I am willing to share 😂
Hi Dawn, Thank you for the excellent review! It's wonderful to hear that this recipe compares to your Nonno's focaccia - thanks for taking the time to share such a compliment with us! This recipe was tested using all-purpose flour, so it will work perfectly with your AP flour. Bread flour can also be used interchangeably. Happy baking!
I have made this recipe many, many times and it's always perfect and delicious. I've done flake salt, rosemary, Italian seasonings, etc., and all are scrumptious. Family and friends agree! Most of the time I make it in a 9x13 pan and it works well.
Thanks for the lovely review and helpful comments, Holly! It's great to hear how often you make this focaccia and how well it always turns out for you. We so appreciate you taking the time to encourage us by letting us know how much your family and friends enjoy this recipe!
I have made this in the past and I am doing it again for the first time in a long time.And the bread keeps coming out very tough. I didn't have this problem before.I'm wondering if you have any suggestions what I could be doing to create this. It was so yummy I wanted to work as it did before!
Hi Carol, Sorry to hear that your recent attempts at this recipe have been tough - that's always frustrating! Here are a few possibilities for why that might be happening to you:
-You could be overworking the gluten, so once you add the flour be sure to stir it only until the flour is incorporated. You might want to try the Danish dough whisk that Chris mentions in the post.
-You may need to add a little more water to your dough - it should be sticky and fairly wet to the touch.
-Differences in the temperature of your kitchen might affect the proofing time, and either over- or under-proofing can result in a tough loaf. In Step 3 under "Shape and Rise", watch the dough's volume rather than just the clock. It should be airy, puffy, and roughly double in size before you transfer it to your pan.
-A metal baking pan will conduct heat better than glass, giving you a crispy exterior but a soft interior.
Hope this is helpful, and that your next attempt is successful!
I am so happy I found this recipe! I had been dying to make focaccia bread for a while. I was worried when I first took it out it didn’t brown at all but I upped the temp, added some extra olive oil and broiled for a couple minutes to get the golden brown crust! So happy I gave this a try and will keep this one handy. My kids loved it!
Hi Jenny, Thanks for the wonderful review! Since there can be so much variation in oven temperatures, we're glad you were able to troubleshoot and get your crust nice and golden. It's great to hear how much you and your kids enjoyed this focaccia - we so appreciate you taking the time to let us know!
I've made this multiple times exactly as written and it comes out perfectly. My whole family loves it. I've paired it with stew, chili and different pastas. My favourite way to eat it is the next morning with a cup of coffee. Thank you for posting! I had no idea homemade focaccia could taste better than a bakery 😊
Thank you for the great review, Elizabeth! It's lovely to hear how much you and your family enjoy this recipe, and we look forward to trying your suggestion of pairing focaccia with morning coffee. "Better than a bakery" is such a compliment - thanks for taking the time to let us know!
My sister found this recipe for a focaccia-decorating party and it was a huge hit. I've now made it at least 5 more times and it's so good, and truly, ridiculously easy! Freezes perfectly, so it's handy to eat one and save one for a future gathering. And I've enjoyed varying the herbs and spices. I realized your rosemary bread was already in my "tried and will make again" baking binder.
I've been making a simple sourdough for years and wanted to try focaccia but thought it would be hard. Thank you for adding a wonderful bread to my repertoire!
Thank you for the fantastic review, Jen! It's wonderful to hear how well this recipe turned out for you, and a focaccia-decorating party sounds so creative, fun, and delicious! What a great idea - we're honored that your sister chose our focaccia for her event, and that you've now added it to your repertoire. Thanks for taking the time to let us know how much you're enjoying this recipe!
I made this focaccia bread yesterday. It was an easy recipe made over two days and absolutely delicious! 😋 I will be making this again. Thanks for a great recipe.
Hi Heather, Thanks for the excellent review! It's great to hear that this focaccia turned out so well for you and we hope it will be a recipe you make on repeat! We appreciate you taking the time to let us know how much you enjoyed it!
Can this be made in one 9 x 13 pan? Or a 10 x 15 sheet pan?
Hi Marci, yes, both of those work! The 9x13 will be a nice thick focaccia and the sheet pan version will be thinner. But both delicious!
I've made it in a 9x13 many times and it works great!
The bread dough did not rise much in the refrigerator. Do I need to mix everything, seal the bowl and let it sit in room temperature before putting in the fridge?
Although it did not rise much I still managed to follow through other steps and baked it. Just that the 2nd proof also did not rise much, thus wondering...
Hi Rachel, just checking to make sure you used instant yeast and not active dry yeast. That will make a big difference.
can I use a square 9 inch pan if I don't have a round one? I love making recipes like this but I often don't have the supplies.
Absolutely! I often make this in two 9-inch square pans!
Is this recipe for an 8 inch or a 9 inch round pan?
What kind of kosher salt, Diamond or Morton?
Can’t wait to make this ! Thanks.
Hi Margot, This recipe was tested using Morton kosher salt. You can use either 8 or 9 inch pans. The 8 inch will just be slightly thicker, but both will work well. Hope this turns out well for you!
My 9 year old daughter and I made this today. We lightly brushed some pizza sauce on top, added a light amount of shredded cheddar cheese and basil. Very yummy. My husband likes dipping it in additional pizza or marinara sauce. Cloud like with a nice crust. Thanks for the recipe. I hope to try wi the roasted garlic in the future.
Hi Lindsay, Thank you for the excellent review and for sharing your experience with this recipe! It's great to hear how well this turned out for you, and especially lovely that it was something you made with your daughter! So glad your family enjoyed this - thanks for taking the time to let us know!
Incredible! The bread came out so fluffy, soft and delicious. My husband, our friend, and I all stood over the counter, cutting off pieces and ducking them in marinara sauce, we ate a whole loaf!
I’m going to try using parchment paper at the bottom on the pan, since the loaves did stick a bit even with lots of olive oil, but other than that this recipe is perfect.
Thanks for the great review, Amber! It's wonderful to hear how well this recipe turned out for you and how much you and your friends enjoyed it. We agree with you about the parchment - cutting rounds for the bottoms of the pans saves lots of hassle by making the bread easy to turn out after baking. We appreciate you taking the time to share your comments!
Hands down the best focaccia recipe I’ve ever used! Delicious, easy, and fool proof recipe for beginners! Highly recommend!!!!
Thanks for your excellent review, Kasie! So glad to hear how much you enjoyed this recipe. We appreciate you taking the time to let us know!
Made this bread in 2 loaves - topped 1 with everything bagel seasoning and the other with cinnamon-sugar. The texture was great and the flavor too...My bread was swimming in olive oil and tasted a bit oily too. I'm thinking I'll half the amount of olive oil the next time. Also, (my fault) I used table salt instead of kosher salt, so it did taste a bit salty too. It was good enough that I will try again, especially the cinnamon sugar loaf.
Hi Susan, Thanks for the review! Your serving suggestions of making one savory loaf with everything bagel seasoning and one sweet loaf with cinnamon sugar sounds delicious!
I just finished making the focaccia! It turned out beautiful & delicious. I ‘m excited to try your other recipes. Thank you for the recipe!
Hi Ivette, Thank you for the great review! Wonderful to hear how well the recipe turned out for you!
This is amazing, crisp and so tasty! It is even better than what I have had in some wonderful restaurants (not to sound braggy!). This is an amazing recipe, I've made it twice and it gets better each time!
Thanks so much for the kind review, Sue! It's always great to hear when recipes turn out even better than restaurant quality!
Okay, I got what you're saying. You jsut transfer the dough to a sheet pan and then tucking it under a bit. I'm so sorry if that was confusing.
Haven't gotten past the proofing. The dough is so runny, IDK how I'm supposed to form rough balls. I double checked my measurements and they're spot on.
Hi Andrea, this is definiely a runny, high hydration dough but I'm not sure where you got that you're supposed to form it into "rough balls"? This is focaccia, you just transfer the dough to a pan and let it do its thing. Are you looking at the correct recipe?
It's step 2 under shape and rise
I've tried this recipe twice this week and for some reason it won't rise. I tried both active yeast with (sucessful proofing) and instant yeast, both with ~120° water. I let it sit for 2+ hours (after 8 hrs refrigeration) with no rising at all. Any tips?
Hi Myka, I think your water may have been too hot. Yeast starts dying at 120 degrees F. I just used warmish water and mine rose to the point of spilling over the bowl. Hope you'll try again. Instant yeast doesn't need to bloom like active yeast.
Hi Myka, your water may have been just a little too hot. When I measure the temperature of my tap water at its hottest, it's 115˚F. Your tap water may run a little hot, which would kill the yeast. If you have an instant thermometer, I would check the temperature of your hot tap water and make sure that it's around 115-117˚F. Hotter than that will feel too warm when you stick your finger into the water.
Hi, how warm does the water need to be please?
Hi Myriam, the water should feel very warm to the touch but not so hot that you have to pull your hand back. If you’re measuring the temperature, it should be between 105 and 115 degrees Fahrenheit.
This bread is incredible!! I would love to know any easy dinner roll recipe using the same basic ingredients and process. Do you have anything I can use for the holidays?
Thanks, Deborah! We have several here- https://thecafesucrefarine.com/7-no-knead-dinner-roll-recipes/
I’ love this bread. My family does also. I am making it with minestrone soup to take to friend healing from surgery. I have always used all purpose flour. You mention bread flour is good too. I don't want to experiment since sending to friend. Which do you prefer? I have both in my pantry. Blessings this upcoming season. I will be enjoying many of your recipes and sharing with others. Love new site upgrades!
This is such a great recipe! For anyone wondering, I have used rapid yeast (just activate for 5 min with warm water) with success!
This is so simple and so yummy! Thank you!
Great! Thanks for the review, Amy!
Why do you split the dough in half? Is that to make sure olive oil is evenly distributed? Mostly just curious. Great recipe btw!
Hi Sk, this version is baked in two pans which is why it's split. You could also bake it all in a 9x13 pan and not split it.
When I transferred dough to cake pan it was very sticky. Normal or did I do something wrong? Haven’t baked yet. 🤞
Hi Helen, yes, it is a sticky dough. How did it turn out?
It turned out great! Thank you!
Awesome! Thanks for the update!
I do not have a round cake pan. What would you recommend using instead?
Can’t wait to try!
Hi Rebekah, you can use 2 8X8 or 9x9 square pans or one 9X13 pan. Enjoy!
Thankyou for this just fabulously easy and versatile recipe! I have had an amazing amount of fun creating new flavours sweet and savoury with this recipe! (14 and counting!)
Wow, that's awesome, Tash! Thanks for letting us know!
It was delicious my whole family loved it.
Wonderful! Thanks for the review, Thomas!
Can I bake in a 9x 13 glass dish instead of pie pan?
Hi Ashleigh, a 9x13 will work but it will be a little thicker, still delicious! But be careful that the bottom crust doesn't get too brown as glass pans can cause that issue. If you see if getting too brown you can always wrap a piece of foil around the outside of the pan.
How does this dough work for a pizza crust? Or do you have another amazing dough recipe for that? I made the focaccia in the pie pans and it came out amazing!
Here you go, Ashleigh- https://thecafesucrefarine.com/easy-sheet-pan-pizza-margherita-with-crispy-focaccia-crust/
Can I use active dry yeast instead?
Hi Margaret, you can use dry active yeast but you will need to activate it before using in this recipe. That's why instant yeast is so wonderful - you don't have to worry about any of that!
After the 2-3 hours at room temp can I wait to bake it? I’m going to work and wasn’t sure if it could sit longer at room temp?
Alternatively, can it sit in the fridge longer than 24 hours? Thanks!
Hi Lauren, once it’s been sitting at room temperature for a couple hours, that’s when it should be baked. You can leave it in the refrigerator for as long as 36 hours, but it will lose a little bit of its oomph after that.
Thank you so much, appreciate the quick response!
Hi, can this focaccia recipe be made with half wholemeal and half white flour for a mre healthy option
Hi Angela, I've substituted a cup of whole wheat flour in this recipe with good success. I haven't tried more than that.
Hi, I made this recipe this weekend and the flavor was really good but I had an issue.
When I mixed the flour mixture, I had to add a lot more water to be able to incorporate all the flour. My bread ended up being very dense. Do you sift the four? I'm not sure if I measured incorrectly. Thank you, I'm excited to get this recipe right because it tasted so good.
Hi Cathrine, I'm so sorry you had trouble with this recipe. It's difficult to say why your bread was dense without having been right there in the kitchen with you. Perhaps there was a measuring issue? You do not have to sift the flour. You might want to try again as this bread comes out light and full of those big beautiful artisan air pockets. Let me know of you have any other questions.
Will this work in a 9x13?
Hi Lauren, yes, this focaccia can be made in a 9x13 inch pan but it will be thicker - that's not a problem for me!
Hello and help! My dough is currently sitting in the fridge. Question about the next step of shaping and rising: do I let it rise in the fridge or at room temperature? Thanks in advance.
Hi Angie, I'm sorry if that wasn't clear. After the 8-24 hours in the fridge the dough should rise at room temperature. I have clarified that in the recipe card. Thanks for asking!
Thank you for the clarification. It turned out great. This recipe is a keeper! Thank you for sharing it.
So glad to hear that, Angie!
Tried this, it was easy to make and turned out great, delicious actually!! This is a keeper, and I will try the other variations.
Thank you!!!
Awesome! Thank you for the review, Joanne!
This sounds very good. Can I make it with cup for cup gluten free flour?
Hi Jo-Ann, I have not personally tried this recipe with GF flour but I have a GF friend who has and she has not had good results. BUT I have a nephew who is an expert at GF baking and he has a great GF focaccia recipe: https://cakesandcoriander.com/gluten-free-focaccia-bread-with-olives-lemon-and-herbs/ - Chris
Just wanted to say that I have been baking this recipe for years now and always try to keep a loaf in the freezer for soup nights to dip in olive oil and balsamic vinegar. My teenagers love it so much that arguing over the last piece has almost come to blows. Thanks so much for this ridiculously easy tasty recipe.
That's great, Pete! Thanks for letting us know!
Can u cook in a dutch oven?
Hi Tiz, no, this recipe will not work in a Dutch oven.
Such a simple recipe that is absolutely delicious and with endless topping possibilities. I've made it twice in the past two days and there will be countless times more. Thanks so much, Chris!
Awesome! Thank you for the review, Stefanie!
The third batch of this is in the refrigerator right now! I'm making one loaf for a friend, so I added finely chopped rosemary. Can't wait to taste! Thanks a bunch for this smooth start to my breadmaking journey!
Awesome! Thank you for your review, Lynne!
Wow this came out amazing. My husband thought I bought it :)) I added some dill and a drizzle of the Graza finishing olive oil after it came out of the oven. I can’t wait to make other variations of this. Thank you!!
That's awesome, Xtina! Thanks for your review!
Fantastic recipe! I’ve made this many times always a success and so easy!!
Awesome! Thanks for the review, Bonnie!
Hello!
My dough is in the fridge now, and I can’t wait to bake it tomorrow. I also saw your seeded version, using whole wheat flour. Can I use this version that uses bread flour rather than whole wheat flour for the seeded version as well? Thanks!
Sure, Connie!That will work. Enjoy!
Thanks for your reply. It’s Carmel though, not Connie. 😀 I have finished baking my first ever focaccia. It’s a success, but I find it too crunchy. Is it really supposed as o be that way? Or was there something I might not have done correctly?
Oops, sorry, Carmel!
Focaccia is supposed to have crisp edges and should be chewy inside. It will lose some of its crispness afte a few hours.
Very easy to follow instructions and bread was great! I will be making it again!
Awesome! Thanks, Liliana!
Preaching to the choir! The most time consuming part of this recipe is measuring out the flour. On your advice, I got a danish whisk - where has this magical tool been all my life? Mine came out looking exactly like the pictures. I added halved grape tomatoes, feta and rosemary to one, good parm, sliced olives and rosemary to the other. Consider me a convert!
Awesome! Thank you for the review, Bet!
I just finished a remodel of my kitchen so I am trying a lot of new recipes, with your's being the majority. I must say, I've not had a bad one in the bunch. I recently made the focaccia bread and it was absoluttely fantastic! I had a friend for dinner and she said it was the best Italian bread ( real complement from an Italian!)I do have a question...would it be possible to add small chunks of cheese (like Asiago) to the dough or in the dimples? Love all your recipes. Keep up the good work.
Judi L.
That's great, Judi! And yes, that will work. Thanks for the review!
AMAZING!! This was perfect in every way. Delicious and so easy. I am making it today for the second time. I made a template for the parchment paper!
Awesome! Thanks for the review, Janet!
Quick question before I try this recipe,it says 27g of instant yeast (1 packet - my packets are 7g each) is 27g correct
Hi June, thank you for noting that. I use a recipe plugin that does the metric conversion and sometimes there's an error. You are correct, it should be 7g. I have amended that in the recipe. Enjoy the focaccia!
Made this yesterday. It was delicious and so easy!
Even though I saw you could freeze it, I gave the second round to my sister for her to try.
I probably used a little too much sea salt on the top before baking because it was a little salty, but we used it with soup, so the extra salt probably helped the soup a bit! Next time I'll use less salt or do a different topping (this time, in addition to the flakey salt, I used herbs de Provence).
Thanks for the review, Helene!
I have the dough resting in the refrigerator and tomorrow I will bake. I would like to add fresh herbs to the top before baking but wonder if they will burn in such a hot oven? Thank you.
Hi Barbara, if you tuck the herbs in when you dimple the dough they should be okay!
Thank you, Chris!
I’m new to baking bread. What size and type pan are you using here? I’ve seen so many different types and sizes I’m not sure what to use. Thank you.
Hi Becky, in this recipe we used 2 9 inch cake pans. There are some other variations linked in the post that use other sizes of pans if you want to check them out.
I've used this recipe for the last few years to make my church's communion bread. It's so easy and so much more flavorful than store bought. I use half of the recipe to make 2 small loaves in 6 inch round pans for breaking. The other half I put in 2 quarter sheet pans for cutting into squares for distribution among the congregation. Since it freezes so well, I can bake for two months communion supply at a time.
That's great, Jan! Thank you for letting us know!
I want to make sandwiches with this recipe can I put the whole amount in a 9x 13 sheet pan? What do you suggest ? Also can you mix bread flour and ap flour together if I don’t have enough bread flour?
Hi Carol, yes to both of your questions! A 9x13 will work well. The bread will be a bit thicker but that makes a gret sandwich. And a combination of bread and AP flour will work!
This was fantastic! I even left the dough in the fridge for a couple days before making, and it was still wonderful. We ate some by itself, then sliced the rest in half & made pizzas. It was life-changing! I just made another batch of dough before posting this. Lol!
That's great, Maggie! Thank you for letting us know!
Will this work in an 8in round pans?
Yes, it will be thicker but delicious!
You were right! This IS ridiculously easy! As my daughter said, “This bread is fire”. 🔥
Thank you for a delicious, super easy recipe!
That's awesome, Heather! Thanks for letting us know!
Good morning Chris,
I made your Ridiculously Easy Focaccia bread but need your help in trying to help me what I did wrong as the bread didn’t turn out right. It wasn’t soft, pliable or easy to cut. My kitchen smelled so good but was wondering what I did wrong. Your video showed it was soft and looked like it was easy to cut.
Maybe I made too many dimples in it as it didn’t raise like yours? I wanted to try the cinnamon raisin one too but don’t want to do it until I can find out what I might have done wrong.
I appreciate any help or suggestions you can give me.
Many thanks,
Susan
I'm so sorry you had trouble with this recipe, Susan. I suspect that the dough didn't rise enough. Every kitchen is a little different and yeast can vary also. Try going by the look of the dough rather than the time. It should be nice and fluffy looking when it's ready to go into the oven. If it's not, just cover it with a light towel and give it a little longer before baking.
I have made the bread recipes many times. So easy and delicious. I have dough in the refrigerator now for baking tomorrow.!
Wonderful! Thanks for the review, Diana!
This was indeed very easy & so delicious! I used bread flour instead of all-purpose and it still turned out great. Will def make this again
Great! Thanks for the review, Carrie!
I love this recipe. It really is as easy as they say. And it is delicious so many different ways. You can add herbs or top it with cheese.
Next I will try it as a pizza crust. Yummmm
Thank you for the review, Karen!
Hi there, i made my dough but found it hard to combine the flour and water with a spatula, I kneaded it by hand and I'm letting it rest now overnight - is this okay? I hope i didn't ruin it by combining by hand, hoping it'll turn out amazing!!
Yes, that's fine, Jennifer. Enjoy!
This recipe was very easy and results were amazingly. I added sun dried tomatoes and olives, delicious. Thanks for a great recipe. Just was wondering if you have tried making it gluten free?
Hi Janet, I have not personally tried this recipe with GF flour but I have a GF friend who has and she has not had good results. BUT I have a nephew who is an expert at GF baking and he has a great GF focaccia recipe: https://cakesandcoriander.com/gluten-free-focaccia-bread-with-olives-lemon-and-herbs/
Hi, Chris,
I love this bread soooo much! I try to keep a loaf in the freezer, but somehow it just finds its way to consumption before it chills. 🤷♀️. Anyway, I have a question about exactly determining when it is well baked. You say, “bake until the tops are golden and the undersides are crisp.” I’ve frequently wondered how I can tell when the undersides are crisp? Magic kitchen gadget?
Mind you, I’ve never been too far off from an ideal finish, it’s just that this phrase always confused me and if there’s a way to tell, I’d love to know. Thanks for the enlightenment! ❣️
Hi Sandy, So happy you've enjoyed this recipe!
Regarding your question, I just take a small knife and lift up the round loaf a bit to check the bottom.
I’m learning how to make yeast breads and this bread sounds perfect. I’m just wondering how much should the dough rise while in the refrigerator.
Thank You
Hi Johanna, this is a perfect place to start! The dough will rise but probably won't double. I would say it will rise about ⅔ of its original volume. Have fun!
So, I can put mozzarella cheese on this bread after dimpled? I'm putting italian sausage should I cook it first?
Hi Mary Ellen, I have parbaked the crust and then added pizza toppings. That works well. And I like to at least par-cook the Italian sausage to remove some of the grease.
Great flavor but time consuming. Recipe states total time as 40 minutes, but you have to allow at least 11 1/2 hours for the proofing. Next time I will let it rise at room temperature hoping the results are the same in 4 hours.
Hi Rarra, this is a classic focaccia recipe and the long rise is what creates the beautiful, flavorful results. If you want a quicker focaccia with the same delicious results, you might want to go with this recipe instead: https://thecafesucrefarine.com/ridiculously-easy-same-day-focaccia/
This bread is wonderful! Tastes delicious and looks impressive while being very easy to make. I particularly love the breads and sweets recipes you offer and really appreciate how you explain and write out the steps. I’ve enjoyed all of your recipes I’ve tried. Thank you
Thank you for the kind and encouraging comment, Renee!
Just made this recipe for the millionth (well, maybe not that many) and it always turns out delicious. I've given it as gifts and all immediately ask for the recipe. So, thank you again from all of us bread lovers.
Awesome! Thanks for the review, Kathy!
Can I let this rise longer than the 2-3 hours?
Hi Diane, a little longer would be fine. If it was going to be more than an extra hour, I would leave the dough in the refrigerator a little longer.
My favorite recipe and only one I use for focaccia, please send printable form
for labels, thankyou
Thanks, Gayle! We do not have labels for this recipe at this time.
Am preparing now. Dough is resting in the fridge. Can I leave longer than the 24 hours in the fridge?
Cheers
Kerin
Hi Karen, I find that the yeast begins to lose its “oomph” after 24 hours.
I HATE when food bloggers say the recipe takes a short amount of time (eg under an hour) only to start reading g the instructions and find that doesn't include the OVERNIGHT RISE TIME. I'm looking for something I can make for dinner TONIGHT, and you're just wasting my time by saying 40 minutes so you show up in the Google algorithm. Gross.
So sorry, LBS, I don’t have the option to add rising time right now.
Speaking of the algorithm,
Perhaps do a search for "same day focaccia recipe". It shouldn't take that long.
When you say warm tap water, do you mean warm on the hotter aider or warm on the cooler side? I’m notorious for killing yeast and I was just wondering if there’s a temp to guide me. I scrolled through everything to see if you said, but couldn’t find anything. Thank you 💖
Hi Nikki, you want nice warm tap water. Warm enough that it feels hot when you stick your finger in it but not so hot that you have to pull it out. Plus instant yeast is much more forgiving then regular active yeast so you should be fine!
This is a great recipe!! I have made it a few times with consistently tasty results. This time I kept the liquid content the same switching out 50g of active sourdough starter for water. So 425 water and 50 sourdough starter. I did do one series of stretch and folds before proofing overnight. It was fabulous! Topped it with Italian seasoning, bell pepper and onions in a pretty flower design. Thank you so much for sharing!!
That's great, Christy! Thank you for sharing your review!
What do you think of making a bacon, cheese, thyme focaccia? Really finely chopped bacon and some cheese stirred in dough and then some sprinkled on top? I think this would work, but you're the expert. Your other variations make me think this one could work too. I make the regular quite often and have tried the cinnamon apple before. Thanks, Heidi
Hi Heidi, I think that would be wonderful! So happy you've enjoyed this recipe!
I would like you're amazing!
This was the best focaccia I have ever had. It was super easy to make.
We had it with tomatoe soup and it was delicious!
My husband could not get enough of it. I will have to make more
Awesome! Thank you for the review, JoAnn!
Shouldn't the total time indicate the 12+ hours it actually takes? With the initial rise, 2hr rise and 1/2 rise time?
Hi E, you're right. However, at this time, I don't have the option to add rising time.
Hello ! Can I do this recipe in one rectangular pan and if yes what size would you suggest ? Thanks
Hi Barbara, I have made this in a 9x13 inch pan with great results!
Hello, Do you use all the dough for the 9 x 13 pan or do you use two 9 X13 pans? Please advise as I would like to make this on the weekend.
Hi Franca, just one 9x13 pan.
Is the cooking time any different in the rectangle pan as opposed to the round pants
Hi Bethann, it may take a little longer. Bake it until it's anice golden brown. If you want to be super accurate you could check it with an instant thermometer. The temp should be right around 190˚F when perfectly done.
I've made this bread multiple times. A family favorite. So simple to put together and bake. Thank you!
Wonderful! Thanks for the review, Maria!
How do I add cheese to the bread & can I use kosher salt instead?
Hi Wendi, if you wanted to add cheese, I would add it at the end when you do the dimpling. Kosher salt will work but be careful not to add too much.
Just wondering can this be cooked in a air fryer?
Hi Heather, we haven't tried baking bread in an air fryer.
I want to make this, but I don’t want it really thick. Any suggestions for this?
Hi Jennifer, if you make this in 2 9-inch round pans, it's not super thick. But, if you prefer it even thinnger, you could make it in a half sheet pan.
Teaching my 20 yr old to cook (finally) and he loved both the recipe and the finished product. thank you!
Awesome! Thanks for sharing your review, Jen!
I made this and it turned out so yummy and flavorful. Thank you for posting this recipe.
Thank you for the review, Kellee!
I’m trying this out right now, the dough is in the fridge!
I do not have two 9x9 cake pans, will it work in one larger rectangular pan?
Hi Leigh, yes, it will’s work in a 9x13 inch pan. It will be a little thicker but still delicious! Enjoy
Does the cook time/temp vary using a 9x13 pan?
Yes, give it a few extra minutes, Katie as it will be a little thicker. If you're in question, you can check the center with an instant thermometer - it should read 190˚F when done.
I forgot to mark the stars!
I have literally made this bread 20 times, almost all variations. It is delicious!! I use it to make sandwiches, cutting the loaves into quarters.
It makes a great Italian non-sub sandwich .
Awesome! Thanks for your review, JJ!
It’s amazing. Made it several times
How would I make this quicker with the proof function of my oven??
Hi Tara, this particular recipe is best when it gets a slow rise. If you want a quicker focaccia that is similar, here's a recipe: https://thecafesucrefarine.com/ridiculously-easy-same-day-focaccia/
This was delicious! I love the scriptures on your site, always a good reminder to include God in everything.
I made this on a cookie sheet as a base for. BBQ chicken pizza for my college kids and friends, GONE!! We so enjoyed it, thank you!so much! Always nice for the mom to come across as a great cook:)
Any ideas how to make it using sourdough or sourdough discard?
Wonderful! Thanks for the review, Christy! We haven't tried this with sourdough/sourdough discard.
Can you please recommend a different pan than the round. I have a cottage food bakery and I don’t think my customers would like round if the intention is for sandwiches.
Ty
Hi Julia, you might be interested in this version- https://thecafesucrefarine.com/ridiculously-easy-same-day-focaccia/
Labeling this as ridiculously easy when it has two resting periods resulting in over day of resting should be criminal.
Hi Mary, it all depends on your definition of "easy". With only 10 minutes of hands-on time and fabulous results (don't take my word, read the reviews), that's my idea of easy, ridiculously easy!
Kindest regards,
Chris
Never fail, ridiculously easy focaccia bread. Wonderfully simple to make, and tasted delicious. Great to make with kids too - digging fingers into the dough was so much fun! Thanks so much for sharing this recipe. It is my go-to recipe for shared meals.
Awesome! Thank you for the review, Pam!
I love this bread and so does everyone I know. People come running when I mention I’m making it.
I have had to use dry active yeast many times due to not having enough instant yeast and I honestly can’t tell a difference. So use what you have!
Thanks for the review, Jen!
This is my favorite bread to make--it is ridiculously easy to make and supremely delicious, and it makes a favorable impression on guests.
Awesome! Thanks for the review, Ginny!
I have made this many times. Everyone loves it. I use a jelly roll pan. I’m at over 6,000 feet elevation and this works great. Many thanks for this easy and delicious recipe. 🌟🌟🌟🌟🌟
Wonderful! Thanks for the review, Nadine!
Do you think it could be cooked , frozen and re heated in a hot oven?
Hi, I left the dough in the fridge for 2 days and my bread is very dense. Is it because it was left in the fridge for too long? Or what are other possible causes?
Hi Lex, it could be several things. First of all, after two days, the yeast can lose its oomph. Secondly, it may have needed to rise longer after it was removed from the fridge.
The ideal time for this dough is overnight.
Can I make this recipe in a loaf pan? I only have a glass pie pan unless that works!
Looking forward to making a savory & sweet version!
Hi Chasity, there's not enough surface in a loaf pan to make focaccia unless you cut the recipe way back. You might be better off going with a bread recipe that's designed for a loaf pan.
This is the best bread I have ever made !! thank you. made a few changes and they have worked out well. 1. I bloom the yeast with a teaspoon of sugar and it foams up quite nicely. 2. I add olive oil and herbs to the dough while mixing. 3. I bake the entire dough in a 4-quart ceramic baking dish with olive oil drizzle and more herbs. The loaf is big but rest assured there is no chance this bread will be around long enough to go stale!! Thanks Again.
Thanks for your review, Jerry!
Hi Chris! I have a question. In the recipe, "Prepare the dough", step 2, why do you roll the dough in the oil, THEN form it into a ball? Seems to me that would put extra oil INSIDE the dough. Wouldn't it just be easier to just shape it into a ball first?
Many thanks, as always!
Hi Terry, I find the dough is easier to handle when it's oiled. I just tuck it under to form the ball. A little of the oil may get "inside" the dough but that's not really a problem.
Appreciate the speedy reply! Blessings to you and yours, and have a glorious day! 🙏
This is my go to recipe for focaccia! I've tried a few others, but none compare. I love adding asiago cheese to the top - so delicious!
One question: how necessary is the plastic wrap? I've been trying to avoid using it and was wondering if just a towel would work?
Hi Amy, so happy you have enjoyed this recipe. Regarding your question, you could use a plate over the top of the bowl instead of the plastic.
I've made this 3 times now for different groups and EVERYONE raves about this - I look like such a star! Thank you.
I've made different variations - jalapenos and parmesan cheese in additional to the Italian spices, rosemary and fleur de sel - this recipe is such a great base to add any toppings you want!
I have just made it on a large baking sheet instead and it turns out great!
Since I'm also always in a hurry to make this, I have modified the refrigeration and rising steps to make it in about 3 hours total (including the cooking time). Maybe it could be better, but this quick way has worked so far!
I put the dough into my Ninja Foodi (inside greased parchment paper) on the yogurt setting for 15 minutes, turn it off and let it sit another 15 minutes undisturbed (which makes it double in size). Then I press it out onto the baking sheet on that parchment, add all the oil and the spices and whatever else I feel like, and cover it with plastic wrap for an hour or whatever time I have and then bake - foolproof so far!!
This is now be my "go to"!!
That's great, Gail! Thank you for your review!
what size sheet do you use?
I will definitley be making this........looks yummy!
Enjoy, Maria!
Do you actually use a cup or grams (120 per cup)? Thank you
Hi Gail, I usually measure in cups since that's what most of our readers here in the US use. We do provide the Metric amounts for users who prefer that method.
Thank you for this recipe. My husband has CKD, and I found an incomplete recipe for Focaccia on a kidney friendly website. It was missing half of the instructions. I started looking for a complete recipe online. I was drawn to "Ridiculously Easy". As I got to the end of the recipe, I noticed the thought for the day. I have been totally stressing over the CKD diagnosis. I've been completely frazzled. I went to Psalm 145 and read the whole thing. It brought me so much peace. I really needed this. Thank you. Thank you. Thank you for posting this scripture.
Hi Tracy, I'm so sorry your husband is not well.
At the same time, I love how God gives us just what we need at the particular moment and I'm so happy He spoke to you through His Word. It's true, it never comes back void! I always pray before posting a Scripture that it would be His choice, not mine. Thank you for taking the time to leave a comment and allowing me to see an answer to prayer 💕 Saying a special prayer right now for your husband.
I can't wait to make this! What brand of Kosher Salt are you using? Morton Salt and Diamond Crystal measure differently. I don't want to ruin this with too much salt! Thank you!
Hi Graciannie, we use Morton kosher salt.
I made this foccacia for my brother and his friends and it was a very big hit. He took some home to make sandwiches and said it was awesome. Thanks for all the great recipes.
Awesome! Thank you for letting us know, Phyllis!
Hi there. I was wondering if I can use my 9" square pans. I do not have round ones. Can't wait to try this recipe. I have never tried to make bread. Your recipe seems so simple.
Hi Arnell, you could use 9-inch square pans. The focaccia will be a little lower though as there are 63.6 square inches in a 9-inch round pan and 81 square inches in the square pan.
You can also cook it in a pie pan and you can make it with active yeast and bread dough, it is amazing. Thank you.
Thanks!
can you make this with gluten free flour please respond soon thank you
Hi Rosa, I have not personally tried this recipe with GF flour but I have a GF friend who has and she has not had good results. BUT I have a nephew who is an expert at GF baking and he has a great GF focaccia recipe: https://cakesandcoriander.com/gluten-free-focaccia-bread-with-olives-lemon-and-herbs/
I tried a didferent recipe to compare with yours, and it confirms yours is "the bomb". I make this to give as gifts for my friends who are too busy to bake, and I always get rave reviews, so thank you again for such a great recipe.
That's great, Kathy! Thanks for your review!
Can this be made with dry active yeast & bread flour, equivalent measurements? Thank you, looks amazing
Hi Donna, you definitely can make this with bread flour.
Regarding the yeast, you could you dry active yeast but you will need to proof it with some of the water before adding it to the rest of the ingredients.
I’ve made this recipe a few times now. This time I goofed and used regular yeast and did not proof it first. 13 hours over night in the fridge and it took about 4 hours to rise on the counter but I got a nice full pan of dough. Lots of bubbles. Hoping it tastes ok as I’m serving it to guests tonight.
Hope it all went well, Sherry!
Can this be baked in a pie pan?
Sure, although you'll need 2-3 pie pans, depending on their size.
SO easy and delicious!!! I can’t stop making (and eating) this! Do you think this would work in 1 sheet pan instead of 2 round pans? I need to bake for 40 people and thought it would be easier to cut into small pieces that way, but not sure if the rising would be affected.
Hi Sophia, yes that does work. I use a jelly roll pan as a regular sheet pan yields a pretty thin focaccia.
Hi - I've been making this bread for a few years but decided to leave a comment. The first time I made it, my adult grandson and I sat there eating it warm out of the oven and did nothing but moan, lol. It is the ONLY recipe of any kind of food I have (out of literally hundreds upon hundreds) that I've given a '10' to on my personal rating scale.
Haha! That's awesome, Mary! Thank you for taking the time to leave a review!
Hi Cafe Sucre Farine, I am a devoted follower and have made so many of your recipes and love all. I must have done something wrong with this focaccia recipe. The texture was beautiful but it lacked flavor. I added italian seasoning to the top but the bread itself was a little bland. I looked at the recipe again and I think I followed it exactly. Any suggestions for additives to enhance the flavor? Many thanks for any suggestions.
Hi Debbie, it's tough to say what went wrong and why your bread was bland. Not enough salt is the only thing I can think of. I'm sorry you didn't enjoy this, so many others have loved it
Thanks so much for this recipe, it really lives up to its name. I do the communion bread for our church every month, and this is the recipe I've used since I discovered it almost two years ago. The congregation loves it. It's a small congregation so one recipe makes more than enough to fill the bread plates to pass around and also make a small 6 inch loaf for the pastor to break. It's good right out of the oven and even makes good toast.
Hi Janet, what an hour to have this served as communion bread. Thanks so much for sharing! 💕
Brilliant recipe! Baked in 2 round cake pans. Took 26 minutes. Topped with Italian seasoning and parmesan.
That's great, Anne! Thank you for your review!
My neighbour is famous in our community for his fabulous focaccia bread. I was always too chicken to try it... till now. I took him over a warm loaf and he raved...insisted on getting the recipe. He'll be making this recipe from now on, he says. He thought the texture was better than any he'd ever made.
That's high praise, Lynelle! Thanks for your review!
Hi! So this recipe makes 2 loaves? I want to make 4 decent sized loaves, so should I just repeat this recipe twice?:) Thanks
Hi Morgan, yes, each recipe will make 2 round loaves.
You mention a video but I have not found a link in the article or on the website.
Hi Gerald, it's in the middle of the post. Make sure the page loads all the way. You may also need to turn off your ad blocker to see it.
My first attempt at making this and my yeast is not as active as it should be. I did the first rise for 16 hours in the fridge and it came out looking the same as when it went in. I separated it into two pans for the second rise and it did nothing. I've continued to leave it in the pans and on Day 3 I'm seeing some bubbles in the dough and it is demonstrating activity. Should I keep it for probably 2 more days to achieve the desired bubbly rise before baking or scrap it?
Hi Jacqueline, I suspect your yeast was old. Did you use instant yeast? If you use regular yeast, you would need to activate it before adding it to the flour. I'm sorry to say that if it's not rising after 8 hours in the refrigerator, it's not going to rise.
This recipe is easy and delicious! I used bread flour instead of AP. My kids keep requesting me to make more. Like, every day they are asking for a loaf LOL! Thank you!
Awesome! Thanks for letting us know, Katie!
Hi Chris,
We absolutely LOVE your focaccia (and so does everyone else we've given it to). Just wondering if you have ever added cheese, and if so how much and how it turned out.
Thanks so much,
Sue
Hi Sue, you can definitely add cheese to this recipe. Parmesan is delicious! Watch it carefully near the end of the baking time and cover it loosely with foil if it seems to be getting too brown as the cheese tends to brown quickly.
Wonderful! Can't wait to try it with cheese. Thanks for your reply and all of your terrific recipes! Also really love the scripture at the bottom of each post ❤
I am making this easy bread and I am wondering if I can add cheese to it before baking or not. Just wanted to try it. Thank you for the recipe. I am anxious to see if it turns out. It smells delicious!
Hi Debbie, yes you can do that. Enjoy!
I found the dough very very dry for some reason, I had to add another half cup of water, the dough rose but was pretty tough, I set it in the pan and will let it proof again after 10 hrs in the fridge, we'll see how it goes but I probably won't use this recipe again as I've had better luck with others.
So sorry you had trouble with this recipe, Rhiannon. This is not a dry dough - it's quite loose. It's difficult to say what went wrong without having been right there in the kitchen with you.
very disappointed, made this today but the breads didn’t rise andso they are flat and hard. I followed the recipeto the letter🙁
Hi Carol, I'm so sorry you had difficulty with this recipe. It's difficulty to say what went wrong without having been right there in the kitchen with you - so many others have had great success with this reicpe.
Why can’t you use active dry yeast in this recipe… it’s all I have on hand😬
Hi Kaitlyn, you could use active dry yeast but you will have to proof it first in order to ensure success. Instant yeast does not need to be proofed.
Hi there! Is 8 hours in the fridge required? If I do a little shorter (6hours), will that change the bread drastically? Didn’t realize it was 8 hours + the 2-3 hour proof time!
Hi Katie, 6 hours will be fine. Just let the dough sit out and start to rise for about 30 minutes before refrigerating. That will give it a head start!
Once again you have provided an incredible recipe! I made this one twice over the last two days as well as the cinnamon raisin adaptation. I probably shouldn't make the cinnamon raisin one as we can't leave it alone! My first trial was with regular flour and the next two were made with bread flour which I do think yielded a bit better texture. The dough hook is in my Anazon basket as I'll be needing it lots!
I'd love the labels, please.
Thank you for sharing such incredible recipes.
Sandy
Thanks so much, Sandy, for taking the time to share your results! I know what you mean about the cinnamon raisin version being a little dangerous. 😋
We'll be happy to send you the labels.
Hi. Love this recipe however the last few times it hasn’t browned. Tasted GREAT but no color. Could you take a stab as to why? Have a great oven & as I said no browning :(. I’ll try whatever you recommend. And I’ll still be making it. Thanks
Maria
Hi Maria, are you using a different type of olive oil? If not, I'd just leave the focaccia in the oven a little longer until you get a nice golden color.
Yes, maybe the olive oil. I am using a different one. I will let you know.
Thanks for sharing with me!
Maria
Good day
I have not made this bread but will definitely in a day or two. Just stopped by to say thank you for the blessing of the song, is He Worthy.
Blessings
HP
So happy to hear that, HP!
Five stars are not enough for these wonderful bread recipes... thank you for beautiful recipes!,
So happy to hear that, Cathie!
I need to make a jelly roll size (10.5"x15.5") loaf. Would the dough amount needed equal the two rounds? Thanks!
Hi Melissa, that should work! The square inches is of your pan and the two 9-inch pans is nearly identical!
I made this yesterday and it was amazing!! I am an experienced cook and have always wanted to make focaccia but thought it was to hard. It is Ridiculously Easy!! I wanted it for dinner so I mixed it up and proofed it till it doubled. punched it down and split it and proofed it again. dimpled it and seasoned the top and baked them - everyone was so impressed - I will never buy store bought focaccia again! I have a second batch going in the fridge right now to bake up tomorrow to see what that turns out like. My tip - I mark all my bowls with their weight so I know how much to deduct when I weight the whole bowl - this has saved be much grief over the years! If you are baking and get distracted and the scale turns off you can keep going!
So glad to hear that, David! Thanks for your review!
I don't usually make "bread" anything, but I tried this today. It is absolutely delicious and easy. Thank you - love your recipes!!!
Awesome! Thanks, Marie!
Thanks so much for this awesome recipe. A friend turned me on to your website/recipes and I'm so grateful. Not only are your recipes great for this budding cook but the website is phenomenal. Both recipes and website are detailed, professional and very user friendly. Count me as a very regular user.
Thanks so much, Jayno! And welcome to The Café!
So delicious!
Oh.My.Gosh.
This is SO freaking delicious! And ridiculously easy!
I will be making this bread again for sure.
Thanks, Kelly! So glad you enjoyed it!
Thoroughly enjoyed making focaccia for the first time following your recipe! Made several for our school teachers who loved it! Indeed it was ridiculously easy to make, versatile, and quite forgiving as well. Will be playing more with toppings next time. Got so many asking for the recipe and I happily obliged.
**only thing I’d suggest you edit is the text on quantity of yeast, it mentioned *(1 packet). Thank you, btw, for allowing ability to adjust quantity to change yield. However, the “(1packet)” text may have to be removed as it can be deceiving to the reader especially those that may not pay particular attention, like me. 😉
Hi Maria, so happy you enjoyed this focaccia!
Regarding the "packet", that's how it's sold here in the US in many grocery stores - a packet is 2¼ teaspoons - that why I put both - so people who buy it by the packet, wouldn't have to measure.
I made your recipe and it was awesome thanks. A friend says she spreads pesto on hers before the dimpling and I plan to try this next time. It is delicious toasted after a couple of days - makes the crust crunchy again. My danish dough hook is a favourite tool!
That sounds delicious, Judith!
Beautiful focaccia. Thank you for tye recipe.
Before I make it, I'm wondering, are you using extra virgin olive oil? The reason I ask is because of the lower burning point but I love the flavor.
Hi Julie, yes it's extra virgin olive oil. Enjoy!
It's wonderful!!
Best tasting focaccia I've tried! And so little work!
Thank you again!
Wonderful! Thanks for letting us know, Julie!
Just made this for the first time ever making any kind of bread and it was so easy. Came out exactly as shown. Very crunchy on outside and airy on the inside. Use rosemary on one and cherry tomatoes on the other. Sea salt is a must. Absolutely delicious. Thank you for sharing. Can't wait to make it again and again.
I'm so glad, Belinda! Thanks for letting us know!
I am scouring the comments for someone else who messed this up. I followed all the instructions but after rising in the refrigerator for 17 hours plus another three hours in the pans on the countertop, my bread did not rise… At all. I cannot figure out what I did wrong… any thoughts?
Bummer! I'm so sorry you had trouble with this recipe, Lindsey. What kind of yeast did you use? Did the dough rise in the refrigerator?
My guess was you used water over 120°. I’ve done that many times now I always temp my water I add and shoot for about 110°. You could have also had old yeast. It only lasts a year or so in the fridge after it’s been open. Good luck!
Can I ask the purpose of refrigerating for 8 hours? Other recipes I've found do not call for it. Suppose I decide at 2 pm that I want foccacia bread for dinner, can I skip the refrigerator and let it rise twice in my oven on the proof setting? I'm not an experienced bread baker. Thank you for your advice!
Yes, you can definitely do 2 rises. The purpose of the slower cold rise is to help develop the dough more slowly and creating a more “ pillowy” final bread. If pressed for time you can do a 2 hour first rise followed by a 1 hour second rise ( dough shoud be transferred after the first rise and double in size ). I prefer to use a 9x12 cake pan.
Thanks, Faber!
Do you also have a ridiculously easy pizza dough recipe?
Hi Sherry, we do!
https://thecafesucrefarine.com/easy-deep-dish-pizza-dough/
We also have this one which is delicious:
https://thecafesucrefarine.com/easy-thin-crust-pizza-tutorial/
Hi Tonya, the purpose for the 8-hour rise is to allow the dough to develop lots of flavor. You can make it quicker but it won't have the large artisan-type air pockets like it will have with the slower rise.
Since discovering your Ridiculously Easy Focaccia earlier this year, I've made it a ridiculous number of times! The first time I made it, my son looked weak in the knees upon his first taste and told me to never make it again -- he was afraid he'd eat the whole batch (which he actually nearly did). I've enjoyed experimenting with different flour combos and my standard mix is 2 cups AP flour, 1 cup einkorn flour, and 1 cup whole wheat or spelt flour. I usually top one with Everything Bagel seasoning and one with pizza seasoning and Parmesan cheese. I appreciate that I can refrigerate the dough overnight and bake it fresh the following day. Thank you.
Thanks for your review, Nancy!
Hi, your bread looks wonderful. I'm making it with wheat flour (vs. white), and the 4 c flour to 2 c water ratio did not yield anything close to what your video shows. (???). I added at least another cup just to get it incorporated and somewhat moist/wet (but not even close to what your video shows. Any ideas? I wouldn't think that just the substitution of Wheat vs. White flour would yield that result (??) Thanks, Lisa
Hi Lisa, I haven't tested this recipe with wheat flour so it's hard to say. I wouldn't advise using all WW flour as this focaccia would come out very dense.
I have used this recipe for a couple of years. I snip a generous tablespoon of a poultry bouquet (sage, rosemary, thyme) over the top of each loaf and add some chopped artichoke from a can on top. But I don’t just eat it as is… I make my Thanksgiving dressing with it! I don’t use any other seasonings in my dressing except what’s in the bread.
That sounds wonderful, Barb! Thanks for letting us know.
This was so delicious! I've never had much luck with bread before, but it turned out perfectly! I made mine in a 9 x 13 loaf pan with fresh chives - this is definitely my new go-to bread recipe.
Wonderful! Thanks for letting us know, Magdalena!
I've been making your recipes for a year now and love them. I have to monitor sodium intake and for the seeded focaccia bread that I just made it gives a sodium amount but I can't see what the portion size is.
Hi Mary, the recipe makes two rounds, each with 8 servings so if you cut the loaf into 8 portions, that would be one serving.
Hi Chris - Love this recipe and make it all the time in Denver. Always turns out perfectly. I’ve made it twice in Palm Desert (almost at sea level) and both times the loaf wound up pretty short. I don’t feel like I’ve done anything different but wondering if I should make some adjustment for the vastly different elevations?
Thanks for all your great recipes. I’ve made many and never had a dud 🙂
Hi Janet, I honestly don't have any experience baking at sea level (we live at 2700ft in the mountains of NC) but this article may help: https://www.foodandhome.co.za/how-to/baking-sea-level-high-altitude-baking
Phenomenal bread! I had run out of bread. Even the loaves I keep in the freezer and I had planned soup the next day. Found this recipe. It has now become a family favorite! Tomorrow night is spicy sausage and corn chowder night. You can believe I have a bowl of dough in the fridge right now. Instead of two cake pans could I do a 9x13 pan? Would it bake the same?
Yay! So happy you have enjoyed this recipe, Jean! Yes, you can make this in a 9x13 pan, however, it will be thicker and take a little longer to bake. I would check it at the given time and every couple minutes after, until it's nicely golden brown. If you want to check for doneness with an instant thermometer, the temp should be between 195 and 200˚F.
This focaccia bread is outstanding. It is, as you say, ridiculously easy. I served it for Thanksgiving with a cream of mushroom soup. Unfortunately, I have very few left overs! I guess I shall have to make the two breads again.
Your instructions, measurements, and baking times are perfect.
I am now going to try the breakfast version with apples and cinnamon.
Thank you for this.
That's awesome, Carole! Thank you for letting us know!
Can I use this recipe for a sheet pan instead of cake pans? That's all I have available to me at the moment. If so, how should I adjust baking?
Hi Rachael, you can use a sheet pan, however, the focaccia will be much thinner. I don't have the exact time but I would bake it until it's a nice light golden brown and the bottom is crisp.
Very succesful and easy. Does not need the endless and useless folding of some focaccia recipes ! WILL DEFINITELY BE MY GO-TO RECIPE IN FUTURE
THANKS
Great! Thanks, Vivien.
I made your recipe last night/this morning and am very excited with the results! Such an easy recipe and the bread is moist, soft and scrumptious. This is going to be a regular in my house. I love how you can make the dough the night before in a matter of minutes with no mess, pop it in the fridge overnight and then shape and proof it the next morning and time everything to have fresh warm focaccia to serve when family or guests arrive. Now to try the cinnamon/raisin recipe! Thank you. Love your blog. Jane from Australia.
Thank you for letting us know, Jane! So glad you enjoyed this 🙂
Hi,
I made this bread last week and it came out perfectly. I am trying again today but the risen dough had a lot of water at the bottom of the bowl. Do you think the tap water wasn’t warm enough or maybe too warm. I’m baffled.
Thanks
Anita
Hi Anita, if your dough has risen, your water temperature was fine. Could you have inadvertently used too much water? That's the only thing I can think of although that would generally just create a very loose dough, not one that separates
Is there a chance you use more than 2 cups of warm water? I have made this recipe three times now and while it has turned out okay, my dough looks veryyyyy dry after mixing it initially and nothing like yours in the video. I don't get any large bubble forming after rising so I am not sure if maybe I am not adding enough water? There is usually flour left in the bowl that I have to try and squish the dough into to mix it fully.
Hi Kelley, I use exactly 2 cups of water but I'm wondering how you measure your flour. If you're scooping and leveling you may be ending up with more flour than you need. I would spoon the flour into your measuring cup, then level it off. Also, try holding back on a little bit of the flour. It should be a fairly thick but loose dough that has lots of bubbles after it rises. You can always add the additional flour to thicken the dough up, if needed.
This was “ridiculously easy” just as described. And so delicious!
Awesome! Thank you, Gayle!
I enjoy reading your introduction to each of the recipe. I am getting the sense of how much love and care you put into creating these recopies. How proud you are with them! So I decided to try this recipe since I am into bread baking recently.
I can say not only they are soooooo easy to make, they are so delicious!! I couldn't help but also tried baking the cinnamon version. My family love them both!!!
Thank you so much for sharing.
Thank you so much for the kind comment, Vana! I'm so glad you enjoyed this recipe!
I am in the depths of despair because my dough has been in the fridge for about 15 hours and it is not looking high, light, and fluffy, as on your video. I was a bit leery when I mixed the dough as it was way harder/drier looking than yours in the mixing bowl as well. I used KA bread flour, kosher salt, and saf-instant yeast. In a little while I'll take it from the fridge to put into bowls and hope and pray it expands more there. In the meantime, do you have any idea why my batch isn't bubbly like yours?
Hi Emily, it's really difficult to say what went wrong without having been right there in the kitchen with you. The dough should not have been hard or dry when you mixed it. It's a fairly loose douhg.
Can you freeze the bread after baking?
Yes, it freezes perfectly, Debbie!
The recipe is easy in the sense that the directions are fairly straight forward and the ingredients required can be found in your every day kitchen, however, I personally find it a bit misleading to say that the prep time is only 15 minutes, when in reality one of the key steps is letting the bread sit for 8 to 24 hours, and then another 2 maybe even 3 hours before the dough is even ready to go in the oven to bake. I would kindly ask to adjust the time that is currently stated at the top to something a bit more accurate to the actual duration of time needed to complete the recipe to where it is ready to eat. Thank you.
Thanks, Shelby. I understand what you mean. Unfortunately, at this time, my recipe plugin doesn't allow me to include rising time. So the prep time of 15 minutes refers to hands-on time. Hopefully, in the future, I'll be able to include those times.
Hi Chris,
Could this dough be allowed to rise in one bowl, then divided into smaller pans to rise for baking? I was thinking perhaps 4 inch diameter pans for individual servings or to bake and freeze for later. Would the baking time be reduced by much?
Thanks for the help ~ Honey C
Hi Honey, that should work fine. I can't give you the exact time without testing it myself but I would bake them to a nice golden brown.
So easy I could make this with my 7 and 4 year old kids! Thanks for such an easy recipe!
I love that, M! Thanks for letting us know!
Finally made this today! Delicious and as always Ridiculously Easy! Can't wait to experiment with different combinations of fresh herbs. I will also try with GF 1-1 flour for my daughter.
Thanks for letting us know, Jacqueline!
I have tried both he savory and cinnamon raison recipes. Both are absolutely rediculously delicious. They are easy, and our household , a senior---me, a middle aged, and a twenty year old almost battle to grab the last piece of either kind. The savory, when sliced and spread with garlic butter, makes awesome garlic bread, toasted in the oven. The cinnamon-raison, if sliced and toasted, then buttered, is more than awesome. It is our daily breakfast choice for each of us, one who spreads the toast with peanut butter as well. Thank you so much with sharing these recipes. By the way, they freeze extremely well.
That's awesome, Janie! Thank you for taking the time to let us know 🙂
Hi there love!
Should I decide to use bread flour instead, is the measurement still the same 1:1?
Thanks for sharing all your recipes by the way! I'm so excited to try this one out! 🙂
Thank you
Denise
Hi Denise, yes, bread flour will be the same amount! Enjoy!
Hi, I would like to make your recipe but I don't know how much flour should I use because in Belgium we use graams instead of cups. So 4 cups of flour equals how many grams? Thank you.
Hi Tatjana, under the ingredients list you can click to convert the ingredients to metric. Enjoy!
Dear Chris,
I went to visit my homeschooling daughter of 5 children two days ago & I wanted to share how they used the focaccia bread I made for them using your recipe. Monday through Friday each child has a day they make lunch for their siblings. Yesterday was Wesley's day. He split the bread, put turkey lunchmeat on the bottom with grated cheddar cheese on top. The top piece he buttered & placed them both on a sheetpan & reheated them in the oven probably 8-10 minutes. Then he turned on the broiler until the cheese was nicely melted. He spread the top piece with mustard & mayo and put it together and cut into wedges. It was a huge hit. He did share with Mother & Grandma. Superb! They want the recipe now because they all want to make it for their day. They have always liked making lunches for each other but they were really excited about this one. They all had ideas what they could put in the bread on their day. I expect them to be making their own focaccia soon. The recipe is in the mail. Thank you for a great bread enabling Grandma to make wonderful memories with her grandbabies whom I don't get to spend that much time with. Then we made my mother's sugar cookies together. Such a great time together all thanks to your inspirational bread recipe. I also took them your strawberry, balsamic, pepper jam which they devoured. Now I have a list of requests for my next trip to visit. Enjoying your site & appreciate you sharing scripture excerpts & songs. Blessings,
MaryElizabeth
Thanks for sharing this, Mary Elizabeth! What a fun story. I love that you're sharing your love of cooking with them, a gift that will keep on giving!
By 'all purpose flour' Do I use plain Flour instead of bread flour then?
Really looking forward to trying it!
Thanks
Yes, our all-purpose flour is similar to Plain flour. But you could also use bread flour for this recipe, just not self-rising flour.
My dough has been in the fridge since yesterday. About 12 hours. It looks a little runny. Is that normal? First timer
Hi Jean, it is a wet, fairly sticky dough. I think you'll be just fine!
This bread is so easy to make, and so yummy. Glad I found this recipe as it is always a hit! It is one of my go-to’s for any events. I love to throw in some rosemary and Italian seasoning into the dough as well as on top, and I tend to use a little extra water to ensure the bread is nice and moist.
I’m wondering how long I can leave the dough in the fridge for? Or if I can freeze the dough? Initially, I needed to bake the bread tomorrow (Thursday), so I prepared the dough yesterday (Tuesday), but now won’t be baking it until Saturday. Any advice? Thanks!
Hi Victoria, so happy you've enjoyed this recipe! I would probably go ahead and bake it, freeze it and then rewarm it before serving. Tuesday to Saturday is probably a little too long. I'm afraid the yeast would lose its oomph.
This is a great recipe! Easy to follow directions and baked up a perfect crusty golden brown!
Yay! Thanks for letting us know, Jenna.
Hi! This looks like an amazing recipe and I’d love to give it a try! I’m a high school culinary teacher and I only have my students every other day. I know you said you have put it in the refrigerator for up to 24 hours, but I would need to have it in there for 48 hours. Do you think it would still work? I’m starting a new class next year called baking and pastry and my classes are every other day and only 80 minutes, so I’m desperate to find some breads that will work. Any suggestions are appreciated! You’re very talented and it all looks delicious!
Hi Lisa, you could definitely let this rest in the refrigerator for 48 hours! It actually gets better. You might need to take it out early though if you only have 80 minutes as you'll need longer for it to warm up and rise the 2nd time.
Lol. The recipe prep time should include how long the dough is meant to be in the fridge for. Although the recipe is simple it needs planning ahead (8-24 +) and that should be in the first few lines of the page.
Hi Rita, I don't have the option at this point (with my recipe program) of adding that to the prep time.
This recipe is really great. My whole family including the grandkids just love this bread. It is so easy to mix up and clean up. The family comes over to our house for dinner every Saturday and I whenever I make this, they devour one of the loaves before dinner.
That's awesome, Lynn! Thanks for letting us know!
Love this bread. So good that my brother who was a chef took some home to make sandwiches.
Would like to know if baking in convection oven is different than a conventional oven.
That's awesome, Phyllis! A convection oven uses a fan to blow the air around so that there are no "hot spots" like a conventional oven. Because I know many people do not have a convection oven, I test my recipes using a conventional oven.
I'd like to make this in a square or rectangle pan. if so, what size would be appropriate? i'm ok with one big one. also, is the parchment required if the pan is well oiled? all the focaccia i've seen being prepared did not include the parchment. thanks in advance! i've got some herbs de provence that i'll be topping mine with. 🙂
Hi Beka, you can make it in a 9x13-inch pan or 2 9-inch pans. You could also make it in a sheet pan if you want a thinner finished product. I like to use the parchment as I think it makes the bottom particularly crisp and ensures easy removal for the pan but you could probably go without it.
im signing up to say that while this recipe is good, you NEED to do something about the 2000 miles of storytelling before we get to the actual recipe. i should not have to scroll for days. this is a thing food blogs do and it is ANNOYING.
So happy you enjoyed this recipe! Oh, and you don’t ever have to scroll through anything. There’s a “jump to the recipe” button at the top of every recipe. Enjoy!
Some people actually enjoy reading peoples journeys and/or adventures with their culinary skills. I am one of them. There is a “jump to recipe” button if you want to skip the reading. There’s no reason to be snarky.
Thanks, Jenna 💕 😊
I just made this today and it was absolutely amazing. First time I've ever even attempted to make bread so I wasn't expecting much. I'm from NZ and used our standard measuring cups but I did need to add about 2 extra tablespoons of water. The dough was so dry the flour wasn't incorporating enough. Despite mucking around with my ridiculous oven ( I did use an oven thermometer but I had it on fan bake because I forgot you said conventional lol) the bread was fantastic!!! I'm going to try red onion and parmesan mixed into the dough tonight...that's my fav combo! Thank you so much for the recipe!
I forgot to mention I halved the recipe and made one loaf in an 8inch pan.
Awesome! Thanks, Kerrie!
This was sooo good! I served it with your manicotti. It turned out perfect. Everyone loved it. I loved how low maintenance it was! Thanks for sharing!
Awesome! Thanks for letting us know, Angela!
I've been making this bread for some time and should have commented sooner. The first time I made it I was nervous about how it would turn out. Well, it was a hit with the entire family (especially me). I love the fact that I can make it the day before I have company. It's just one less thing for me to do the next day. I'm a big fan of preparing dishes ahead of time. This is by far the BEST focaccia bread I've ever made. Thanks for sharing.
Awesome! Thanks for letting us know, Ann!
This bread is AMAZING! My family absolutely loves it, and I can't count how many times I have shared this recipe. My recent college grad is making this for his roommates to rave reviews. Thank you for yet another wonderful recipe!
I love that, Susan! Thanks for letting us know!
OMG! I just made this and can’t stop eating it. This recipe is as good or better than the recipe I’ve made by Anne Burrell and so much easier! Thank you so much for another wonderful recipe!
Awesome! Thanks so much for letting us know, Nikki!
Can you freeze these ?
Would love to try this ..
Hi Leslie, yes it freezes well!
I tried a lot of focaccia recipe and this by far is fail proof! I’m a horrible cook (not enough patience) and this recipe made it extremely easy and some of the comments on using regular active yeast works really well too. I’m book marking this recipe and have favorited it. Thank you so much for this amazing ridiculous easy focaccia recipe! ❤️
Awesome! I'm so glad to hear that, Sien Aime!
I only have dried active yeast. If I make up the yeast starter then subtract the liquid from the 475 ml will it still work?
Yes, that will work fine, Donna!
It was great! I have made this recipe many times now in different pans and it is always yummy. Thank you so much. xx
Thanks for letting us know, Donna!
Hi! I've made this recipe before and it's turned out great. I know you say it's ok to leave it rising for longer-- what about resting? I'd like to separate and rest the dough tonight to put in the oven first thing tomorrow morning before I leave for work (and my fiance can take it out of the oven)-- that way we can head out of town for thanksgiving as soon as I get home. But that would mean it's resting for 8ish hours.....is that way too long???
Hi Sarah, that would be a long time to rest the dough. It would be better if you would refrigerate the dough tonight then get up early and let it rest untl you leave for work. Then pop it in the oven and let your fiance take it out.
I have always wanted to try making focaccia and today was the day! Thank you for making it SO easy!
I'm so glad, Denise! Thanks for leaving a review!
Hello, I have a 9 x 12 pan, can I put the dough in there without dividing in half or will it be too tall?
Hi Jessica, it will definitely be a thicker bread but still delicious. It works well for sandwiches in that size pan.
Hi! First timer here. Wondering if I were to put all of the dough in a 9x13 baking dish to have one large rectangular focaccia as opposed to 2 round, would I need to adjust the baking time? Will it need to bake longer?
Hi Kimberly, you could do that for sure! The focaccia will be thicker though and might take a bit longer to bake since it's larger.
I am looking to make this for a church reception. I noticed in previous comments that this could be made in 1/4 sheet cake pans. Can this recipe be doubled? Can I make in half sheet cake pan?
Hi Kim, this recipe can be doubled and a single recipe can be made in a half sheet pan.
I love love love this recipe and have made it many times but would love to see the time adjusted to reflect the rise time in your total time at the top of the recipe....
Hi Emily, I would really like that too but at this time my recipe plugin doesn't allow any custom times like resting.
Could I bake this in a cast iron pan? Not divided in two, just as one whole foccacia?
Hi Erin, you could but you would need a fairly large pan. I would use at least a 12-inch cast-iron pan.
I have one 9 inch cake pan. Could these also be made in two 1/4 sheet pans or will they raise too high?
Hi Melanie, you could definitely use two quarter sheet pans!
Can you use self rising flour for this recipe?
Hi Morgan, I would not use SR flour for this recipe. You don't need the extra ingredients that are in SR flour.
Absolutely perfect. Thank you. Followed your directions to the t including cutting the parchment paper. Lol I’ve tried to post the two pictures of the focaccia right out of the oven.
Awesome! Thanks for letting us know, Noemia!
Your recipe says use warm water.....or follow directions on the yeast packet. Those temps ar e not warm. I am wanting to make this bread but just want to make sure I use right water temperature.
Hi Carolyn, definitely use nice warm tap water. Hope you enjoy it!
Made it today - finally!! It was a lovely side to my cherry tomato/bocconcini/and pesto salad! With fresh rosemary, oregano and basil from the garden! Love this time of year, how bountiful were the crops in my neck of the woods.
Thanks you for posting this ridiculously easy recipe!
Thanks so much for letting us know, Mary!
Hey
I was wondering if I can use active dry yeast instead of instant yeast? The recipe looks great, and I really want to try it out.
Hi Urvashi, if you use regular dry yeast, you will need to activate it before adding it to the recipe. Just combine it with a few tablespoons of the water water and let it sit for 5 minutes or so until it's nice and bubbly. Then add it along with the rest of the water to the dry ingredinets.
The recipe says 40 minutes total time. Then the first instruction is put together ingredients and wait 8 hours...... just be clear about how long it takes, I should've read the instructions before starting
Hi Ben, sorry that was frustrating to you. My recipe plugin at this time doesn't allow a "resting" or "proofing" time. You're right though, it is important to read a recipe through before starting. Again, sorry if this caused a problem for you. Hope you get to try the bread as it is really delicious!
I absolutely love this recipe, I’ve made it many times now, always great. I add sliced olives on top and started to add sun dried tomatoes. I added them when I put the dough in the cake pans, spread them over the dough and then folded the bread over and inverted the loaf. It was great. Do you think you can use whole wheat flour? A friend wanted whole wheat.I had never made yeast bread before although I’m a avid baker.
Hello, I have followed the metric measurements on this recipe and for some reason the dough is really wet- I left it overnight and it did rise but it’s too liquid to actually form into balls in the pan and coat with the oil. I’m not sure what’s happened as I followed the instructions exactly. Is there anything I can do at this point?
Hi Ruth, it’s supposed to be fairly loose. You basically “pour “ it into the pan and then tuck the edges under and proceed with the directions. I think you should be okay if you followed the measurements.
Thanks Chris! I just cracked on and made it and it was delicious! I think next time I make it (and I will make it again!) I might use slightly less water just because it was so wet that it was impossible to make the dimples in the dough so it didn’t look quite right. Tasted amazing though, thank you 🙂
Thanks for letting us know, Ruth!
Hi Chris, just to update, I noticed on one of your other recipes (buttermilk biscuits, also delicious!) that you said British flour was slightly different and you needed to add more. I’m in England so I upped the flour on this by about 30g when I made it again and it was much more successful! Thanks so much, this is going to be my go-to recipe every time we have guests!
That's great to know, Ruth! Thanks so much.
Excellent focaccia, the best I've ever tried to make. A no fail easy recipe. Served this with the Cafe's fresh tomato soup. Great combination. Freeze very well.
Awesome! I'm so glad to hear this, Candace!
This bread is truly easy, and so, so good. I can't remember how many friends and family I have shared this with! Thank you for another wonderful recipe!
Thanks so much for letting us know, Susan!
Greetings from Downunder! I'm a grandmother, and my family come over once a week for dinner. Some time ago, I served them your Focaccia and it was a huge success. Since then, it doesn't matter what meal I make - there has to be Focaccia on the table. Thank you so much for such a simple, easy and delicious recipe.
I love that, Shelia! Thanks so much for letting us know!
I made this to go with your manicotti recipe I am serving for Sunday lunch. I baked it last night to have ready and to test it out since it was my first time making it. Grandson is visiting and Between my husband and grandson, I hope there’s enough left for lunch ! A lovely bread that I will make frequently because it is easy to make and delicious to eat. I think the flaked salt and herbs add so much flavor . Have a blessed Sunday.
Awesome! Thanks so much, Jennie!
Tried this out, and it definitely lives up to being ridiculously easy! I could dimple focaccia all day. Thank you for sharing this recipe 😀
I'm not sure if I didn't cook it long enough (the top of the bread was golden brown already), but it tastes a little more yeasty than I thought it would? Did I underbake it perhaps? (20mins baking time, because the top was a medium brown color)
Will bake again. This is such fun bread.
Hi Barbs, not sure why your dough tasted yeasty, might be a stronger tasting yeast. The bread should be a nice golden brown on top and if you peek at the bottom it should be nice and crisp. If the bottom needs a little more time (but the top is already golden), just cover the bread with foil and bake a little longer.
This is so easy and delicious! I really like the texture.
Fun to make!
Definitely a 'make again!
Thank you for this great recipe.
Awesome! Thanks for letting us know, Debbie!
This is a great recipe but I’m almost never organized enough to mix the dough the day before I want it- so I’ve adjusted by doing my rise instead of the fridge in the microwave (OFF) with the door slightly ajar to keep the light on and a pint of hot/warm water in the corner to make it nice and humid. I refresh the water throughout the day and can usually get away with a 5hr rise time. I keep the pan rise the same if I can. My kiddo LOVES being the “dimpler” too. I’ve never been disappointed!
Thanks so much for sharing your results, Kelly!
This is a fantastic recipe, beautiful with olives, or grapes, yes grapes, or chopped apricots. I once left it 48 hrs in the fridge and it was perfect. Thankyou!
Awesome! Thanks for sharing your results, Rhonda!
Nice recipe but the time to make should include the 8 hour rise time too. I started mixing without reading all the way through (my fault) ended up doing a 30 min rise then baking. Still turned out well.
So sorry, Karen, for the confusion. At this time, my recipe plugin doesn't allow me to add the resting time. I'm happy your focaccia turned out well. I've discovered that this recipe is very flexible!
i'd love to try this recipe, but can i make for 1 pan only using half of all the ingredients listed?
Yes, that will work fine!
I don't know why took me forever to try this bread. Made it for company and it was fabulous to say the least. A lot of "this is really good" comments while eating dinner. Nothing like trying a new recipe for company! but worked out great. So happy and happy to have finally made this. Will not be the last time for sure. Heated up well in oven the next day - the few pieces had left!
Thank you
Awesome! Thanks so much, Kathy!
Do you have a favorite dipping oil? I LOVE this recipe! A real family hit!
Hi Sudie, I really like the Tuscan olive oil from Costco. It comes in a glass bottle. They also have a nice California olive oil.
This is the easiest and best bread! I made it for Christmas for our family and the gobbled it up. I'm making a double recipe to serve for Easter tomorrow. Flaky sea salt makes it amazing! We dip it in olive oil and spices.
Yay! I'm so glad, Hollyre!
I’ve been using this recipe for a couple years now. It’s become a favorite in our home and any time there is a family get together it’s always requested. Our favorite way to make it is to top it with King Arthur Flours pizza seasoning, it gives it the most amazing flavor!
I love that! Thanks for letting us know, Mariah!
OMG!! It's very possible that I'll never eat anything else... ever. It's that easy AND that amazingly good.
Haha! Thanks, Karlee!
Is the nutritional info per slice or per loaf???
My husband who was born and raised in Italy had me use Type 0 flour instead of AP flour. It came out great but I left it a little too long because it wasn’t browning fast enough. Next time I’ll raise the loaves up higher and do less time. Great recipe! Thanks!
Hi Zalina, the nutrition info is for one slice of bread. I'm glad you enjoyed the bread!
Will give this 5 stars!! So easy to put together and just pop in the fridge overnight. The next day it's a breeze to take it out of the fridge and let it rest in a warm place for 2 hours. Divide it in half, put it in prepared pans and you get the best bread ever!!!! It was a great hit at last night's dinner party!
Thanks so much for your review, Jan!
I made this GREAT focaccia today. My Italian friend said it is the best she ever tasted. As a "rookie" Italian cook I could not be more proud. Followed recipe exactly. Will do so again.
Thanks, Karen! I'm so glad!
Forgot to rate. Wish I could give 10 stars
Thanks, Debbie!
I love this recipe! So good and so easy. I’ve never been much of a bread baker, but this has changed that. I literally cannot stop eating this crisp, crunchy bread. Have made it twice already. Thank you for this wonderful recipe.
Yay! I'm so glad to hear that, Debbie.
This is AMAZING! With all kinds of unexpected happenings after I made up the dough, I had to put it in the refrigerator and there it stayed until 26 hours later. When I finally placed the dough into the 2 cake tins, it was time to make our dinner and feed my mother. Soooo, 4 hours later, I had a kitchen clean enough to start the oven again. After baking, I let the 2 rounds cool and stuck them in plastic bags in the refrigerator - not the freezer. The next evening I took one out, warmed it for 10 minutes in the oven and it was oh, so delightful!! 3 people scarfed down that first bread loaf at dinnertime. I have taped this tasty easy recipe to the door of my Recipe cabinet! Thank you, thank you!
I'm so glad, Nikki!
Looking forward to trying your Focaccia bread. Instead of the 2 round cake pans, would you get similar results using 1 9 x 13 pan?
Hi Michelle, that will work fine. It will be a little thicker but that's not a bad thing! Enjoy!
I'm so happy to have found you! I've just read two of your recipes and already I'm hooked! I plan to make the R.E. Focaccia and the Prosciutto Chicken soon. Also I loved the Scripture at the end!
God bless you both this Valentines Day and always!
Nancy Wilson
Thank you for the kind words, Nancy!
Hi ! First of all, thanks for all these amazing recipes, I already made quite a few (mainly desserts) and they all turned out great ! And I'm really not kitchen savvy. So thanks, it gave me much needed confidence (and some experience). I would like to try making this focaccia, but I was wondering which baking dish size do you use ?
All the best, and I look forward to making even more of your delicious recipes,
Tijana
I'm so glad to hear that, Tijana! 💕 I use two 9 inch baking pans to make this focaccia.
First time making any kind of bread from scratch. This was so easy and my company just loved it! The 2 loaves was an extra bonus. I can't wait to eat the 2nd loaf with soup.
Yay!👏👏👏I'm so glad, Linda!
February 2, 2021
This is by far the best focaccia recipe I have ever made and, I have made many! I am so glad that I came onto your sight and tried several of your recipes with great success, all delicious. Your instructions and photos are well written and spot on! Can’t wait to try more of your recipes that I have saved. I’ve made this one about six times now , in the past couple of months...😋😋😋
Thank you so much, Millie! 💕
I tried this for the first time-WOW! Not only easy, but delish!
Question...have you tried using this recipe with any GF flours? My husband does GF and I would love to try this out on him.
Yay, Brenda! I have not tried any gluten-free flours, but let us know if you try it.
OMG. Your food blog is a gold mine. I've just finished baking this wonderful focaccia, and the result is perfect. I've already started to prepare for the healthier version. Thanks for the good work. May God bless you.
Thank you for the kind words, Rita! So glad you enjoyed the focaccia 💕
This is a brilliant recipe - I'm a useless baker but got great results first time round with this. I halved the ingredients to make just one loaf and added garlic and rosemary on top
I'm so glad you had great results!
Thank you for your recipes Ridiculously Easy Focaccia & Ridiculously Easy Roasted Veggie Pizza. Being of Italian background, pizza and focaccia has been a staple growing up. These recipes reminded me of Momma’s pizza. When I found your recipe for the focaccia and the slow rise in the refrigerator, I was so happy. No kneading was fantastic. I have been making it often and everyone who tried it just loved it. Also, I saw you mention about the Danish Dough Whisk and I ordered one. I absolutely love it. I ended up ordering a few and gave it to my baking friends.
I have also made the Ridiculously Easy Roasted Veggie Pizza. I have made pizza for years and not used to pre-baking the crust, so when I made it the first time I forgot to pre-bake and put the topping on and in the oven it went. After a little while I remembered you were supposed to pre-bake the crust. I have to tell you it still turned out beautifully and tasty.
I have a question about the Ridiculously Easy Focaccia. If you didn’t want to do the slow rise in the refrigerator, could you leave it on the counter or in a warm place to rise? If so, how long do you suggest for the rising times.
I look forward to trying out your other recipies.
Hi Silvana,
Regarding your question about the focaccia, you can definitely leave it on the counter to rise. The time depends on how warm your kitchen is. I often will boil a cup of water in the microwave to create a nice, cozy, warm spot and then let my dough rise in there. It only takes about 45 minutes to an hour for a nice rise. You can also preheat your oven for 1 minute then turn it off and leave the light on for another good rising spot.
I just made this recipe yesterday and it most definitely does not need all the time to rise. I left it in a bowl, covered with plastic wrap then a tea towel in a warm spot for two hours. Then, after putting in the cake pans, I put them in the oven for about 45 minutes on a very low setting (mine had a “ proof” setting). After I spread them out and made the dimples, I put them in the oven while it was heating to 425. They baked up beautifully and I can’t see where the extra time would have made any difference.
My only other suggestion is that the bread could use a little more salt in the recipe - next time I’ll add another 1/2 teaspoon.
My family was quite happy with the bread and I can see making it again very soon.
Hi Nola, thanks for leaving your review. Yes, you can make this bread in less time and I often do if I'm in a hurry. However, the slow, over-night rise does develop more flavor (you may not need the extra salt) and a really nice texture. Either way works, but if I have the time I will do the overnight, cold-rise method.
Thanks for your reply! I will definitely give the over night method a try. I’m making it again today - but of course thought of it too late to try it that way. (But it’s all good as my family doesn’t know any difference.)
I look forward to trying some of the other recipes in the near future.
Hello! I was wondering if this recipe can be made as a taller rectangular loaf instead of the 9 inch cake plan?
Hi Sacha, it definitely can! It will make a nice thickness for sandwiches that way!
I have made this recipe several times over the past month and it turns out delicious every time! I am planning on making a batch today and saving one of the loaves to make stuffing for Christmas dinner. Thank you for such an easy and impressive recipe!
You're welcome, Megan! I'm so happy you've enjoyed this bread!
I can’t wait to try this for Christmas-is it possible to make this in one big sheet pan instead of the cake pans? Thank you
Hi Christine,
Yes,this will work in a sheet pan but it will not be as thick as a sheet pan is more square inches than 2 9-inch pans.
Hi Chris. First time making focaccia and was encouraged by your recipe. Just put in my dough in the ref , as i type this. Excited to see the "magic" tom 🙂 I have a small oven and can bake a 9in plate only one at a time . Is it ok to leave the other plate waiting in room temp while the other is baking ?
Hope to hear from you. Thank you very much for sharing this recipe. Merry Christmas !
Merry Christmas to you, Cuci! Yes, it's fine to let the other sit at room temp. I might wait to "dimple" the second one until after you put the first one in the oven
I made this recipe three times in the last 2 weeks. So delicious! I had never made bread before. Thank you so much for this "ridiculously easy" and tasty recipe!
That's awesome, Irina! You may just become known as the family breadmaker! 💕
Can I use bread flour
Hi Chris, Looking forward to trying your recipe, looks delicious. Wondering what brand of kosher salt you use? I have made a few batches of a focaccia recipe from a popular cooking magazine and they list different quantities of salt depending on whether it’s Diamond or Morton. I believe the granules are different sizes. Thanks so much.
Hi Kim, I usually use Diamond brand.
I am a novice baker and have baked very few things. That said, I am well versed in and around the kitchen and have spent many years eating in some of the best restaurants in the US. I made this the other night and was absolutely impressed. Super easy and very good. I am making it again this week and will add some olives to the next batch. Thanks for sharing!!
Thanks so much Scott, for your kind review! Sound like you can't call yourself a nice anymore! Bravo 🙌
This is by far the best recipe for delicious focaccia and it is superior to any other recipe I’ve used before finding this site’s recipe and wisely entertaining instructions. Thank you for being generous in sharing this easy to make focaccia bread recipe. I wish you much love and excellent health.
Thanks so much! I'm so happy you enjoyed this bread!
I have made this recipe twice now and both times, the dough didn’t rise during the time it was in the fridge. Made it anyway and although it didn’t rise during the 2 hour period it was still good, just more dense than I would have liked. Did I do something wrong?
Hi Susan, are you using instant yeast? That could be the problem if you're not. Another thing that's important is to stir the dough really well. My daughter-in-law had some problems with the dough not rising well until she began stirring it well.
You might also want to leave the dough out for 20-30 minutes before you refrigerate it to give that yeast a little boost.
I just mixed a batch; used 100 degree water and used bread flour this time; my yeast is the instant kind out of a new jar (same yeast used for last batch. I stirred it really well and am leaving it on the counter for a brief time as you suggest before refrigerating it. Will let you know how it turns out—maybe third time is the charm!
Hi Chris
This bread was so easy & delicious!! I know you said to stick with the yeast in recipe - thinking yeast is yeast had all ingredients ready to go then saw the yeast packet - ACTIVE DRY YEAST - ok now what do I do??
I added yeast to water allowed it to bloom then added in the remaining water - added that to other ingredients - hoped for the best & I can say that it is!
Thanks for a great recipe
Yay! Thanks for sharing your results, Kathy! I'm so happy you had good results! That was perfect to bloom the active yeast the way you did. Bravo!
Hello, I’m a baking novice! I’ve been wanting to try this recipe but was wondering if I could half this recipe to make just one 9in loaf instead of two. Would that change the proofing time?
Thank you!
Hi Kana, you can definitely make half of the recipe and it won't change the proofing time.
I have made this at least a dozen times & can verify it’s very tasty and virtually foolproof for novice bread bakers such as myself. I have no patience for the mess & effort of a lot of bread recipes (i.e. anything that involves kneading and/or rolling pins) - this is a low effort, high reward recipe. I have topped my focaccia with all kinds of things (the Malden salt is the only non-negotiable topping) & have learned that if you want to include sun dried tomatoes, just make sure you poke them in deep during the step of making pockets in the dough. That ensures they won’t be at risk of burning at all. Delicious fresh, freezing well, and makes a gourmet foundation for Caesar salad croutons.
Thanks so much, AnnieBananie, for sharing your helpful review!
Hi! I have made this recipe in the past and loved it! I do have a question as I will be making two loaves for the holiday. I need one for Wednesday and one for Thursday and I’m preparing the dough tonight so it has 24 hours to rise and time to bake for Wednesday’s meal. I remember it not being quite as good the second day. The salt kind of melted on top and homemade bread is always best the day you make it. What is the best way to have a fresh tasting loaf for Thursday if I make the dough today? Can I leave the dough in the fridge to rise for two days and bake it Thursday morning? Should I freeze one loaf and thaw for the dinner Thursday? Any advice would be greatly appreciated . Thanks!
Hi Morgan, if you want to make two loaves and serve them on different days, you can make one as directed and freeze the other after you dimiple the dough. Then remove it from the freezer 5-6 hours before you want to serve it, let it thaw and then rise and then bake it as directed.
The other option is to bake both loaves and freeze one. Warm it in the oven on a sheet pan with a bit of olive oil which will give you that nice crisp crust.
If I plan to freeze the dough after dimpling, do I put the flake salt on it then or do I wait until just before putting it in the oven? I love your recipes and go back and look at them over and over. The Christmas sugar cookie one is a family favorite, and I love the dip method for the icing. Thanks for all of the pointers.
Hi Ruth, if I was doing it, I would freeze the dough before dimpling, then let it rise and dimple it before baking.
Thanks so much for the reply. Will try that for sure. Love your site.
Hi! My dough is in the refrigerator right now. I just realized I used active dry yeast instead of instant yeast. I am worried it might change up the results of the bread. Do you know if it will?
Hi Rachel, it might be a problem because regular yeast generally needs to be activated before adding it to the dry ingredients. You might be okay though because of the long, slow rise. If it's not doubled in size by morning, try letting it sit out at room temp for an hour or two before adding it to the pans.
Hi! Luckily, the yeast was not a problem. I followed the recipe exactly. The dough rose to the top of my pans and the bread was delicious! Thanks for the recipe!
Yay! That's just awesome, Rachel! So happy it worked out!
Hi, Chris,
I’ve used this recipe a lot and really enjoy it. So easy! Such good results! I’ve also shared it with a group called “Good to Mama: Lasagna Love”, which is a grassroots group, rapidly growing around the country, in which a family brings a meal (usually lasagna) to another family.
Anyway, I need to make it for a family with a nickel allergy. No aluminum pans allowed. Have you ever tried this either in a glass pie plate, or as a full recipe in a glass 9x13? OR have you tried it in a cast iron skillet (in the oven)?
Thanks in advance for your response.
Sue
Thanks, Sue! I'm so happy you've enjoyed this recipe!
Regarding your question, I think you could definitely make this in the pie plate or glass 9x13. The results will be thicker though which wouldn't be bad, just different. You could also make it in two 9-inch cast iron pans or make a half recipe in one 9-inch cast iron pan.
I love what you're doing in this group! 💕
I am not a baker and have never made a bread in my life! But I was intrigued by all of the beautiful garden focaccia breads I was seeing on line. So I started my search for an easy focaccia bread. When I saw your Ridiculously Easy Focaccia bread recipe I knew you were speaking to me! Your instructions, tips, and video were so helpful, I felt confident every step of the way. I decorated my focaccias with herb and flower bouquets, chives, cherry tomatoes, rosemary, thyme, and sea salt. I sprayed the bouquets with olive oil spray. They were so beautiful and the bread was absolutely delicious. Crispy outside, and soft inside. I’ll be making these for thanksgiving and Christmas. Thanks for helping me. achieve a culinary milestone! - Wendy S.
Bravo, Wendy! 👏 So happy this worked out well for you!
This is an absolutely ridiculously easy bread to make, we will be making it over and over again! My variations worked really well, I thinly slices lemons and red onions placing on top of the bread, drizzles a little more olive oil and sprinkled with a finishing salt...amazing! The second one I used cherry tomatoes that were skinned and seeded ( sounds like a lot of trouble but I wanted the intensity of the tomato to come through) and then cut in half and placed one piece in some of the holes in the dough then lightly brushed the rest with a good quality tomato sauce added a couple of tablespoons of freshly grated parmesan and some thin slices red onion , a sprinkling of Italian seasoning, then finish it off with a drizzle of olive oil and some Maldon salt. They were both so amazing, almost couldn't stop eating this bread! The variations are unlimited and I am also thinking that I might try a brown sugar cinnamon topping with a butter drizzle next time.
The lemon and red onion was truly amazing...a must try!!
Thank you, Donna, for sharing your review. Your adaptations sound wonderful! I will try them!
Good day...this bread looks delish. I would want to make sandwiches with it...can this be made loaf pan size so that I can slice it for regular sized sandwiches?
Hi Nessa, I wouldn't try to make this focaccia in a loaf pan. I do use it for sandwiches though by slicing it across horizontally. You can either first cut it in wedges or slice the whole thing horizontally and then fill and cut in wedges.
Can you please mention water temperature range somewhere in recipe. Warm water is subjective and I am afraid of killing the yeast .
Hi Karen, the water temperature should be nice and warm to the touch, 105-115˚F.
Hihi. I am a novice baker.
Can I use 2 8-inch square pans and if oven is small, bake one after the ?
Yes! The bread will be a little thicker but still delicious!
I tried the recipe yesterday with Rosemary and Truffle salt.
It’s crispy on the outside and soft and chewy inside. I will definitely
add this to my recipe collection. Thank you for this fantastic recipe! Just one question, the bread turned out flatter than I expected. I am not sure what went wrong. Also maybe my fridge is too cold, I have to let it sit on the counter for 4-5 hours for the second rise.
Hi Priscilla, it's hard to say without having been there in the kitchen with you. One thing I always advise is to make sure it's well-stirred at the beginning as pockets of flour can keep the dough from rising. Next time, you might want to warm your pans by running hot water over them (then drying) before adding the dough. If my kitchen is chilly, I do that sometimes to help boost the rise.
I had never worked with yeast before but a friend sent me your website at the beginning of our lockdown so my husband and I thought why not. Well we were pretty proud of ourselves, it was amazing. My sister lives in Ontario while we are in B.C and thought what a great idea to make this via a video call. It took 3 calls a lot of fun and getting to see family. Next is the Rosemary shortbread. Thanks for the great recipes and the chance for family to get together.
That's so awesome! Bravo! I love the though of you guys making this via facetime! Thanks so much for sharing your results!
Love this simple recipe. I did want to point out you don’t have to refrigerate this dough at all. It can rest, covered, on your kitchen counter overnight and is perfectly safe. Using the fridge is okay and you can actually leave the dough in the fridge for up to 4 days, as this allows for a longer dough fermentation which improves depth of flavor.
I’ve used your recipe several times with great results!
Hi Lea, I'm so happy you have enjoyed this recipe and appreciate you sharing your review. You're right about the refrigeration and sometimes when I'm in a hurry, I don't refrigerate the dough. The reason for the refrigeration, however, is just what you were talking about, it slows down the rising, creating the longer fermentaion which really does improve the flavor. I have found, if you let the dough sit too long though, the yeast kind of loses its oomph.
I have made this bread three times (so far)and changed it slightly each time. It just gets better each time. I think I have hit on the perfect recipe for me. I added 1/4 cup of honey to the mix and sprinkled parsley and parmesan on top. I also bake it on an insulated cookie sheet. It is perfect! I served it with your manicotti recipe. I couldn't ask for better bread. Thank you so much for the recipe. I haven't been successful with bread in the past, but those days are over now. I plan to make the scones next.
Thanks so much for sharing youre results, Joy. Your adaptations sound wonderful!
Ridiculously easy and, according to my six-year-old, crazy great!
That's awesome! I'm so happy everyone enjoyed it. Thanks for sharing your results, Danielle!
Thank you for the recipe. However, after seeing that my dough has not risen, I double checked the recipe and there is a discrepancy. When trying a new recipe I always follow the measurements exactly. You called for 2 1/4 teaspoons of yeast adding that was a whole packet. I added exactly 2 1/4 teaspoons because the packet I have (Red Star brand) is 3 1/4 teaspoons. I’m a bit frustrated as I now have to show up at my in-laws without the expected homemade focaccia. So was it supposed to be 3 1/4 teaspoons, 2 1/4 tablespoons or 2 1/4 teaspoons? Thanks ~
I forgot to add.... my yeast is not expired and the water temperature I used was with range.
Hello Evalynn, I'm so sorry you had trouble with this recipe. I hate wasting good ingredinets. However, the recipe is written correctly. There are 2¼ teaspoons of yeast in one packet. If you check the Red Star Yeast website, they will verify this: https://redstaryeast.com/tips-troubleshooting/frequently-asked-questions/
It's hard to say what went wrong without having been right there in the kitchen with you. If you read the comments most people have had good success with this recipe.
Again, I'm sorry this was a problem for you. One thought that occured to me was to check the type of yeast you used. Was it instant yeast?
Hi Chris,
Love your website and have made so many of your fabulous recipes. I use Gluten Free Cup 4 Cup flour for all my baking. Do you think I will get the same rise if I sub this flour for Bread Flour?
Thank you, Mary! I haven't tried GF flour with this recipe but I know other readers have with good success!
Hi Chris,
Another fantastic recipe! I can’t believe how ridiculously simple and ridiculously good this bread turned out. Was a bit concerned since I left the 2nd rise for over 3 hours. The bread was perfectly crispy on the outside and soft inside. This recipe is a keeper for sure. Thank you for sharing.
Yay! So happy you had good results, Lil! We love this bread! Thanks for taking the time to share your results!
If I let the dough sit in the fridge for 40hra before baking is that ok?
I think that might be a little long, Katie. I'm afraid the yeast would lose some of its oomph.
Helllo dear thanks for the amazing easy recipe, i made it twice my family love the taste but i wonder why my bread is a bit rubbery, what could possibly wrong......
God bless from Singapore
Thanks for sharing your results. It's hard to say as I've never had that issue or have heard anyone else report that. I wonder if it could be the type of flour that is available to you??
We love this recipe! Since there are just two of us, I freeze the second one. It freezes beautifully.
Now that I can find yeast again in my local grocery, I will be making this bread more often!
Thanks, Chris!
Thanks, Suzi! Great idea!
I just made this recipe OMG so good thank you so much. I have a question instead of using 2 9-inch cake pans could we use a 13 X 9 pan instead? Next question if possible would I use the full dough recipe and how long would I bake it for?
Thanks for sharing your review, Joy! I'm so happy you had good success with this recipe. You could definitely make it in a 9x13. It will be a little thicker and you may have to bake it just a bit longer. You can also make this in a 13x18-inch sheet pan.
What temperature should the warm water be? I ask because I would like to use filtered water and heat it to the proper temperature in a saucepan. Thank you!
Hi Ann, the temperature should be anywhere from 90-100˚F.
My dough did not rise at all. I did exactly what you said. Now planning to add more yeast after activating it and adding little more flour.
Hi Sonia, I'm wondering if your yeast could be bad. If you look through the comments, the majority of readers have had great success with the recipe the way it is. Are you using instant yeast? For this particular recipe, you definitely want instant yeast. The other culprit could be the temperature of the water. You want the water to be nice and warm. I often warm the measuring up with some hot water before measuring out my water as a cold measuring cup can drop the temperature of the water really quickly.
Hi! I tried the recipe yesterday thank you for sharing. A question tho, is the dough supposed to rise/double its size in the fridge? I found my dough did not rise overnight or am i supposed to put it in the fridge after the first rise on a warmer temperature? Thank you.
Hi Bea, it could be that your water was not warm enough. To ensure good rising next time, use nice warm water and leave it out of the refrigerator until you see the dough staring to rise. Then refrigerate it.
Exactly as promised! Ridiculously easy and very tasty! Thanks for sharing the recipe.
You're welcome, Suzie! So glad you enjoyed it and had good success! Thanks for sharing your results!
This turned out absolutely amazing! I’ve never made focaccia before, and I’m not much of a baker, but this was excellent and so easy! The perfect combination of fluffy, crispy, oily. YUM! Thank you!
Maybe you're more of a baker than you thought, Jessica! I'm so happy you enjoyed this bread and had great results! I'm making a batch right now!
I tried this bread yesterday! It is so delicious! Thank you for sharing your recipe! 🙂
Yay! So happy you enjoyed it, Tanisha! Thanks for taking the time to share your review!
Just made 1/2 recipe for 1 loaf and it is wonderful!!! Thank you Chris
Awesome! Thanks, Terrylee! So glad you enjoyed this recipe!
Hi Chris,
Another great recipe.... and this really is ridiculously easy! I used fresh rosemary on one and Good Seasoning Salad dressing mix on the other. Both were delicious. Thanks for sharing your recipes.
Carol
Yummy! Your versions sound wonderful! Thanks for sharing your review, Carol!
This is the best recipe ever. I add garlic powder, oregano and parmesan cheese to the bread then when it's ready to go into the oven I sprinkle some garlic salt on top. Also I put it in an 8x11 pan to bake rather than 2 round pans. Just love this recipe!
Thanks so much, Sue! I love your adaptations!
This is a question after a friend raved about this bread. I have a ton of active dry yeast in my pantry and really would like to not have to buy instant yeast. Can I make this substitution with equally good results? Please say yes! Thank you.
Yes, you can Katrina. You will need to proof the yeast though. To do this, simply combine the yeast with ¼ cup of the warm water (make sure it's nice and warm). With regular yeast, I like to add a pinch of sugar to make sure it activates. Stir the mixture, then let it sit for about 5 minutes until it gets foamy. Then proceed with the recipe adding the proofed yeast along with the remaining 1¾ cups of water.
Followed the recipe to the letter, but the bread never rose at all and baked like a rock hard disc. The constant pop up videos make this website very hard work.
Hi Jen, sorry you did not have success with this recipe. I think that your yeast must have been bad. I haven't had anyone else, out of hundreds of emails, report a problem with no rising.
Regarding the videos, again, I'm sorry that you were annoyed by them, however, the ads and the videos are the reason that we can offer quality, tested recipes for free.
You might want to give the recipe another try, with good yeast and following the instructions as written. At the same time that I got your email, I got another that said "I’ve been making your ridiculously-easy-focaccia-bread all summer with fresh garden herbs and my family thinks I’m a genius!"
It is an easy and delicious recipe!
I put mine in two 8x11 baking pans and added a little garlic to the top with the Italian seasoning and sprinkled one of them with shredded Romano! Oh my!!!
Haha! Thanks, Connie, so glad you enjoyed it!
I can only find "cake yeast" ( little cubes ) in the refrigerated section in the grocery store. Will that work?
Hi Carol, that will definitely work but you will have to proof it first.
Hi I only have active dry yeast. Should I proof before adding to the recipe??
Yes, if you're not using instant yeast, definitely proof it. Hope you enjoy this recipe!
WOW! WOW! WOW! Rosemary & flaked salt / Herbes de Provence & flaked salt
Your adaptations sound yummy, Patti! Thanks for sharing your results!
Hello Chris + Scott,
THANKs to you I can proudly announce that I made my very first Focaccia bread yesterday —using your awesomely easy recipe. After making the adjustment when using regular active-yeast ( details kindly provided by one of your reviewers), I followed the recipe to the T, and my gosh, it delivered. The bread came out looking as good as the one in your photos and, my family could barely wait for it to cool down to start enjoying with our prepared olive oil+ balsamic vinegar dip. The texture and taste were spot on! So good, both loaves are finito and prompted me to write this, my first online review 🙂
Keep safe & healthy,
You're welcome! We're thrilled that you and your family enjoyed it. Now you can have delicious bread anytime you get the urge 😋
Look no further for a focacia bread recipe than this one. I was anxious not to chill dough but did, for 24 1/2 hours. I think you could use a variety of spices. I added fresh basil only because I have it growing. 1 pan eaten/gone in a few hours (only 2 of us in the household). Told my husband I just can't make this anymore, it's way way too good. He said "how about just for company then" - as if I was really serious...LOL Was never a focaccia fan before but will now always make my own (regularly). Thank you so much for this awesome recipe
Haha! I know what you mean about not making this anymore! 😂 Thanks for sharing this awesome review, Jan!
do you have to put it in the frig and make later? Could you make it all at one time?
Hi Jan, you can make it without refrigeration although I think you get a better depth of flavor with the slow rise in the refrigerator.
The metric measurements for this one are very wrong. The US measurements have about 50% water compared with flour, but the metric is around 90% water compared with flour. You can probably guess what my 'dough' looked like to begin with 🤣 I added a more flour and it seems to have come together well. Haven't tasted it yet, but it looks delicious!
Hi Lauren, sorry if this was confusing for you. This is supposed to be a very wet dough. It's not a dough that you could knead on the counter. I think the confusion came with the word "cups". Here in the US, a dry cup and a liquid cup are totally different. Flour is measured with a dry measuring scoop, usually plastic or metal. A cup of flour is approximately 120-128g, depending on the type of flour you use.
A liquid cup is measured with a different type of measuring device, usually a clear glass container with a spout. A cup of water is 235 ml, so the metric measurements are actually quite accurate on this recipe.
I use a conversion tool that is part of my recipe plugin. Sometimes it's slightly off but not by enough to cause a problem with the recipe. The conversion tool seems to get more and more accurate as new updates come out so I just went back and re-did the conversion from US Customary to Metric. It changed slightly but not much.
Sorry our American measuring is so confusing and uses the word "cups" for two totally different measurements but I can't change that 😞
No problem at all! It turned out delicious in the end with the addition of a little more flour. The dough was definitely sticky after the second prove. I'll be making this one again and again!
Yay! So happy you enjoyed it!
This bread is SO good. Delicious and wonderful and I could go on with adjective after adjective but that could be over the top. Thanks for the great recipe. Blessings!
Julie Pietras
Thanks so much, Julie, for sharing your review. We love this bread too! 💕
ABSOLUTELY DELICIOUS!! With COVID-19 I am not able to go to the store that sells focaccia. Now I can make it myself and it is even better than the store bought! Thank you for sharing this recipe. A new favourite for me.
That's awesome, Hattie! All this craziness is good for some things!
Thank you for sharing another great recipe! I told my husband the house smells as great as the bread tastes!
Thanks so much, Jane! So happy you enjoyed this recipe1 💕
That so awesome, Jane! It is an amazing aroma!
Can I use this as a pizza base and if so, do I bake it first and then bake it again with the toppings on? Thanks!
Hi Stacy, I have used this as a pizza base. I par-bake it, then add the toppings and finish baking. I did this in a sheet pan. Here's one of the recipes I've done:https://thecafesucrefarine.com/ridiculously-easy-roasted-veggie-pizza/
I would love to find these recipes in my email.
Hi Jolene,
If you go to the blog and look at the top there’s a black bar. On the black bar, there’s a window to add your email. Just fill in your email and click “subscribe”. You will get an email that will ask you to “confirm”. Just click on the word “Confirm” and you’ll then start getting all of our new recipes in your email.
First time I’ve made focaccia bread, it was so easy, and tasted amazing, thank you for the recipe
Wonderful! Thanks for sharing your results, Jane!
It seemed like the first rise was great - the dough doubled like it was supposed to. But the second rise barely happened, even after 2 hours. I finally went ahead & put the pans in the oven, and the finished bread had really good flavor, but it was much denser/heavier than I expected - more like two big hockey pucks than two loaves. Any ideas?
Hmm... that's hard to say, Mel, without having been right there in the kitchen with you. One reason why dough sometimes doesn't rise as well on the second rise is that it over-rises the first time and then it just doesn't have enough strength to go again. Just let it rise until it's double on the first rise.
This recipe is AMAZING! So easy, and delicious.
Because everyone is obsessed with baking right now thanks to the plague, yeast has been hard to come by. I was forced to but regular Active Yeast instead of instant.
I have to say, the results are amazing. Even preferable. I find it rises a bit more, and has a bit more "chew". Just a bit.
The adjustment for using active yeast is as-follows.
Put half the warm water in the mixing bowl and sprinkle yeast on top. Allow to "bloom" for 5 minutes. Add the rest of ingredients and continue recipe with the regular directions.
Thanks so much, Shawnabelle, for sharing your results and adaptations. I know it will be helpful to other readers to know that it also works with active dry yeast.
Thank you for this amazing and delicious recipe, I just made it and my whole family loved it.
I'm so happy you enjoyed this bread, Lisa! Thanks for taking the tie to leave a comment!
This is my first time making foccacia bread and I can't believe I hit the nail on the head the first time with this recipe. I used bread flour and gosh this bread was so light and airy and delicious. It rose beautifully and I did take the suggestion of using bread flour. My kids and I did the prep together. My son greased the pan and cut out the parchment circles and had fun making the holes in the dough with their fingers! I would suggest being quite liberal with the salt and also the herbs as it's hard to know how much to put. I can't wait to try the brioche buns next! I love recipes like this that don't sacrifice on the taste and texture and is wonderfully easy to do, and a great way to get your kids involved. Thank you for a this keeper!
Thanks, Surj, I'm so happy you had great success! So great that you had your kids joining you in this venture. You're giving them great memories and some wonderful life skills!
I have made this recipe a few times now and it is the best ever! Not only is it so easy and delicious but it's so flexible for alterations. I have followed the trend of making beautiful garden focaccia- so adding toppings like pepper, tomato, onion, and herbs to make it look like a garden. I am so glad I came across this recipe, thank you very much!
Thanks, Briana, for taking the time to share your results. I'm been doing some of the garden focaccia too. So fun!
Hi can I divide the quantities in half to make just one loaf as a tester?
Yes! That will work fine, Arati!
This recipe sounds like the ultimate comfort food! In the current quarantine world though, fast-rising yeast seems to be in short supply. I have regular yeast - will that work?
Hi Lori, just proof your yeast with some of the water before adding it to the mix and you'll be fine.
This bread tastes exactly like the bread used in Italian cafes for panini. Thank you for sharing. I’ve missed it so much! I have also topped this with everything bagel seasoning and it is also delicious!
That's so awesome, Jackie! A taste of Italy! Thanks for sharing your results.
This bread is everything indicated by the recipe and SO much more!!! Out of sheer covid boredom I decided, last night, to try making focaccia bread. I found this recipe and decided that it looked the easiest out of all of the ones I had read, mixed it up and popped it in the fridge before bedtime.
It just came out of the oven and all I can say is - Oh my gosh, my husband, our 10 year old and I are dying over how delicious this is!!!!! Seriously, how do s this SO stinking easy?!?!
The only modification I made was to brush the top and add the toppings before the 2nd rise; I used sea salt, Italian mix, rosemary and some fresh chopped parsley and fresh chopped cilantro. I also baked mine in a jelly roll pan as I wanted the traditional shape of focaccia but didn’t want it overly thick by using a 9x12 pan.
This. Recipe. Is. Perfection.
Thanks so much for sharing xo
Haha! It truly is stinking easy, Lisa! I'm so happy you enjoyed it. Your adaptation sounds delicious!
Hi Chris,
I wanted to make this today, but I do not have a Danish Whisk. Is there
anything else I could use instead?
Thank you.
Nancy
Hi Nancy, you can just use a sturdy spatula. I use a silicone spatula with a wooden handle.
Thank you so much for replying. I am about to make another batch today. Going to double the amount and freeze the extra loaves. It is really easy and delicious. Thumbs up.
Thank you so much for this recipe. You have so many really good recipes.
Sincerely,
Nancy Carlson
Thanks, Nancy! 💕💕
Hi, this recipe looks amazing! I was just wondering, what happens if the dough is left longer than 24 hours in the fridge? Will the focaccia still bake?
Yes, it will still be okay but I have found that the yeast gets kind of "tired".
The name is true to its word: RIDICULOUSY EASY. Beautiful shape, beautiful color! Helpful hint, the dough will rise in the pan so poke it down until it begins to collapse. Don't be shy. At first it may seem like sticky mess but keep poking. I seasoned mine with Simon and Garfunkel herbs: parsley, sage, rosemary and thyme.
Thanks, Michael! Your adaptation sounds wonderful!
I just found your site and I love your writing style! I’m excited to make this bread... from Christy in Sydney
Thank you, Christy - and welcome to The Café! 💕
Hi! I cannot wait for an 8-hour proofing. Can I place at room temperature covered with damp cloth until doubled in size? How many hours do you think shall I wait? Thanks 😊
Hi Lerma, you can definitely do that. I would go by sight more than time. Yes, let it rise until doubled and the second rise will also be shorter.
Delicious and easy! I’ve made several recipes; this one is tops!
Yay! Thanks so much for sharing your results, Deb!
I've made this several times. It's delicious, as easy as advertised and friends are very impressed. Can I use whole wheat flour, or a mix of whole wheat and AP? And change to amounts? Many thanks.
Thanks, Susan! I've substituted a cup of whole wheat flour in this recipe with good success. I haven't tried more than that.
Can i use this same recipe to bake it into a 9x13 baking tray because that's all I have right now. Please suggest.
Hi Ruby, that should work fine. Your focaccia will be a bit thicker but it will be delicious!
I’d like to make only one loaf this time— I’ve made the full recipe many times). Would I still use one packet of Rapid Rise yeast or use 1/2 of it?
Oh and I forgot to mention that it did rise a lot. More than doubled but it’s way to runny.
I pinned your focaccia bread recipe a long time ago but haven’t gotten around to making it yet because every time I think about it and pull it up, I am reminded it calls for instant yeast. I always have active dry yeast on hand but never instant. Can I make your recipe with “regular” yeast? How would I adapt the rising times? I have a pizza dough recipe that uses regular active dry yeast with very little rise time because it doubles the amount of yeast in a typical dough recipe. I’m wondering if that would work with yours. I look forward to hearing your experienced opinion!
Thanks for your interesting recipe! 😊
Hi Amy, I think you could sub regular yeast for the instant yeast. The rise time might be a little slower but it should work. Just make sure your water is nice and warm - fairly hot to the touch but not so hot that you pull your finger back.
I would like to make one of the pans with cheese. What's the easiest way to incorporate shredded cheddar into it? Is that even an option?
Hi Christina, just add the shredded cheddar with the dry ingredients. Enjoy!
The dough has already proofed lol I'll try to mix some in before the second rise. Stay tuned 😉
Hi, if I want to make it quicker, can I just leave it rise for a shorter time and not in the fridge? I have made it many times before (great recipe) but now it’s 10 am and I would like it this evening.
Hi Donna, yes you can! It doesn't have quite the depth of flavor as with a really slow rise but it is still fantastic. I'm often in a hurry and just stir it up and let it sit out until it's risen nicely. The timing will vary, depending on the temperature of your house and the second rise will be shorter because the dough won't be cold. Just watch it and you'll be fine. It's nice to have a quicker option. Enjoy!
This worked brilliantly! The ‘holes’ were big and the bread had a great texture. I did as you said and just watched it - banged the bowl on the work surface if it looked to be rising too high.
Yummy!
Awesome! Thanks for sharing your results!
Can I use bread flour for this recipe?
Yes, bread flour will work fine, Heather! Enjoy!
So excited mines in the fridge! Can I use non stick cake pans jw, Thank you!
Yes, I usually use non-stick pans!
This bread is so good and easy, you can't possibly ruin it. I will add some garlic powder next time. Baked 1- 9" round and 2-6" personal pan pizza size. Nice and crispy. Would be a fun recipe for little ones to poke at
Haha! That's true, Nancy, it's such a forgiving recipe, it is hard to ruin! And yes, kids love helping with this focaccia!
BEST FOCACCIA ON THE PLANET.
haha! Thank you!
Sooo good! I made it exactly according to your directions - even ordered the danish whisk and Maldon flaked sea salt you suggested. I’ll be making this again soon!
Thanks, Kathy, for sharing your results. I'm so happy you enjoyed this bread!
Hello again Chris,
I prepared the entire ball of dough in an 11x15 metal baking pan. It worked out pretty well but did not quite fill in to all the edges. The result looked a lot like the artisan focaccia I have purchased before at Trader Joes. The outside third of my bread is way too chewy (tough) for my liking. Did I possibly overwork my dough when originally incorporating the flour, or is it because the edges were thinner than the middle of my bread?
Hi Beth,
The edges of the bread should be nice and crisp. I sometimes make this bread in a 13x18 inch pan. I have to push the dough a little to get it to reach to the edges but it does fill the pan nicely.
Sorry, I'm not sure why your outer edges were chewy.
Actually, 2 round 9 inch pans are only about 127 square inches (4.5*4.5*3.14*2), it would be 162 if they were square ones with a 9 inch edge!
#mathpolice
Trying this recipe today and I also had to use a different pan size 🙂
Thanks, Agata! You're right, thanks for pointing this out!
This looks so wonderful. I’ve got my first batch of dough riding in the fridge right now. I need to make several batches of this bread for my focaccia bread pizza. Is there any radon why I can’t put all the dough is an 11x13 Pyrex or a large 12 inch round cake pan, instead of the two 9 inch rounds?
Hi Beth,
With both of those pans, you're going to get a thicker bread. If that's okay with you, it will work fine. You might have to give it a few extra minutes of baking.
The two 9-inch pans equal 162 square inches. Your 12-inch round pan would equal 144 square inches and the 11x13 143 square inches. So you can see that either of those pans will yield a thicker bread.
Hope that helps.
Pans ready for oven and oven won't heat. Can I save the oven ready dough?
Yes, cover it w plastic wrap and refrigerate. You might need to make the "holes" again tomorrow when your oven works (hopefullyaa0.
What’s the next best tool to use besides the danish whisk? On a tight budget.
Hi Sheri, a sturdy spatula will work great!
I think I’m going to try all the recipes on this website!
I prepared my mix last night. I got out of the fridge today but I noticed that the the dough was too runny to form balls! I added some more flour and mixed it in and left to proof again. It’s my first time baking bread with this lockdown. I’m experimenting so I don’t mind if it doesn’t work. I hate it if all the floor has to go to waste though. You never mentioned the consistency of the mixed dough before putting it in the fridge. I’m sure I followed every step correctly. I’m not sure what could’ve gone wrong. So how runny or firm should the dough be? Thanx!
Good morning, Tala! Bravo to you for your first stab at bread making.
Just a little clarification - don't try to form this dough into balls, simply transfer the wet dough to the two pans (after the first rise in the refrigerator) and let the dough rise again, as directed. Don't add any extra flour, it's perfect just the way it is. If you follow the directions as they are written, you will have wonderful success! Bon Appétit!
Just use half the amount, Tala!
Over 12 hours later and my dough is still very soupy when I take it out of the fridge? Help😬
Hi Blake, this dough will be a little wet. It should have risen up though. Did it?
Very slightly, it’s kind of thick and lumpy so I might just go for it and move to the second rising and see what happens????
Yes, I would do that. Give it plenty of time to get warm and rise.
We had this bread for dinner tonight as lunch meat sandwiches, it was so easy and so good!!!!
I love this focaccia for sandwiches! I'm so happy you enjoyed it too! Thanks for sharing your results, Sheena!
Oh, my, that does look easy! Coming over from Mountain Mama. Hi neighbor!! I'm a WNC gal too!!
Hi Carole, nice to "meet" you! Love that you're right in the neighborhood 🙂
When you say it was easy it truly is. I made it for Xmas dinner the first time, it was a great hit, made it with rosemary n onions. And finished off with some Parmesan. I love this recipe. Making it again for my daughter's bday party tmrw.
This can be used for pizza dough as well?
Thanks ☺️
Thanks, Vanessa. I'm so happy you enjoyed this focaccia! Yes, it can be used as pizza. I published the recipe below a while back and I'm working on another one right now.
https://thecafesucrefarine.com/ridiculously-easy-roasted-veggie-pizza/
Hi Vanessa, thanks for sharing your results. I have used this for pizza!
I just finished making the dough.
When focaccia is ready to bake, can I put toppings on it?
Yes, I would let it rise just a bit longer after you add the toppings.
I tried this recipe with active yeast and increased the yeast amount by 1/4.
I let the dough rise on the stove top with oven on low. Took no time at all to raise both times.
Turned out great!
Save time and use the active yeast!
Thanks for sharing your results, Jane!
Made this bread to serve with lasagne on Christmas Day. It was an easy recipe and the overnight raise meant most of the work was done prior to the day I needed it. Delicious. Big hit at the party.
Yay! Thanks, Pam, so happy you enjoyed it!
Thanks, Pam! I'm so happy you enjoyed it. I love that you can do most of the work the day before!
I made this Christmas Eve. It was super easy and everyone liked it.
Tonight I have a half batch in the fridge. I am going to try to make pizzas by splitting the half batch into 2 8" pans. I am going to bake them a bit, top with sauce, cheese and toppings, then bake til done.
So happy this was a hit for you. I hope you enjoy the pizza as well!
The pizza was very good. My boyfriend usually thinks it is not worth it to make pizza at home because take-out is better. But he said this was really good!
I made another focaccia to go with dinner tonight. Saturday, we're having pizza again. This time we have my 11 year old cousin over to try it!
Yay! Thanks so much, Jen for sharing your results. Sounds like you're becoming a pizza/focaccia expert! 🙂
Successful first try! It truly is the most ridiculously easy and yummy recipe! thanks heaps!
Awesome! You're welcome!
Yay! So happy you enjoyed it!
Absolutely fantastic! So easy to make, a beautiful crisp crust, and perfect for dipping in oil and balsamic! I will make this over and over again.
Yay! So happy you enjoyed it, Leslie!
I hosted a Raclette party and made the foccacia to accompany the meal. Wow!! I was so impressed, as were my guests! It turned out so well. I sprinkled sea salt and rosemary on top with olive oil. So easy, and yet impressive results. Recipe shared with my guests already!
I was a bit nervous making for our party since I’d never made before, but your recipes are always amazing!, and you proved it again tonight!
Thank you! This recipe is a keeper!
Thank you, Joanne! Sounds like a fun party! I appreciate you sharing your results and your kind words!
Do you think this recipe would work if I added a little bit of discarded sourdough to incorporate a tangy sourdough flavor? Or maybe even a small amount of my active bubbly sourdough starter? Thanks!
Hi Jill, I think either one would work and would be delicious!
WOW.. I was so impressed with myself on this one, and I am not known for breads... mostly I'm known for not being able to make any bread!!! I received rave reviews for this and I cannot wait to make it again, and again.... so easy... THANK YOU!
That's SO awesome, Jennifer! That's my job, to make you look good 🙂 Thanks so much for sharing your review!
That's awesome, Jennifer. Good thing it's so easy, you may be developing a reputation as a breadmaker now!
Hi. Could you stir fresh rosemary into the dry ingredients when preparing the dough? I don't want to ruin the recipe by trying it 😉
Thank you so much!
Yes! You can definitely do that!
OMG, made this yesterday and sooo good, dangerously good for someone who tries to stay away from bread products. Thanks (I think)!! Now off to try some of your other recipes.
Haha! I totally understand what you're saying DeeDee! I made a parmesan version of this bread yesterday which I'll be sharing soon. It was so good and so... dangerous! Thanks for visiting The Café ❤️ Chris
I’ve made this focaccia a few times now. (With a lil less salt for nonna). I also let the dough sit for another 30 minutes after going to town with me fingers. I think this makes it a bit springier once it’s cooked. Sister even bought me 2 extra 9” pans (so I can make 4 at a time instead of 2). 😉
Thanks for the recipe! Will be making this for forever!
I love it that your sister bought you extra pans! I think you're becoming famous for this bread, Clare! Thanks so much for sharing your results.
Hi, baking the focaccia right now as I type for dinner tonight, can’t wait to try it! BUT I used only half of the dough (which has been refrigerated for 24h)... how long can I keep the dough in the refrigerator also could I freeze the dough?
Thank You
Hi Shannon,
I would bake the dough in the next 8-12 hours and then freeze the baked loaf. I haven't tried freezing the raw dough so I don't want to say for sure how that would work.
Hi! Is the refrigeration necessary? Is it possible to just make this recipe all in the same day?
You can definitely make this without the refrigeration, just let it sit out until doubled in size and then proceed. The second rising won't take as long as the dough will be warm. I do think there's a depth of flavor with the slow rise in the refrigerator but it's not a huge difference.
Just finished making this and I am impressed. Fun to make, super easy, and tastes delicious. I feel like a bread maker!! Loved the part where you use your fingers to make the dimples!! Thanks so much for a great recipe - love your blog.
Mary
Thanks so much, Mary, for sharing your results! You are a breadmaker now 🙂
I’m excited to make this next week to serve with chili. I always thought that yeast needed sugar to activate it. Is it different when using instant yeast?
Hi Diane, good question! That is a pretty common misconception. Yeast likes sugar but it's not necessary. Yeast will feed on either sugar or starch (or both) and will activiate just fine without sugar. Hope you enjoy the focaccia as much as we do!
Fantastic recipe and super easy. I like grating Asiago cheese and putting on top with the herbs. Perfect combo to go with tomato soup.
Thanks so much, Jess. I love the idea of the Asiago!
Hi! Want to make this for a crowd. Can I bake it in a sheet pan instead of round pans? TIA
Hi Lisa, that should work fine!
Hi! I used dry yeast by mistake. Will it come out too flat? Should I throw the dough away and start all over? Also, have you tried to make small focaccias in one big tray? Thanks for your time!
Hi Veronica,
Dry active yeast will definitely make your focaccia flatter because it needs to be activated. Dry instant yeast (or quick-rise yeast) is what you want as it doesn't need activation. I haven't tried small focaccias.
Have you tried this with gluten free one to one flour?
I have not. Please share your results if you decide to try it!
Hi, can you use active dry yeast or does it have to be instant yeast? I know we will this bread.
Hi Sammie, it does need to be instant or rapid-rise yeast for this recipe. If you use active dry yeast, you would have to activate it before adding it to the recipe.
I think this bread is lovely! Is it possible to bake this bread in the 9x5 loaf pans? I'm thinking more along the lines of "sandwich" size loaf.
Thanks!
Gini
Hi Virginia, I think I would use a different recipe for a loaf bread as this dough is pretty loose. I will be posting an easy brioche loaf bread soon. It's easy and quick like this focaccia.
Fantastic results! Tasted great, easy to make, and has kept well for a few days. Will make again for sure.
Thanks, Shannon! I'm so happy you enjoyed this focaccia!
Making this for the first time! Dough is in refrigerator and I plan to bake tomorrow. I only have 8-inch round cake pans; will they work or will they be too small? Also, to grease pans is Pam okay or is butter only option? Never heard of a Danish whisk before, so I bought one. It works fine, just needed a toothbrush to clean dough in the tight spaces. Can’t wait to eat our bread with tomorrow’s dinner. Since there’s just the two of us, I’m going to give one loaf to my neighbor. So far, the recipe is easy-peasy! I’ll rate after dinner tomorrow!
Hi Laurie, 8-inch pans will work but will make thicker focaccia. I wouldn't use Pam - it's not that much butter but it makes the crust really nice and crisp.
If you soak the Danish whisk for a while it will just about clean itself 🙂
ENJOY!
Hi Chris!
I can’t wait to try making this bread. Have you tried it using whole wheat flour? Do you think it would make the texture too heavy? By the way, I love your Ireland posts! We went to Ireland right before you did and loved every minute. I would have loved another week or two there. Now I want to go back and spend some time at Ballymaloe! And the weather!!! It was so nice to escape the Georgia heat! Our dream place to retire is Asheville. We love it there! Maybe we’ll be neighbors some day! Thanks for the recipes and your beautiful blog!
Lishcia
I just realized that I bought "fast-acting" instant yeast. Will it be OK to use in this recipe?? (Sorry! I haven't really made bread like this before. It's one of my goals! To try and make things with yeast in them. LOL! )
Hi Kathy, sorry to be late to reply as we've been out of the country. "Fast-acting" yeast will work well!
Is there anyway to make this without the parchment paper?
Hi Faitb, you could try it without parchment if you butter and then oil your pan. I can't guarantee results as I haven't tried this but I'm guessing it will work.
So easy and so good! Another winner from you Chris, thanks so much!
Yay! So happy you had great success with this recipe, Vickie!
How would you cut this bread for use in making sandwiches?
We absolutely love this bread! I made a batch last week, 1 tin with lemon olive oil and the other with garlic olive oil, both topped with Cornish flaky sea salt and cracked pepper. They turned out amazing, and I had enough bread left over for my daughter’s lunch box for the week! I have another pan in the oven now, half batch this time, for this weeks lunch boxes. No more buying bread for sandwiches! Thanks for a great recipe!
Haha, I know what you mean. My granddaughter requests this for her lunch and is so disappointed if I don't have any stashed away! Your versions sound wonderful!
Hi! This recipe & reviews sound great. If I intend to bake it the same day, how long should I leave it out? Have never baked bread before. I live in a tropical country so weather is pretty hot.
Hi Sheryl, I think you'll love this bread. This bread is best if you can refrigerate it for at least 5-6 hours and then let it rise in the pan for 2 hours. Sometimes, however, when I'm in a pinch for time, I will let it sit out for 2 hours at room temp or until it's risen nicely and then proceed with the instructions in step 2.
How many grams of fresh yeast would I use instead?
Thanks
Kaye
I have made this before and it was wonderful. I'm making this for a meal tomorrow and the dough is quite wet. I don't remember if this is normal or if I forgot a cup of flour. I've read all the comments and can find no mention of this.
Elaine
Hi Elaine, you're probably okay, this is a pretty wet dough.
This recipe looks amazing, I'm anxious to try it. I make "peasant bread often in the winter and love how easy it is. I was wondering if I would be able to use regular yeast, and what changes would be needed?
Hi Susan, yes, this is super easy. If you don't have any instant yeast you could make this with regular yeast but I would activate it with some of the water in the recipe before adding it.
Hi, definitely going to try your bread but how do you like living in the mountains? We’re thinking about getting a 2nd place there to get out of the Fl heat. Thx!
Hi Kirsten, we absolutely love it here. We lived in Raleigh for 40 years and always kind of dreaded summer because of the intense heat and humidity. Now we love summer and enjoy the outdoors just about every day!
Wow, this bread is delicious! The crust is just perfect and it’s chewy on the inside !! I love that it’s so easy to make also! Thanks for sharing your recipe.
So happy you enjoyed this focaccia, Lori. We love it too. Thanks for taking the time to share your results!
Hi—this looks great but I am wondering about the flour to water ratio. This is a lot more water than most bread recipes.
Hi Karen, you have to try it to believe it. Just read all the reviews then give it a try. I think you'll be very pleasantly surprised!
Can this be baked in a cast iron skillet?
Hi Shirley, I haven't tried it in a cast iron skillet but I think it should work just fine.
Absolutely brilliant recipe, so easy to make and the results are perfect! Huge time saver delivering delicious bread! My family love it. Thanks so much
Thanks so much Alli, for taking the time to share your results!
Hi, this easy foccacia recipe doesn't seem to have any sugar. Was this a typo?
Hi Tracey, no, it is not a typo. Sugar is not necessary to activate yeast. A pinch of sugar can quickly tell you if yeast is still alive but it's not needed for it to work its magic.
Awesome thanks I'm about to potter for 2 hours 😀
This recipe is so good and so easy! More often than not, online recipes just don't come out looking like the picture on the recipe. This one did and it was delicious. The crust was crisp and the bread was chewy. This recipe is a definite keeper.
Yay! I'm so happy you enjoyed it, Karen. We love this bread. I don't repeat a lot of recipes as I'm always onto something new but this one is different. I make this bread at least once a week. Thanks for taking the time to share your results!
Mixed it up and left it on the counter covered as I intended to use it the same day, was going serve with a pasta dish. Well, it got late so I made "dressed" focaccia- added Trader Joe's everything but the bagel seasoning, thin sliced roma tomatoes, onions and marinated artichoke hearts, topped off with fresh mozzarella and grated parmesan cheese. It was DELICIOUS - ridiculously easy indeed. Looking forward to trying more recipes!
I love your version, Debra! Thanks for sharing your results!
I’ve made this with regular flour and loved it! Would it be possible to make it with Kamut flour for those with gluten sensitivity?
I think some readers have made this with GF flour with good success. I haven't done it myself so I can't advise any adaptations that might be needed. If you try it, please share your results. Thanks!
This looks amazing, can't wait to try it!! I assume I can use my Kitchen Aid stand mixer to mix the dough....this is going on my MUST MAKE ASAP list! So happy I found your blog, can't wait to explore more of your recipes!
Hi Debbie, you definitely could use a mixer but it's so easy and quick by hand that it's really not necessary. Thanks for visiting The Café 🙂
I’ve made this several times to go with my Paella. Tonight I added a twist....fresh crushed garlic, rosemary and Asiago cheese. I blended it all before I added the water. I’ll send a pic and a review tomorrow.truly love your recipes....Thank YOU For sharing your talents and passion!
Thanks, Buddy! Yum, that sounds wonderful! Thanks for taking the time to leave such a nice comment 🙂
I use this recipe all the time now! Everyone raves over it. Can the dough be frozen? And if so at what point, before or after the first rising? Thank you!
OMG. This so delicious and so easy! Thanks for a great recipe.
Thanks for taking the time to leave a comment. So happy you enjoyed it!
I would like to make this but I wonder if I could just make just one loaf, and use a 13x8 pan?
I love your recipes and the blog, thank you so much !
Rosemary
Hi Rosemary, that should work just fine. Hope you enjoy it! Thanks for your kind words 🙂
Wow, this is a wonderful recipe. I made it to go with dinner tonight (chicken and spinach orzo) and served it with a bit of olive oil with pepper, and my SO took one bite, looked at me, and said "This is the bomb!" I'll be making this again soon. Thank you!
Hi Anita, I'm so happy you enjoyed and I love the response you got from it 🙂 That's exactly what I thought the first time I made it!
I started this yesterday afternoon. Wow. I looked in fridge before bed. Already had risen. Made the bread today. Great and easy instructions. It came out perfect. I could eat the whole loaf myself. Loved it. Will be making again.
Yay! So happy you enjoyed it, Lisa! It is very dangerous to have around. Once you eat one piece, it's hard to stop! Thanks for taking the time to share your results!
Such a great and simple recipe. I made my first one cutting the quantity in half as there is only two of us, and I used wholemeal flour. It was perfect and delicious. I took a photo because it looked exactly like yours - and NEVER happens!! Thanks so much, this will be a regular in our house.
Yay! I love that your bread turned out so great! Bon Appetit!
I want to try to make several batches of this to serve with pizza sauce at a church youth event. Do you think I could bake it in bigger pans? I have a 17 inch deep dish pizza pan, or even 1/2 sheet pans? Thank you, it looks delicious
Hi Toni, you could use a half sheet pan for this recipe.
I made this but was in a hurry. I didn’t let it rise more than 30 minutes and it was delicious. The flavor was well developed and the rise was very nice. I will make it again with the proper rise time. Thank you!
That's good to know, Trish! Thanks for sharing your results!
Thank you for this wonderful recipe! I have made this several times already and always with perfect results. My family's favorite version so far: I brush basil pesto all over the top, then sprinkle the sea salt and bake. Irresistibly delicious!
Yum!! That sounds wonderful! Thanks for sharing your results, Marian!
Thank u for the astonishingly easy &yet delicious recipe ..looking forward for more easy recipes with the same generosity of details and tips ..thank u so much one more time
You're welcome, Hala! I'm so happy you enjoyed it and found the directions easy!
Can I make the dough on a Thursday night but wait to bake it Saturday morning? Or is that too long to wait?
Yes, you definitely can Lauren. Just make sure it's well covered in the fridge so it doesn't dry out.
I accidentally put the yeast in the warm water as a habit. Will my focaccia still turn out okay? Thanks! Amazing recipe by the way
Yes, I think it will be fine.
Thank you! I made the dough yesterday and baked today. The bread is delicious and I loved that I had all of the ingredients already in my pantry.
Thanks, Lisa! So happy you enjoyed this bread as much as we do!
Do you know how long this will keep in the freezer?
I've kept it up to a month with great results!
I noticed that there is no sugar in this recipe. Not needed to activate the yeast?
Hi Mubeena, no does not need any sugar to activate in this recipe. I was surprised at first too but it rises beautifully!
Fabulous recipe! It works just the way you said it would and tastes great. There are so many flavour variations that immediately come to mind. Thanks so much for posting this!
Amazing!. Very easy to make. I will use this as my go to recipe when I go to someone house. I made one with pepper jack cheese, cilantro and tomato. The other one I made with olives, sun dried tomato brushetta, parm cheese, Italian seasonings. My family loved it.
Thanks and I love your website. Your my go to site when I'm looking for a recipe. Everything I've tried from your site has never failed me.
Gail
Hi,
Do you think this one recipe would fit a traditional half sheet pan instead of 2 round cake pans? Thanks very much
Hi Heather, I think it would work but it would be not as thick.
I'm astounded that this recipe does not get a higher user rating than 3.84 (at time of reading) - it deserves 6! I've shared it with friends who have been equally amazed. This would have to be one of the best, most indispensible recipes I have ever found online. The results are spectacular and the method so incredibly easy. I'm extremely grateful to Cafe Sucre Farine for posting it, thank you very much.
Thank you Urszula, I'm so happy you've enjoyed this recipe as much as we have! Sounds like it's become an old friend to you too!
Regarding the rating, it's hard to understand Google sometimes. There are lots of really positive comments on this bread although not everyone leaves a star rating. Most of the star ratings for this recipe are 5 but I've heard that sometimes when a recipe is fairly new (this one was published in August of 2018) and has lots of 5-star ratings, Google still doesn't trust that they're all legit so the recipe isn't given full credit. Not sure how all that works but I am sure that this is a wonderful recipe 🙂 Thanks for taking the time to share your results!
One more question : Why does the bread become rubbery when its at room temperature ?
Because there are no preservatives in this bread it will not stay fresh for more than a day at room temperature. I always slice the bread I'm not using and stick it in the freezer. It keeps really nice that way.
What is the height of the pan ?
I use a 2-inch round pan.
I baked this focaccia today ...the top got a livy brown hue but the bottom was white. On inserting a wooden skewer it came out all clean. I followed your lovely easy recipe to the t. Please let me know is it normal to have a white base at bottom and if not how to i get the golden hue at the base. Thank you
Hi Tejal, the bottom should be golden and crisp. Try baking it on the lowest rack of your oven. You should be able to resurrect the loaves you already baked by putting them back in the pan with a small amount of olive oil. Cover the top with foil and bake on the lowest rack for 10 minutes to crisp up the bottom. You can also crisp up the bottom by adding a small amount of olive oil to a sauté pan and heat over medium-low heat. Add the bread and reduce heat to low. Cover the pan and cook until bottom is crisp and golden.
Thank you so much for your prompt reply. Will try this way & see how it works.
Thanks , Chris , for this terrific recipe. We’ve used this bread for sandwiches, to accompany soups and just eating a crispy slice. This bread has turned out great for me each and every time. I now have the dough in the fridge for overnight and can’t wait to bake it in the morning. This may be my 7th time making it...that’s how much we love it!
Haha! You sound like me, Sherrie. When I find something I really like, I can't stop making it! I've probably made this focaccia 100x!
Absolutely a great recipe. I changed it a bit. Tried a few different things. I added 1 tsp. Garlic powder 1 Tbs Italian or so seasoning 1tsp dry parsley 1 tsp rosemary I broke it up a bit. To the flour add yeast mixture. Let it rest like the recipe. When they have proofed put the olive oil on poke down add Italian season and salt. Heat oven to450 put in the loafs reduce to 425. After 5-10 minutes add 1 -?2 cupyof shredded cheeses or a mixture of parmigiana on each. Finish baking for the 22-28 minutes. Cool on racks on paper towels
Yum, sounds wonderful! Thanks for sharing your adaptation!
I love onion foccacia - have you tried topping this with onion? Does it work?
Hi Emily, yes, I think it would definitely work. I would add the onions after you dimple the dough.
Hello
,
Can you use store brought pizza dough for this recipe ?
Thanks
I think this recipe is easier than even running to the store and buying dough. Try it! I think you'll agree 🙂
This is the second time I've made this. The first time, I followed the directions and it did not disappoint.
The second time, I skipped over the refrigeration and kneaded it once, after several hours, to get those air bubbles going. Baking it had the house smell heavenly. It was so soft and fluffy and the Tuscan seasoning I used was perfect.
Thanks so much for the recipe. I'll be making this for our church bake sale!
Thanks for sharing your results, Lisa! I hope this will go like hot cakes at the church bake sale!
I have been experimenting with lots of different recipes to make rolls, focaccia, ciabatta, baguettes and none of them have been as easy as this ridiculously easy recipe. And so YUMMY!! My SO LOVES the results, and I'm happy to keep it simple. Will make this again and again.
Thank you for sharing the techniques!
Yay! So happy you've enjoyed this focaccia, Polly!
This was simply wonderful. I didn’t have 2 round pans. Used a rectanglular pan, worked just fine. Loved the crispy edges. It was so easy !
Thanks for sharing your results, Marsha. I make this bread at least once a week. We love it with everything. I've just created a new version of it too with some whole wheat flour and lots of seeds. It's wonderful and I will share it soon on the blog!
I’m a recent college grad and am still learning how to cook by myself. I’m very much an amateur but I wanted to branch out and try something new and I stumbled across your recipe. I can’t believe how easy this was and it turned out fantastic! Everyone who has tried it has been incredibly impressed and doesn’t believe I made it myself! I love how simple the ingredients are. I topped it with salt flakes and some generic Italian seasoning but next time I plan on using fresh herbs. I also cooked this in two 8” square pans instead of 9” round pans but I had done the math beforehand and the area of those two are nearly identical so it worked out no problem. I agree with one of the other comments I saw that a tablespoon of oil in each pan seemed like a little much so I may try a couple teaspoons next time instead.
Thanks for sharing this! I think a pan of this foccacia will make a great gift when attending my friends dinner or housewarming parties.
Bravo to you Kevin! I love that you're already impressing your friends with your focaccia expertise! Thanks for sharing your results!
I read your recipe last night in bed. It got me so excited that i got out of bed and put together the dough. Left it in the fridge for 15 hours, and proceeded as per your recipe. It looked fantastic when i took it out of the oven but when i cut it, i somehow did not get the nice holes inside. What can be the possible cause? (I used all purpose flour, i did knead a couple of times as the dough looked a bit too shaggy, and i used a glass cooking pan.... )
Hi ET, next time don't knead the dough. It will be shaggy looking but that's what produces the beautiful big holes. I know (if you're a bread maker) that kneading will be a temptation - but it's not a traditional recipe. Do try it without kneading and I think you'll be quite happy. Like the name says, it's ridiculously easy!
Also, if you have a traditional round metal cake pan, use that for best results.
I sooo want to try this recipe but, I can’t find instant yeast where I live. Can I use regular active yeast instead?
Hi Mika, Sometimes instant yeast is also called Rapid Rise. Maybe you could find it under that name. You could you regular active yeast but you will need to proof it before adding it to the dough. To do this, take 1/4 cup of the water and make sure is very warm to touch (should be around 110˚F 43-44˚C) and add the yeast. Allow it to sit for about 5-10 minute until foamy and poofy. Proceed with recipe an add yeast mixture along with the rest of the water.
This sounds really wonderful!! Is there any way to reduce the sodium to less than 2 teaspoons? My husband's heart condition means we are always fighting the sodium battle. I know some sodium is needed for the bread to rise properly, but would like to keep it as low as possible.
Hi Sherron, I think it would definitely be okay with 1 teaspoon of kosher salt, especially if you're used to a low sodium diet. And then go super light on the flaky sea salt on the top.
I made this recipe today and it is easy and delicious. My only comment would be that , for me, 1 tablespoon of oil in the bottom of the pan was too much. I had a large "oil slick" in the bottom of the pan. I will try half a tablespoon next time.
Hi Perlita, you're right, there is always a little extra oil on the bottom of the pan. But I think baking in the oil is what makes this crust so crisp. Then I'm always happy when I get to discard it, knowing it's not in the bread!
Hello... so I was nervous that the dough was to soft and sticky but I stayed with the recipe and continued. Well I have to tell you the bread came out perfect!!!! So crispy herby on the outside and fluffy and tender on the inside. Exactly what I was hoping for. I only gave it 7 hours in the fridge and then 2 1/2 hours in the cake pans. If I could post pictures I would. I am so pleased. I served it with Burrata Cheese, tomatoes and fresh basil salad on the side. My husband LOVED it. Thank you!
Yay! So happy you persevered! We love this bread too and I love when others discover how easy and delicious it is! Thanks for sharing your results, Lorraine!
I am making this recipe right now. I have never made this before. Is the dough supposed to me really sticky and soft? I made sure my measurements were correct.
Yes, it will be soft. Don't worry, it will turn out great!
Just follow the directions and you'll be shocked at how wonderful it turns out!
Could this recipe be made in one sheet pan instead of 2 cake pans. If yes, would the bake time be the same and if I want to add toppings such as plum tomatoes and olives, even in the cake pans, should I pre-bake at all?
Hi Donna, I think you could make this in a sheet pan but I haven't tried that yet. The baking time would probably be a little longer.
This bread was an absolute hit!!thank you so much its delicious!!
Awesome!! You just reminded me that I have to make another batch of it!
Can this be done with whole wheat flour?
Hi Angelove, I think you could sub some whole wheat flour but it would be pretty dense with 100%WW flour.
May I ask why it would be dense with 100% WW? Can it be sifted or blended to make WW lighter?
Thanks!
Hi Mark, good question. Baking with 100% whole wheat flour is a little trickier than when working with all-purpose flour. Bread can get really heavy with 100% WW flour and you have to incorporate an ingredient called Vital Gluten to lighten the texture. Even with that, I'm not sure that you would get the same beautiful texture with the big open "Italian-style holes". I'm sure there are recipes out there for focaccia that have been adapted to 100% WW which might be a better option.
Hi Chris,
I made this twice and my family loves it. However, we notice a strong yeast taste that's not in store-bought focaccia bread. Any ideas how we can lessen the yeast taste?
Thanks!
~Katty L
Hi Katty, you could cut back on the yeast just a bit and see if that helps. There are 2 1/2 teaspoons of yeast in a packet so you could try just using 2 teaspoons. Another thing you could try is a different brand of yeast. I usually use the instant yeast from Aldi and don't notice any yeast taste in the finished focaccia.
Can you do the first rise on the counter? I'm wondering about making it in one day when I don't have 11 hours notice. Starting it in the morning and letting it sit on the counter. Have you tried this? How will I know when the first rise is complete?
Hi Connie, I would let it rise for about an hour on the counter and then stick it in the fridge for as much time as you have left. Do plan for the second rise to be 2 hours after you've removed it from the refrigerator. This will speed up the rising a bit and help with the texture. It won't be quite the same as with the nice slow rise but it's still very good. I've done this with good results.
Thank you for this wonderful recipe. Definitely the best focaccia I have ever made and even tasted.
Thank you, Sarah! So happy you have enjoyed it. I've made lots of focaccia over the years but I totally agree with you, this is our favorite too!
Hi Chris! I have made this twice now for dinner parties we have gone to in the last 2 weeks and everyone absolutely loved it. Made it yesterday using fresh rosemary and it was delicious. You are not kidding when you say it us easy!! Love, love, love your recipes and your blog. Thinking of you today in the mountains and know it must be a beautiful sight to behold!
Aww... so nice to hear from you, Diana! We ended up on opposite sides of the state, didn't we? I'm so happy you enjoyed this bread, it's definitely a favorite around here too. I HAVE to have some on hand when our granddaughter, Emmy comes to spend the night and I pack her lunch for school. She's super disappointed if I don't have "focaccia" for her sandwich. A little kindergarten food snob 🙂
Happy Thanksgiving!
p.s. It is absolutely gorgeous here - but not today! It's cold, windy and rainy/icy. A perfect excuse to make focaccia!
Love at first, second, third, and so many more bites! I made this for a potluck at work and had rave reviews! We even have an International worker, yes, from Italy and she said it was amazing! I have loved every recipe I’ve tried from The Cafe and so appreciate your hard work at putting them together for us. I am always looking forward to the next post!
I am using a large cookie sheet because I have no baking pans. I put plastic wrap over the pans and the balls got spread out so they are already kinda flattened out. Do they need more air and is it ok that they are already flattened or will this effect the bread quality?
Hi Kat, I wish I had a better answer for you but you won't get optimal results with this recipe without the right size pans.
Hi I tried your recipe it is amazing, I have been home baking bread for 45 years and this is the best and most simple Focaccia recipe I have come across thank you for sharing.
Yay, that's awesome! Such a wonderful compliment!
I have a lot of pain in my hands & wrists, so I can't make recipes that require a lot of stirring or kneading. I was thrilled to find this recipe! It turned out great, & I look forward to making it many more times & experimenting with different toppings. Thanks so much for sharing!
I love that you can make this bread, Katie, despite the problems with your hands and wrists! Thanks so much for sharing your results 🙂
Hi Scott and Chris!
Do you have any ideas on how to make this Gluten Free? I don't think I can just sub the flour for Gluten Free flour. Would love to hear your thoughts!
Hello Adrienne, I wish I could give you advice but GF is not my forte. I've read good things about this bread: https://www.lowcarbmaven.com/low-carb-almond-flour-bread-almond-flour-focaccia/
I have fresh yeast. How many grams should I use? K
I attended to bring bread to our next potluck (soup night) and have been looking over various recipes I've saved and then I ran across your recipe. Looks delicious and super easy, which makes it a winner, not to mention all of the great reviews. Thank you for sharing.
Hope you enjoy it, Judy! Thanks so much for your comment.
Just fantastic and so easy! I’ve made six loaves in the last two weeks! No issues with the exception of a longer baking time of about 30 minutes the second batch. Thanks for sharing!
Yay! So happy you enjoyed this recipe, Kelli. We love this bread too!
Thank you so much for this recipe. Just baked a half of the recipe and it is a huge success! The three year old has not stopped eating (will need to stop her at one point). It was super easy and took me literally 5 minutes to prepare the dough and I threw it in a zip lock bag then in the fridge. I won't pay another $7 for a Focaccia! Thank you so much!!!!
You're welcome, Sue. I'm so happy you enjoyed this as much as we do. I love that your 3-year-old is already a food connoisseur :)!
Chris, You are certainly right - this is a *great* recipe! Wonderfully, amazingly easy with great flavor. I probably did add a tiny bit more oil on the top, but I will make this again and again. Thanks for your work on developing and trialing these recipes for the rest of us! Have you tried letting the dough it sit longer than the 24 hours? I do love that this has so much less oil than most other recipes.
Thanks, Sue. I think I eat a little too much of this bread because it has less oil, haha!
Super recipe! Made one savory with dried herbs and one sweet to go with a brunch. Used melted butter instead of oil and sprinkled with turbinado sugar and cinnamon. Super yummy, thanks.
I bet your house has been smelling amazing, Brigitte! Thanks for sharing your results!
Turned out fabulous. I topped mine with garlic, olives, cherry tomatoes and anchovies!!
Yum! Sounds wonderful, Michele. Thanks for sharing your results!
Why do I need to use rapid rise yeast if it’s going to sit for 8 hours or more?
That's a good question, Vikki. You use rapid rise yeast because it's doesn't have to be activated like regular yeast does - if you used regular yeast you'd have to take the time to let the yeast proof in water before adding it to the flour.
Hi there,
Is it okay if I don't use a 9-inch pan and just put the dough on the normal rectangle baking pan to make a longer oval shape?
I'll try the recipe and leave a review soon!
Thank you! Have a good day!
Yes, that should work fine, Quyen. It will probably come out rectangular though, rather than oval. I make it sometimes in a 9x13-inch pan and it comes out great.
Hello again!
I made it and this is the best foccacia I've ever tasted. The dough's texture is amazing and I love to handle it! The recipe is very easy to follow with simple ingredients. It tastes so good when the top is still crunchy.
I'd make it again and again <3
Thank you so much for sharing the recipe!
Have a good day!
I forgot to mention. I added fresh figs and thymes, and poppy seeds. They're still perfect with the same baking time and °C 🙂
Thank you for a wonderful recipe. Turned out perfect and was so yummy! Have to admit I nearly polished off one by myself.
Haha! I totally get it! Thanks for sharing your results Valerie 🙂
We can’t stop eating this. It’s so so good and very easy to make. I added black olives to one and minced garlic to the other along with the salt and herbs . Thank you for sharing this.
Thanks for sharing your results, Grace. I know what you mean when you say you can't stop eating it. I have to freeze it to remove the temptation! I love your adaptations!
Big fail for me! Sadly mine didn't turn out. It was dense and did not have any of those lovely holes. I would love to try and figure out what went wrong as the recipe is simple enough. If you have any ideas I'd love to hear them as I will happily try again. It tastes good but it isn't like focaccia, just like regular squatty bread. I struggle with most bread recipes and thought this might be THE ONE that would work.
Hi Judi,
Don't give up! I can't say exactly what went wrong since I wasn't right with you in the kitchen but I have made this so many times and it's always been a win-win. Make sure you have instant yeast that's not too old. Your tap water should be warm, not lukewarm. It should feel quite warm when you stick your finger in it. Not so hot you have to pull it out but definitely nice and warm. Let it sit in the fridge for at least 8 hours or longer. Then make sure you give it the two-hour rising time. If your kitchen is cool, it might need a little longer. Look for a nice cozy, warm spot. I think you'll be happy with the results if you give it another try. 🙂
P.S. The "oily" dimpling was very therapeutic!
Oh Wow, Chris...you were not kidding! So easy, not much hands-on and yet a superior product! Friends raved and I just sat back and beamed. Truly, from my perspective, it is one of the very best recipes I have discovered on the net! I cannot thank you enough. It is also very adaptable, as without the garlic and herbs (though divine) it is also very adaptable for sweeter applications. Having some now with chokecherry (recently renamed "black cherry") jelly.
Hi Chris—- I know that there are differences in Kosher salts, with some recipes calling for a specific brand. Which brand did you use for this recipe?
Hi Donna, I use Diamond Crystal although I have used Morton's in the past. Diamond is a little lighter than Mortons but I don't think if you're using less than a tablespoon that it makes a lot of difference.
I love this kind of bread, and I love that you'd paired it with a soup that looks perfect for dunking.
Thanks, Jeff! The soup is perfect for dunking! 🙂
I am curious why you refrigerate the dough rather than let it rise at room temperature.
Hi Karen,
Good question. The refrigeration helps the dough to rise slower which actually helps develop flavor and those wonderful "holes" that are characteristic in artisan breads.
I made your ridiculously easy focaccia bread and I had to drop you a note to say it turned out beautifully! Just like your picture. I have been taking pictures and sending to my friends and sister to show off these beauties.
Your recipes are truly a gift.
Thanks for sharing!
Trish S
This focaccia looks perfect Chris. I truly can’t wait to give it a try - especially with a nice bowl of soup. And can’t wait for the soup recipe too!!
Your focaccia looks delicious and I am really looking forward to trying it, Chris! I just made homemade soup yesterday and this would be perfect with it!
Such a wonderful bread, and one I've never made for some reason. And should -- and use your recipe! -- because it's, well, ridiculously easy. 🙂 Thanks!
I have a very similar recipe that I haven't made in ages, you have me drooling! I will try making it in a round pan like you did, mine always comes out very flat like a thick flatbread, so I can't wait to try yours, thanks Chris
Love bread like this! So easy to whip up to have with whatever is for dinner 🙂 Looks perfect!
Can't resist any homemade bread! Great with soup or salad for a wonderful lunch.
Love your frequent flyer note ! LOL
Hi Chris, thank you for posting this marvelous sounding and looking bread and also for the tip on sizing the parchment paper - genius !!
I have been noticing your nail polish and I love it! Could you tell me the brand and color? Thank you.
Hi Judy, thanks so much. I really love the pre-cut circles of parchment but this is super easy too!
You're going to laugh (or think I'm dense) but I don't know the color of my nail polish. I do know it's OPI but I usually just let my nail girl pick it out. I'm going tomorrow so I'll check the name and let you know 🙂
There's nothing better than the smell of a yeast bread baking in the oven--except for eating it! I'm long overdue to make some homemade bread---and how could I not try this beautiful focaccia??
Chris
How does this bread differ in taste and texture from your older tomato and parmesan focaccia recipe? It certainly takes less work.
I’ve always loved your other focaccia
Thanks
Maggie
PS we love Curate in Asheville.
Try this one Maggie, you might not go back to the other. 🙂 This one is a little thinner but super crisp with a tender and chewy interior. I love the tomato and parmesan one too but I'm quite smitten with this one now!
This looks delicious and I’m delighted to see you posting again. Looking forward to many more great recipes!
Your bread has the perfect texture! And I love seeing your posts from the previous years, I want to make a meal of all of them together!
Thanks, Sue - I wish we could sit down and eat that meal together 🙂
Just mixed up a batch. Can't wait to try it tomorrow night! So glad you got moved. Looking forward to pics of your new place.
Haha! That sounds like something I would do, Donna! Hope you enjoy it as much as we have!
Chris, I really enjoy all your fabulous recipes. Thank you for making them available. I was recently diagnosed as gluten sensitive. Can the focaccia bread be made with king Arthur gluten free all purpose flour? Thank you
Cassi Stagner
Hi Cassi,
I have checked with a friend who is gluten-free and she thinks that it should work fine with the KA all-purpose flour. If you try it, let us know!
Thank you!Pinned..you can never have too many recipes:)
True, true, true 🙂