This post may contain affiliate links. For more information, see our privacy policy.
This festive one-bowl, no-mixer Red Velvet Bundt Cake couldn't be easier but it also couldn't be more delicious or more perfect for a holiday celebration!
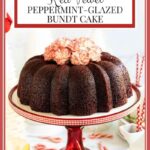
There's nothing like a super easy, minimal-effort holiday dessert that looks amazing, can be made ahead, will be loved by almost everyone and can be dressed up or down. This one-bowl, no-mixer Peppermint-Glazed Red Velvet Bundt Cake checks ALL the boxes!

What is a Red Velvet Cake?
Although Red Velvet Cake has been historically popular in the Southeastern United States, it seems to be beloved all over the world these days. When our daughter lived in London, there was a famous sweet shop that specialized in red velvet cupcakes. If you check out Google or Pinterest, you'll find a zillion variations... red velvet cakes, cupcakes, breads, bars, cookies, whoopie pies... you name it!
If you do a bit of research, you'll find there are numerous claims to its origin. According to Vintage Bakehouse LTD, "the Red Velvet Cake is believed to have originated during the 1800s, and like most southern cuisine and culture, is of African American origin."
They go on to say that, "Originally the redness of this cake wasn't so apparent. It was therefore known then merely as the Velvet Cake. The color began as a Reddish-brown tint caused by the chemical interaction between the brown sugar, buttermilk and vinegar. To enhance the redness, food coloring was introduced to the recipe much later, but exactly when and where remains a mystery."
The Waldork Astoria Hotel in New York City claims that Red Velvet Cake made its debut with them in 1959. Another theory is that it was a 1950's housewife who added red food coloring to the batter to make it prettier. And then there's the story of the baker who created the distinctive red color so that he could sell more cake on Valentine's Day."
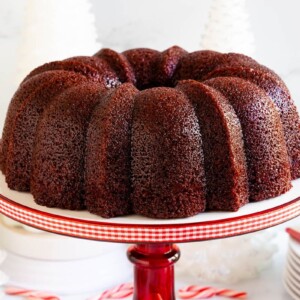
So who really knows? What I do know is that this Red Velvet Bundt Cake is moist, delicious and has a super tender crumb. It's made with cocoa, buttermilk and a splash of vinegar in addition to the classic cast of cake characters, flour, sugar, eggs, and vanilla. And, of course, red food coloring which gives this cake its romantic "red velvet" hue.
If you're not a fan of food coloring, this Red Velvet Bundt Cake is just as delicious without it. See the Café Tips below for how to make adjustments. You can always go back to the original name, Velvet Cake.
Ridiculously Easy
If you're new to The Café you might not know that we have a whole category of recipes called Ridiculously Easy. They're some of our most popular recipes with the busy lifestyle that so many of us lead. You can read all about our Ridiculously Easy recipes in this post and you can check out the whole collection here but my super condensed definition of these recipes describes them as "the recipes that make you feel like a kitchen rock star with minimal effort on your part".
This Peppermint-Glazed Red Velvet Bundt Cake definitely falls into the Ridiculously Easy collection. With just one bowl and a whisk, you can whip up this delightful dessert in minutes with common pantry/refrigerator ingredients. The only difficult part is waiting for the cake to finish baking as the fabulous aromas waft through the kitchen!

Why did my cake dome and/or crack at the top?
Bundt cakes often generate two questions. First of all, why did my cake dome at the top? This is a perfectly normal phenomenon for Bundt cakes. Because there's more heat at the edges of the pan, the cake get's done more quickly around the edges. This causes the center to rise up more as it slowly bakes.
What to do about this problem? I like to slip a silicone cake strip around the sides of the pan. It helps the cake to bake more evenly although you may still have a bit of doming.
If the doming really bothers you, you can always use a long serrated knife to remove the dome. That also allows you to have a delicious little snack that no one else will know about once you flip the cake over to serve it.
The second question that's often asked is "Why did my cake crack as it baked?
Again, it's the nature of a Bundt cake. It happens because Bundt cake batters are generally quite dense which (again) makes the outside of the cake bake faster than the center. That causes the batter to rise in the center creating cracks on the top. But Bundt cakes are traditionally flipped over after baking to show the pretty shape of the cake so the cracked top (bottom) doesn't really make much difference.

A delicious pairing
You'll often find Red Velvet Cakes paired with cream cheese icing and/or the addition of peppermint, either in the filling or the icing. I decided to keep things simple and use a quick, easy peppermint glaze that's simply brushed on the cake shortly after it emerges from the oven. The glaze gives the cake a beautiful shine and it sinks into the cake, creating a layer of fabulous peppermint flavor that's not over-the-top sweet.

I like to serve this Red Velvet Bundt Cake with a dollop of whipped cream and a sprinkle of crushed peppermint. A cheery sprig of mint finishes things off for a pretty presentation.

Serve it plain or dress it up... it's all good delicious!
Serve this Peppermint-Glazed Red Velvet Bundt Cake with a cup of coffee or a tall glass of cold milk and you'll have lots of happy partakers. But if you feel like dressing it up a bit, here's a super easy, super pretty way to pizzazz things up.

Place a small vase or cup in the center opening of the cake. Add a bouquet of flowers to peek out over the top. I like to use edible flowers like carnations, pansies, daisies, roses, etc. Although we don't actually eat the flowers, they do brush up against the cake and I always want to be safe when serving family, friends and guests.
One other easy decorating option is a sprinkle of powdered sugar. I use a small sieve with a spoonful of powdered sugar. I just tap the sieve gently as I move it over the cake for a pretty coating.

Ridiculously easy and ridiculously delicious! Put this Peppermint Glazed Red Velvet Bundt Cake on your holiday baking list!

Café Tips for making this Peppermint-Glazed Red Velvet Bundt Cake
- You'll need a large (12-cup Bundt pan to make this Red Velvet Bundt Cake. If you use a smaller Bundt pan (10-cup or smaller) for this cake, the batter will run over the top. If you don't have a 12-cup Bundt pan, you can use 2 9x5-inch loaf pans.
- It's important to prepare your Bundt pan properly before adding the batter. There's nothing worse than going through all the trouble to make and bake a cake only to have it stick to the pan when you're turning it out. I like to spray my pan generously with baking spray. (Be sure to use baking spray and not non-stick cooking spray. Baking spray includes flour and oil vs just oil.) Then I take a paper towel and rub the spray into all the cracks and crevices. Finally, I give the pan one more light spray. This technique has worked like a charm for me for many years.
- That being said, Bundt pans do wear out and can lose their nonstick finish. If you're a moderate baker, your Bundt pan will probably last a lifetime. But if you're a crazy, non-stop baker like I am, you may eventually run into problems and have to replace your pan.
- I LOVE my Nordic Ware 12-Cup Bundt Pan. I've had mine for several years, have put it in the dishwasher repeatedly and it still looks and performs like new. (One of these would be a great gift for a budding young baker.)
- This recipe calls for "neutral-flavored oil". That just means oil that doesn't have a strong flavor of its own. Sunflower, safflower, avocado, canola, corn, vegetable and grape seed oils will all work well.
- This recipe calls for a large microwave-safe bowl. This means a bowl that won't get hot or melt in the microwave. You can check to see if a bowl is safe to use in the microwave by checking the bottom. It should have a symbol that looks like this:

- You'll need a big bowl as this recipe makes a lot of batter. If you don't have a large microwave-safe bowl, just heat the butter, oil and water in a smaller microwave-safe bowl then transfer the mixture to a large bowl.
- My favorite way to make from-scratch whipped cream is with my immersion blender. I pour a cup of cold cream into a tall glass or container (you want the cream to cover the blades of the blender). I add a tablespoon of powdered sugar, 2 teaspoons of cornstarch (for stability) and a teaspoon of vanilla. Then simply insert the immersion blender and let it do its magic. It will take only 15-20 seconds so be careful, once it begins to thicken. (Homemade butter is nice but not on cake!) With the addition of the corn starch, you can make this cream several hours in advance and it will keep nicely in the refrigerator.
- Have a problem with red food coloring or food coloring in general? This recipe makes a fabulous chocolate cake. Skip the red food color and increase the cocoa to 5 tablespoons.
- Last BIG tip... it's important to allow the cake TO COOL COMPLETELY before transferring it to a serving plate or platter. I learned the hard way (see below). After 4 test runs and tweaks, I had the perfect cake but (foolishly) decided to transfer it from one cake stand to another while it was still fairly warm. NOT a good idea... unless you are making a trifle! (Scott and I have a trifle too much around the middle and didn't have guests coming, so I decided not to take that route.) My first instinct was to cry 😩 but then I was reminded that, in the big scheme of things, this was a minor problem. We got a good laugh out of it and I asked Scott to take a pic so you could learn from my mistake too.

Thought for the day:
Therefore the Lord Himself will give you a sign:
Behold, a virgin will be with child and bear a son,
and she will call His name Immanuel.
Isaiah 7:14
What we're listening to for inspiration:

If you enjoy this recipe, please come back and leave a star rating and review! It's so helpful to other readers to hear your results, adaptations, and ideas for variations.
Scroll Down for the Recipe - or Save It to Your Inbox
We’ll email you the recipe so it’s easy to save, print, or share.
Ridiculously Easy Peppermint-Glazed Red Velvet Bundt Cake
Ingredients
For the cake:
- ½ cup neutral flavored oil
- ½ cup butter, I use salted butter
- 1 cup water
- 2 ½ tablespoons cocoa powder, not Dutch or dark cocoa
- 1 ¼ cups buttermilk
- 1 cup granulated sugar
- 1 cup light brown sugar, packed (don't use dark brown sugar)
- 2 large eggs
- 2 teaspoons vanilla extract
- 1 tablespoon baking soda
- ½ teaspoon kosher salt
- 3 cups all purpose flour
- 2 tablespoons red food coloring
- 1 tablespoon white vinegar
For the glaze:
- ¼ cup water
- ¾ cup powdered sugar
- ½ teaspoon mint extract
- ½ teaspoon vanilla extract
Instructions
For the cake:
- Preheat the oven to 350˚F (177˚C). Spray a large Bundt pan with baking spray. Rub with a paper towel to coat all of the surfaces including the interior of the center core. Spray again lightly over all the surfaces. (Note** Don’t try to make this cake in a smaller Bundt pan as it will overflow. See notes above under Café Tips.) Place a piece of parchment paper or foil on a work surface and place a cooling rack on top.
- Spray a large Bundt pan with baking spray. Rub with a paper towel to coat all of the surfaces including the interior of the center core. Spray again lightly over all the surfaces.
- Preheat the oven to 350F.
- Combine oil, butter and water in a large microwave-safe bowl and heat for 2-3 minutes on high power until the butter is melted. Whisk in the cocoa and buttermilk. Stir well to combine.
- Add both sugars, the eggs and the vanilla extract. Whisk until well incorporated.
- Sprinkle the baking soda and salt over the top of the batter and whisk well until any small lumps of baking soda have disappeared. Add the flour and whisk well again until smooth.
- Lastly, add the red food color and vinegar and stir until well incorporated.
- Transfer the batter to the prepared pan. Bake for 45-60 minutes or until the top springs back lightly when touched or a toothpick entered into a center area of the cake comes out clean. The best way to tell if a cake is done is to use an instant thermometer. The temp should read 200-205º F. when the cake is done.
- Allow the cake to cool in the pan for 10 minutes then brush the top liberally with the peppermint glaze. Turn the cake out onto the prepared cooling rack and slowly brush the entire exterior with the glaze. Use it all up. Some of it will drip off onto the parchment paper or foil, but most of it will be absorbed.
- Allow the cake to cool completely before trying to move it. Trust me!
For the glaze:
- Toward the end of the baking time, prepare the glaze by mixing all ingredients together until nice and smooth in a small bowl. If you have trouble getting the lumps out, you can microwave the mixture for 30-60 seconds then stir again.
Notes
Nutrition
Shop Our Café Loves
We’ve gathered our favorite kitchen tools, tableware, and entertaining treasures in one place, the Café Loves store. It’s a wonderful spot to find something special for yourself or the cooks and hosts you love!


Chris,
I have noticed there is a mint extract and a peppermint extract. Which do you use?
Thanks! Lynda
Hi Chris,
This cake is amazing!! So far I have made six for gift giving, (and of course one for my husband and me!)
I am using 6 cup Bundt pans, and they have worked perfectly. Perfect size for my gifts!,
This is my question! I love the glaze, but would like to ice some of them with cream cheese icing. Do you have a recipe for that?
I have looked at several, but I would love to get a recipe from you.
I made your pumpkin bundts with butterscotch icing during Thanksgiving. Once again in my 6 cup Bundt pans for friends and neighbors, and they were awesome. I am addicted to your blog! From the detailed instructions to the beautiful photographs, to the praise and scripture!
Thank you so much. Blessings, Lynda
Hi Lynda, I use peppermint extract. I really like this one: https://amzn.to/3BkkAU9
Wow, you've been busy, Linda! I'm so glad that you have enjoyed these cake recipes.
Regarding your question, I think this cake would be delicious with a cream cheese glaze. For a glaze, I would probably go with 4 ounces of soft cream cheese, 4 ounces of melted butter, 1 teaspoon of vanilla extract and 2-2½ cups of powdered sugar, thinned with enough half-and-half to make it thick but still spoonable.
Thanks for your kind words about the blog 💕
Thank you so much for your quick response! Everything you blog is five stars for me! This one is amazingly good!
Thanks again!! Lynda
Thank you, Lynda!
I always like to put a liquor in my Bundt cake glazes. Do you think I could use cream de menthe instead of the mint extract?
Hi Jenne,
Since peppermint extract is quite strong, you would need more of the Crème de menthe and that might mess with the texture of the cake. Two things you might try:
1. You could sub ¼ cup of the buttermilk for Crème de menthe
2. You could use Crème de menthe for the glaze in lieu of the water.
This looks absolutely delish but aside from the cake, I have a very left of centre question for you - how do you stay so slim with all your delectable cooking? (Suzanne - Australia)
Haha! That is something we are constantly battling with, Suzanne! We try to eat a balanced diet and not indulge with too many of the sweet treats. That being said, we do have to taste things and often many renditions before I'm satisfied. So, it is a battle and we do give a lot of food away!
Hi Kris, I don't have the 12 cup bundt, & would prefer not buying one at this point. I'm wondering if you can guesstimate how full I should fill a 10 cup pan, & what size small loaf pan I might use for the remainder. This enthuses me because I would then have a small cake as a taste test - when making a lovely cake for others. Always nice to be able to a quality control check .. right?
Hi Katy, I would fill the 10 cup bundt pan ¾ full and then use a small loaf pan and fill that one also ¾ full. That should work fine!
Bonjour, je me questionne sur la quantité de cacao pour ce gâteau (velvet bunt cake) seulement 2.5 cuillère à soupe??? Cela me semble très peu pour un gros gâteau 😮
Merci
Bonjour Lucie, c'est le bon montant. Je l'ai essayé avec différentes quantités de cacao. Au-delà de cette quantité, le rouge disparaît totalement. Le gâteau de velours rouge n'est pas censé être un chocolat noir profond. Ce gâteau a une belle saveur de chocolat, même avec cette quantité de cacao. Si vous préférez faire un gâteau au chocolat sans l'effet velours rouge, sautez simplement le colorant alimentaire et augmentez le cacao à 5 cuillères à soupe. J'espère que vous l'apprécierez, de toute faço