This post may contain affiliate links. For more information, see our privacy policy.

I know you're going to love these Rocky Road Toffee Fudge Jars. Don't get me wrong, we love to eat lean, light and healthy here at The Café; but you know what? When it's time to celebrate, breaking some of the everyday rules is perfectly legitimate to us. Sometimes we like to celebrate simple things like just living another day on God's beautiful green earth. Then there are moments in life that are so special, we just have to put on our dancing shoes. Like today. Today is the day we've been anticipating for weeks .......... an exciting day for us when our daughter Cait, her husband, Josh and their little herd (three sweet girlies and a baby toddler boy) are winging their way from London for a three week visit here in the States. We'll be picking them up in a few hours at the airport and we can hardly wait.

We've got a few more things to do in preparation, so I'll make this post short; but I wanted to share an all time favorite family dessert I reinvented for this fun occasion. I've been making versions of these Rocky Road Toffee Fudge Jars for, what seems like forever. I had my first taste of this indulgent treat many years ago when a friend brought a pan to share at work.
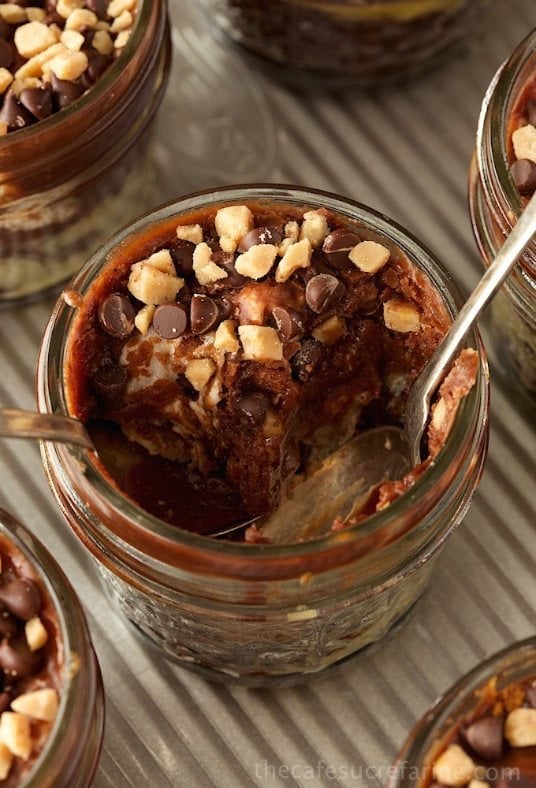
One bite of the delicious brownie, with cream cheese filling and fudgy marshmallow icing, had me begging for the recipe. My co-worker shared that the recipe had been a Pillsbury Bake-Off Winner in 1972. She kept her promise the next time we worked together and handed me a recipe scribbled out on a little note card (no email or Pinterest back then!) I probably didn't even wait a day to make them myself, and they've been a huge hit whenever and where ever I've taken them since.

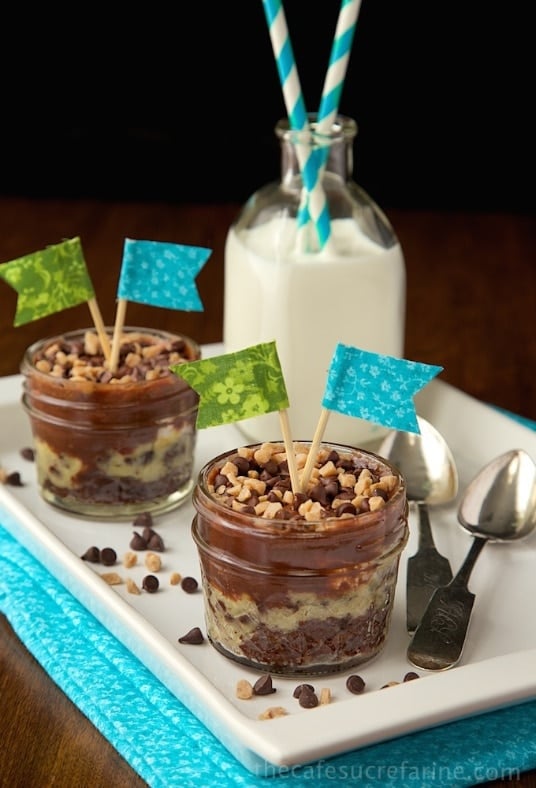
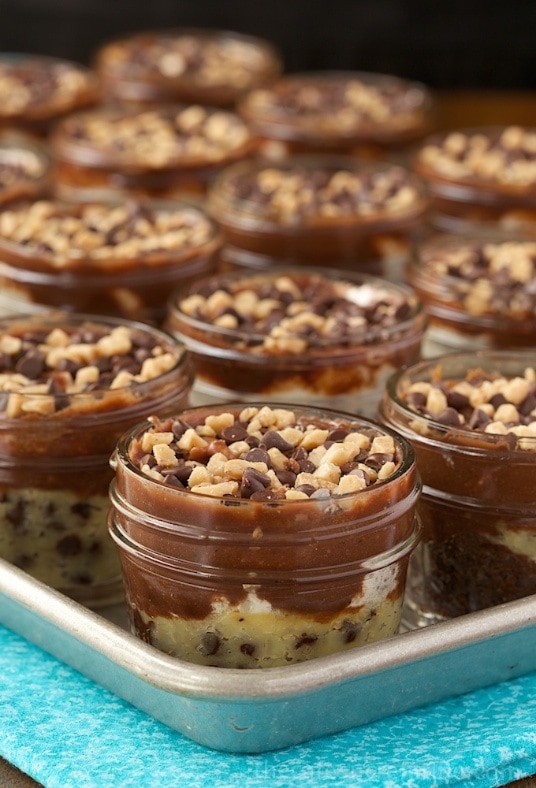
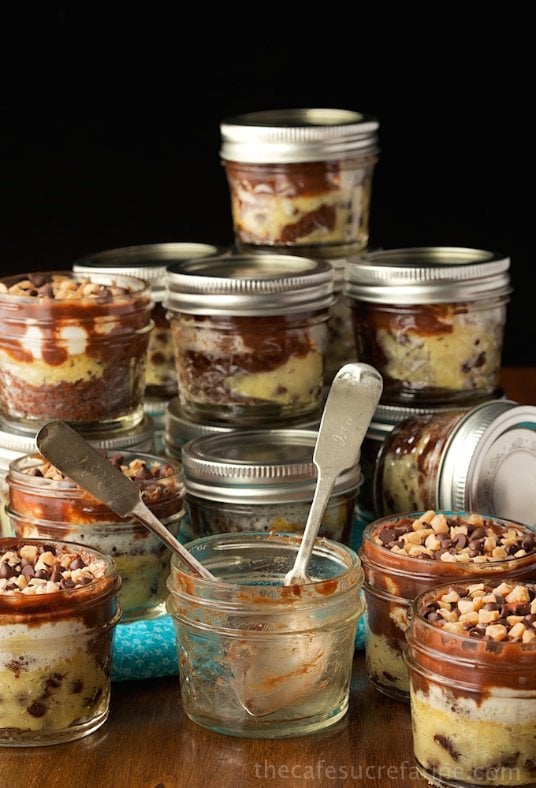
I had a little fun with these Rocky Road Toffee Fudge Jars this time by baking them in small jelly jars. I love how these little jars make dessert so simple with no cutting or portioning. They can be made ahead, covered and stored in the fridge for several days or the freezer for months. They'd be perfect to tote to a party, picnic or any type of get together with family, friends, co-workers, etc. One recipe makes 20 jars; definitely enough to feed your herd!
We'll be headed to the airport soon so I'll sign off. Hope you enjoy this special treat as much as we have. Don't be surprised if it becomes a requested dessert at your house!
P.S. Just in case you're wondering, the photographer and "his wife" couldn't stand looking at these anymore. Do you blame them? Could you take pictures for 45 minutes, smelling the intoxicating aroma of chocolate the entire time, and not indulge just a bit? .......... Tell the truth!
Scroll Down for the Recipe - or Save It to Your Inbox
We’ll email you the recipe so it’s easy to save, print, or share.
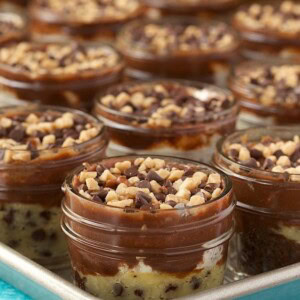
Rocky Road Toffee Fudge Jars
Ingredients
- BASE
- ½ cup butter
- 2 ounces unsweetened chocolate
- 1 cup flour
- 1 cup sugar
- 1 teaspoon baking powder
- 1 teaspoon vanilla
- 2 large eggs
- FILLING
- 6 ounces cream cheese, softened
- ¼ cup butter, softened
- ½ cup sugar
- 2 tablespoons flour
- ½ teaspoon vanilla
- 1 large egg
- 1 cup mini chocolate chips
- TOPPING
- ¼ cup butter
- ¼ cup milk
- 2 ounces unsweetened chocolate
- 2 ounces cream cheese
- 3 cups powdered sugar
- 1 teaspoon vanilla
- 1 to ffee bits, for garnish
- mini chocolate chips, for garnish
- ½ 10.5- ounce bag miniature marshmallows
Instructions
- Heat oven to 350°F. Line a sheet pan with parchment paper. This will keep jars from slipping. Place 20 4-ounce jelly jars on sheet pan. Jars should not touch each other.
- Spray insides of jars with baking spray and wipe with a paper towel to evenly spread spray.
- For the base, place butter and unsweetened chocolate in a medium size microwave safe bowl. Cook on high for 1 minute. Stir and return to microwave for another 30 seconds and stir again. Repeat till chocolate and butter are melted. Add flour and all remaining base ingredients; mix well.
- Divide mixture evenly between the 20 jars. I like to use a 2 tablespoon cookie scoop. This is approximately how much you want in each jar. Don't worry about spreading or leveling the mixture.
- For the filling, in a medium size bowl, combine 6 oz. of the cream cheese and the rest of the filling ingredients. Whisk until smooth and fluffy. Stir in chocolate chips. Divide this mixture between the 20 jars, on top and around the base mixture about 1 ½ tablespoons per jar.
- Bake at 350°F. for 25 to 30 minutes or until toothpick inserted in center comes out clean. Remove from oven and allow to cool for 30 minutes. Don't skip this part. Brownies will sink a bit as they cool and if you don't give them this rest time, your jars will have "sinkholes" in the center.
- While jars are cooling, make icing. In a medium microwave-safe bowl, combine milk unsweetened chocolate and butter. Cook on high for one minute and stir well. Return to microwave and cook another 30 seconds or until chocolate and butter are melted. Add cream cheese and vanilla and stir until smooth. Stir in powdered sugar and vanilla and again, stir until smooth.
- Refrigerate 1 hour or until firm. Store in refrigerator.
- After 30 minute cooling period, add 10 miniature marshmallows to each jar. Return jars to oven for 5 minutes. Remove from oven and, working quickly, divide icing between jars. Using a small wooden skewer or chopstick, swirl the icing and marshmallows together to create a marbled effect. Sprinkle each jar with 1 teaspoon of toffee bits and 1 teaspoon of miniature chocolate chips. Allow to cool completely before serving, one hour in the refrigerator or 3-4 hours at room temperature.
- To store jars. Cover with lid screwed tightly to secure. May be refrigerated for 1-2 days or frozen for several months.
Shop Our Café Loves
We’ve gathered our favorite kitchen tools, tableware, and entertaining treasures in one place, the Café Loves store. It’s a wonderful spot to find something special for yourself or the cooks and hosts you love!


2023-12-20
Found this recipe and decided to use it for a Christmas Day gathering, I was asked to bring a dessert.
This recipe did not fill 20 jars, I only managed to get 12, so double up the recipe if you need more than that.
I didn't quite get why you would cool and refrigerate the icing, then have to get it warm again so that it would swirl with the marshmallows. It was much easier to do the mixing with the marshmallows right away, it all hardens up as it cools anyways.
Couldn't find toffee bits, so I used SKOR chocolate bars and broke them up into chunks. I also added chocolate sprinkles, this dessert is a chocolate overload, LOL!
Hope everyone enjoys it, although in my mind it really needs a dollop of whipped cream to garnish. I will be providing that for those that wish to indulge.
Want to make these in a pan verses the jars, what size baking pan would you suggest? Thanks for sharing this recipe, cant wait to try it!
Hi Mona, I would use a 9x13-inch pan. ENJOY!
Would like to bring to a group of teachers -- but in a disposable container of some sort. Any suggestions? Thanks!
Great idea, Paula! What about some small, clear, plastic cups?
Wonderful recipe! If I freeze these, how can I “rewarm” them prior to serving?
Hi Lisa, I'm so happy you enjoyed this recipe! To answer your question,, you can thaw them and you warm a bit in the microwave on low power.
Do you have just a plain chocolate fudge recipe that you love? The ones we tried were terrible.
I plan on using only 10 jars with half this mixture. Can you tell me approximately what size pan I would need for the remaining half mixture?
Hi Judy, I would use a 9x9 baking pan.
When you say vanilla ? Vanilla what?!
Vanilla extract is often referred to as just "vanilla".
I was wondering if you have ever tried to halve this recipe?
Hi Denise, I haven't tried to halve it but I can't see why it wouldn't work.
These sound amazing!!!! I am looking for a treat to mail to friends. I am wonder if this will mail well? I am thinking it will be 3 days in the mail tops. Do you think I could freeze them before hand and they will be good once they arrive?
Hi Tia, I think it would be better if it was going to be that long to send fudge or cookies. I'd worry that these might spoil as you never know with mailing what temperature they would end up in over the mailing duration.
Anybody who can give feedback on the taste? Has anyone tried to make these yet?
I am mesmerized by these!! The name, implying that these are a little jar full of fudge makes me swoon! I love it!!
Hi Chris,
These look super delicious.
But I have a question: It says one recipe makes 20 jars. I was yust wondering how big are the jars you've used (diameter and height)?
Thanks for sharing the recipe.
Hi Elys, I used 4-ounce canning jars.
Pure deliciousness, Chris! Yes, every once in a while we deserve a fudgy treat like this. Thank you for sharing. Pinning!
So happy that the kids are coming to visit and I know you have some terrific things planned. Charisse's wedding is still a year away but I think this will be one of the desserts at her shower. Of course I'll have to do some culinary research between now and then (wink-wink).
What mouthwatering jars, love the toffee and chocolate pairing!
Oh, I can not resist this one! these are darling, and I bet they are delicious. Thanks!
I'm a sucker for dessert in jars so I love these fudge treats! Definitely would be a real sweet treat!
You know how I feel about toffee...and then you had to throw in a decadent cream cheese layer AND frosting! Wow! Enjoy your precious time with Cait and family! I can't wait to hear all the stories!!!
Chris - I am SOOOOOO hungry right now and then I popped onto your site. Now I am even more hungry. These look so yummy and I need to pin to make later!! Hope you had a great weekend!
Have a marvelous three weeks with the cute crew. I haven't baked in jars yet but I love the idea of portion control.
These are so adorable!
You lucky things! You get Nana hugs AND brownies in a jar. how can it get better than that?
These look lovely and so much fun. My kiddo is going to love this. Thanks for sharing.
These Rocky road dessert is so perfect. beautiful pictures like always. Great that you can spend some time with your family.
Nope I could not resist and I'm pretty sure I wouldn't share either!
Looking forward to seeing photos of all the kids but most of all the middle of the night party. Hope the girls are good this time so we don't all miss out!
I can hardly wait to try this yummy looking treat. Was wondering what other containers (pans) you would recommend and their approx. baking times. I don't have the cute jars and would need to use something else to bake in.
Thanks for the great blog!!
Hi Sharon,
Thanks so much. You could use a 9x13 inch pan and bake it 30-35 minutes or two round 8-inch cake pans and they would probably need to bake about 30 minutes. If you have any round ramekins, those would work as well and the baking time would vary depending on the size. Just stick a toothpick in the center and it should come out clean if it's done. Have fun!
I am so drooling right now! I am speechless. All I can say is I have all of the ingredients and nothing to do today. You know what will be on my dessert menu tonight! Thank you for the beautiful recipe!
This looks delicious! I love the ingredients you use here...some of my favorites! Thanks for sharing!
This is the best way to welcome a dear one. I feel so jealous right now, these jars are staring at me and calling my name (in my head though) .... I wish you can send me a jar or maybe two, but till then I guess I'll just make some 🙂
Definitly a good reason to celebrate properly! These verrines looks absolutely delicious!
What a sinfully decadent dessert!
Sounds like a fun dessert Chris! Enjoy your company:@)
I have been enjoying your blog and recipes for sometime now. I know when I see one of your recipes it is gonna be delicious! I'm excited for you getting to see your grand babies and I am looking forward to hearing about your middle of the night party. 🙂
Blessings to your family.
Oh Cheryl, how sweet you are! It's so nice to meet you, thanks for taking the time to leave a comment! The girls already asked me last night if we could have a middle of the night party during the night. I thought they were a bit too jet-lagged to do the crazy party last night but promised it would be one night while they were here.
You will have a ball.
Thanks for this recipe..I put my red pepper jelly in these small jars..will get more for these.
I just lost a blogging friend so your thoughts about one more day ring so clear to me.
Enjoy your beautiful family..looking forward to pics