This post may contain affiliate links. For more information, see our privacy policy.
These Easy Artisan Rolls truly are ridiculously easy. Stir up the dough then go to bed. In the morning, shape and bake. Unbelievably delicious too!
When I first published this recipe 5 years ago, I called the rolls Unbelievably Easy Artisan Rolls. And it was true, they are unbelievably easy. But that was before the days of our Ridiculously Easy Recipes. Recently, when making a batch of this delicious bread, I realized that it truly deserve a place in our Ridiculously Easy collection. So, without further ado, let me re-introduce you to these fabulous, Ridiculously Easy Artisan Rolls.

What is Ridiculously Easy?
If you're new to The Café, you might not be familiar with our Ridiculously Easy recipes. They are super popular with our readers and I love them just as much! You can read more about these recipes in this post along with the specific criteria that these recipes have to follow but my nutshell definitely is "recipes that make you look like a kitchen rock star with minimal effort on your part". Like that? I sure do!
Can yeast rolls really be easy?
Let me explain how easy they are and you can decide for yourself. Ready? Combine flour, salt and yeast in a bowl. Grab a sturdy spatula. Add tap water (even cold tap water works!), and stir till combined. Cover, go to bed and have sweet dreams! When you wake in the morning, the yeast will have done its magic.
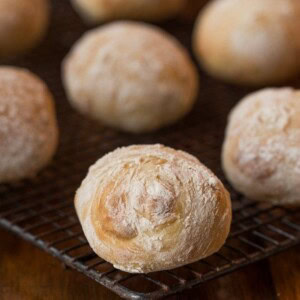
Sprinkle a work surface with flour and turn the dough a few times, to give it a nice white coat. Divide your dough into 12 pieces and shape the pieces into balls. Place the dough balls on a parchment-lined sheet pan and bake for 20 minutes. That's it! See what I mean? Easy, ridiculously easy!
Oh, one more thing; wipe that drool off your mouth, and please, try to wait till they've cooled just a bit before you start sampling.
I saw these beautiful rolls a few months ago on Pinterest. They originated on a beautiful blog called Alexandra's Kitchen. I did adapt the recipe slightly, but she's the genius who came up with the technique.

It's hard to find really good artisan bread unless you live in a big city where there are lots of bakers. Here in Asheville, NC, there are several high-quality bread shops, but they're few and far between. So what do you do if you're craving delicious, European-style bread? You know, the crusty exterior and chewy, richly-flavored-interior type of bread with those big irregular holes?
In the past all I could personally do was dream about it but now the answer is super simple, I just whip up a batch of these Ridiculously Easy Artisan Rolls.

I started to call them dinner rolls but changed my mind when I thought about how versatile they are. While they do make wonderful dinner rolls, I also love these rolls for sandwiches and as an accompaniment to soups and salads.
Four Ingredients
And, while my recipe today has just four ingredients; flour, yeast, salt and water, you can get really creative with herbs and spices. My favorites are rosemary and sea salt, but I was at Whole Foods for lunch recently and had a crusty dinner roll with Parmesan and fresh ground pepper. That just might be my next version!

Make ahead!
Do you know what might be even better than the simplicity of this Ridiculously Easy Artisan Rolls recipe? The fact that you can make a batch in advance and freeze them for several weeks. Just under-bake the rolls slightly, then pop them in the freezer after cooling. Pull the rolls out of the freezer a few hours in advance and warm them for 8-10 minutes before serving. They'll taste just like freshly baked!
Imagine a basketful of these fragrant rolls being passed around the table at your next dinner party. You'd be sure to see smiles of delight, as each guest peeks under the napkin. Be prepared for lots of compliments, as the warm rolls are savored by one and all. Only you will know that the total hands-on time for these rolls is less than 20 minutes!

Café Tips for Making these Ridiculously Easy Artisan Rolls
- Use plenty of flour on your work surface. This is what will keep the dough from sticking. You will need at least a ¼ cup, maybe more, depending on how wet your dough is. I also like to keep my hands well-floured while shaping the rolls.
- A metal bench scraper (aka a dough scraper) is a wonderful tool to have when making bread, rolls, etc. It will keep your hands from getting sticky as you can use it to move the dough and coat it with flour. Also turning the dough a couple of times on a well-floured surface with a bench scraper, will also keep the dough from sticking to the counter. And lastly, a bench scraper makes cleaning the counter a breeze as you can just scrape up any excess dough and flour.
- Do you have to let the dough rise for 10-12 hours? Nope! I've been in a pinch a number of times and have sped up the rising time by using warm water instead of room temperature water. The rolls still turn out and are delicious BUT the beautiful craggy interiors of these rolls are definitely improved with a long slow rise. There is also more depth of flavor - so if you have the time, by all means, go for the overnight l-o-n-g, s-l-o-w rise.
- This Ridiculously Easy Artisan Rolls recipe is a bit unusual in that you form the rolls by pulling the edges under, then pinch them together to form a smooth ball and place them on the baking pan with the pinched side UP. All other roll recipes that I've ever used direct you to place the rolls on a baking pan, smooth side up. Being a bit of a rebel, I decided to try baking them with the pinched side up and LOVED the beautiful artisan whimsical presentation when the rolls "rolled" out of the oven.
- I love these pre-cut sheets of parchment paper. They save a lot of time in the kitchen, as they're the perfect size for a half sheet pan.
- For regular parchment paper, I really like the Kirkland brand that Costco sells. The problem is, that they only carry it seasonally. I was happy to discover you can purchase it online with free shipping. A roll like this will last a long time and is way more economical than the typical size rolls that you often find.
P.S. If you love delicious, EASY bread recipes, be sure sure to check out our Ridiculously Easy Rosemary Bread. SO good and you won't believe the amazing aroma that will fill your house; AND how easy it is!
Scroll Down for the Recipe - or Save It to Your Inbox
We’ll email you the recipe so it’s easy to save, print, or share.
Unbelievably Easy Artisan Rolls
Ingredients
- 4 cups bread flour, plus extra for shaping
- 2 teaspoons kosher salt
- 1 teaspoon active dry yeast (traditional)
- 2 cups room-temperature tap water
Instructions
- In a medium-large bowl, whisk together the bread flour, salt, and yeast. Make a well in the center and add the water. Mix with a sturdy rubber spatula until all flour is incorporated. Don’t worry, the dough will be wet and sticky, that’s how it should be. Cover the bowl with plastic wrap and leave to rise at room temperature for 10 to 12 hours.
- The following morning (or after 10-12 hours), the dough will have risen, but it may still look shaggy and its surface will be covered with bubbles.
- Line a sheet pan with parchment paper. Preheat the oven to 425ºF.
- Spread a generous ¼ cup of flour on a work surface. Dump the dough out onto the floured surface and turn it several times to coat with flour. I like to use a bench scraper for this.
- Divide the dough into 12-16 equal portions, turning each piece in the flour to coat. (The bench scraper is also great for cutting the dough). Shape each piece into a ball, pulling edges under and pinching together to make a smooth top. Invert balls and place on prepared pan, pinched side up. This will give you craggy, rustic textured rolls. If the dough is sticky as you’re shaping, just roll the piece in more of the flour. Let shaped rolls rise for 20 minutes.
- The rolls may look a little deflated as they're rising and they won't rise a ton during the 20 minutes but a little magic happens when they hit the hot oven and you'll be shocked at how beautiful they look when baked.
- Transfer the pan to the oven. Bake 15 minutes. Rotate pan. Bake 5 minutes more or until nicely golden. Transfer rolls to a cooling rack to cool completely.
- If making in advance, remove from oven when pale golden brown (about 3-4 minutes less). Cool completely, then freeze on a baking sheet. Once frozen, transfer rolls to a large zip lock bag and store in the freezer. To serve, allow rolls to thaw, then heat for 10-12 minutes at 325˚F.
Notes
Nutrition
Shop Our Café Loves
We’ve gathered our favorite kitchen tools, tableware, and entertaining treasures in one place, the Café Loves store. It’s a wonderful spot to find something special for yourself or the cooks and hosts you love!


Just made a half batch...so good so 2nd batch is proving now... I had my doubts but they are so easy yet so yum!
Hi Claire, We appreciate your kind comments! It's great to hear how well these rolls turned out for you - thank you for taking the time to let us know!
I was very sceptical when I saw how wet the proofed dough was. I bake a LOT of sourdough and this dough is literally the opposite of what you want your dough to be. Same for the shaping- I even shaped a few of the rolls the “sourdough way” nice and tight with the seam side down.
Trust the process everyone- these really do work!
Definitely use a bench scraper to help as the author recommends. Or you will lose loads of dough on your hands.
Batch just finished baking and they are gorgeous. As the author mentioned, they don’t rise much (if at all) while sitting for 20, but the magic really did happen in the oven.
All are gorgeous and golden, risen and fluffy with a beautiful crumb.
These were just what I needed after realising I didn’t have rolls for school lunches. Took 5mins to prep the night before, 10mins to shape and 15 to bake. Kids got some yummy fresh rolls and they’re stoked.
Just wish I could attach a photo. The seam side up rolls are definitely more pleasing to look at! And have a lovely crunchy crust.
If you’re in Aus- I baked at 205C fan forced, on the middle rack and it was the perfect temp. Give these a go!!
Thanks for the excellent and thorough review, Mumma D! So generous of you to write up the details of your experience with making these rolls - we're sure your thoughts will be helpful to other readers! It's lovely to think of your kids taking freshly baked rolls in their school lunches, what a treat! We so appreciate you taking the time to share how much you enjoyed this recipe!
Simple, easy, delicious, definitely make again
Thanks for your review, Jim! It's great to hear how well this recipe turned out for you - thank you for taking the time to let us know!
I have made these delicious rolls many times! This morning the dough wasn’t bubbly and looked very dry. When I looked at the recipe again I realized I used a whole packet of yeast instead of one teaspoon! Is there anyway to save the dough or do I start over? Thank you!
Hi Connie, I’m afraid of the dough is looking dry that it will be difficult to resurrect it. You would have better results to start over.
Can you use instant yeast with this recipe? And if you want to rise the dough overnight should you do so in the frig like your focaccia recipe? Thanks! Can’t wait to try this.
Hi Jane, yes, instant yeast will work! And regarding the rise, yes you could do a longer rise time in the fridge.
If I mix them up the night before, can I let them rise longer than 10 -12 hours, so that instead of making out and baking that morning,I could make them into rolls and bake closer to dinner time? Thanks, I can't wait to try them!
Hi Terri, yes, that will work!
to reheat from par-baked, is the oven temp 325 or 425?
Hi Ashley, 325 until they're beautifully golden!
Hi! Could you please send me a picture of what the dough looks like after combining all the ingredients? When I make this its too wet using the recipe amount of water. I would like a picture to get an idea of what the dough should look like. Thank you
Hi Adele, this is a very wet dough - that's why you get such beautiful artisan air bubbles. I don't have a picture of the dough. Just use enough flour on your work surface so that you can form it into rolls.
Can you make these using a KitchenAid mixer?
Hi JoJo, sure you can! Just don't overmix - they don't need a lot, just until all of the flour is incorporated.
I don't have bread flour. Can AP flour be used?
Yes, that will work. Enjoy, Caryn!
This was the stickiest, messiest dough I’ve ever worked with. Even with flouring the surface, my hands, and the roll, shaping these was impossible because of how wet the dough was. Took me SO LONG to shape and portion. Weighed my ingredients and weighed each dough portion. Lost 30 g of dough to my hands and the counter! Impossible to form into a ball. They looked more like cookies just out of the oven as soon as I plopped the dough onto the sheet. I like making bread but this is the most miserable and frustrated I’ve ever been trying to follow a recipe.
Hi Maddy, thanks for taking the time to share your experience. I’m truly sorry this dough felt so frustrating... that’s never what we want for anyof our readers!
This is definitely a very wet dough by design, which is what gives the rolls their super light, artisan-style texture. While many readers have loved this recipe (you can read all of the enthusiastic reviews over the years), a few have mentioned that depending on the brand of flour, humidity, and even how the flour is measured, they occasionally need to add more to make the dough easier to handle. That's also why I instruct to very generously prep the work surface with flour.
I am trying to picture this process and am lost. Can you explain it so a dullard like me can understand? How does a ball of dough have edges and what is meant by ‘pinch them together?’ Hope you can describe this so I can picture it better!
‘Shape each piece into a ball, pulling edges under and pinching together to make a smooth top. Invert balls and place on prepared pan, pinched side up.’
Hi PK, I'm sorry if this was hard to understand. I hope I can make it more clear. You can pull the edges up or under - it might be easier to understand if I describe how to pull them up. See if this makes more sense: Gather the outer edges of the dough and pull them up toward the middle, like drawing a drawstring closed. Pinch the seam together well to form a tight, smooth top. Set the dough ball on the prepared pan with the pinched seam facing up. - I hope that helps!
Has anyone use this dough for pizza? I’d imagine it’d be good!
Can these rise on the counter for longer than 12 hours I made my dough too soon and want to bake in about 24 hours from now
Hi Taylor, I be concerened that the yeast would lose it's "oomph" (rising power) if it was left out that long. You'd be better off to bake today and freeze the rolls then thaw and warm them tomrrow for fresh, warm bread.
I am confused about the use of active yeast. You don’t proof the yeast first?
Hi Diane, it's not necessary in this recipe, as you can read from the reviews! Try it! I hope you'll enjoy it as much as so many others have, then come back and leave a review!
Just made these rolls! They are amazingly easy and delicious! Will definitely be using this recipe again!
That's awesome, Denise! Thanks so much for taking the time to let us know. We love these rolls too!
These rolls are surprisingly good and very easy to make, the crust is not too hard and the interior is soft and a is perfect for jam and butter. We halved the recipe, added a little malt powder and sugar to enhance the color and taste, did a few stretch and fold, and sprayed water on the rolls and in the oven. Will make again anytime we need a no fuss bread recipe, thanks!
Thank you for the review, Constance!
Hello, I want to try these rolls but I’m can’t make the 10-12 hr rise time work for my schedule. Will the dough still be ok if after a period of rise time on the counter I put it in the fridge until I’m ready to divide and bake? I know it will continue to rise very slowly in the fridge, but don’t want to ruin my efforts by chancing it either. Thank you! Sheri
Hi Sheri, this dough is pretty forgiving. That will work but allow a good hour to bring it back up to room temperature.
Is there a way to get a shiny top to these rolls rather than the floured look?
Hi Johanna, if you prefer a shiny top roll, I would go with a brioche recipe like this: https://thecafesucrefarine.com/ridiculously-easy-brioche-dinner-rolls/
These are also wonderful:https://thecafesucrefarine.com/easy-no-knead-potato-rolls/
Hi can you bake rolls in a Dutch oven
Hi Chris, this recipe won't work in a Dutch oven.
Can I make the dough and let it rise but only take enough to make 4 rolls at a time and keep the remaining dough till next day ?
Hi John, yes, that will work!
if i use the rapid rise yeast, how long do i need to let the dough rise? do i still let it rise in the refrigerator, or can i let it rise on the counter? I can't wait to make them!
Hi Dani, use the same timing as with the regular yeast. For a deep, rich flavor I would still let it do the slow rise in the refrigerator although if you're in a hurry, you could let it rise on the counter.
These are amazing! I am a seasoned baker/yeast bread & roll maker, but have never made rolls like this. They are so rustic looking and crusty on the outside yet chewy and soft on the inside. I let my dough sit for the full 12 hours. I was a little skeptical because my dough was so sticky, but I kept adding flour to each roll so I could work with it. I wasn't sure they'd turn out because they were so much looser than other recipes I've made, but they are phenomenal!
Wonderful! Thank you for letting us know, Erica!
These sound amazing.
I would like to use high fibre low carb flour. I have wholemeal, rye flours. Would it work perhaps with a little white bread flour
Hi Sillysue, I haven't tried this recipe with rye flour so I can't say for sure how that will work. I would start with a small amount of rye flour. If that works then increase the amount next time.
I am new to baking but wanted to make homemade rolls for a dinner party. This recipe was SO easy and the rolls were easily the highlight of the night! We had no leftovers, they went fast! Crusty on the outside, chewy on the inside, just how a roll should be! Thanks for this awesome recipe, it's a keeper!
Awesome! Thank you for the review, Allison!
These look so yummy but I’m gluten-free! Do you know if this recipe would work with a quality gluten-free blend? I’m willing to experiment but I recently saw a similar recipe that specially said it wouldn’t work with gluten free flour; and advice would be appreciated!
Hi Meredith, yeast recipes can be tricky if you try to sub a GF flour. It's best use a receip that's been designed for GF flour. That will ensure success.
Can I use rapid rise yeast? If so what would be the difference? Thanks so much.
Hi Susan, you can use rapid-rise yeast. No need to proof the yeast with rapid rise.
Ooops sorry I forgot this recipe is for rolls which is why I won’t need to heat a Dutch oven! Still curious about whether you first put active yeast in water or do you add it dry to the mixture in the same way a fast acting yeast would be added?
Thanks very much for your recipe. Two questions: 1. Should I first activate the active dried yeast in water or do you just add it dry to the flour and salt? 2. Realize you don’t note anything about heating the Dutch oven before putting dough in it. Only asking because I see some recipes note to first pre heat the Dutch oven but if you think there’s no need then great.
Hi Helen, you do not need to activate the yeast for this recipe. Enjoy!
Can I use rapid rising yeast vs the traditional yeast to make these?
Some of the others artisan breads and rolls call for putting a cup of hot water in the oven while baking, would this make a difference?
Hi Doreen, you can do that to make the crust a little crispier but I haven't found it to be necessary.
Seriously good!
I am notoriously bad at baking bread. But these came out perfectly and so delicious. I'm on the UK and used oven temp 200°C fan
Wonderful! Thanks for the review, Michele!
I want to make this but I'm not understanding this: "Shape each piece into a ball, pulling edges under and pinching together to make a smooth top. Invert balls and place on prepared pan, pinched side up. Pulling what edges??? I wish there was video or pictures so I can see what you mean.
Hi Cynde, I'm sorry this is confusing for you. If you check out this post: https://thecafesucrefarine.com/ridiculously-easy-brioche-dinner-rolls/
there is a pictorial of how I shape the rolls. It's a different recipe and the rolls are put into a muffin tin but the shaping is the same. Hope that helps!
Absolutely fantastic! I was sceptical as dough was very sticky and buns looked more like pancakes before going into the oven…..but OMG they puffed up beautifully (needed extra 10 minutes to brown) and tasted amazing. Husband ate two as soon as they were warm and I’ve hidden the rest. Thank you for this recipe.
Awesome! Thank you for the review, Gillian!
I tried these Artisan rolls, used AP flour instead of bread flour, I had both but was trying to multitask, let rise for 12+ hrs. I should have used more flour when shaping because dough was incredible soft, your were right about rolls looking deflated until I put in 425 degree oven. I baked about 30 min altogether before they got light brown. Couldn"t wait to sample til cool, delicious!
Thanks for the review, Linda!
I keep my jar of yeast in the refrigerator, does the yeast need to come up to room temp first or can it be added cold to the recipe.
Hi Joyce, you can use it right from the fridge. Enjoy!
Can I do a longer rise on the dough? Say 48hrs ?
My rolls were not very golden brown. They were baked through. I was a little hesitant to bake longer. How can I correct this issue ? Overall these tasted great!
Hi Rene, just bake them a little longer.
mine were the same as Rene's, I added an extra 5 min and they still were not as dark as in your picture or as I felt they should be. The bottoms were dark however. Next time I will raise my rack but wonder if the oven temp should be 450?
thank you
Hi Deb, every oven is a little different. You could try a higher temp but I would defintely raise the rack. You could even use a double sheet pan if you have it to prevent the rolls from getting too brown on the bottom before the top and sides are golden.
Hi There, these look amazing. One question, there are only 2 of us, can I cut this recipe in half? I also don's have a large freezer.
Thank you. 🙂
Yes, that's fine. Enjoy, Donna!
Excellent rolls , I am in love with this recipe. If I want to double it, is it better to just make 2 batches or can't I do 1 larger ( 2x) batch?
Hi Lucy, it's fine to double the recipe in a large bowl!
My most FAVORITE Recipe!! I want to make it into a whole loaf of bread rather than rolls, what would you suggest for cooking time and temp?
Hi Sierra,
So happy you've enjoyed this recipe!
Regarding your question, I haven't made this into a larger loaf so I can give you a specific itme but I would use the same temperature and then bake until the loaf is a nice light golden brown. You could use an instant thermometer to be certain that it's baked enough. The internal temperature shoulde read right at or around 190˚F (88˚C).
It worked! I had to cook it about 30 minutes, but it came out perfect and was quickly devoured,
Thanks for the review, Eva!
Can I use all purpose flour instead of bread flour? I don't have any bread flour.
Thanks.
Carolyn Wharton
Yes, that would work fine, Carolyn!
Perfection! The best buns I have ever made and tasted. Thanks for the recipe.
Awesome! Thanks for sharing your review, Diane!
Have you ever tried adding herbs and garlic to this recipe and then letting is rise? I'd like to make garlic herb rolls.
Hi Cindy, yes, that works well!
Is the 1 teaspoonful the correct amount of yeast. My dough was not as bubbly as expected and I wonder if I should have used 1 TABLEspoonful or 1 packet. They are doing their 20 minute rest now before a trip to the oven.
Hi Eunice, that is correct. It's a slow rising dough - that's what gives it the nice artisan air pockets.
Husband immediately said, “These are fabulous!”
Easy to mix, make rolls and bake. Already planning to serve at next dinner party. Thank you for another “keeper” recipe!
Awesome! Thank you for the review, Carey!
I have made this recipe a couple of time and it is absolutely great! One question, instead of rolls, could I just make a round loaf of bread from this recipe? If so, what would I need to change or do differently to achieve that.
Thank you!
Hi Katya, you could make a round loaf. It will need to bake a little longer. You could test the doneness with an instant thermometer to determine how long to bake it. Bread when it's perfectly baked should read right around 190˚F or 88˚C.
Question: how would I need to modify this recipe to use 100% wholemeal flour? And if you are able to, do you have a decent rule of thumb for modifying yeasted bread recipes for wholemeal flour just generally?
Hi Katy, I haven't tested this recipe with 100% WW flour so I can't say for sure. You would need to add vital gluten to lighten it but I would have to do some testing to give you exact advice.
Can you add currants (or golden raisins) and fennel seeds to this without messing up the rise, or making the raisins too soggy? Thanks!
Hi Kate, I haven't tried adding any dried fruit to this recipe but I think it should work fine. You might want to try this recipe: https://thecafesucrefarine.com/irish-freckle-bread-or-rolls-one-bowl-no-mixer/
Is bread flour the same as all purpose flour and how do you know when you have added enough flour for cutting and shaping?
Hi Mot, bread flour is not the same as AP flour as it has a higher protein content. That being said, I have used AP flour with this recipe with good results.
I made the dough last night and am about ready to form the rolls. I may have found what caused Helen's ( February 4) problem. The recipe calls for 2 cups or 473 grams water. Assuming my scale is accurate two cups of water weighs 439 grams.
Love this site and the recipes you share.
Thanks for your kind words, Donna!
Regarding the water, it seems that the weight varies, depending on the source. I refigured the metric amount with my recipe plugin and 2 cups came, again, to 473g. Then I googled it and two sources agreed that it was 473: https://calculator-converter.com/cups-to-grams.htm and https://online-calculator.org/2-cups-to-grams
But another one said 454g for 2 cups of water: https://boundedbybuns.com/weight-conversion/water
I've been working with yeast x 5 decades. A home baker and my most favourite activity in the kitchen is making yeast products. I've made many kinds of bread and rolls ever since I was married at age 22. Either by hand, and sometimes, with my stand mixer in recent years. Using a variety of techniques - BH&G Bread cookbook is where I started when I was young, and I often use recipes from Cooks Illustrated now, and have made Jim Lahey's bread, as well as a rye bread that goes into a Dutch oven in a cold oven. For these rolls, I made the starter exactly as stated. I used organic hard bread flour and very fresh yeast. Barely warm water. Fine sea salt. The next morning, the batter was very soft and VERY ALIVE. (It was fun to see how alive!) In spite of its wetness, I put it on my large bread board, as directed, with the 1/4 cup of flour. It still needed more flour - repeatedly. I later looked at the recipe from which this recipe was was adapted, and she states "add flour as needed". She didn't specify an amount. The bench scraper helped a lot as I added flour and folded, added flour and folded more. It was kind of frustrating and messy and took about 10-15 minutes. Finally, it seemed OK to go ahead and shape the dough, and I did. The dough wasn't firm, of course, I know better, but I shaped them the moment that it was even possible to do any shaping. I did the 20 minute rise and baked them. They didn't rise too much in the oven and remained a very pale colour. Rather dense inside. Cud be my oven wasn't at 425 degrees - I will check it with an oven thermometer the next time. I'm tempted to try this again, but may let them have a longer rising before baking. Thanks!
Hi Helen, I'm sorry you didn't have the best results with this recipe. It definitely will need extra flour and the amount depends on your flour (some is "thirstier" than others) as well as the humidity in the air.
That being said, do try the recipe again. As you can read from the reviews, so many have had great results and love this recipe!
hello! may i use all purpose four instead of bread flour? and what is the major difference between the two?
Hi Gwen, I have used AP flour with this recipe with good results. The difference between bread and AP flour is that it has a higher protein content. Bread baked with protein flour will have more structure and chew but it's not a significant difference.
What do you think about using gluten free flour like Bob’s Mills?
Hi Cathy, all of our scones and biscuit recipes work well with GF flour but yeast recipes are a little trickier. I am not an expert at GF yeast recipes but my nephew, Steve has a blog and he is a GF pro! https://cakesandcoriander.com
Easy is right! Delicious, too! Flexible also - you can play with the flours. I wanted a softer bun for making egg sandwiches for my husband who has trouble chewing. These rolls are perfect. Maybe I'm a rebel, too, Chris. I love it when things don't quite match.
That's great, Jan! Thanks for your review!
Will this overnight rise work if the house temp is 65 at night?
Hi Gloria, that might be a little cool. An option would be to put it in the oven and leave the light on.
Of course I only have bread machine yeast and it is Christmas eve. Will it work?
That will work fine, Marilyn! Bread machine yeast is very similar to instant yeast. You can exchange instant for regular but not the other way around.
These are the Bertucci's restaurant rolls! Thank you!
Enjoy, Jewelie!
These are not only easy to make, but they are delicious!!!!
Awesome! Thanks, Tessy!
This has become my favorite for bread rolls. My hubby absolutely loves them so he asked if I could make them bigger to use for sandwiches. So my question , is that possible and would I have to adjust bake time?
Hi Sue, so happy you have enjoyed this recipe!
Regarding your question, I would give larger rolls a few minutes extra!
Hi Chris - I'm looking forward to making these, Should I follow the instructions on the active dry yeast packet (combine with 1/4 cup warm water and 1 tsp sugar. Then add to recipe) before combining with the flour, salt, and water? Or do you just add the dry yeast directly to the other ingredients. Thanks in advance!
Hi Toni, just follow the directions as given and you'll be fine!
These were SO easy. And they’re SO good. Mine were underbaked slightly, so I will warm them before dinner to finish up. Next time I will add a few more minutes. I almost didn’t care what they were going to taste like because they are so easy to make!
Question, though. Can I (should I) bake these buns on convection bake? Or is that overdoing it?
Thanks for a great recipe. Pulled pork sandwiches for dinner!
Hi Lynn, I always bake these rolls with conventional heat. If you use convection, the baking time will be shorter.
Have you tried baking them part way and then the same day, finishing off right before serving?
Hi Kathryn, yes that works!
Can I use all purpose flour and instant yeast?
Hi Fatima, yes, that will work!
Wow when you say ridiculously easy, you really meant it. I've only been making bread from scratch for the past 8 months. This recipe is a keeper. Made these for dinner tonight and they were a hit! I do have a question, can you let the dough sit longer than 12 hrs?
So happy you enjoyed this recipe, Sue!
Regarding your question, I have let the dough go as long as 18 hours with good success.
fabulous recipe….thank you!
Thanks, Annabel! Glad you enjoyed them!
Will definitely make again. Loved it!
Great! Thanks, Amy!
Thanks for sharing your recipe. This was so simple and so easy to make! I made this yesterday, and turned out great! I used the rolls for french dip and it was delicious! My family loved it!
Awesome! Thank you for letting us know, Leonida!
Anxious to try these rolls...what is the temperature for the oven to bake? Thanks so much and I love your website
Hi Norma, it's in step 3. 425˚F.
So delicious and easy to make!! Will definitely be making these again!
Thanks, Taneal!
The total time should read 12 hours and 40 minutes. Not the 40 minutes listed. The 12 hour rest is a big deal if someone was out looking for a quick bread recipe.
I hope this helps.
Dave
Thanks, Dave. Right now, I don't have the ability with my recipe plugin to add resting times.
Hello! Can you freeze dough balls from raw to bake later?
Hi Erin, yes, that will work! I would freeze them in a pan lined with parchment, then cover them to keep them airtight. Let them thaw and rise before baking. The rising, of course, will take much longer.
Looking for a Awesome reqlly soft Artisan Hamburger Bun Recipe. Will this recipe work?
Hi Blake, this recipe is more like a crusty dinner roll. We like this recipe for hamburger buns- https://thecafesucrefarine.com/easy-buttermilk-brioche-buns/
I really want to save this recipe to make for a friend who will be going through radiation treatments, but I don't see a Pin button. Can you tell me please how I can save this to Pinterest? Thank you.
Hi Pam, there's a black Pin button at the top of every post under the title of the recipe. Hope you enjoy the rolls!
Hi, these rolls look so tasty so I have just tried to make them. I must be doing something wrong because my dough is very dry. Concerned about my measurements. I'm in Australia so 1 cup equal 250grams. I've used 1000 grams of flour to 500 grams of water. I'll let it sit until tomorrow and will bake them anyway, just not super confident how they will turn out. Any help would be greatly appreciated.
So sorry you are having difficulty with this recipe, Dragan. If you look right above the word "Instructions" in the recipe box, you will see a button where you can toggle to Metric measurements. Most of our recipes posted over the last few years have that option. If you ever come across one that does not, just let me know and I can do the conversion.
Here in the States, a cup of four is 120-125g so it sounds like you have doubled the amount of flour. You can fix things by doubling up everything else. Just be sure to use a big bowl as you will have lots of dough. But you'll also have lots of delicious rolls and they freeze well!
Happy baking!
Thanks Chris, I assumed 4 cups flour was double the 2 cups of water listed. I found the metric conversion button and to my surprise it wasn't. I'll try again.
Sorry to inconvenience you by my last comment inquiring how to subscribe to your web site. After I sent the comment to you I went to your home page and at the top it had the subscribe options. I filled it out and received your approval. Thanks for your Help in this matter
Glad you figured it out, Kitty!
Not only "ridiculously easy" but very forgiving rustic dinner rolls - this is my new go-to recipe for rolls. I pushed the rise time to the limit - 18 hours due to baking these in a wood-burning stove. It takes a while for the oven to heat up and maintain a higher temperature for 20 or so minutes. I used all-purpose flour and one packet of active dry yeast. I read the comments and prepared for any difficulties. I had none. The dough was not overly wet even using well water high in iron. I had no sticking to my work surface or metal bowl. Made the little twist flourish when forming the rolls and this was well worth the little effort required. These rolls turned out beautiful. Lots of nooks and crannies for my herb butter. And the taste? Fantastic. I took the suggestion of adding a sprinkle of parmesan and a light shake of coarse pepper to the top of the rolls before baking. What a game-changer! My dinner companions were impressed.
Wonderful! Thank you for your review, Diana!
I have been making your bread recipes for over a year now. I actually end up adding a bit more water but it may be due to my heavy hand with the flour. I love that the dough is wet as it makes combining so much easier. I have yet to bake anything less than perfect bread. People rave and I must admit it’s the best bread I’ve ever made including recipes with my bread machine. Todays add in is oregano as we are having lasagna for dinner!
*Thank you for all of your recipes! Friends think I have a gift for baking. Shhhh!
Thanks so much, Debbie, for taking the time to share your review! You last sentence made me laugh. It sounds like you’re a much better baker than you give yourself credit for 🥰
Something is wrong with this recipe. For 4 cups of flour I usually add half the amount of water, ( 260 grams) so when preparing the ingredients I was quite surprised by the enormous amount of water. Anyway, I did follow the instructions hoping it would be OK. It was not. I did add more and more flour and the dough still resembles porridge. Such a pity.
Hi Dolly, I'm so sorry you had problems with this recipe. It is a wet dough and you do need a good amount of flour on your work surface, however, as you can read from the reviews, lots of other readers have had great success with this recipe.
I live in Florida and the dough is very wet after rising. I add enough flour to be able to work the dough (sometimes a cup of flour or more) and shape them and bake and they are great! But why is the dough so wet? the humidity? or should I being changing the amount of water I'm using?
Hi Teresa, this is a wet dough but you shouldn't have to add that much flour. That being said, it is very humid in Florida and that can make a big difference. You might want to go with a few tablespoons less water.
Hi, can instant yeast be used?
Hi Jodi, yes, you can use instant yeast for this recipe!
These rolls are just the best! They are rustic and crusty and have an amazing texture. I have been baking bread for 50 years and this in now my go to recipe for rolls. On top of that, they are so easy and now that I am in my 70's, my arthritic hands really appreciate that aspect! I found them a little pale the first time I made them because of all the flour. Next time I melted a little butter and gently dabbed the top of each roll. They turned out beautifully golden brown. Problem solved!! Seriously, thank you so much for this wonderful recipe. My family absolutely loves them and I make them all the time.
That's great, Karen! Thank you for your review 🙂
Labels please!!
Hi Eileen, we do not have labels for this recipe at this time.
Just made and turned out wonderful! I added italian seasoning with aleppo pepper (1 tbsp) and the taste was great. I’ve been baking bread as a hobby for a few years now so I didn’t freak at the wet dough and was comfortable handling, flouring, cutting and forming but I think for folks not familiar with how the dough reacts could be the reason for some of the negative comments I read. I actually used 1/2 cup by the time I was done forming. Also, yes, they were a very light color with a hint of white from the flour but again if you are familiar with artesian breads then you know that’s ok. I’m going to make less rolls and bigger for hamburger size next time. One question- where you say dump from bowl onto floured surface and TURN several times - you actually mean turn or roll, not envelope fold, right? Thanks for the recipe!
So happy you enjoyed them, Hedy!
Regarding your question, yes just roll the dough in the flour to coat.
For the past few years, we have had soup in the crockpot(s) all set for when we arrive home after church on Christmas eve. These rolls are great with soup. I did add sea salt and rosemary to half of them and should have added to all. Super easy and again, great with soup!
Thanks, Gail!
I made these rolls for a postponed Christmas dinner due to the blizzard. Very easy to make they look good. I wish they were more brown on top. Should I have brushed with egg white before baking? Recipe didn’t indicate to.
Hi Margaret, so sorry you had some trouble with this recipe. You probably just needed to bake them a little bit longer as every arm is a little different. I’ve never brushed egg on them as they are an artisan roll, and should look kind of rustic. Just because I am until they have a light gold color.
I have not had much luck with making bread. I have had this recipe saved for a long time and tried it yesterday. I had zero confidence in my ability to make these. I am a great cook but when it comes to baking, not so much. Even though my rolls were not uniform in size (need to practice dividing the dough), these rolls were so good! I will never buy rolls at the store and I plan to make these with the partial bake instructions to bring to our family Christmas dinner. I would say I used closer to a 1/2 cup of extra flour to turn and shape the dough but it didn’t impact the rolls. Thank you for the great recipe and instructions. I will definitely be reviewing other recipes you have posted.
Thank you for your review, Leigh! So glad you had success with these.
We did not like these. Flavor meh, and way to dense and doughy.
So sorry you did not enjoy them, Beth. So many others have loved them, as you can read from the reviews! Again, sorry you wasted good ingredients, I hate that.
Chris, i am always hesitant about kosher salt. I have coarse kosher salt. Is there a difference and if so how do I measure it. Thanks, Susie
Hi Susie, kosher salt is a coarser salt and sometimes it's even called "coarse salt". You can use more of it than you would regular fine table salt as table salt is much more concentrated. I like the pure flavor of kosher salt as it doesn't have anything else added.
I made these rolls for the first time today, and they are, oh, SO good! I formed them into 6 hamburger buns/rolls. These are the kind of rolls you wish you could buy, but why do so when they're so easy to make? I really appreciate the flexible rising times since this allows more accurate planning as to when you want to serve them piping hot from the oven. This is my new go-to recipe for rolls. Thank you and bless you for all your efforts!
Wonderful! Thank you for letting us know, Nancy!
These are wonderful little dinner rolls. They are so easy too! I added diastatic malt to the dough. It gives the bread a caramelized look and can be found on Amazon. I like the slight crunch on the outside and the holes inside.
Thanks for letting us know, Joanne!
I really wanted to like these, but there was really nothing to rate highly. There either needs to be less water or more dry ingredients to make this recipe “work” the way a normal roll/bakery item should. My dough was so goopy that it was close to impossible to work with without having to add close to 1-2 extra cups of cups. In turn, there isn’t enough yeast flavor or salt to flavor these properly. While cutting and folding, the dough is so goopy that you end up making tough and sticky dough blobs. There was a bit of rise to the bake but not enough to remove how “patched” these look. They also don’t brown within the time allotted. Flavor, with the addition of butter and extra salt, is okay but not something I’m comfortable serving to my family.
Hi Kyle, so sorry you didn't enjoy these and had difficulty with these rolls. It's hard to say what went wrong without having been right there in the kitchen with you.. As you can see from other reviews so many readers have absolutely loved them as does my family. It's meant to be an artisan roll, not a soft buttery roll although we love those too!
Again, sorry you had trouble with these rolls. I hate wasting good ingredients.
I struggled with this recipe because the dough was so wet that I couldn't shape the rolls. It didn't rise considerably in the oven and created a crust, but I ended up with turkish-style bread, which had very large and irregular air pockets. It was delicious, but wasn't crusty dinner rolls. I wonder if this is because I hit the "metric" button for the recipe, which stipulated 500 ml water to 500g flour.... I have made a lot of different bread recipes and never used more than 75% liquid to flour ratio, so this is incredibly wet.
sorry for typo - it *did* rise considerably in the oven (but still relatively flat like turkish bread)
Hi Sim, it is a very wet dough. That's why I say not to hesitate to use plenty of flour when you shape the rolls. I will double check the metric measurements.
I know you have said in the past that all purpose flour could be used. What about gluten free flour? I always need to consider a granddaughter with celiac.
Thanks
Hi Renee, I haven't tested this recipe with GF flour. Yeast bread recipes can be a little thicker when you're going GF and require more than one type of flour. I would probably go with a recipe that is designed for GF baking to ensure success.
If you're interested in GF recipes, my nephew is a great chef and baker and specializes in GF recipes. Here is his site: https://cakesandcoriander.com
Super easy to make and taste wonderful. Will definitely be making this recipe again and again instead of buying crusty dinner rolls.
Awesome! Thanks for letting us know, Joy.
These were so easy. They’re so delicious I don’t want to eat any thing else. Thank you. This goes in my favorites. As me will be made often
Thanks for letting us know, Cynthia!
Just made these. So good! Will definitely need double batch cause kids will inhale them!
Awesome! Thanks for letting us know, Glenda!
Hi there!
I was wondering what the ratio would be for the yeast if I were to substitute with Instant Dry Yeast instead of Active Dry Yeast? Can’t wait to give these a try. Thanks for sharing!
Hi Lily, you can use instant yeast for this recipe. I have used it in an equal amount.
Can he dough rise for morw than 12 hours?
Hi Susan, it could probably go as long as 18 hours.
Thank you Chris.
Will try them an let you know how they turn out.
Susan
Great!
Hi, I was wondering if I could add seeds to the dough and also seeds and salt to the tops. I know that there are recipes out there with seeded soft rolls but I really want to give these ones a try as I really like the idea of a crusty roll for a creamy soup that I’m making . Thank you for all the wonderful recipes, I haven’t tried anything yet as I just discovered your site this morning but I absolutely look forward to your inspiration.
Hi Robin, you could definitely do that! I would add the seeds to the dough with the dry ingredients. You might have to add a little egg wash to make the seeds stick to the rolls on the tops.
These rolls were so easy and unbelievably delicious!!! Thanks so much for the recipe!!!
Yay! Thanks for letting us know, Donna!
I just made the rolls and they turned out fine. I guess I did not shape the rolls appropriately so that the inside of the rolls looked more dense (no big bubbles) compared to the picture. I probably deflated the rolls to much in order to make them round. It would be very helpful if a video how-to can be posted. Thank you for sharing.
Hi Yang, it may have been that you dough didn't rise as much as it needed. We will put this on the list to make a video.
I am just getting to put these in the oven. Can't wait to see how good they are! Thanks Chris.
Enjoy, Donna!
Hi Chris:
I made these rolls this morning and they turned out perfectly. I made artisan bread during the Covid shutdown so I wanted to try the rolls. We had sandwiches with them at lunch today. They were delicious. I love working with yeast. James Beard's book was my go-to in the old days. Thanks for this recipe and all the other great ones you share with us!
Kathy
I'm so glad, Kathy! Thanks for letting us know!
Hi, in recipe there is a mention that you can add Parmesan cheese and fresh ground pepper . I'd you want add them when you add them at time of making dough or after overnight rise ? Thank you.
Hi Swati, you could add the pepper when you mix up the dough but I would wait until after the overnight rise to add the parmesan.
Hi,
I’m Dana from Coventry in England 🙂
Thank you for sharing this amazing recipe! I’ve made it several times and the five of us love the bread. Makes super lunch rolls, anything roll really 🤩✨
Thanks again, Dx
I'm so glad, Dana! Thanks for letting us know!
I made these this past weekend to go with a pot of Beef Barley soup. Perfection. Everyone loved the chewy rolls. I forgot to let them rise for 20 minutes after I shaped them and they were still fine. Next time I'll try following the instructions more closely. 😁
Thanks, Nancy! So glad you enjoyed them 🙂
Thank you for this recipe ~ I have found it is perfect for bread bowls!
Question: will it make any difference to use instant dry yeast? I am running out of the traditional, and instant is all I can find.
Thank you so much.
Hi Nancy, instant yeast will work fine!
The rolls were very good, however I thought they were too hard on the outside. I am not a baker, I followed the recipe exactly, but have a gas oven which tends to be hot, should I lower the temp or the cook time ? Thank you so much for the recipe and advice.
Hi Connie, this is a European type roll which does have a nice crusty exterior. If you prefer something softer, you might want to go with something like our Brioche Dinner Rolls: Honey Maple Roasted Carrots
Hello Chris,
For years I have been trying to find the easiest dinner roll recipe to make for Thanksgiving, with results not to my satisfaction.
Last night I cut your recipe in half to try this method. It worked out great!
The texture was wonderful, thank you so much for this recipe.
My question is, could I add some sugar to the dough to give the roll a bit more flavor?
I do not care for herbs or cheese in my rolls as you had suggested, therefore that isn't an option for me.
Thanking you in advance for your help.
jk
Yay! So happy you enjoyed them, JK!
Regarding your question, you could definitely add some sugar. The rise time might be a little less as the sugar will grow the yeast quickly but the rolls will be delicious!
Thank you Chris, jk
Chris, here we are year later, and I was looking at my printed recipe, and I failed to mark down how much sugar I used.
I want to make these next week and freeze them for Thanksgiving. Would you say a 1/4 or 1/3 a cup of sugar in this recipe? Thank you Chris.
Hi jk, I would go with 3-4 tablespoons.
The dough finished rising about 6 hours before we wanted to eat dinner (made the dough very late the night before). Should I still freeze them and finish baking right before dinner, or just partially bake them and keep them on a cooling rack to finish baking right before?
Hi MaKenna, I would go ahead and bake them. Just slightly undertake by 2-3 minutes, then rewarm later in a 325˚F oven for 10 minutes.
Chris, I would like to make these for Thanksgiving. If I make the dough on Wednesday evening and let it rise overnight, how long would I have to bake the rolls on Thursday morning with the consideration that I would want to heat them up right before serving them for dinner?
I would not want them to be dried out that's why I'm asking. Thanking you in advance for your help.
Hi jk, I would just bake them a few minutes less, probably about 18 minutes, then warm them in a 325˚F oven for about 10 minutes before serving.
Could you make a loaf instead of rolls?
Hi Cindy- check out this post if you are interested in a loaf- https://thecafesucrefarine.com/5-minute-artisan-bread/?swcfpc=1
I made these this morning and they are awesome! I've added a couple notes to my recipe: 1. It would help to spray the plastic wrap lightly before putting it over the bowl at night. The dough can rise up to the top of the bowl and will stick otherwise. 2. I preheated my oven about 10 minutes into the last rise; that was plenty of time for it to get to temp. 3. Do make 16 rolls. I made 12 rolls and they are large and also take quite a bit longer to get done (at least 30 minutes overall). I think 16 rolls would produce exactly the right combination of outside crunch and inside soft bread. This is definitely a keeper! Most likely will be on the Thanksgiving table and many more tables beyond! Thank you, Chris, for yet another amazing recipe. When I want to make something, I check your site first.
Thanks for sharing your results, Josie!
Hi Chris! I'm a whole wheat kinda girl. Could I sub half - ' or even more for the bread flour?
Thanks for what looks to be another stellar recipe - and your inspirational sayings & song links. I listen to the songs and email the link to my BFF so that he can enjoy them too.
Hi Terri, I think you could do half WW flour. Any more and I think you would need to go with some vital gluten so that wouldn't be super heavy.
So happy you've enjoyed the Scriptures and music. Love that you're sharing them 🥰
Just wondering whether these could be increased in size and used as bread soup bowls?
HI Sandra, you could definitely do that. I would crisp them up in the oven before adding the soup.
I mixed these up last night before bed per instructions (I did have a whoopsie with too much yeast, so added more flour, salt & water accordingly.). Baked this morning (I got 16 rolls), and they are absolutely delicious! Crunchy, soft inside with big crags! Sprinkled with shredded Parmesan and coarse sea salt before baking. I’ll never to search for another dinner roll recipe!!
Thanks for letting us know, Paula!
I made these last weekend for Dinner & Game Night . Using a silicone mat on my counter top and bench knife to
1) turn the sticky dough (thanks very much for suggesting it) over a few times in the flour, and
2) cut the dough into 12 equal pieces dipping the metal edge into the flour each time (gosh, I love my bench knife!) ,
I made 12 rolls. Yeah, they were a little temperamentally sticky to shape into balls. They required 15 more minutes bake time because 12 rolls are larger than 16 rolls. I made gloriously chewy rolls with gorgeous interior holes (the better to hold homemade boursin) that were a perfect accompaniment to pasta e fagiole.
My husband absolutely LOVED these rolls and unabashedly ate the leftovers with peanut butter. He let me know MANY TIMES that he loved the chewiness...so he grinned happily this evening when I said I'd make another batch this weekend.
Thanks, Chris, for making me look good. Cheers from Maine!
I love that, Joyce! Thanks for taking the time to leave a review!
Got up very early yesterday & prepared a batch of this dough. It was ready to bake by 5:30, just in time to cool for dinner. What a delightful treat. I must have made the rounds too big as I only got 11 rolls. Still came out perfectly. This shortcut method is so quick & easy. They were great this morning split, toasted & covered in jam. Thank you again !
Awesome! Thank you so much for letting us know, Candace!
Hi Chris,
You mentioned that sometimes you add rosemary and sea salt. How much do you add for this recipe?
Thank you,
Lishcia
Hi Lishcia, I add a teaspoon of finely chopped fresh rosemary with the flour and brush the rolls lightly with melted butter before baking then sprinkle with sea salt.
Do you measure your flour by weight or scooped and levelled measuring cups?
Hi Barb, I generally spoon my flour into the measuring cup and level it.
I followed the directions, but the rolls came out a bit under-baked. I put them back in at 350 degrees for an extra 10 - 15 min.
Thanks, Susie.
How do you get the taste smell and especially the aroma of the Kirkland artisan Burger buns.
The ingredients are flour water salt yeast malted barley
Thanks Brian
Hi Brian, I've never tried the Kirkland burger buns so I'm not sure.
I made these rolls for the first time and they truly are amazing! These rolls will be on our Thanksgiving table for sure.
Thanks so much for sharing.
Awesome! Thanks, Tracy!
Just wondering about leaving the dough on my kitchen counter overnight .......what temperature is it safe to leave the dough out for a long rise?
If my kitchen is too hot overnight, would the dough be unworkable?
Hi Linda, as long as you don't have eggs in the dough, it's fine to leave the dough out overnight. If your kitchen is super warm, you could refrigerate the dough and then let it come back up to room temperature for a few hours in the morning. Just give it plenty of time to rise after it's been chilled.
Can I use all purpose flour instead of bread flour? Anybody tried this?
Hi Heather, you can definitely sub AP flour for the bread flour! Enjoy!
I’ve made these 3 times and use my pizza stone. Just let heat it thoroughly in the oven while you shape the rolls. Just plop the flour-coated rolls on the stone. They bake beautifully with nice crusty bottoms and don’t stick. *It’s ok even if they touch each other. Thanks for this great recipe.
Thanks for sharing your results, Char!
I cut the recipe in halve then add 25 grams of my 50% hydration sweet stiff starter. Rather than rolls, I made a rustic boule and baked in my Dutch oven. It made the most beautiful open crumb loaf for breakfast. Thank you!!
Thanks for sharing your results, Melissa!😊
Since I have a split pea w/ ham soup going in the crock pot, I decided to make some crusty rolls to go with it. I've never tried a no-knead artisan bread recipe before and this recipe looked so simple I just had to try it! The dough is raising now and if all goes as planned, the soup will be done just about at the time the rolls will go in the oven. I'm so excited to see how it all turns out 🙂 Thanks a bunch for this recipe!!!
Yum! Sounds like a wonderful dinner for a chilly January evening. Hope you enjoy the rolls, KJ!
Wish I hadn't waited so long to try the recipe! Could not be easier. Very rustic and delicious. I'm going to add some rosemary next time.
Yay! So happy you enjoyed these rolls, Diane! Rosemary will be wonderful!
My dough before rising is looking more like batter than dough... I spooned and leveled my flour, should I add more?
Nope, if you need a little extra flour, just add it when you turn the dough out onto the counter.
Chris, I made these little Artisan rolls yesterday. They were wonderful! I give you 5 stars! I put the dough together in the morning and baked them off for dinner. Love all your recipes. They are easy and very tasty. Like you, I love my mixer, but sometimes like being able to use one bowl and making things by hand.
Thanks for all the time you take creating these recipes for the world to enjoy.
You're welcome, Chris! I'm so happy you enjoyed these rolls! Thanks for your kind words and for sharing your review.
I make a lot of artisan breads, but was drawn to your recipe for ease plus I have never tried making it into rolls. Would you by chance have the weight measurements for the ingredients? I just find textures and results are better with weighing the ingredients
Hi Cheryl, if you look at the recipe, right above the word "Instructions" there is a little button you can click for the metric measurements.
Hi there, I was wondering if after you roll the dough int balls if you could leave them on the sheet pan and put in refrigerator and bake later that day. Thank you,
Angela
Hi Angela, I haven't tried that so I can't say for sure. I know you can bake them and then just warm them up later in the day with good results.
Very tasty! Crisp outside - chewy inside. Excellent. I added flax seed and dried cilantro.
Thanks, Jay! Love your adaptation!
Love these rolls! I added sour dough starter, dry malt for flavor and a little sweetness, then baked them in a hot Dutch Oven. Words cannot describe how crusty, yet tender and tasty they were.
Yum! Your adaptations sound amazing!
Can you let these rise for more than the 12 hours? I have other no kneed breads I have made that say they can rise for 18-24. Would that be okay for these rolls?
I think you could go a few extra hours with these rolls. If you go too long, yeast can lose its oomph.
Sorry....In my earlier comment, I failed to mention that after I put the rolls in the ziploc, I toss them in the freezer!
I've made the rolls about 4 times now and each time, they've came out wonderfully (and I am new to this whole no-knead bread baking thing). I just wanted to share how I freeze them - after they have fully cooled, I slice them in half, as you would an english muffin, put one or two in a ziploc, and that's it. To warm them up, I separate the top from the bottom, toast them frozen under medium-dark setting in my toaster oven (the freezing slows it down) and they come out crisp and smelling delicious. They taste delicious. The rolls have replaced my morning bagel-shop bagel and the texture and flavor reminds me of a NYC bialy. Hmm, I wonder if the recipe could be converted to a bagel or bialy?
Also, I 've learned that I prefer the Bob's Red Mill brand bread flour (harder to find) than the King Arthur bread flour. I think the Bob's brand ferments better and with more flavor. Just one person's opinion.
Anyway, thanks for the recipe!
Thank you, Rob! I appreciate your taking the time to share this review, it will be very helpful to other readers! I love that these have replaced your morning bagel habit, that says a lot from a New Yorker 💕💕💕
Thanks for this recipe. It is super easy and delicious. My husband loves them and wants me to teach him how to make them. I use instant yeast and looked up what the equivalent is to active dry and so I only use 3/4 teaspoon of instant yeast. I don’t get the nice big air holes like yours. Should I be using the full teaspoon of instant yeast to the big air pockets.? What is the key to get those? Also what is the best way to store the leftovers for the next few days without them becoming hard as bricks . Thanks again for this incredible recipe
Hi Kim, I'm so happy you both enjoyed these rolls. Regarding the big holes, I think it's the slower rise which happens because of the regular yeast which activates slower than instant. There's nothing wrong with instant yeast and I use it for lots of recipes but I think when you're looking for the big craggy holes, you're better off using regular yeast.
Can't wait to try these...But I always have a hard time with freezing bread. Any suggestions? There will probably be none to freeze, but just thought I would ask. Thanks, Judi
Hi Judi, I usually just freeze the rolls on a sheet pan. Once they're frozen (after an hour or so), I pop them in a ziplock bag. When I want to use the rolls, I just pull out however many I need, thaw and then rewarm in the oven for 5-8 minutes.
Judi in regards to freezing bread. Came across a tip to put paper towels in the bag when thawing. It works! I had the same problems the bread just wasn't good to me when I froze it. Give it a try!
Thanks, Debora! Great idea!
Hi Judy, I found that the best way to freeze bread is to completely wrap it in foil and then put it in a ziplock bag. I freeze baked goods like this all the time and each time it comes out fresh, tasting just like I baked it yesterday. There are no ice crystals touching the bread and no weird freezer burn center. I hope that helps.
When do I add rosemary and salt (or other spices) to give the rolls flavor? Before they rise?
Add rosemary or other seasonings with the flour.
I just started making bread three months ago. These are the best, easiest rolls ever. Will never buy store-bought again. Thank u!
Awesome! Thanks so much, Valerie! You may be designated as the family bread maker from now on!
In case it helps, I added 1Tbl of finely chopped rosemary to the flour at the start of the recipe. After shaping, I brushed the tops with melted butter and sprinkled liberally with a mixture of 1 tsp. flaky salt and 2 tsp finely chopped rosemary. Took these great little rolls to a whole new level of goodness.
Thanks, Laurie! Sounds like a wonderful adaptation!
When you say to turn the dough in the flour, do you mean to literally just turn and coat the dough or do you knead please? (novice here). Thank you 🙂
Hi Lynne, no just turn them in the flour. That's one of the beauties of this recipe - you don't have to knead. Just make sure to keep them rolled in flour so they won't be sticky.
I've made these once already and they turned out pretty good but not quite right. I have found that the required amount of water in the recipe doesn't seem to be enough for the four cups of flour. I made the dough again and had to add extra water this time too. Is there a reason for this?
Hi Angel, it's hard to say what went wrong without having been in the kitchen with you. Most people say that this dough is on the wet side. I usually have to roll the dough balls in flour to form them into balls.
I've made this recipe quite a few times and I have noticed that just the last couple times, it seems the dough is drier. I'm wondering if it has to do with the weather. I first started making this in the spring and the last couple times, it's been summer. Maybe that's all it is? I love this recipe and I usually make bigger loaves rather than the rolls. I've made 8 small loaves, 4 loaves and sometimes only 2. I live alone so I keep one out and freeze the other. I would like to try using this for sweet bread like cinnamon rolls. Wondering if that would work.
Hi Gretchen, flour can differ, depending on, not only the weather, but also the batch. Next time, you might want to add a little less than the designated amount of flour as you can always add more but you can't take it away. Thanks so much for sharing your results! 💕
Can you use instant or quick rise yeast instead of traditional yeast?
Hi Heather, you could definitely use instant yeast! The rise time may be a bit shorter.
I've been making your recipe weekly since sheltering started. I admit I now use my Instant Pot in the yogurt mode to proof because I can't wait overnight. The recipe still comes out perfect.
You mentioned bf to raise my oven heat and now I add an egg wash (husband's suggestion) and they are beautiful. I love making bread now. Thanks for this recipe.
Awesome! Thanks for sharing your results, Jan!
I can't find anything on here about proofing in an instant pot...you put it on yogurt mode instead of letting it rise for 12 hours? That would be amazing if so! Thank you!
Hi Mary, I haven't done it myself but I have heard that you can proof dough in an instant pot. Perhaps some of our readers have done this.
How long do you let it proof in the instant pot?
These rolls are exceptional. I made half the recipe and got eight rolls just under 2oz each. Taste and texture are great. If making as dinner rolls I would make smaller and add toppings like sesame, poppy or everything spice.
I didn’t brown as I was going to freeze. Just reheated one in my toaster oven and it came out great. Very crunchy crusty on the top and still soft, chewy and delicious on the inside.
Thanks so much Angela! We appreciate you taking the time to share your results! 💕
Can I use gluten free baking flour.
I haven't tried GF flour so I don't want to say but perhaps some of our GF readers have tried this recipe with another flour.
I made these amazing rolls the other day and they are easy and delicious! I did have some browning trouble but I will try an egg wash to see if that resolves my issues.
My question is: if you were going to flavor these rolls (I think I saw something about parmesan and black pepper), how much would you use? Would you only use seasonings on the tops of the rolls or in the bread itself? When would you add the spices, during rising or at the end? Maybe by now, you have tried these additions and have some insight.
Thanks again for a really yummy recipe that was a bright spot in our day!
Julie
Hi Julie, I add the spices or seasonings with the dry ingredients. I'm so happy you enjoyed them!
I did what someone suggested and put a pan of water in the bottom of the oven when backing. Mine brown beautifully.
Thanks, Gretchen!
I saw the "40 minutes total" and got it started for dinner and THEN saw that it has to sit overnight. ☹️ Guess we'll be having fun rolls with breakfast tomorrow.
Aww... sorry about that, Deb! My recipe plugin doesn't allow me to add rising or resting time at this point.
Hey!!
This recipe looks delish! Can’t wait to try! Do you think I can use whole wheat flour instead of regular ? Thanks
Hi Hanna, I think it would work to use 50% WW flour. The rolls would be pretty heavy with 100% WW. Enjoy!
Today is the 4th time I’ve made this recipe. These rolls are delicious and so easy. But, they don’t turn golden brown. What am I doing wrong? Do I have them on the wrong level in oven? Top better or bottom? Won’t stop me from making them tho. 😉
Hi Jan, try moving them to an upper shelf in the oven for the last 5-8 minutes. You could also up the temperature just a bit. Every oven is so different.
I have made them 3 times so far, love them! I had the same issue previously of rolls not browning, I have found that if you put a shallow pan of water in the oven while baking the rolls, they brown nicely! I did that for all 3 batches I've made and they baked to a beautiful golden brown!
Thanks, Debra. I'll give that a try next time I make these rolls!
Thanks. I’m making the dough tonight and baking in the morning. I’ll keep you posted. Thanks for the tips.
Chris, I baked the rolls this morning. I added an egg wash, raised the rack and set the temperature up. Still not as golden as yours but still delicious.
Yay! I'm going to test out the pan of water that Debra mentioned (above) and see if that makes a difference.
Another winning recipe from your blog!!
Several of your recipes are in heavy rotation at my home, and this one has just been added. As a rule, the first time I make a recipe, I follow the instructions to a T. Had an interruption at the time the dough was ready to be shaped in rolls, and forgot to let them rise again for the twenty minutes, so was resigned to throwing them in the compost bin. But no, no, no!!! They turned out fine, crunch to the crust, nice soft interior. DELICIOUS!! Many thanks for all your your recipes.
Thanks so much, Lucille! 💕 I love that you were able to enjoy these rolls despite the interruption!
I live on a boat and just made these. Easy and delicious. Will make these a lot I think!
Lucky you! Thanks so much for sharing your results, Mel!
I have a wonderful bread machine but this recipe intrigued me. I made it as directed and it turned out fabulously! The only thing I did differently was make it into eight large rolls, about the size of a hamburger bun. When they were hot out of the oven we slathered them with butter and just enjoyed the extra crunchy exterior in the airy interior. The next time I tried slicing them vertically into Crostini. Worked like a charm and lastly I cut it horizontally to make rounds of breads that I toasted and topped with a poached egg – much like an English muffin and I’ve also use the horizontal slices to make an amazing grilled cheese. This is a keeper and I feel blessed to have found this recipe
You're making me so hungry as I read your wonderful review. Thanks for sharing your results. I'm so happy you enjoyed these rolls!
Love your ideas about the different ways you cut and used your rolls! I can’t wait to try them.
Agreed!
Not sure how so many have gotten good results with this recipe. I have done a fair amount of baking, and hesitated when I saw ‘room temperature’ water (not proofed first), but gave it a try based on reviews. I followed this recipe exactly - the ‘dough’ did not rise and was beyond sticky and so wet. I added lots of flour just to get it out of the bowl. It was impossible to form into any shape no matter how much flour used, so had to drop in blobs onto my cookie sheet (half remained on my hands). It was a MESS. So disappointed as we made these to go with a special meal tonight. I just put into oven and interested to see what becomes of this....
Hi Julie, Sorry you had trouble with this recipe. It sounds like you've done a lot of traditional bread baking. This type of bread is a bit different. I was skeptical at first when I started making artisan bread also about not proofing the yeast, just like you. But I discovered that, just like many of the popular no-knead slow-rise, artisan breads, that you do not need to proof the yeast.
That being said, the dough does need to sit for 8-10 hours though as it's a slow rise but that's what develops the nice flavor and big yeasty holes.
It is a very wet dough, that's why I encourage readers to turn the balls in plenty of flour as they form rolls.
There have been so many readers who have loved these rolls. I hope you have good results as they bake.
We really enjoyed this super easy recipe for bread. I've shared it with my daughter, who is new to bread making and unsure of the kneading & rising necessary for 'regular' bread. This worked perfectly for her too. I don't hesitate to share your website when people ask me about my love for cooking & baking. It makes me happy to know that I can refer friends and especially new cooks to you for tasty, easy-to-make recipes.
Thanks so much, Susan. I really appreciate this kind, thoughtful comment 💕
I made these last night, and, they turned out great. I did have to add a little extra water to make it sticky and my cook time was a little longer, but, for a first attempt, I’m happy. Thank you. I took pictures of the dough to show how it looked, but, I can’t upload 🙁
Thanks so much Rhonda! Flour can be so different, depending on the type and the climate. I'm so happy you had success. You could email a picture to me. chris@thecafesucrefarine.com.
Thank you! I have another question for you. I must be doing something wrong and I hope you can help me figure out what it is. I have made this recipe twice now. I repeated it because I was sure I must have made a mistake the first time. I make the dough precisely as the recipe states — 4 cups of flour, 1 teaspoon of yeast, 2 teaspoons of kosher salt, and 2 cups of room temperature water. I let it rise for the right amount of time. But when it’s time to shape the roles, my dough is an incredibly wet, gelatinous mess. I had to add over a cup of flour just to get it dry enough that I could work with it at all. Even then, it was so sticky I could barely get the rolls onto the baking tray. And they did not hold their shape. They are just blobs. There was definitely no shaping or pinching involved. That said, the resulting rolls are incredibly scrumptious! I would love to make this recipe frequently, but the dough is so hard to work with. What am I doing wrong?
Hi Jen, flours can be really different so I would suggest, if your dough is very loose after it's risen, heavily flouring your surface and turning the dough over onto itself a number of times before you try to form the rolls. Also, when you form each roll, again, use a good amount of flour to roll each one in until you can pinch it and form it into a ball. Hope that helps!
Can you use all purpose flour, or what substitute for bread flour?
Yes, you can definitely use all-purpose flour!
Hi! I am wondering if this recipe would work using instant yeast? If so, would I need to make any adjustments? I know a slow rise is key to these delicious rolls… But instant yeast is what I have right now. Thanks!
Hi Jen, instant yeast will work fine! Use the recipe just the way it is and let it rise at room temp, not in a warm place. It may rise a little quicker but they will still be delicious!
HI!
I can't wait to use your recipe, it looks amazing. I have instant yeast instead of active dry yeast. How much do I need to use of this for this recipe and is the procedure different as well?
Thank you so much!
Hi Mary, instant yeast should work fine. Use it just like you would regular in this recipe. You will probably have a shorter rising time so watch the dough.
I realized I have instant yeast. Will that mess it up? Should I let it sit for a shorter amount of time?
Thanks!
Hi Sarah, instant yeast will work fine in this recipe. You may have a little shorter rising time but otherwise, proceed as directed in the recipe.
Ok weird question. Due to the timing of my event, is it OK if the dough sits out 15 hours rather than 12? Thanks so much can’t wait to try!
Hi Debbie,
Yes! You should be just fine! I’ve let mine sit shorter and longer with good results. It’s a very forgiving dough! Enjoy!
Can I use regular flour or does it have to be bread flour?
I have used regular flour when I'm out of bread flour and it works fine.
Hello Chris.
I will be using room temperature distilled water.
I do not like the taste of tap water.
I was looking the picture for these rolls and they look
Like they came from wegmans bakery section . I am
Originally from New York State, and so is my mom,
My two brother’s and my late dad.
If you do not know what a wegmans grocery store is;
it is a New York State based store. The sahlens hot dogs
are incredibly delicious. And the bakery has the most delicious
Artisan rolls. they have a few wegmans stores in Virginia
However since my husband and I moved to Elkins, WV.
I cannot get any of that good stuff here at all. I like the olive rolls the best, that wegmans sells; And that is what
I was thinking as a version of your recipe.
Hi Heather, I've heard so many wonderful things about Wegmans. I wish we had one here! Hope you enjoy these rolls!
Hi Chris ,
These look delicious.I have a few questions.
Why don’t you use sugar and proof the yeast before
you add the salt and flour?
And if I want to add ingredients like rosemary and olives
to this recipe before I knead it and bake it , what do I
do? Please help with this. Please let me know by
e-mailing me at midnight0675@suddenlink.net
Hi Heather,
Regarding the sugar, you don't need to do that in this recipe. You want the yeast to very slowly activate and do its work. If you proof the yeast in the beginning, it will work faster and it's the very slow rise that makes these rolls more artisan with nice big air pockets.
If you want to add ingredients like rosemary, olives, etc. I would add them along with the dry ingredients
I have baked both loaf and rolls. Rolls are better eating. Loaf is hard to slice. My rolls never frozen, they are eaten the same day. Love the recip ..
Thanks, Jerry! So happy you enjoyed the rolls!
I tried this @ 5 am this morning using the exact ingredients. The yeast is 'RED STAR' purchased fronmCOSTCO 2 weeks ago with expiry Sept 2021. Yeast, kosher salt and bread flour were whisked together water was added and everything mixed. The result was a solid mass of dough - not liquid in any way shape or form. As of 2:15 pm absolutely nothing is showing and certainly there could not be any 'bubbles' as the mass has simply absorbed all the water and in fact looks like it could have absorbed another cup.
Anything you can suggest?
Hi Frank,
It's really hard to say without being in the kitchen with you. If you combine 4 cups of flour and 2 cups of water you should definitely get a loose, shagy dough. Not sure how you ended up with a solid mass.
Just a thought...
When measuring by volume (cups), everyone measures differently. Perhaps Frank "packed" the flour in to those 4 cups. I've moved on to weighing my ingredients, particularly flour, when I bake from scratch.
Thanks, Bonita. You're right, weighing is the most accurate.
I'll give them a try Today and bake them in the morning. Freezing 6, and eating the remaining 6 the same day. Fingers crossed.
Also, there's one small mistake in the ingredients list. It should say 512g, not 512 cups 🙂
Thanks, Kamil! I'll correct that. Hope you enjoy them!
I've made the Artisan bread and it called for a tray of water on the bottom shelf and bread on middle shelf. Should I do this for the rolls ?
You can, but that's not necessary for these rolls.
Mine never come out round they always expand protruding in some areas of the rolls. Any ideas why?
Hi Deb, Try pulling and pinching them together a little tighter when you form the rolls.
Does it worked if rolled out baguette style for future appetizers? Just wondering if the dough will still rise and bake as well with more.
Hi Kimberly,
I have made this recipe into 2 round boules and that worked fine but I haven't tried a baguette.
I will never buy store bought rolls again! They are delicious!
Haha! Thanks, Carrie. I know just what you mean! 💕
I’ve made these three times since the holidays and shared them with friends. They got rave reviews! I like to add 2.5 tablespoons of Everything but the Bagel Seasoning.
Thanks for taking the time to leave your review, Gretchen. I love your version with the bagel seasoning! What a great idea!
Can I use white whole wheat in this or at least partly?
Hi Leslie, yes, I think that 50% WW flour would work great!
I would leave more than 5 stars if I could!!!
This is my first time making these rolls, although I’ve been making bread for about a year now.
I absolutely love baking and cooking! I haven’t bought bread for at least a year!
The only difference I noticed between my bread and yours is that the holes in mine are not as large and mine did not rise as much.
It is delicious 😋!! Crusty and chewy and sooo yummy 😋 !
I will definitely be making these frequently!
Yay! I'm super happy that you enjoyed these rolls as much as we do, Nancy! Thanks for sharing your results.
Chris ,
I make two boules with this recipe can I freeze the dough for one or do you suggest baking it then freezing thanks lita
I would suggest baking both and then freezing one. I know that works well and it will also be easier when you're ready to serve. You could slightly underbake it so you can finish it off right before serving.
Made the dough last night, ended up with them sitting a little over 13 hours. They came out fine, really like them. Inside they look (and taste) exactly like English muffins, which I thought was a little weird. (Rather then Artisan rolls - though they LOOK artisan on the outside.) Maybe I let them sit too long or didn't punch out enough of the little bubbles? All good because they are great with butter and jam and will probably do well with beef stew and the like also. They were super easy to make and I will make them again for sure. Thank you for the great recipe.
Thanks for taking the time to leave a review, Peggy! I think you did everything right. Artisan rolls are supposed to have lots of air holes. I'm happy you enjoyed them !
Another truly amazing recipe. I cannot even believe I made these rolls. Could not be easier or more delicious. I used KA regular flour as I did not have bread, followed the recipe exactly. I did bake a few extra minutes and ended up with truly artisan rolls- as good as any French bakery. I mixed the dough in the morning and baked rolls about 10 hours later. Will make these over and over. Thank you, thank you, thank you - you NEVER disappoint!!!
Thanks, Julia 💕 and bravo to you!
Hello Chris,
I have been baking sweets and breads for many years and I am so happy to I have made a few have found your site!y I have made a few of your bread/roll recipes, all of which have turned out amazingly well!
I have a question about the Unbelievably Easy Artisan Rolls. There are two sets of weights for the ingredients, I am wondering why and what difference it makes? I used the weights that were listed after the ingredient, I hope that is okay as I have them sitting all nice and comfy in my warm kitchen, ready to bake tomorrow.
Also, Thank you for using weights in all your recipes. It is just so much easier to work with, and always get the same results!!!
Hi Patti, thanks for taking the time to share your results. Sorry for the confusion with the two weights. You are correct to use the ones you did. I have corrected this in the recipe so there is only one set of weights. Thanks!
Thank you, Chris! I baked the rolls this morning and the results are ***** (5 stars). They were unbelievably easy to make, I got 17 rolls at about 60 grams each. The colour was perfect and my own personal taste tester, my husband gave it a thumbs up and said it was a keeper! Again, Thank you!!!
Yay! Thanks for coming back to share your results, Patti!
Is it easy to double the recipe?
Hi Lori, yes this recipe can easily be doubled!
Chris can I cut this in half and make two boules in a Dutch oven? thanks for all your recipes ... Hope your loving North Carolina lita
Hi Lita,
Yes, I think that would work well! You could also make boules freeform as in this recipe: https://thecafesucrefarine.com/ridiculously-easy-rosemary-bread/
Enjoy!
I've made this before and they were fantastic! Will they stick too much or burn if I don't use parchment paper? I'm at college and don't feel like buying some if I don't have to.
Bravo to you for baking at college, Camryn! You could try sprinkling a sheet pan with a dusting of flour and make sure the bottom of the rolls are also lightly coated in flour. If you can get some parchment that would work best.
If you're wondering why this recipe has no sugar, it's because yeast is smart enough to break down the flour and turn it into sugar. Adding sugar to yeast bread actually doesn't do much in terms of rising, except maybe gives it an energy boost at the beginning. Because we are letting this rise all day, adding sugar wouldn't really matter. Sugar does change the bread's flavor and texture; it will make the bread moister and have fewer and smaller holes as well as a sweeter flavor, like sandwich bread or dinner rolls. If you want a bread with those big holes and crunchy exterior like this recipe, you don't want to add extra sugar. This is also how you make sourdough. As for the room temperature water, yeast does not need warm water to activate, that is a myth, all it does is speed up the process a bit. Again, because we are leaving this dough out for so long, you could use ice water and it wouldn't matter. Wanna make sourdough? Follow this recipe but instead of leaving the dough out all night pop it in the fridge for a few days (the longer you let it sit, the more sour it will become). Just let it come back to room temperature before step #3.
Thanks, Rebekah, for this very informative and accurate comment 🙂
Can all purpose flour work?
Yes, it definitely will work with all-purpose flour. I like the results bread flour gives but it's not that significant if you don't have bread flour.
After I placed rising dough onto flour to to roll in ball with additional flour I noted a lot of air pockets (from yeast). I’m thinking I should mash out or do I just leave. I mashed some what - after they cooked we ate them so quickly while warm couldn’t really tell what the inside of the rolls looked like. They were great though. Very new at baking artisan so unfamiliar with terminology. They looked great and somewhat crispy. Guess I really need to know if I need to knock down dough or just try to roll dough before separating into individual rolls. Thankyou
It sounds like you did a good job, Toni! Yes, definitely knead the dough just a bit to get rid of some of the big air pockets before forming into individual rolls. The dough will form more pockets in the oven but they will be smaller and look like the inside of good artisan bread.
Do you think these would make good soup bowls?
Hi Erin, I think they would! You would need to hollow them and let them dry out a bit.
I just tried these and they are AMAZING!! They did not get very brown but the texture inside was just what I was hoping for! I did undercook them because I didn't get them all the same size and I plan on freezing them too. I reheat in my toaster oven or might try the air fryer to brown and crisp the outside. But they are DELICIOUS just like they are!! I can't wait to try some variations, plan on adding nuts and fruit. Could you use this dough to make focacia?
Thanks so much, Nancy. So happy you enjoyed them. Next time, just let them bake a little longer if you're not planning to freeze and they'll get more golden.
Regarding focaccia, this is a similar recipe but specifically designed for focaccia. I think you'll really like this one too! I don't repeat a lot of recipes but this focaccia is almost always in my freezer 🙂
https://thecafesucrefarine.com/ridiculously-easy-focaccia-bread/
I'm reposting this-you missed me again (smile). I haven’t tried them yet, but would they work as soup bowls if I made them bigger? Maybe make 6? Do you think they would work for that and if so, how long would you bake? I was just reading a different recipe that mentioned bread bowls and then I saw this recipe and I like anything that says unbelievable easy *grin* and they look good.
Hi Brenda, thanks so much for re-posting this. I did miss it! Yes, I think it would work for soup bowls. I would do 6 and bake them as directed, then when cool, hollow them out and crisp them up in the oven a bit before adding the soup. Let us know how it goes!
What oven rack level should these rolls be baked? Do you have a preference when you bake rolls or breads?
I like to use the middle rack for the most part. If I see that bottom of the rolls or bread is pale towards the end, I'll move it down to the lower rack for the last 5 minutes or so.
I haven't tried them yet, but would they work as soup bowls if I made them bigger? Maybe make 6? Do you think they would work for that and if so, how long would you bake? I was just reading a different recipe that mentioned bread bowls and then I saw this recipe and I like anything that says unbelievable easy *grin* and they look good.
I made these this morning, and they turned out beautifully! I used instant yeast (and warmer water, no proving), so I opted to combine everything in my stand mixer and kneaded with the dough hook for a few minutes. 20 minute rest, then I shaped into rolls and let them rise for about 20 more minutes. I think I've found my new go-to recipe for easy dinner rolls!
Yay! That's wonderful, Jen - thanks for sharing your results!
Do you use instant/rapid yeast or regular active?
My apologies. I just saw that you use dry active yeast. Thanks for sharing!
Thanks for stopping by The Café!
No problem1 I miss things reading recipes all the time!
Thanks for the important information Kristy! You must have a very powerful microwave! I'll check the recipe again, but I know there's a vast difference from one microwave to another!
I’ve been making bread for over 40 years and have never had a worse outcome. I’ve been testing recipes for my youngest daughter so she can make easy bread and am exceeding disappointed.
I'm so sorry to hear that Elizabeth! I always hate it when I have to waste good ingredients. We have made the bread so many times and gotten so many excellent comments!
Hi Chris! Hoping to make these soon but am wondering if you've tried using whole wheat flour instead of white bread flour. Any thoughts?? Thanks!
Hi Maia, I haven't made these rolls with WW flour. If you do try them, please let us know how they turn out!
Okay. I left the dough out for about 3 hours. It had already puffed up to fill the bowl so I put it in the fridge before going to bed. Next morning I took the dough out and left to reach room temperature for a couple of hours before proceeding with the recipe. They turned out great!! Thank you Chris for yet another great recipe. I'm off to the kitchen again now to make your easy chocolate cup cake recipe. Husband says they as the best he's had!!
How good are these!!!! Mixed before work this morning, didnt have bread flour so maybe this is why my texture wasn't so "holey" but they were delicious for dinner and more in the lunchboxes tomorrow. Yrt another cafe Sucre Farjne success story. Have to try the brioche next.
Yay! So happy you had delicious success with these, Lorna! Thanks so much for taking the time to leave a comment.
Hi Chris
Do you think it's okay to leave overnight at room temperature here in Thailand ? Or should I pop in the fridge and leave longer than 12 hours? My room temperature would be somewhat different to yours, I'm sure - especially right now, we are experiencing heat wave conditions.
I've made these rolls several times and each time they burn only underneath and stick to the parchment. I end up having to slice off the bottom. I've tries using more and less flour, longer and shorter bake times...any suggestions? My friend makes them and they turn out beautifully. I continue to try them because it is such an easy recipe and so delicious with melted butter. Love your recipes, Chris!
Try lightly flouring the parchment paper and baking the rolls on a higher shelf of the oven. You could also lightly spray the parchment with cooking spray! Let me know if you still have trouble and we can figure it out.
Followed your recommendation to spray the parchment and sprinkle with flour. They turned out perfect! The first one was consumed before it even made it to the cooling rack! Thanks for your help!
Yay! So happy this worked well for you! I know what you mean about a roll not making it to the cooling rack 🙂
Suzi either your oven is running hotter than you think or you have them on a rack too close to the bottom. try baking on a light coloured cookie sheet. I personally hate and dark coloured bakeware because it gets too hot and burns the bottom of everything.
Thanks, Lorrie!
Thanks for this great recipe! Can I freeze the rolls fully baked, then later defrost and use them without reheating?
Hi Caren, you can definitely do that - but they're better if you pop them in the oven for a few minutes to get that nice crispness on the outside.
We made these last weekend. Super easy and amazingly delicious!
Thanks so mch Lisa! So happy you ejoyed them!
Rolls were good fresh but dried out a bit. Good flavor and were great toasted.
Just made these for our NYE dinner. Great flavor and the directions were exact. My only question is, do these brown much for you? Despite baking for the maximmum time per directions, the rolls looked par-baked and very pale. I ended up using the broiler function to brown them, but even with that heat, browning was minimal.
Hello Maureen, thanks for sharing your results. These rolls shouldn't get super brown but they should look like the pictures, light golden. Every oven is different so next time, just bake a little longer, even if it's more than the maximum.
Love these rolls! So easy and so good! I make a batch of them, throw them in the freezer and pull out how many I need any time for dinner. What a treat to have fresh warm rolls in a few minutes! Thanks for this great recipe which everyone asks for.
Thanks, Shelley! I appreciate you sharing your results!
Made these for the first time tonight. Mixed the dough this morning (weighed the bread flour) and then finished them to go with a homemade soup for dinner. I definitely needed my bench scraper and used better than 1/4 C. of flour on my counter when I dumped out the "gloopy" dough. I portioned into 15 rolls and kept using more flour in order to roll them into a soft ball. Baked as directed for the first 15 minutes and then removed 7 rolls (for freezing) and finished baking the others for another 6-7 minutes until golden. They were delicious!
We frequently host a soup/salad/dessert game night. I am going to try making these the day before and then partially bake but without freezing. Will finish baking right before dinner. Hope it works, the gang will love them!
Thanks so much, Ellie! I find that at times I need a bit more flour than at others. I think the flour and humidity level can be the variable in this recipe. I'm so happy you enjoyed them. I think you'll be pleased with the results after freezing too!
I just made these and they were delicious!! I followed exactly.
Many thanks for a great recipe and Happy Holidays!
Thanks, Verdi 🙂
i do not know about this recipe.
there is not any warm water at least 110 degrees and sugar to help the yeast bloom for 5 to 10 minutes
there is no sugar amount listed. this may look unbelievably easy but i do not think it will taste good.
without sugar to go with the yeast it just is probably not going to taste right. oh well they looked good
good anyway. now i am going to scrap this recipe by first whiting out what little i have written and delete the pin
from my pinterest board completely and look somewhere else for a normal homemade artisan roll recipe.
Hello Heather!
Thanks for your thoughtful comment. I know you'll never read this since you've whited out and deleted your pin but I felt compelled to respond. It's too bad because you are missing out on something wonderful. I understand your response however as I've been baking for more years than I care to admit and a while back, I would have had the same response as you. However, I've discovered that sometimes rules can be broken with astonishing results and these Unbelievably Easy Artisan Rolls are the poster child for that! If you read any of the preceding comments you'll see that many readers have the same opinion. Hope you find those wonderful rolls you are looking for!
Chris these rolls were a wonderful accompaniment and were a delight to everyone at our Thanksgiving table this year. The recipe was easy and the kitchen smelled heavenly as they baked. I had to work Thanksgiving so My better half made a lovely dinner and he could not believe the simplicity of the recipe. When I arrived home from work we made them together and our bread basket was empty by the end of our delicious meal family was thoroughly impressed. Thanks for a very easy yet elegant roll recipe it’s now going to be a regular on our holiday table
How long do the frozen rolls need to be thawed before baking the last 5-10 minutes?
Just took these rolls out of the oven. They are fantastic! I fully cooked a few for us and we couldn't even wait for them to cool before digging in. I par-baked the rest and will be serving them on Thanksgiving.
Yay!! Thanks so much for sharing your results, Norma!
My dough is rising as we speak. I did knead the dough and formed a ball. Hope it still works
Hope you enjoy it, Sara!
When doing the freeze and rebake method, does it taste exactly as fresh as if you just baked them? Or is the texture/flavor compromised at all?
Thanks!
I don't think you can tell at all, Lisa. I usually thaw them and then warm them in the oven at 325 for 5-10 minutes or until they're nice and crisp.
Thanks! How long do you thaw before baking the 5-10? This makes thanksgiving-day baking so much easier!
when do you mix the olives in? I make these rolls often and love them but want to try the olives
I have made these a few times now and they are always amazing. My favourite variation is to add chopped kalamata olives. The result is restaurant worthy. I made some last year for a family get together and they were gone by the end - adults and kids alike wolfed them down. I made some again tonight with olives and they were as good as the olive bread I buy in the shop - but fresher and made the house smell amazing! A very big hit in our house!
These look delicious . I am thinking to put olives and rosemary in the dough.
Couldn’t I just eat a couple
of these rolls with butter after
they have cooled
Some and still are warm enough to melt the butter.
I probably would not want to freeze them
all of the time.
I wonder if adding some grated cheese inside the roll would work? Thanks!
I bet that would be wonderful!
could you use half whole wheat flour with this recipe?
Hi Doris, I think that would work fine. The rolls will be just a bit heavier though.
I made them 6 months ago with half whole wheat - they were alright (my guests ate quite a few), but I wasn't crazy about the fact that they were a little too heavy. So happy I tried them again, with original recipe above using bread flour, they were a huge hit for Thanksgiving dinner and were SO easy (other than my shaping them - they were uneven sizes). I can now hardly wait to try them with chives, parmesan and cracked black pepper, maybe some Himalayan salt on the top? And, I saw the recipe for bread too - so will try it as well.
Thanks, Charlene, so happy you tried them again!
I was SO happy with these rolls that I am making them for Christmas dinner. The last time I made them I thought there were ample for leftovers - NOPE... the guests ate them all and asked for the recipe.
Thank you for this absolutely delicious, easy winner!
Thanks so much, Maureen, I love that your guests gobbled them up 🙂
These are excellent! And you can shape them for different purposes. I’ve made hot dog buns and little ciabatta-type rolls. I think I’ve made them 5-6 times now. The best part is you can whip up the dough before you leave for work and when you get home take 10 minutes to shape the rolls and you will have very impressive rolls to go with dinner !
Thanks for sharing your results, Lane. I love the idea of making the dough in the morning and having them ready for dinner!
My first time making homemade bread. Wow! Just WOW! So easy with no kneading involved. Perfectly crisp on the outside and heavenly chewy on the inside. The rolls were a little hard to shape, since they're a bit sticky, but still managed to pull it off, even as a first-time bread maker. We ate the entire batch soon after they were out of the oven. Decided that we're having lasagna for dinner tomorrow night, so already set to make another batch. Can't wait to share these with family and friends.
Yay! That's awesome Jaime, congratulations! I'm so happy they worked out so well for you!
When making artisan bread I lightly coat my hands with oluve iil instead of flour. Works great. Also a dough hook is great for muxing this type of dough.
Thanks, Nancy. You could definitely use a dough hook and mixer for this bread but it's so easy to mix up by hand. That's one of the beauties of this recipe.
I don't think I will have the time to shape these and bake in the morning, but I want to make them for a work event. If I made these as the recipe states, but I let them have their final rise is the fridge, could I shape them at night then bake in the am?
I think that would work fine. I would give them at least 30 minutes at room temp though before baking.
I have tried baking bread rolls earlier with not much success, but this recipe can't be easier, I am so excited to make rolls from this recipe, unbelievably easier.
Thanku thanku thanku ....god bless you both
love
ninni
Yay! Thanks so much, Ninni, so happy you shared your results 🙂 God bless you too!
I have bread machine yeast, traditional yeast and quick rise yeast and I was all set to try these and it calls for dry yeast. I am not a bread maker and did not know which one to use. Does it matter?
Hi Claire, thank you for noting this. Dry yeast is the same as traditional yeast.
I can't wait to try this bread.
If I decide to refrigerate for later use, how long should I let it sit before baking?
Hi Sue, I just bake them after the 12-hour rising time.
Can these be made in a bread machine? Just the dough portion?
I think you could although I haven't done it.
Made these for Thanksgiving...as easy as advertised and delicious! Rolls don't usually grab a lot of attention at a holiday meal, but people were commenting on these! Thanks for another great recipe!
Yay! So happy these worked out well for you! Thanks for letting us know DC 🙂
Is there any changes to the recipe if using whole wheat bread flour? Thank you so much!
Hi Thatch, I haven't made these with whole wheat bread flour so I can't tell you exactly what to do different.
I cannot tell you how much I love these rolls - First time I made them I used them as rolls for a ham - let everyone make a sandwich. Then I used them with some Italian food - They go with everything. I have never had a problem - I was amazed at how they poof up in the oven - fun to watch! I want to try them with some chopped fresh rosemary in them....Everyone thinks I spent hours making them! Thanks so much for this recipe!!
That's awesome Paula, thanks so much for taking the time to leave such a great review!
I have been making in the artesian bread for a year or so now and just came across this recipe for the rolls. I am so excited. I did make them and they were so easy however they did not get Brown in my oven. Anybody have any suggestions as to how to get them to Brown nicely?
Hi Donna,
I know everyone's oven is different but could you just bake them a little longer? I just leave mine in until they're a nice color.
Make the dough and freeze it??
Or can I make the Dough and keep it in the fridge for a few days?? If so do I proof it first then take it out of the fridge and proof it again then bake??
You probably can Donna but I haven't tried this. You can just proceed with the recipe as directed and slightly undertake the rolls. Then freeze them and when you want to serve, just thaw and finish off the baking. I have done that and it works great!
I decided to experiment with this recipe. I made jumbo sandwich buns to use with pulled pork. They came out great! I did have one moment of semi-panic when resting my shaped rolls. They went all bloopy (technical term) and flattened but they puffed back up in the oven. Really happy I found this recipe. Thanks!
Thanks Dianne, I know what you mean about that moment of panic. They do bloop a bit but then when you open the oven, it's a wonderful sight!
Know what tastes great on these rolls....your cherry freezer jam! Not only can I not stop making the jam, now Im making these wonderful rolls to eat with the jam!!,,,,,first made them back in November....WONDERFUL with your jam.There goes the summer diet!
Haha, you're a girl after my own heart Gayann!!!
I totally agree. I was eating the raspberry jam with these rolls too!
Gloria, you might try using instant yeast. You don't have to proof it and can just throw it in with everything else at the beginning. I made these rolls today and they turned out beautifully. Added 1 Tbsp canola oil (I have found that adding oil makes keeps finished bread moister longer and does not impede proofing) and 1 Tbsp sugar, no salt. I let the bread raise for about 4-6 hours at room temperature and then, fearing (with the added sugar) that it might overproof, I put it in my refrigerator overnight. It came out very bubbly, light, airy dough that did not raise much during the 20 min 2nd raise but raised nicely in the oven. I used, probably around 1/2 cup of flour for the brief kneading required.
Outside nicely brown, crisp, inside moist as can be. Cooking time, temperature as provided in recipe, perfect.
Thanks Sharon!
I made these for our dinner last night. We loved them! I used 1/2 whole wheat flour (hard white spring wheat) and 1/2 all purpose white flour. After letting the dough sit for 8 hours, it had raised in the bowl and had many bubbles on the surface. It had a flat top instead of rounded. I dusted the counter with 1/4 cup of the all purpose flour and rolled all the dough in the flour. Then I cut the dough into 16 pieces. I rolled each piece in additional flour until it was easier to handle, then shaped into rolls and let rise 20 minutes before baking. They turned out delicious. I did bake them about 25 minutes instead of 20 so they would brown a little. We live at a little higher altitude (4300) so baking takes a little longer. They had a crusty exterior and a nice soft interior. We will definitely make these again and again!
Thanks for such a detailed review Joy! So happy you enjoyed them!
Oh my goodness Gloria! I'm so sorry you had such a bad experience. I hate wasting good ingredients. I'm honestly not sure what could have gone wrong as so many others have had wonderful results with this recipe. The dough is always pretty wet and you need to use a good amount of flour on your work surface to make it easy to work with. It sounds like, for some reason, the yeast did not activate.
We can't get enough of these rolls!! sooo easy and delish! Has anyone tried adding cheese to mix? If so, when to add and how much?
Wanted to add that the measurements work fine using metric cups - 600g of flour and 500g of water, for anyone like me in metric areas. Also, in case you don't hold that info in your head and can't be bothered looking it up, 425*F is roughly 220*C, and 350*F (the reheating temperature) is roughly 180*C. Hope that helps somebody. These rolls are my new favourite bread! Making some now using brown (wholemeal) flour to try out.
These worked perfectly! I have made slow yeasted bread before that honestly was a bit meh. I mixed the dough for these last night and baked them this morning - the smell pulled the kids away from their Lego which doesn't happen often! Perfectly crunchy on the outside and chewy on the inside. I am going to teach my 9 and 7yo how make them because really, it took very little effort on my part to make these rolls but my cunning plan is to have fresh bread with zero effort on my part! It's easy enough for them to handle. With four young kids it can be hard to find time and energy to cook well - thanks for the inspiration that your blog is!
These rolls are amazing! I made them at Thanksgiving, baking them in the morning, and everyone loved them. For Christmas Eve, I baked them just before dinner and, of course, they were even better hot out of the oven. Either way, you can't beat easy + delicious. Thank you, thank you, thank you.
That's awesome Peggy, so happy you enjoyed them! Thanks for taking the time to come back and leave a comment! 🙂
This recipe is absolutely amazing, Chris! I first made it for Thanksgiving, then I made it again this week for a Christmas dinner party. So easy and simple, but full of that wonderful yeast flavor! All of my guests loved these rolls, and I've shared the recipe with several of them. Also, my husband has declared that he would forego many servings of inferior breads for these rolls.
It would be helpful for this recipe to have step-by-step photos of how you shape the rolls at the end. I looked at the photos on Alexandra's Kitchen to get some help with the process.
These are so good! I made a couple batches for my parents while I was home for Thanksgiving. We par baked them and froze them so they can have fresh rolls whenever they want.
Thanks for letting us know Jennifer, and what a great idea. I know your parents loved it! It's so nice to pull something yummy out of the freezer and warm it up with a bowl of soup or something warm and comfy on a cold winter day!
This is the second time, in two days, that I made these. The first time, they did not rise much. So then I checked my expiration date on the yeast, it was December 2016, which is now. So I went out and bought a new yeast product. I also put 1/1/2 tsp of yeast in this batter.. they are in the oven now and I will let you know how these turned out. I also used AP flour. So lets keep our fingers crossed.
That was a good choice Luci! Sometimes yeast can be a little tricky and fussy.
Well, they came out much better, but I can not get them to brown, like your pictures, so I thought next time, I would raise the temp in my oven and put on a higher rake, do you have any suggestions? However that tast great.
These are great! A friend brought them to T-giving dinner then shared the recipe with me. I made the dough first thing this AM and left it to rise while I was at work. I had fresh rolls ready for dinner tonight in a short amount of time. Delicious and easy!
Thanks so much Nicole for taking the time to leave a comment. So happy you enjoyed the rolls. What a wonderful thing to come home to!
Thank you so much for this recipe. I was skeptical however it was unbelievably easy and the rolls came out perfect! This recipe is a keeper according to my husband and family! Absolutely awesome!!! I already have requests to make these and to bring them to Christmas dinner...
Thanks for your encouraging comment Krista! We had them with a warm, cozy bowl of soup yesterday - so good!
This is the easiest recipe to follow and make. I made a batch the other day, and they will be reheated today for Thanksgiving dinner. Delicious rolls!! A keeper recipe.
Thanks so much Sue. So happy you took the time to leave a comment. Have a lovely Thanksgiving!
P.S. If there are any left, they'll make wonderful turkey sandwiches tomorrow! 🙂
My son is my fancy bread maker in the family and usually takes around 3 days to make his loaves. We are making this for Thanksgiving and I can't wait to taste them. In the oven as we speak!
That sounds wonderful Donna, and that he's become the bread maker, so cool! There's nothing more fragrant than bread or rolls baking in the oven, yum!
Funny story....You know those cute chalk labels that you can put on mason jars? Well, they rub off. I accidentally used potato starch instead of flour!! It was basically a science experiment! Usually have some sort of goof up like this leading up to Thanksgiving but I thought it would make you laugh like I did 🙂
Haha! That is so funny! My mom once used part powdered sugar instead of flour to make her homemade bread. She didn't realize it and wondered why the bread looked a little off. It tasted terrible and then she knew what she'd done. I hope you get to try these rolls with the correct label on the jars 🙂 Thanks for sharing, I know lots of us have done something similar!
These rolls are absolutely fabulous, and soooo easy! They'll be on our Thanksgiving table this year!
That's awesome Ruth, so happy they turned out well for you. Have a wonderful Thanksgiving!
Chris, i am an avid bread lover so had to make these. Fabulous, just Fabulous. Thank you for sharing
Dare I try these for Thanksgiving? Not having to have the water at the perfect temperature is wonderful. I think I can, I think I can!
Made em yesterday....ate and gave away all but one! Theyare crazy easy! Next time I am adding parm cheese in the dough,and a little sea salt on the top...I made 14 large rolls....they are PERFECT as small sandwich rolls...a lot like chabatta bread! My normal yeast roll recipe takes 5 hours,and is very tempramental.....these are rediculously easy! No fuss!
Absolutely perfect! I have already wrote down the recipe in my recipe notebook, this is something I will make for sure.
Oh, you'll love them Adina! And they'll go so well with all the good food you're always making 🙂
These rolls look incredible, Chris! I know I'd never be able to stop at just one 🙂
Thanks Laura! I have to admit, I didn't stop at one!
HOME RUN you guys! I struggle with bread most of the time. I can be pretty good or a hit and a miss. So when I decided to try these and wanted them for a friend who is going through a difficult time, I figured I'd better hedge my bets, so made a batch of regular buns yesterday and started these last night. WELL, they are baking as we speak and I can tell they are perfect!!! We will have a couple for breakfast and share the rest. And EASY? Could not be more so! I LOVE your recipes and am always trying new things from you, . I've only had one flop and that was my error. I feel the happiness you guys share and this is my favourite cooking site. Thanks so much. Okay, now to get one of those beauties with my coffee. Have a great day!!
That is just awesome Judi! I hope they cheered up your friend! Thanks for letting us know!
I made the rolls today, very easy, and taste great. Thank you for sharing recipe. I will be making them often I'm sure????
Thanks Marjorie for taking the time to let us know. So... happy you enjoyed them!
Looks great! Any suggestions for a gluten-free version?
Hi Ann, I haven't tried a gluten free version and have to admit, I'm not super smart when it comes to GF. If you try them with GF flour, please let us know your results. Sorry I can't be more helpful 🙁
Hi Chris, these rolls look perfect for the holidays. I can tell they are wonderful just by the way they look.:)
Wow, that IS easy! And awfully good looking. Love a good roll/bread recipe. And love the way these look when you tear them open -- that's the way bread SHOULD look! Really good -- thanks.
i am already experimenting with different herb combinations. Also, crust for a delicious pizza......
There are a hundred and one things to do with this recipe......thx for sharing.
That's wonderful See! Let us know your favorites 🙂
Can you suggest a whole wheat version? I try not to make white bread anymore (not that I don't love it). It seems better to me to add some fiber if I can.
Hi Leslie, I haven't tried these yet with whole wheat flour but I would probably start with just one cup of whole wheat flour or perhaps more of the white whole wheat flour from King Arthur (it's a little lighter than regular ww flour(.
Simple and yummy ♥
Thanks Summer!
Holy wow, you weren't kidding about incredibly east Chris! I can't wait to try these, the texture looks amazing! Thank you!
I don't understand why the setup has changed. When I hit Print on your website, viewing from my iPad, within TG E Print mode, the recipe page comes up blank. I can't print the recipes anymore.
New also are all these icons at the bottom of the page which is annoying, you can't minimize or get rid of them. I also used to,have the option to switch to Safari to print and that isn't there either (although that feature may have only been in Pintrest.)
Hi Mollybea,
Sorry you've had difficulty. We'll check into this and see if there are issues wit hour print button. In the meantime, I've email you the recipe. Hope you enjoy it 🙂
Can recipe be used to make artisan bread rather than rolls?
Yes!
Could I substitute all purpose flour for bread flour.
I am a great fan of Jim Laheys overnight bread, so am anxious to try these
Hi Pauline, I think all purpose flour should work, I just haven't tested it.
Chris- Could this dough be shaped into a loaf or 2 small loaves, instead of rolls? If so, what might baking time be?
Peggi
Hi Peggy, yes, you could definitely do either a loaf or 2 small ones. I would bake for at least 30 minutes.
Can recipe be used to make artisan bread rather than rolls?
Hi Arlene, yes, definitely. It would need to bake longer though.
Do u think you could use sourdough in this recipe? This looks absolutely amazing -- but then, don't ALL your recipes? Thanks for this, dear!! 🙂
Thank you Mary! I haven't tired a sourdough version but it sounds wonderful!
Did you use instant yeast or rapid rise or just the regular?
Hi Jennifer,
The original recipe called for instant yeast but I tried it with regular yeast and it works great. I just used a little extra. The recipe called for 1/2 teaspoon instant but I used 1 teaspoon regular yeast with success every time. Enjoy!
We are lucky to have several wonderful artisan bakeries in town but I still love creating my own at home. I love the do-ahead ease of these too. Pass the butter!
You are lucky Susan!
Chris these look amazing!! I'll be putting the dough together tonight. They'll be perfect with soup tomorrow for dinner. Love your recipes Chris. They always look delicious and simple. Most of the time I have the ingredients on hand. It's nice to follow someone who cooks like I do. Thanks for having the desire and taking the time to create (and perfect) such lovely recipes.
Thanks so much Alice, enjoy the bread!
Chris - Where have you been all my life? I've searched endless websites and recipes, and they're either way too complicated or way too beginner --. I love how simple and wholesome your ingredients and directions are. Thanks for speaking my food language. You inspire me!
Thank you Shannon, that is the sweetest, most encouraging comment. I appreciate you taking the time 🙂 Welcome to The Café!
These are so quick and easy. They're perfect for Thanksgiving when there's so much prep already.
Yes, I love that aspect Vicki. Anything that makes entertaining easier is right up my alley!
You are definitely speaking my language with these lovely rolls! Love the magic that is no-knead, though never thought to make it as rolls. Brilliant 🙂
Yes, this is your language Jennifer, you are the best baker!
Good morning Chris - I love baking bread and this recipe really appeals to me! Homemade rolls with simple easy directions - how perfect! I am drooling over that warm roll slathered with butter. I could hurt myself on these rolls. Thank you so much for sharing this terrific recipe - can't wait to try them, and freeze them too!
Thanks so much Tricia. Don't tell anyone but I did hurt myself a little bit on these rolls, I had to walk a long ways to make up for my indulgences!
These bread rolls make me miss you
Let's cook together again, soon:)
love, geenie
aww... Geeenie, me too! I'm doing a pizza class this week for our small group. Wish you were here to do it with me!!
Chris, PLEASE email the pizza class recipe. I never have been able to nail a good tasting pizza dough.
Hi Jim, I will be sharing the pizza recipe in an upcoming post. It's a thin crust and super crisp.
me too - I could be there in no time at all:)
small groups were our specialty:):):)
I love this Chris, we can't get any good bread out here in Southern CA ~ I need to make it myself!
It is kind of crazy how hard it is to find good bread. But you won't believe how easy these rolls are!
Oh, my gosh, I need these in my life!!! Perfect with butter melting into all those nooks and crannies!!!
That butter melting into all the nooks and crannies can be a problem Liz, it's hard to eat just one! (don't ask me how I know this!)
Can't wait to try this recipe they look delicious.. Re: parchment, Sams Club has had a crazy inexpensive deal on parchment rolls, it's the same brand Costco carries and it was under $5.. Great quality and as King Arthur recommends I use it until it falls apart. Also I highly recommend King Arthur's Hamburger bun recipe is easy and taste really good, I do the 2 egg variation and I think I'm going to make the recipe into rolls for thanksgiving. Love your blog, I look forward to each new post!
Thanks Jo for all the great tips! I will check out the Sam's parchment paper! King Arthur does have wonderful recipes and I'm glad to know about the hamburger bun recipe, yum!
It doesn't get much easier than that and they look so good.
And taste good too Karen!
They are perfect my dear..Pinalalala..lalala:)
Monique, you crack me up!
Wow, who knew? My mouth is watering!! For me, bread may be even better than chocolate. Notice I said 'may".
So true Ginny! I go overboard for a delicious, crusty, soft-on-the-inside loaf of bread!
They look so good with open crumb and crunchy crust!
I'm with you Angie!