This post may contain affiliate links. For more information, see our privacy policy.
Do you ever run across something that you think is just too good to be true?
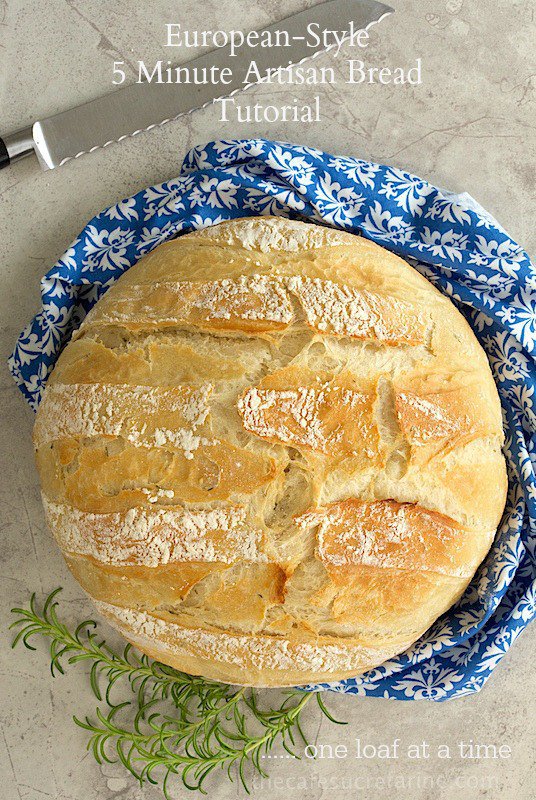
I'll never forget the first time I read about 5 Minute Artisan Bread. The loaves in the pictures looked like the came from a wonderful French or Italian bakery, the process sounded simple and the whole thing seemed way too good to be true. I'd made bread the traditional way for years, and knew it was a labor-intensive process requiring a fair amount of hands-on time. To say I was a skeptic was an understatement.
I also knew that yeast was a bit tricky and a bread recipe's success or failure was often dependent on a baker's "yeast competence". So when I read the recipe and discovered that you basically just throw everything in a large container, give it a stir and set it aside .......... well .... let's just say I was sure it wouldn't work.
I tried it and was shocked when, 45 minutes later, the dough had doubled in size. I followed the rest of the instructions carefully and before long the most wonderful aroma was emanating from my little (non-European) kitchen. When I pulled the rustic, golden-crusted loaf from the oven I did a happy dance because too-good-to-be-true was true!
I've made this delicious bread quite frequently since then and, over the years, simplified and refined the process. The original recipe made a huge batch, requiring either baking three loaves at a time or having a fairly large refrigerator space to store the extra dough. I've scaled down the ingredients to yield just one nice size loaf and have adjusted the technique to make it easier.
Are you skeptical? It's okay, I understand. Nothing can be that easy, right? That's why I had Scott click some photos of the process so you could see for yourself. Try it, you'll become a believer, I promise. You can find the original recipe and method in the Artisan Bread in 5 Minutes book. Below is my simplified method.
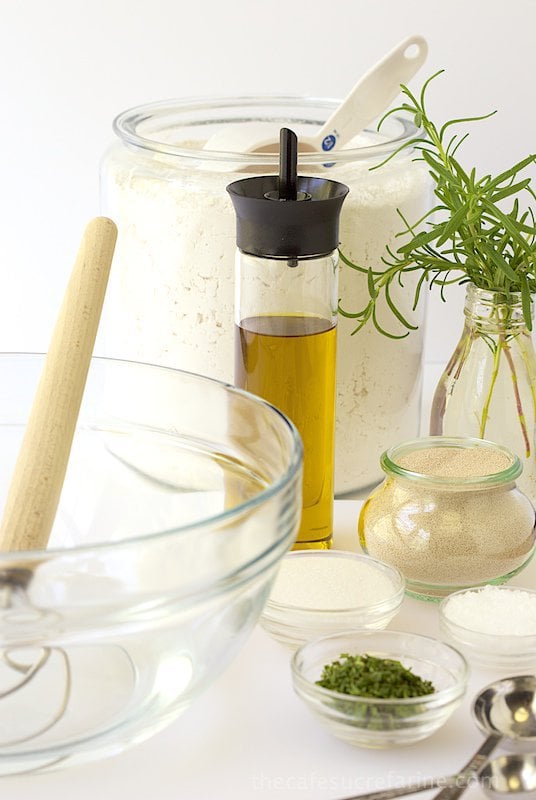
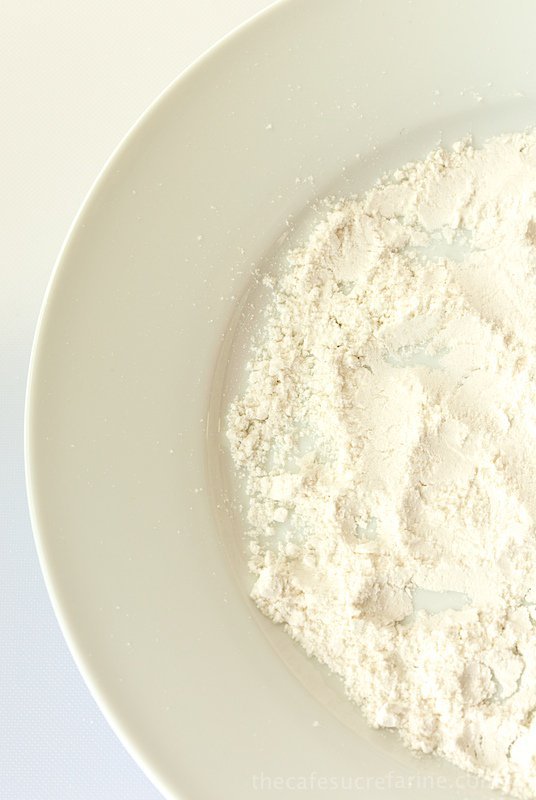
Gather the ingredients; a large bowl, some measuring spoons and cup. Be sure you have a sturdy wooden spoon or a whisk.
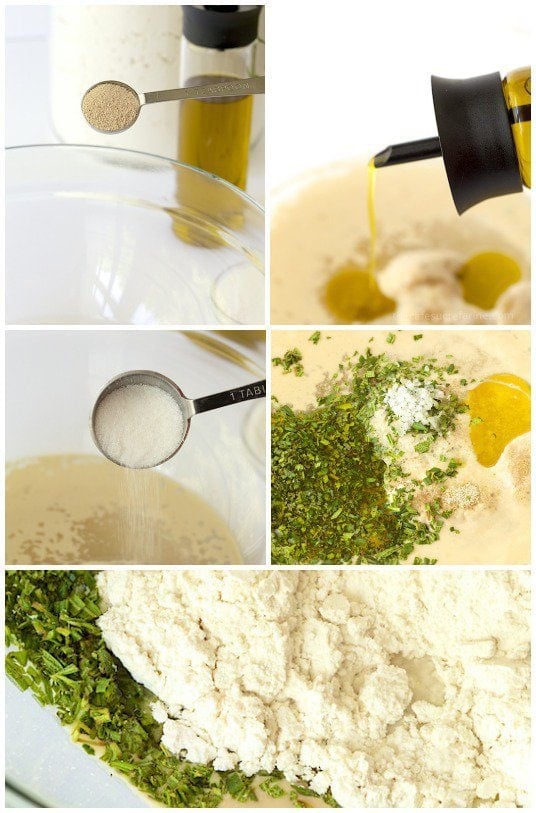
Add warm water to a large bowl. Stir in yeast and sugar. Let it sit for a few minutes, then add remaining ingredients.
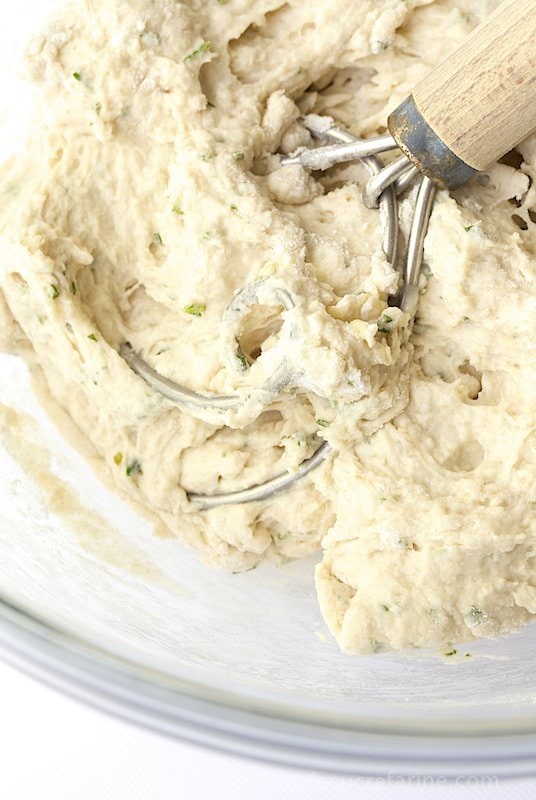
Mix until all of the flour is incorporated.

Cover loosely with plastic wrap and set aside.
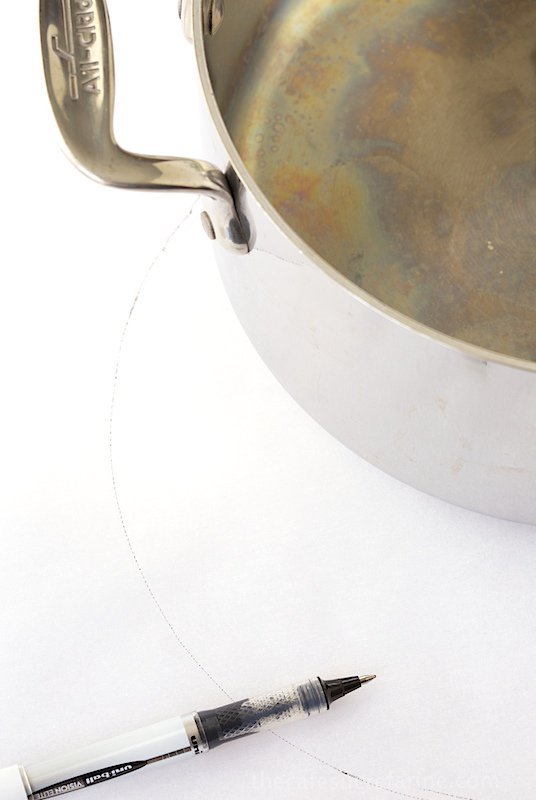
While the dough is rising, take a 3-4-quart pot (with or without a handle*) and place on top of a piece of parchment paper. Trace a circle, slightly bigger than the bottom of the pot. Cut out the parchment circle and set aside.
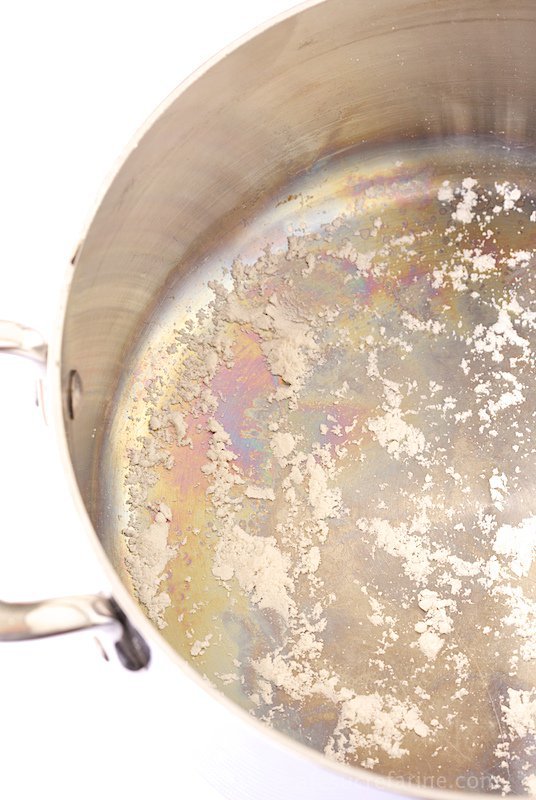
Sprinkle the bottom of the pan with 2 teaspoons of flour.
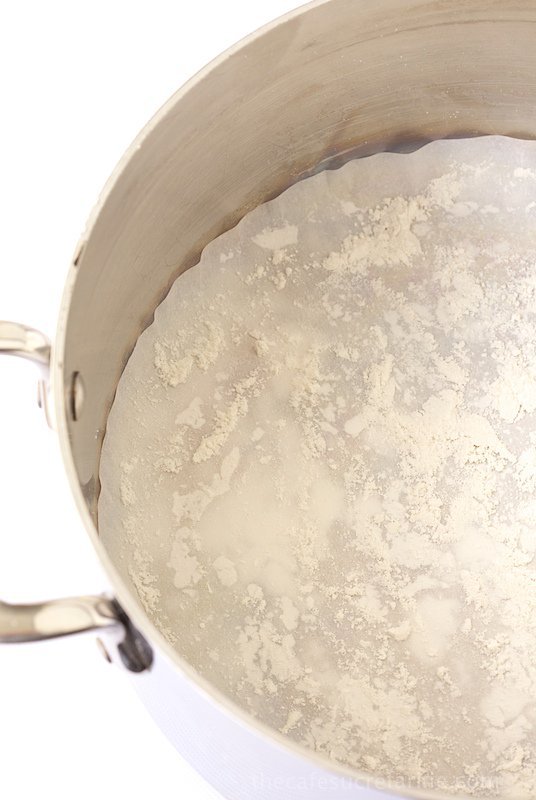
Fit the parchment circle into the bottom of the pan and sprinkle another teaspoon of flour over the paper. This will keep your bread from sticking to the pan and parchment paper. Set pot aside.
Spread out ¼ cup flour on a dinner plate.

Transfer dough to the floured plate. Flip several times to thoroughly coat dough with flour.
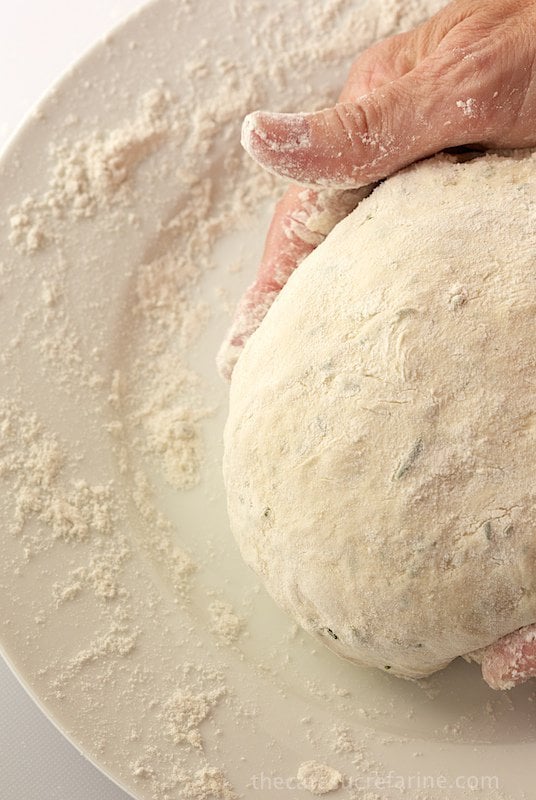
Shape into a smooth, flat ball by stretching the surface of the dough and tucking it underneath with the palms of your hands, rotating a quarter of a turn as you go.
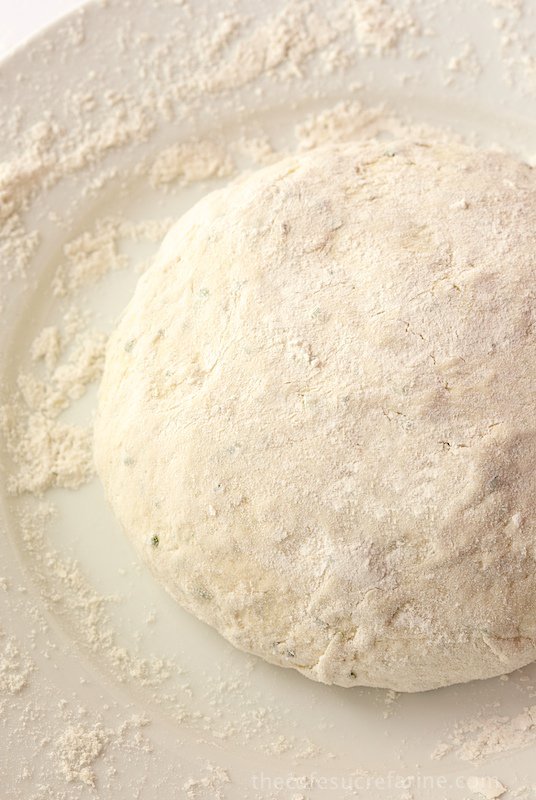
Dust with more flour from the plate as needed to prevent stickiness.
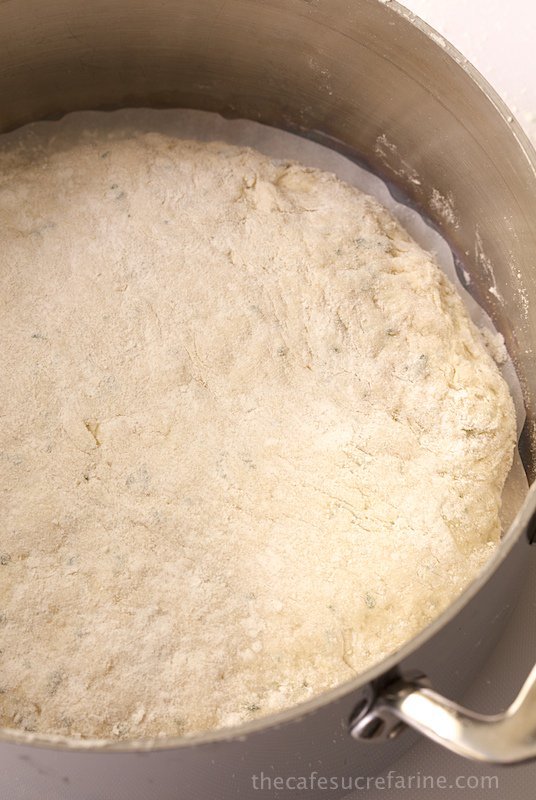
Transfer the ball of dough to the prepared pot and cover.
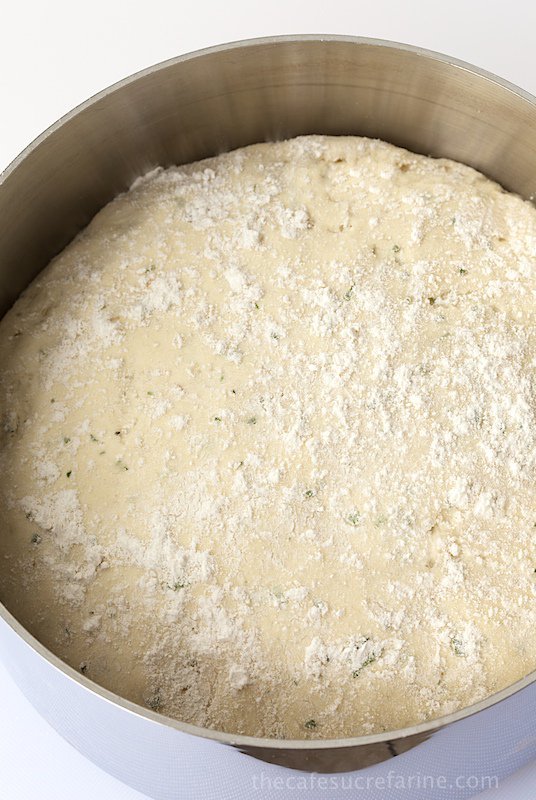
Let it rest for 30-40 minutes or until doubled in size. (Rising time will depend on how warm your kitchen is.) Then sprinkle the top with a bit more flour.
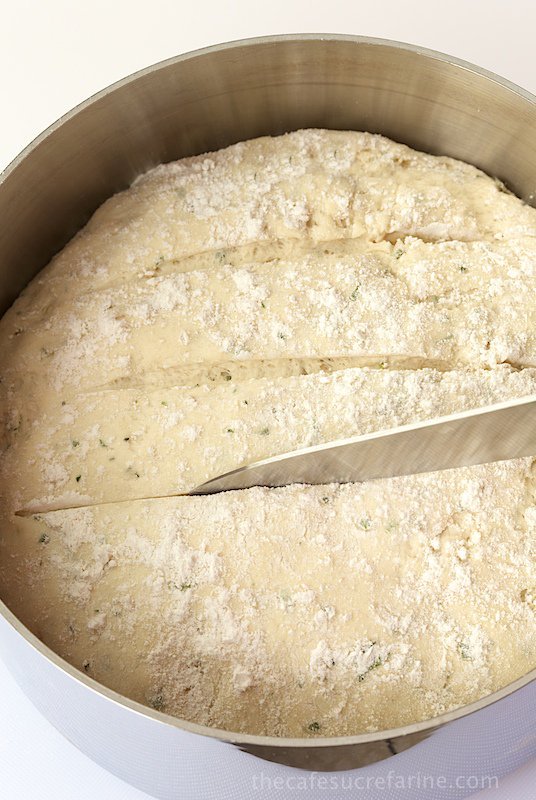
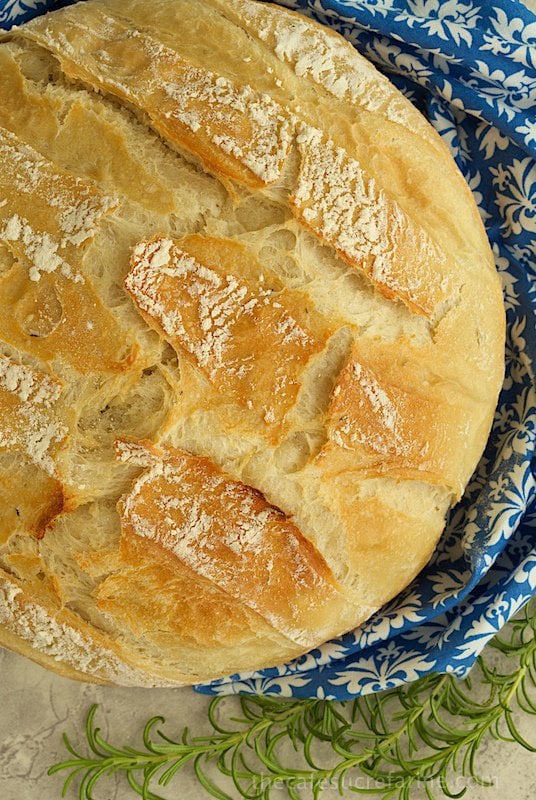
With a sharp knife make horizontal cuts across the top of the loaf. You can also cut an x (or just make little random cuts with a kitchen shears all over the top of the bread for a fun whimsical look.)
Now, cover on the pot and pop the whole thing in the oven.
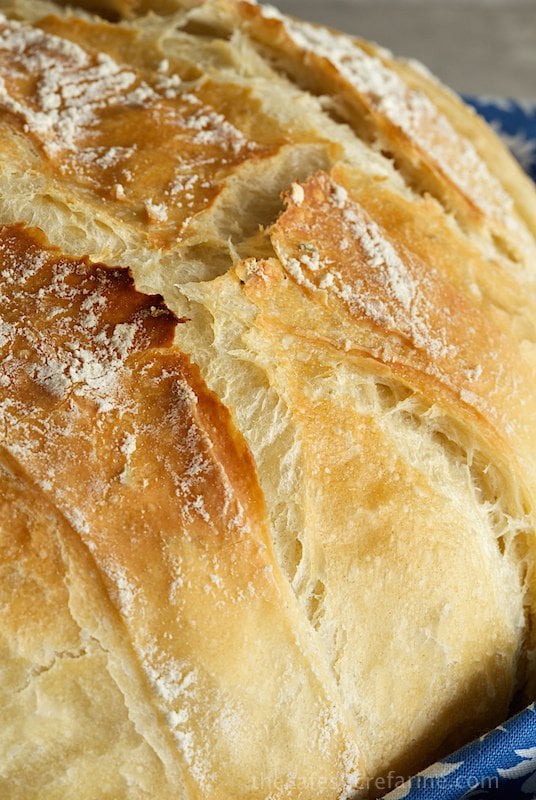
Before long, unbelievable aromas will fill your kitchen. You'll flip when you open the oven door and see the rustic rounded top of the golden loaf peeking out of the pot. I'm quire certain you'll be doing a little happy dance too!
Scroll Down for the Recipe - or Save It to Your Inbox
We’ll email you the recipe so it’s easy to save, print, or share.

5 Minute Artisan Bread Tutorial
Ingredients
- 1 ⅓ cups warm water, 320ml at 100-110˚F
- 2 ¼ teaspoons granulated yeast*
- 1 ½ teaspoons sea salt or 1 teaspoon regular salt.
- 1 tablespoon sugar
- 2 tablespoons extra virgin olive oil
- 1 tablespoon finely chopped fresh finely chopped herbs, optional
- 1 cup 130g whole wheat flour**
- 2 ⅔ 330g cups all-purpose flour
Instructions
- Add warm water* to a large bowl. Stir in yeast and sugar and let sit for 4-5 minutes till mixture begins to bubble a bit and get foamy.
- Add remaining ingredients and stir with a sturdy wooden spoon. (A Danish whisk works wonderful for mixing this dough and can be purchased online very inexpensively.) Stir vigorously until all flour is incorporated. This will only take a minute or two.
- Cover bowl loosely with plastic wrap or a kitchen towel and allow to rest at room temperature until dough rises and collapses (or flattens on top), anywhere from 45 minutes to an hour. (It could take a little longer if your kitchen is cooler.)
- While the dough is rising, take a 3-4-quart pot**** (with or without a handle******) and place on top of a piece of parchment paper. Trace a circle, slightly bigger than the bottom of the pot. Cut out circle and set aside.
- Sprinkle the bottom of the pan with 2 teaspoons of flour. Spread out with your fingers if needed. Fit the parchment circle into the bottom of the pan and sprinkle another teaspoon of flour over the paper. This will keep your bread from sticking to the pan and parchment paper. Set pot aside aside.
- Place ¼ cup flour on a dinner plate. Spread with your fingers to cover surface of plate with flour.
- After dough has risen and collapsed, dump it out onto the floured plate. Flip several times to thoroughly coat dough with flour.
- Shape into a smooth, flat ball by stretching the surface of the dough and tucking it underneath with the palms of your hands, rotating a quarter of a turn as you go. Dust with more flour from the plate as needed to prevent stickiness, but don't try to incorporate a lot of extra flour into the dough.
- Preheat oven to 400˚F.
- Transfer the ball of dough to the prepared pot and cover with lid. Let it rest for 30-40 minutes or until doubled in size.
- Remove cover and sprinkle top of dough lightly with flour.
- With a sharp knife make parallel cuts, 1 ½ inches apart across the top of the loaf. You can also cut an x (or just make little random cuts with a kitchen shears all over the top of the bread for a fun whimsical look.)
- Place pot in oven with cover on. Bake for 30 minutes, then remove cover and continue baking another 15-25 minutes, or until bread is golden brown.
- Allow to cool on a cooling rack, uncovered for 15 minutes. Remove bread by inverting onto a cooling rack. (If bread sticks to pan at edges, use a sharp knife to loosen any areas that are stuck.) Cool bread, right side up.
Notes
** You can make this bread with entirely all-purpose flour. The whole wheat flour makes the loaf a bit more rustic. If you want to use all whole wheat flour, check out the Artisan Bread in 5-minutes website for adjustments that need to be made.
*** I use warm tap water. It should feel fairly warm to the touch but not so hot you need to pull your hand back.
**** Don't worry about the depth or width of the pot. As long as it will hold 3-4 quarts, you'll be fine. If it's a deep pot, your bread will be smaller and taller. If the pot is shallower and has a larger circumference, the finished loaf will be larger and not as tall.
***** If using a pot with a handle, be sure it's oven-safe to 400˚F.
I like to slice the bread then place it in a zip lock bag. You can pull out a few slices at a time or, for a wonderful dinner bread, place the whole loaf back into the same pot you used to bake it. Cover the pot and rewarm in the oven for 30 minutes at 350˚f. The bread will be wonderful crisp on the outside with a soft and chewy center.
Shop Our Café Loves
We’ve gathered our favorite kitchen tools, tableware, and entertaining treasures in one place, the Café Loves store. It’s a wonderful spot to find something special for yourself or the cooks and hosts you love!


This is the best artisan bread recipe ever!! We make it 3 times a week and my 4-year-old son won't eat any other bread. I use the bread machine (dough setting) though, because I'm terrible at kneading. It comes out perfect every single time! Thank you so much!
Great to know! Thank you, Clara!
This bread recipe is spectacular! I made it today exactly as directed to accompany Thanksgiving dinner (except I left out the optional herbs and used active dry yeast). Absolutely rave reviews. We are so looking forward to making it again! Thank you so much!
Awesome! Thank you, Kim!
OMG this turned out perfect and can't wait to try different herbs. Thank you for this wonderful recipe.
I'm so glad! Thanks, Diane!
Hi, instant yeast or active yeast? The tutorial/recipe looks very easy.
Thank you
Hi Carol, I use instant yeast.
all of the artisan bread recipes tell you to pre-heat the dutch oven or large pot then put the dough in but you do not say to do that. Just wondering why? I am intending on trying your recipe this weekend.
Hi Diane, it's not necessary for this recipe. You could do that but this one comes out nice and crisp without that step.
Is it ok to leave it to rise in the final stage for several hours?
Yes, but then let it warm up a bit before baking. Enjoy!
Thank you. I left it to rise in the baking dish, on the counter, until time to bake. In the oven now and smells so good. Thank you so much. Blessings
Thank you so much for sharing this recipe, the bread turned out amazing. ❤️🇨🇦
Yay! That's awesome, Maggie! Thanks for sharing your results! 💕
I love this recipe! I am the head cook of a camp and always make this bread to go along with stew. Of course I have to more than triple the recipe because the kids love it! I've baked it in large rectangle aluminum pans with lids (lined with parchment like the recipe recommends) and this last time I made a "log" of aluminum foil under the parchment so as to make 2 long loaves in one large pan. Great results every time! Making a loaf for home as I write 🙂
Wow, I wish I would have had a cook like you at camp! You are definitely spoiling them (in such a fun way) 🥰 Thanks so much for sharing your review, Jennifer!
Dear Scott and Chris. I messaged you back a few years ago about this fab bread recipe. My name is Sherie. Boy, you have just a few more fans since then. I am so happy for you both. You work so hard to bring us these great recipes. I started making bread again, and last night, instead of sleeping, all I could think about were you both. I remembered saying to you I had people waiting at the gate with money in their pockets, it smelt soo good. Tasted even better. I wanted to go to the kitchen at 2am to bake bread. I resisted, just. I would like to tell you again, I have had the same success with your recipe. Thank you for sharing your knowledge and time. I made a vow to bake one recipe from your collection every day. I love you both so much and I do hope you and your beautiful family are all safe. Hugs from Sherie Rodrigues in Australia. 🥰🤗
Thank you, for writing, Sherie! Greeting all the way to Australia! Hope you are safe and doing well.
I’m so happy you’ve enjoyed our recipes and appreciate your kind thoughts and wishes.
Kind regards,
Chris 💕💕
Can I bake this on a pizza stone?
Yes, that would work!
How long would u say u kinda kneaded dough in ur hands.b Until it was smooth all the way around? I turned maybe 5-6 turns. Tasted good, maybe add a little salt and next time I will try whole wheat flour. Hubby liked it
You did it just right, Beverly! I'm happy you enjoyed it!
It was fun to bake ! Result was puzzling, and maybe you can send advice. Followed recipe exactly, added fresh rosemary. Loaf looked great and had a good rise, texture and fragrance. I might have underbaked slightly.
However, it tasted bland, desperately needed more salt and some flavor. Has anyone added additional herbs, salt, nuts?
Hi Becky, you can defintely increase the salt and rosemary, to taste. It's always good to follow a recipe precisely the first time and then adapt to your taste.
Fantastic recipe! I used all all-purpose flour and added rosemary and dehydrated garlic slices and it was delicious. Thank you!
Thanks so much, Lisa! I'm so glad you enjoyed it. Your version sounds wonderful!
Hi There! Thank you so much for sharing all of your delicious recipes! I wonder if I am doing something wrong - I've tried this one a couple of times and it's not working for me. I wonder if my kitchen is not warm enough? Do you think I could let the dough rise maybe in a 100 degree oven instead? My dough didn't seem to rise enough, and it wasn't very sticky after it did do its little rise. It seemed to separate as well, not really stick together when I was kneading it afterward. Any advice you can think of would be awesome! I will definitely keep trying it because it is too tempting to not, especially if I can end up with an amazing loaf of bread at the end 🙂
Hi Samantha, sometimes yeast can be a little tricky. That's why I've switched to instant yeast in many of my newer posts. It's so much easier to work with.
To answer your question, yes you could definitely try the oven. Sometimes I just preheat the oven for 1 minute, then turn it off and leave the light on. This makes a great place for proofing bread dough. Another option is to boil a cup of water in the microwave for several minutes. Leave the water cup in there and add your bowl of dough. It makes a nice "steamy" environment that yeast loves.
I burned myself bc this looked so good right out of the oven! I'm on my third slice and seriously reconsidering my low carb diet. Thank you for this recipe and the step by step tutorial. They made it easy to succeed!
Hi Sam, I never like to laugh at someone else's misfortune but your comment made me laugh right out loud! I"m so happy you've enjoyed the bread. Thanks for taking the time to share your results!
Hello, can I use bread flour for this recipe?
I thought this was going to be time consuming but it worked out great. I had laundry and other chores to do around the house as well so coming back to my baking was a nice break
I added an extra tablespoon of olive oil and some fresh rosemary. Smells delicious! New family favourite.
Yay! So happy you had good success with this bread, Carrie. Thanks for sharing your results!
This is a great recipe, came out really well apart from the bread sticking to the paper. Next time I'll grease the pan and flour it rather than use the paper.
Thanks, Mim! So happy you enjoyed it! You can also spray the parchment paper a bit which will solve the problem!
I tried this again the other day greasing and flouring the paper and it still stuck. Making it again today and just greasing the pan instead line I normally do with bread.
Hi Mim, I have sprinkled a little flour on the parchment and that worked well.
What herbs do you suggest?
Rosemary is delicious as is thyme. But you could also use a little garlic and some oregano for a fun twist. Basil and sundried tomato would be great too!
Just made this loaf today. I've been making okay bread for years, but never quite managed the perfect crusty loaf, this is easily the best I've made yet. Needless to say it won't last long in my house!! I'll be making it again for sure.
Wanted to attach a photo, but I can't. 🙁
Yay! So happy you enjoyed it, Rob. I'd love to see a picture of your bread. You could send it via email.
Being the poor college student I am, I dont have any pots that are oven safe. However your recipe is the best I've found yet. Would a 9"x3" metal circle cake pan work with the same technique?
Hi Lydia, I don't think that pan would work for this recipe as it's not heavy enough and wouldn't have a cover but you could definitely use it for this recipe: https://thecafesucrefarine.com/ridiculously-easy-focaccia-bread/
It's wonderful!
My granddaughter (age 5) and I made this today. It is delicious and she is so proud. Thanks for your detailed instructions. It was so simple to make. Thanks for sharing.
That's just awesome! I love it!!
Hi. I don't have a round pot that big.
You could divide it in two and make it in two smaller pots.
I'm confused. In the intro you said everything gets tossed together, then in the directions you proof the yeast in water before adding to the other ingredients. Please clarify. I'm not an accomplished baker.
Hi Marilee, technically you can just throw it all together. I do like to spend just a few minutes proofing the yeast to ensure good results.
Just came across your site. First question, could this be baked in a cast iron skillet covered with foil? Second question, could this dough be divided in half and baked in bread pans?
Thanks
Hi Cris, I think you could do the skillet if it was deep enough. I honestly haven't tried it in bread pans, but I know this one works in bread pans and it's actually easier: https://thecafesucrefarine.com/ridiculously-easy-rosemary-bread/
Enjoy!
Do you actually cover the pot to bake? Seems it wouldn't get brown and cristy?
You do cover it Pat - and then remove the cover just for the last 15 minutes. It comes out perfectly golden brown!
The very best artisan bread Ive made so far, hubby is demolishing it !!!
Awesome! Enjoy and grab a bit for yourself! 🙂
Would this fit into a rectangle loaf pan? Or would there be too much/enough to make two loaves? Im not sure i have an oven safe pot to use.
Can I use this bread dough to make baguettes?
I've just discovered this recipe and it seems to be exactly what I'm looking for however I wanted to ask if it would be okay to use a casserole dish with lid rather than a metal pot?
Thank you!
I think that would work Jedda.
I have a QUESTION
I am disabled and don't have much upper arm strength (still love cooking/baking!)
Can I use the whisk on my stand mixer if I keep it on low?
Hi Rachel,
Definitely!
Hi Chris, love your recipes, they are always delicious and easy to follow. I have made this bread several times and it's very good. Can I substitute bread flour for the all purpose white flour?
This is fantastically delicious bread. I have made it twice and will be making 2 loaves today. Company coming for dinner.
The second time I made this it raised so high it almost touched the top of the pot. Also, it stuck to the sides. Now I put a strip of parchment around the inside too.
LOVELY BREAD INDEED. YUMMY.
Thanks for sharing.
Darlene
Thanks Darlene, great tip!
Hello there! Thank you for the wonderful recipes. I am new at cooking and baking, and your guidance and inspiration has allowed me to gain confidence in cooking for my family. I am new to baking bread, so I have a question. I do not have a pot which I can put in the oven. Can I make this on a pizza stone?
Regards,
Mirah
Did you ever try it? I have same question
Hi there. I just recently started following your blog and, first of all, I want to thank you for sharing such wonderful recipes and tips with us. I have truly appreciated all I have learned. I do have a question. I am new to baking bread and I want to try this recipe, however, I do not have a pot that is oven safe. Can I bake this bread on a pizza stone or an aluminum baking sheet? I would appreciate any guidance.
Cheers,
Mirah
Hello Mirah and welcome to The Café! I haven't tried that bread without the pot but you might want to use this recipe. You don't need a pot and it's a easy, delicious bread recipe: http://thecafesucrefarine.com/2016/11/unbelievably-easy-artisan-rolls/ You could make two loaves instead of rolls.
Chris, thank you for this wonderful bread! I was hesitant to try this recipe because my last few no-knead loaves have been inedible doorstops. However, with a new tin of yeast I persevered and the result is an impressive golden loaf that I'm so excited about! I find it hard to believe that so little work, and not even leaving the dough overnight as some recipes do works SO well. I've just eaten several slices warm and they are delicious. I substituted spelt flour for the whole wheat.
Oh Sarah, that warms my heart that you enjoyed the recipe. Yes, yeast can be challenging and that's why I've always loved the 5 Minute Artisan breads - they work!
This bread recipe sounds delicious and I do have to try it. I was wondering where I could buy the tool that
You used.
Hi Sandra, here is a link for the tool: http://amzn.to/2cyTVtK
Chris, have you ever made this bread recipe using a Bread Cloche?
I don't have one Mendy. If you try it, let us know how it turns out!
Hello! First time using my Lodge 3 qt. for bread. Used rye flour in place of wheat (none left), honey in place of sugar, and herbs of thyme and rosemary. Rose nicely first 2 times, but not much in the oven? Smells awesome with uniform crumb, but disappointed with rise. Great, easy recipe!
Kathleen, the rye flour may have been too heavy for this recipe.
Post bread making comment 🙂
Found your site and love the recipes. I made this last night. Amazing bread! One slight change. I don't use granulated yeast. I used fresh yeast I buy in block and freeze in usable chunks. I used 10g frozen.
One other slight change was that I used a sponge base baking tin about 10in across. I lightly gear and dusted with floor. Baked at 200C for 20. Dropped to 180 for 15 as it looked like it would burn.
Apologies for the slight change but the basics are the same :).
Welcome to the Café! I love your adaptations. That's what makes cooking fun!
Its so dissappointing to see each and every commenter comment before they even attempt to
make the bread. I would have liked to read comments AFTER people try making the bread to get
some idea if it worked for them.
Thank you Christine for taking the time to leave a comment. I totally agree with you, I often decided whether or not to make a recipe depending on the reviews of others. I'm wondering though, if you neglected to scroll through all the comments above. When a recipe first comes out, there are often lots of comments from others based on the appearance of the food. After it's out for a while and people actually make it, then there will be more practical and useful reviews. If you take a bit of time, I think you will find what you're looking for as there are lots of people who have made this bread with success. Hope you do too as it's a wonderful, easy technique and a delicious recipe. Kind Regards, Chris
can you use instant yeast
I wouldn't use instant yeast Judi. Baking is a pretty exact science, as I'm sure you know, and it's better to just stick with the recipe. Thanks for your comment!
Is it supposed to be 3-2/3 total flour? or are you supposed to substitute 1 cup of wheat flour for a total of 2-2/3 cups.
Hi Jake, the total should be 3 2/3 cup flour. That includes the white and wheat.
I would love to try this bread! I'm a little worried about my pot. What kind did you use? How did you cover it? I have a metal Dutch oven with a glass lid. Would the lid break in the oven? Just curious. Thanks! 🙂
Hi Meredith, I use an AllClad with the cover that goes with it. As long as your Dutch oven says "oven-safe" you should be fine.
What brand and size of pan did use that is in the photos? Can't wait to,try your recipe. Love, love bread!
Hello LaDonna, my pots are AllClad. Hope you enjoy it!
I made this delish bread tonight. It looks amazing. The taste was great but def needed it more salt. :/
I will make this bread again....
Thank you!!!!!
Thanks for a super easy but super good bread recipe! I came across your blog last week whilst searching for some new bread recipes. Since then I've made the bread 4 times, it's a real hit with all the family. I've used a mix of strong white bread flour and wholemeal with pumpkin seeds. I've also tried mixing the dough the night before and doing the first rise in the fridge overnight. The second rise took a bit longer, about 1.5h at room temperature (pretty chilly here in England at the moment!) but the taste and texture was wonderful! Thanks again from my family, they're loving having fresh bread rather than shop bought!
Jan, your letter made us smile! Scott and I love everything England, since our daughter and family live in London. We are headed there at the end of October. Follow us as we go across the pond to the place we have grown to love! Love your modifications and creativity on the bread recipe!
My first attempt at bread, 5 star recipe, it was delicious with a beautiful light but substantial texture, text book perfect bread (and I know, my mum is a master) it was so good it got shared at thanksgiving dinner and everyone loved it!
Thank you from a grateful beginner
I am so glad you enjoyed it Amanda!
Just made this recipe for the first time - with some Rosemary from my garden. Fast, easy and delicious!
We love the 5 minute recipes William. They are so good and versatile too!
After looking at many overly-daunting bread recipes, I decided to try this one as my first bread-baking attempt EVER. You made it so so easy! Thank you for the clear instructions and big, nice photos. My husband and I loved it!!!
Only thing I would say is maybe you could clarify what "granulated" yeast is. If there are any other baking novices (like me), it might be nice to know what that means. I spent 20 minutes googling "granulated yeast" and could only find people specifying active dry vs rapid rise/instant yeast, so I just crossed my fingers and hoped for the best. Luckily, the loaf was amazing! Again -- I am a total newbie at "real from scratch" baking, so maybe everyone knew what that meant except for me 🙂
Morgan, that is so cool that you tried it and it worked first time! Way to go! We've got tons of bread and baking recipes here at the Café, so dig deep into the index and you'll find a number of 5 minute bread recipes, as well as some other "short-cut" breads that are delicious. That's a good point about the yeast, switch out the word granulated, for "active dry" and you've got it. I'm going to take it out of the recipe on the blog too - it can be confusing.
Thank you for this recipe! I just checked out the AB5 book and didn't have all the equipment to make their bread, plus I wanted just the one loaf for my family of three. Your recipe was wonderful and I can't believe how good the bread is. I used 1 tsp of dried rosemary and thought it was perfect. Thank you so much! I'm now on a quest to play around with this recipe to make it all whole wheat using your technique. But while I work on that, I'm not an experienced baker by any means, this recipe will be my go to bread recipe!
Thank you for the kind words Nadia. I am so glad you enjoyed it.
My first loaf of this bread yesterday. Half gone. This is truly a wonderful bread. I am making another loaf today with garlic. Thank you for sharing this. I paid $4.00 for this gbread last week. Thought I would look for recipe and here I fround your web site. Thanks a bunch.
Daughter is cooking us dinner for our 62nd Anniversary and will surprise her with this delicous bread!
Hi Maxine,
62 years? Wow, that’s certainly worth celebrating! Congratulations, hope your dinner was lovely 🙂
Thanks for sharing your results with the bread too, so happy you enjoyed it!
Hi!
Love this beautiful recipe. I was wondering what kind of herbs you used?
Thank you.
Hi Tiffany,
I love to use rosemary and thyme but basil or oregano are also delicious.
I made this tonight (minus the herbs) to go with our meatloaf supper! I also tried a new recipe for potatoes au gratin, which took a bit longer than I had planned! My husband was starving, so I brought him a nice slice of the piping hot bread, slathered in butter, with a drizzle of local honey. He just kept saying, "I love my wife!" LOL!
I plan on making it again soon using the herbs this time.
Just made this bread today today. Outstanding! I have made ABin 5 which is good but this boule is super good! Crust stays crisp and light and crumb is light and fluffy. (Not gummy). Could it be the addition of oil and sugar? Anyway, you have got to make this bread.
Thank you for this great recipe!
Thanks Bianca, so happy you had good results. We love this bread and I do think the oil and the small amount of sugar make a difference.
many thanks Chris for the helpful advise re my question to you. it is a great help to have the metric weights for flour, as I am an avid user of scales! It is good to know a le creuset type of pot will do as good a job. GOD BLESS YOU
gLORIA
It does look great. I'd like to know how much gr you used of each ingredient, thanks.
First of all thanks for your reply.
The bread is very delicious.
I had difficulty with the amount of yeast , perform the preparation twice without success.
As I made bread before, decided to increase the amount of yeast and I was fine , yeast made bubbles and when the mass was well levo rest.
Add a total of 25 grams of instant yeast and use only plain flour ( do not use flour ) .
I would love to send you the photos of my bread , or let me invite you to visit my page where climbed instagram photos of bread. https://instagram.com/pilypr/
Many successes with The Café Sucré Farine .
Yours Truly
PILY
Pd ... am using a translator because I do not write the English .
En español:
Ante todo gracias por su respuesta.
El pan es muy delicioso.
tuve dificultades con la cantidad de levadura, realice la preparacion dos veces sin exito.
Como he realizado panes anteriormente, decidi aumentar la cantidad de levadura y me fue bien, la levadura hizo burbujas y cuando la masa estaba en reposo levo muy bien.
Agregue un total de 25 gramos de levadura instantanea y utilice solo harina normal, (no use harina integral).
Me encantaria enviarle las fotos de mi pan o permitame invitarle a visitar mi pagina de instagram donde subi las fotos del pan. https://instagram.com/pilypr/
Muchos exitos con The Café Sucré Farine.
Atentamente
PILY
Pd... estoy utilizando un traductor ya que no escribo el ingles.
Making my second loaf of this recipe, easy to make and delicious to eat. Would like the crust to be crispier and will put water in a pan and try a bit of steam. Otherwise that once baked it won’t last any longer then the first one I made.
Glad you enjoyed it!
did you use active dry yeast. I've never made bread and I'm totally intimidated! My grocery store has two types of yeast. I think one is called instant yeast
I am using Active Yeast now (but its a year old so crossin fingers) waiting for the first rise. I will let you know how it goes but its not rising much yet 45 minutes in.
So I was looking at this recipe again tonight. I made this last week and it was amazing. I didn't see the first time around about letting it rise a second time. I"m assuming that's a vital step and will probably make the bread more fluffy than it was? I mean It was great the way it was and everyone wanted more.
So happy this turned out well for you. Yes, it would probably be a bit fluffier if you let it rise the second time 🙂 But you never know, maybe your family would like it better without that rise 🙂
I am new to this website and love it, just wondering if there is a way to print the recipe without printing all the review's
which is about 12 pages. Thank's for your wonderful recipes! Liz
Hi Elizabeth, you should be able to just click the Print button and just get the recipe.
I've made this recipe probably 5 times in the last two months and it is da bomb! The whole family loves it and it is sooooooo yummy! I actually used the herb version and made our Thanksgiving stuffing with it and it was such a hit I've been asked to make it again for christmas! Lol Today I am going to attempt to makeit into sub rolls for meatball subs for dinner. Wish me luck!
Hi Christina,
Thanks so much for letting us know how much fun you’ve have with this bread. I love hearing from people like you. It makes my job worth while 🙂
I’m actually making the bread today too but I’m making it into dinner rolls. I just shape it into small round balls and put them on a a cutting board that’s been covered with parchment. I let them rise, then make a slit in the center with a sharp knife, then slip the whole parchment onto my baking stone which is hot in the preheated oven. I use a little sprayer a couple times and spray some water into the oven as they start to bake. This gives them a super crisp crust, just like the one you bake in the pot. I’ve heard that European bakeries use steam injected ovens to make their bread so crisp out the outside. They come out wonderful and everyone goes crazy over them with a bit of honey butter 🙂
Hope you have a lovely holiday and happy baking!
This is the best bread I've ever eaten and made. Glorious. So soft. Nice texture. Easy recipe. I urge you to try this it's fabulous.
Thanks so much Melanie!
hi,
i tried this but my bread is dense any tips
where did i go wrong?
Hi Tan,
The only things I can think of is that your kitchen might be cool and it would need to rise a bit longer or that perhaps your yeast had lost it's life.
I'm making this right now! I'll let you know how it turns out!
Been making bread this way for about five years. It is the best. Roast a head of garlic, take off the skins, and put the whole cloves into the bread. You'll think you've died and gone to bread heaven.
Yum!
I am making this bread right now, but my next attempt needs to be with the roasted garlic! Thank you for the idea.
That would be wonderful Becky!
beautiful loaf of bread. ! gorgeous and easy!!
Thanks for this wonderful recipe! Who would have known bread could be so darn easy to make? I am making a loaf as type this!
Thanks again!
p,s, I cheated and used my Kitchen-Aid with bread hook. Easy peasy!
Absolutely beautiful, my friends 🙂
great seeing you at FBF!
A gorgeous bread and such beautiful pictures. Love this post.
Beautiful-that bread looks so good, and your step by step photo essay is absolute perfection. FAbulous work, and I just want some of that bread right this second!
I've never tried any of the artisan recipes because, honestly, I'm afraid to crank up my oven temperature to 500F. Thanks for this recipe, now I can have an artisan bread at home..
Melissa gave me his first cookbook and I just pulled it off the shelf again.. She was making this bread all the time and did have room in her fridge to store the dough. We made it once together but I never did it again. Now that my USFS rangering duties are done for the Season, I will have time on my hands to finally try some recipes and techniques and answer the "Will this work in the high altitude" question?. Although I can buy beautiful bread in this area, I still want to give this a go.
Oh I love this. I've made the artisan bread where you preheat the pot to 500 degrees and then plop the bread in. I have broken one cooktop taking the hot pan out of the oven and nearly burning myself. I LOVE the idea of not having to risk melting my skin to get beautiful bread. This is SO mine!
I love this bread, especially with the herbs in it...looks fantastic!
Have a wonderful week 😀
thanks for the tutorail, it definately helps !
Hi again..the pot you use is it 3 or 4 qts:)Thanks..:)
This recipe for bread has completely changed my attitude to bread baking. The loaf comes out perfectly and looks like I could have purchased it in a upscale bakery. I have the same tool for mixing the dough and it works like a charm. Your tutorial is excellent, Chris, and a good reminder of what a great recipe this is.
It's me again : I went on the "Artisan bread in 5-minutes" website and I saw something necessary to make their bread, called "vital wheat gluten (or vital wheat gluten flour)". Do you know if this is available in France (or in Europe), and if so, do you know the french translation ? I don't know that product... 🙁
Hi Elké - you only need the vital gluten if you're making bread with entirely whole grain flour.
I can find it at the local bio coop store in central France. Ours sells bagged flours of all sorts and this gluten in the same section. In another area of the store, they sell fewer kinds of more 'typical' flours (T65, T80, etc.) in large containers where you scoop out the amount of it you want. In other words, you might have to look in more than one place in your bio store before you find it.
This does look easy! And good. I gotta tell Mrs KR -- she's the bread baker in our household! Scott's pictures are always good, but these are exceptional. Good stuff -- thanks.
Awesome tutorial... My husband and I were thinking to make homemade bread. I can use your recipe for sure!!!
I was so impressed the first time I made this bread too Chris. I think you got me started on it actually. There really is nothing better than freshly-baked bread is there? Oh how I love baking bread!
I love baking bread and I will try your recipe this weekend:)
I'm always terrified of making bread! but I think I could attempt this!! Thank you for such a great post and the step by step pictures - fabulous!
Mary
I'll be making this soon. I can't pass up good artisan bread. Thanks for the step by step, Chris.
Thank you for this wonderful post. I love the detailed instructions and beautiful pictures. This bread looks delicious and i plan on making it very soon and i will report back. This is something i plan to give as a gift along with a pot of soup this fall when someone is recovering from an illness or surgery. I am following your website now too. Anyway, praise all the way around. Appreciate you!
Thanks so much, hope you have great results.
I do also make a very simple and quick-to-make bread (5 minutes to prepare/12 hours (a night) to wait before baking), but yours seams really wonderful. I'll try it... tomorrow !!! Thanks a lot,
Chriss, for sharing this recipe.
Your bread is absolutely gorgeous and what a great tutorial! Love that Danish whisk too - it makes mixing high-moisture doughs so easy!
What a beautiful loaf of bread!
Hi Chris, very impressive recipe, I pinned, printed and saved this,. Love that it only makes 1 loaf and your tutorial is wonderful, thanks for this!!!
Chris, I have made 5 Minute so many times, but I love your tips. This dough is so wet that it is not always easy to manage. Thank you for that little extra to help manage a great recipe.
Scott, your photos make me feel like I am right there. So nice.
M.
I must try this.
I took a tour at La Farm this summer and Lionel totally poo-pooed the quick bread-making methods. He's a bread genius so of course he would. I really don't have the time or patience to make bread the way he does so I either need to be OK with spending the money on his and/or try this method.
Thanks for sharing!
You sure know how to make a gal hungry right before bedtime!! I haven't made one of these artisan breads in over a year...it's time to break out the yeast again!!!
Amazing look bread and great tutorial
Love AB in 5, and your website. I look forward to your recipes and beautiful photography. Do you think I could use whole wheat pastry flour instead of whole wheat flour?
Thanks for your reply.
Linda
Yep, I've been make ABin5 bread for years too and hope any one on the fence will give it a try-they'll love it! Your loaf is beautiful Chris:@)
I'm making this tonight, Chris. It looks absolutely amazing. Thanks so much for doing the legwork and reducing the recipe down to one load. While we'd probably make short order of all three, it makes more sense to just make new, fresh loaves one at a time. 🙂
This bread looks wonderful! I love the addition of freshly chopped herbs...thanks for sharing!
One of the most gorgeous 5 Min tutorials I have seen.
Kudos you 2..
I need me a dough thingie like u..and I want a lame too:)
I sent one to a friend of mine and she really likes it..
Little wish lists ..Nothing huge:)
ABSOLUTELY love this technique!! I will be trying this and pinning this!
Gorgeous artisan bread, Chris. Thanks for doing the tutorial .
gonna be a making this soon can you use a cookie sheet to cook it on i do not have a pan that goes in oven vicky
Oh my gosh, my mouth is watering! This is without a doubt the most beautiful loaf of brad have ever seen! So then who would guess that it did not take all day to make, fabulous!!! Please push me a slice through the screen, I will wait...
Gorgeous - absolutely beautiful loaf of bread. The texture looks amazing. Nothing makes me happier than a yeast bread coming together and rising to a glorious loaf! Bravo - give me a plate with some good olive oil and a sprinkle of Parmesan - I could be very happy right now!