This post may contain affiliate links. For more information, see our privacy policy.
These Microwave Salted Caramels are crazy delicious homemade caramels you can make in less than 15 minutes! Everyone who tries them, begs for more!
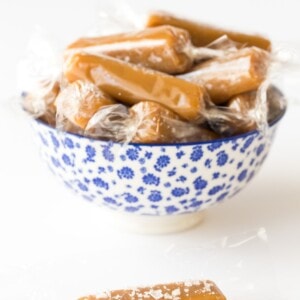
If you've ever wanted to be famous it may be closer than you think! In fact, all you have to do is pull out a bowl. Make sure it's microwave safe. Grab some butter, brown and granulated sugar, dark corn syrup, condensed milk and vanilla. That's pretty all it takes to make a batch of these microwave salted caramels and you'll be on the road to famous!

The only other thing you'll need is some flaky sea salt. If you can splurge a little bit, pick up a box of Maldon. It's a wonderful sea salt from Maldon, England, located about 50 miles north of London. It's more expensive than regular or kosher salt, but it's totally worth it. Maldon is not the kind of salt you want to use for everyday cooking, but rather as a "finishing salt". So a little goes a long way, which means your little salt indulgence will last a long time.

What's a finishing salt?
Well, pretty much just what it says; a salt that's used on finished foods. Or for finishing food. Like these 8 Minute Microwave Salted Caramels. A little sprinkle of flaky sea salt adds an over-the-top, gourmet touch to these over-the-top delicious caramels. Maldon has large, but parchment-thin, irregular-shaped crystals and a delightful crunchy texture. It's the fastest dissolving of all salts so, despite the wonderful texture, it literally melts in your mouth. When using flaky sea salt, take a pinch and crush the crystals between your fingertips letting the little flakes fall on salads, bread, pasta, meats, fish and ... caramels!

If you've ever made homemade caramels you know that it's not a walk in the park. The instructions are generally long and involved and you need to take precautions so the mixture doesn't crystallize and/or burn. Cooking too fast can cause the butter to separate, and you can easily go over the recommended temperature, resulting in rock hard caramels. This microwave technique, in contrast, is super simple. Combine the ingredients, microwave, stir, microwave again, then check for doneness. That's about as tricky as it gets.

So back to where we started with "becoming famous". Honestly, once you make these caramels, it won't take long. They're creamy, buttery, sweet, salty and addictive. Of course, there's the assumption that you'll share them. When you do, you'll be sure to get requests for more. And that's not a problem since they're so darn easy. Pretty soon your family and friends will be calling them ____'s (fill in your name) caramels. See what I mean? Famous.
If you think I'm spoofing you about how easy they are, just check out our video:
See what I mean, easy peasy, right?
The only thing that will take a bit of time with these caramels is wrapping them. But you can make that fun by eliciting family and/or friends for a little party. Call it a (w)rap party and who knows who might show up! How do you wrap these little morsels of deliciousness? There are lots of options. You can cut your own wax paper, use precut wax paper, cut your own parchment paper or use precut candy wrapping papers like these clear cellophane wrappers or these twisting papers.
Make this buttery, sweet, salty irresistible confections soon! And if you decide to share them, keep lots of butter, brown sugar, corn syrup and condensed milk in your stash. Your fame will spread faster that you can say 8 Minute Microwave Salted Caramels!
Scroll Down for the Recipe - or Save It to Your Inbox
We’ll email you the recipe so it’s easy to save, print, or share.
8 Minute Microwave Salted Caramels
Ingredients
- 6 ounces butter , I use salted butter
- ¾ cup dark corn syrup
- ¼ cup granulated sugar
- 1 ¼ cup packed dark brown sugar
- ¾ cup sweetened condensed milk
- ¼ teaspoon salt
- 2 teaspoons vanilla bean paste or vanilla extract
- flaky sea salt, I love Maldon
Instructions
- 1. Spray an 8-inch square pan with cooking spray then line with parchment paper so that two two ends extended over two edges of the pan. Spray the parchment with cooking spray also. Set aside. Prepare a small bowl of water with a few ice cubes and set aside.
- 2. Place butter in a large microwave-safe bowl* and cover with a paper towel. Cook on high power for one minute. Butter should be mostly melted. Add corn syrup, sugars, sweetened condensed milk and salt and whisk well to combine.
- 3. Cook on high power for 7 minutes. Remove and give mixture a quick stir then check for doneness by placing a bit (a small spoonful) of the caramel into the prepared bowl of ice water. It should form a soft, pliable ball. If it needs a little more time (it doesn’t form a soft ball), return to microwave and heat in 15-20 second increments, till soft ball stage is reached. Mine was done at right around 7 ½ minutes but time will will vary a bit based on the wattage of your microwave. You can also check with an instant thermometer which should register 240-242˚F (240˚ will yield a softer caramel and 242˚ firmer. Carefully remove bowl from microwave (it will be hot - that’s why I love the Pyrex with the handle). Add vanilla bean paste or vanilla extract and stir with a heat resistant spatula until foaming subsides.
- 4. Pour mixture into prepared baking dish. Allow to cool for 10 minutes then sprinkle top lightly with flaky sea salt (I like Maldon) If you sprinkle with sea salt right away, the salt will melt right into the caramels rather than sitting on the top. Allow to cool for 3-4 hours or refrigerate until completely cool and set. Cut into rectangular pieces (I cut into rows about ½-inch wide and then cut each row into three equal pieces). A pizza cutter works wonderful for cutting caramels. Wrap in rectangles of wax paper, parchment or pre-cut candy wrappers and twist on both ends.
Notes
Nutrition
Shop Our Café Loves
We’ve gathered our favorite kitchen tools, tableware, and entertaining treasures in one place, the Café Loves store. It’s a wonderful spot to find something special for yourself or the cooks and hosts you love!


These caramels are so easy to make and so is the clean up! I decided to pour them into silicone candy forms. They are little squares. I love nuts in my caramels, so I put walnut pieces in each little cup. My arm got tired of pouring, but I just traded arms for a while. If you add the nuts, be sure to tap the forms on the counter to get any air bubbles out. I put my silicone forms on a baking tray. The caramels pop out of the forms very easily. I intend to dip at least some of them in chocolate. I only had the light corn syrup, but they are still very delicious!
Awesome! Thanks for your review, Melissa!
Good morning Chris,
I made these caramels yesterday and the flavor was delicious but I have a couple of questions: maybe I used the wrong amount of butter (12 Tbsp.?) or something else went wrong? The microwave took almost 12 minutes before I poured it into my 8” pan and I couldn’t remove them from my pan to cut—the waxed paper tore when trying to lift it out. Also the waxed paper stuck to the bottom of the caramels! I was so frustrated by this time I couldn’t wait to ask you what I could’ve done wrong.
They were difficult to cut and very greasy. Maybe I sprayed too much PAM on the pan and waxed paper? I had to turn the cut piece on its side to cut off a sliver of caramel to make sure the waxed paper wasn’t still on the bottom. I noticed others had the same issue so I need your suggestions/help what I possibly I did wrong.
The flavor was the best and I’d like to make another batch but need to know first what I could do differently.
Many thanks for any help you can give me; it’ll be greatly appreciated!
Susan
Hi Susan, I'm so sorry you had trouble with this recipe.
Did you use parchment paper or wax paper? Wax paper won't work - you'll need to use parchment paper.
From what you describe, it also sounds like it cooked too long - that would make it hard and the butter could also separate. You might want to try using an instant thermometer - the temperature should be 240-242˚F.
Hi Chris,
Please make label for these similar to your pumpkin ones.
Thanks,
Hi Jim, I don't have a label for these caramels at this time.
Hi! My family has a corn intolerance, so the corn syrup is out. Could it be replaced with Golden Syrup? Agave? Thanks!
Hi Wendy, the corn syrup is to prevent crystallization. You could sub Golden Syrup plus a teaspoon or two of lemon juice.
How long do you suggest waiting before adding the salt on top?
Hi Mary, cool for 10 minutes and then add the salt (step 4). Enjoy!
Have you ever made these carmels with a little jalepeno heat?
I have not, Mary. Let us know if you try it!
I KNOW my friends are going to go crazy for these - but I was wondering if I could add cocoa powder (or...?) to make a chocolate version? I have zero candy making experience so would hate to waste ingredients trying if it won't work/isn't possible.
In my mind I envision these as written, plus chocolate & chocolate espresso versions.
And visions of sugarplums danced through her head... 🙃
Here's hoping it can be done 🙏
Thanks!
Yes! I think you'll love this recipe, Terry- https://thecafesucrefarine.com/easy-salted-chocolate-caramels/
What is the purpose of the water and ice cubes set aside for???
To check the stage of the caramel, i.e., "soft ball" etc., TO determine if the Caramel has cooked long enough. The "old method" of testing in candy making!😉
I have made these several times now and they are the best!! So simple, they really hit the spot!
Yay! Thanks, Wendy!
Hi Chris
I tried these today. It hardened properly when kept in the refrigerator for setting ( about 4 hours ). But when i started cutting them into pieces for wrapping, they turned very soft and lost their shape by the time I finished the batch. Is this how its meant to be? Does it have to be stored in the fridge ?
OH! the taste was simply divine . Thank you for sharing the recipe
Hi Sheila, no, they shouldn't have to be stored in the refrigerator. I have kept them at room temp for several weeks with good results. It's hard to say without having been right there in the kitchen with you but I'm wondering if yours needed to be cooked just a a little longer?
Same thing happened with me. I checked at 7 minutes and 7 minutes 20 seconds. A "softball" was acquired and I thought they were done. But...when left out at room temperature they were too soft(but delicious held in a spoon to eat, lol!) Clearly they needed to be cooked closer to "hardball" stage, then poured up. My guesswork is closer to 8 minutes total. I'm thinking of dipping these in chocolate, having been chilled beforehand. And...making a new batch to wrap. They will be like the chocolate covered caramels in candy boxes...melt in your mouth deliciousness! Thank you for another wonderful recipe, Chris!
Thanks for your review, Peacetou!
These were delicious. Not sure if they are supposed to be very soft i may have not cooked them enough. I put them in the fridge to harden up a bit. So delicious though and ill keep making these. Friends have already asked for the recipe ill be sending them over to your page as well. Thank you
Thank, Nikki! They shouldn't be hard but should hold their shape. I'm so happy you enjoyed them!
Absolutely delicious homemade caramels. I couldn’t stop eating them! Little pieces or big, yum! I’d say these are the best I’ve had. Thank you for sharing.
Melissa
That's awesome, Melissa! Thanks for sharing your results!
I tried these caramels and they are amazing and easy. I am going to try to use this for caramel apples. Have you tried it and is there any reason you see that it may not work to dunk an apple into the bowl and let it harden with toppings?
Hi Anna, I haven't tried this caramel with apples. I would think it should work but I can't say for sure. Let us know if you try it.
Chris,
Just wanted to share that my husband and I made this last night, and my staff at work gives them a 5 star rating! I used light corn syrup because I assumed we didn't have the dark, so you may imagine my frustration mid-way through when my hubs let me know that in fact the dark corn syrup was in the pantry all along! Anyhow, results are absolutely fabulous. I had unsalted butter only, but next batch will contain with the ingredients you have specified. BTW, we used 1 teaspoon of vanilla paste and one teaspoon of homemade vanilla that has been aging for 5 years! We are looking forward to sending these to family in Tennessee and North Carolina! You are amazing!
Thanks so much, for sharing this great review! I know your family will love them!
Thank you so much for sharing this terrific recipe! My daughter (she’s 9) and I had so much fun making these as Christmas gifts. They are sinfully rich and delicious. I’m sure they will be our new most requested Christmas treats year after year! Cheers to you and yours! And thank you for your blog!
You're welcome, Jennifer. I'm delighted that you enjoyed these caramels! How fun to start a tradition like this with your daughter!
Any suggestions for the leftover sweet condensed milk? Or can you freeze it?
Thanks
Hi Sheryl, yes you can freeze it. Just transfer it to a storage container. It won't freeze solid (because of the high sugar content) but it will keep well in the freezer for 2-3 months.
Could you also use this recipe to cover them in chocolate? Or,
would they be too soft?
Just made these easy caramels! They tasted amazing but I had a hard time cutting them. They stuck to the parchment paper! Did I not cook them long enough?
I'm not sure without looking at them. Are they too soft or did they just stick to the paper? You could try refrigerating them and then peeling the paper off. I'm sorry you had this problem. Mine peel right off of the paper.
At my first go at it I think the caramel wasn’t hard enough. When I took out the parchment to cut it on my board- it was slowly melting. I had to oil the knife between cuts. I gave up! It will be a yummy caramel sauce!
The ingredients are cheap enough to do a redo
Sorry you had trouble, Mimi! Hopefully, the second try will be better!
This may be a silly question, but could you recommend a good wax paper? I've tried this recipe several times and, while delicious, it refuses to budge from the paper. I tried a new brand, I even tried spraying it with cooking spray before pouring in the caramel. I've had to resort to cutting slivers off the bottom to remove it. Please help?
Hi Luna, I like to use a good quality wrapper that's made for caramels like these: https://amzn.to/2lVwMYl
They don't stick and will last a long time.
Thank you. But I meant a wax paper to line the pan with. I found some good pre-cut wrapping papers for them that work well and don't stick, the problem I'm having is while they're still in the pan. Before cutting or wrapping. I'm sorry I wasn't clear.
Hi Luna, I use parchment paper for these. I really like the Kirkland brand. You can get it at Costco but I believe Amazon also carries it.
I tried these and they are amazing (and very popular). I only went to 240 degrees and they were pretty soft so I'm going to try a little higher. Question: Have you made these on the stove top? I"m guessing it's a similar process. While I like the convenience of the microwave, my tiny one isn't good for much more than warming up food so it took me closer to 15 minutes in the microwave; so I think the stovetop might be easier. Please let me know what you think.
And if you're willing to share how you made that great video let me know. It's on my "do one day" list for http://www.bakerchef.co
Hi Cindy, so happy you enjoyed the caramels. I would definitely go a bit higher next time with the temp. As far as making them on the stovetop, I have made stovetop caramels, but with a different recipe. I haven't tried this method on the stovetop. If you have specific questions regarding the video, we'd be happy to respond and help you. It's been a learning experience for us, as well and we're happy to pass on anything we know 🙂
The caramels are delicious - I love how soft they are! Found cellophane wrappers at Hobby Lobby and small candy bags to gift them with. Do you have labels for the caramels?😁 Thank you
That's great, Kayc! We do not have labels for these at this time.
These are dangerously easy and I'm sure I'd eat my fair share while wrapping them!
Wow, this is so yummy looking, Chris. I used to be such a caramel fan when I was a kid but haven't had it in ages. My little nephews will be coming for Easter and they sure would like this treat. Fabulous!
What dreamy caramels, I love how quick and easy this method is to get my caramel fix. 🙂
Can't wait to try these - - - what is the wattage of your microwave?
These caramels look luscious! Easy sounds great to me! I've never wanted to be famous (paparazzi are such a pain), but I would risk it with these. 😉 I have had a treasured box of Maldon salt for several years. A little does go a long way! Have you ever tried a little Maldon sprinkled on top of a grilled cheese sandwich? A whole new level, I promise!
The microwave is perfect for things like this! For years we only used our microwave to reheat things, but when it comes to making caramel or melting chocolate, it's the perfect tool. Great for making fudge, too. Anyway, super recipe -- thanks.
Yes, Please! I think these could be dangerous but oh, so delicious. Can't wait to try them, Chris!
8 minutes??? I am in serious trouble!!
8 minutes?! I've gotta try these Chris! My girlfriends from college LOVE homemade caramels! When we all get together I always bring treats! Can't wait to try!
LOVE this recipe! So easy and I would definitely not be able to only have one.
I think you've won a lot of hearts with this one, Chris! 8 minutes for caramels? Too cool.
Oh yes! This is dangerously easy 🙂 I love it and I can't wait to try it.
I can't wait to try this. I've made caramels for years but it's 45 min or more of constant stirring. They're wonderful but I rarely make them. I love your microwave caramel sauce so I'm sure these will be amazing too.
Oh we would love this at our house! So easy and they look perfect. Thanks for sharing and have a great week!
I love cooking with the microwave, I make microwave peanut brittle, so now I need to try these caramels, what a fun and easy holiday gift, too! Love your video!!
Thank you for the easy and delicious recipe. Could you convert these to chocolate caramels? if yes, how much chocolate would you stir in?
Thanks Beth. I haven't tried chocolate caramels but I would probably start out with a 4-6 ounces of dark chocolate.
Your videos are adorable..music and all..nails:) Crisp blouse..perfect accoutrements.
Lovely Chris:)
These salted caramel look so felish... I could eat the whole thing all by myself. I am a caramel lover!!!
I make microwave caramel sauce all the time so it shouldn't be a surprise that caramels can also be made in the microwave. Thanks for doing all the testing so that I can sit back and reap the delicious reward! xoxo, your fellow partner in caramel and toffee love