This post may contain affiliate links. For more information, see our privacy policy.
Making soft, chewy, chocolate caramels, the kind you find in the expensive gourmet shops, is much easier than you think! And you can make this heavenly sweet confection in less than an hour!
Back in November, I made a list of recipes that I wanted to share with you this month. A salted chocolate caramel recipe was NOT on it. But I woke up night last week in the wee hours and couldn't go back to sleep. I got up and read for a while and then (surprise, surprise) got in the mood to cook. I'd run across a recipe for chocolate caramels and couldn't resist trying it. We already have a delicious (and super easy) recipe for regular caramels but the thought of chocolate caramels was intriguing.

I'm surprised Scott didn't wake up because within thirty minutes a wonderful chocolate-caramel aroma was wafting through the house as the little sleepless elf was stirring, stirring, stirring at the stovetop. Within 45 minutes I was finished with a pretty pan of salted chocolate caramels cooling on the countertop and sleepy dust beginning to finally settle on my eyelids.
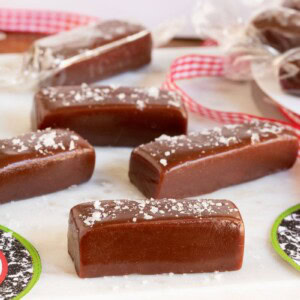
In the morning I was delighted to see that the caramels had set up perfectly, not too soft, not too hard. And when I went to cut them, they were soft and pliable, but kept their shape nicely. The only thing left was the taste test.

You might frown on me, but I served Scott his breakfast that morning with a little taste of caramel on the side. But you have to realize, this is our job. And we do it for you, haha!

Well, we both concurred that the chocolate caramels were definitely blog-worthy. They're soft, chewy, with fabulous chocolate caramel flavor - and definitely worth adding to the December blog roll!

Stir, stir, stir
Yes, you do have to be attentive when making these chocolate caramels. That being said, you don't have to be stirring continuously. It's just important to be in the kitchen and give the mixture a good stir every couple of minutes.
How do you know when you're done?
Making caramels can be a little tricky when it comes to knowing when the simmering mixture is done and ready to transfer to the pan. Cook it too long and the results are hard caramels that are difficult to bite into. Cook it too short and the resulting caramels are gooey and sticky.
But that's a problem that easy to solve. A good quality (but inexpensive) candy thermometer makes consistent caramel-making results super easy! I really like this digital thermometer as it actually has a little alarm that beeps when you're getting close to the finish temperature.
How to cut caramels
Now that you've made this beautiful pan of chocolate caramels, you need to cut and wrap them. Let's talk about cutting first. I like to put the caramel pan in the refrigerator for 10-15 minutes. This firms up the caramels a bit so they're easy to remove from the pan without distorting the shape.
Choose a long, sharp knife and spray it with cooking spray. When the caramels have cooled a bit in the refrigerator, remove them from the pan with the parchment paper extensions. I like to measure and score the surface of my caramels before cutting to ensure even pieces. You can decide if you want squares or rectangles. I like a rectangle that's about one half inch thick and about 2 inches long. I've found that a classic metal tape measure is almost perfect in width for my caramels.

Once the caramel is measured and scored, cut it along the scored lines with the prepared knife. Press the tip of your knife into the side of the caramel farthest from you and draw the knife towards you, cutting quickly and evenly.

How to wrap caramels
Once the caramels are cut, it's time to wrap them to keep them fresh and from sticking together. Some people like to use wax paper, others like parchment paper. Personally, I really like these clear cellophane wrappers. The caramel doesn't stick to them, they show off the candy and they twist nicely.
To wrap each caramel, place a wrapper on a work surface. Place a caramel in the center of the wrapper. Fold the bottom of the wrapper up over the caramel, then start rolling the caramel toward the top end of the wrapper. Twist the ends several times and repeat with the remaining candies.

A wonderful gift!
There are caramel lovers and chocolate lovers out there but these Salted Chocolate Caramels satisfy both of those sweet tooths. Scott dropped off a little carton of these caramels to a friend of ours who owns our local wine shop. His wife is a graduate of the Culinary Institute of American so this guy knows good food!
He sent a text to us later that day:
"Oh. My. Gosh. These are absolutely the most delicious candies I have ever eaten!!!!"
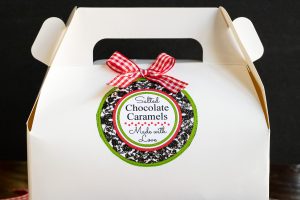
We created a gift label to make giving these chocolate caramels a little more fun and festive.
Get your free printable labels...
Enter your name and email above to receive an instant download, plus printing tips to get you started. You'll also receive fresh recipe inspiration from The Café... easy, elegant recipes and ideas to enjoy and share.
I like to use the cute little boxes pictured above. They come in a pack of 25 and are reasonably priced. I like to line the bottom with some pretty tissue paper then add the wrapped caramels and finish off with another piece of crushed tissue to keep the caramels from wiggling around.
Make these caramels asap!
If you've got an hour to spare (or wake up one night and can't sleep), make a batch of these delicious salted chocolate caramels. But beware! Your family, friends, neighbors, anyone you decide to share them with will be begging you to make them again and again!

Café Tips for making these Easy Salted Chocolate Caramels
- This recipe calls for "good quality semi-sweet chocolate chips". When you're making candy, using good quality ingredients will ensure delicious results. I use Ghiradelli 60% Cacao for this caramel recipe which can be found at most larger grocery stores in the baking section.
- I really love these heat resistant spatulas with a sturdy wooden handle. I have 8-10 of them and find that I use almost all of them every day. They feel good in my hand and are useful for stirring hot mixtures like these chocolate caramels but also for mixing up cakes, bread, cookies, etc.
- When making these chocolate caramels, keep the mixture boiling at a steady roll. You want to keep it boiling but don't allow the boiling to creep up the edges of the pan.
- You'll need a candy thermometer for this recipe. I left a link for the one I like in the post above. If you have an older candy thermometer you may want to check it to ensure that it's still accurate. To do this, simply boil a pot of water. The thermometer should read 212˚F when the water boils. If your thermometer is a degree or two off from the boiling point of 212°F, you'll need to subtract or add the difference to the recipe's final cooking temperature. For example, if your thermometer reads 210°F in boiling water, you'll want to cook the candy to 238°F, not 240°F. If your thermometer is more than a few degrees off, it's time to buy a new one!
- You don't have to stir this caramel mixture continuously but stay in the kitchen and give it a good stir every few minutes, scraping the sides and bottom of the pot. I've learned to hold onto the top of the candy thermometer when I stir so I don't dislodge it from the pot and make a mess on my stovetop.
- When the thermometer reads 23o˚F, that's when you'll want to stay right at the stovetop as the temperature can rise quickly at this point and also this is the point where you want to stir continuously to prevent burning.
- When you reach 240˚F, remove the pot immediately from the heat, give the caramel mixture one more stir, then pour it into the prepared pan.
- Be sure to wait 10 minutes as instructed in the recipe before adding the sea salt. Otherwise, the salt will just disappear into the hot caramel mixture.
- The recipe calls for flaky sea salt. I'm a big fan of Maldon Flaky Sea Salt. It's a delicious finishing salt which means it's not used for everyday use but rather to add flavor and a little crunch to finish dishes. I keep a little bowl of Maldon on my countertop and use it every day. It's more expensive than regular or kosher salt but a box will last a long time. To use it, just grab a pinch between your thumb and forefingers and rub them together to break up the large flakes a bit.
- One last little tip. It's important to line the pan that you pour the caramel mixture into with parchment paper. Make sure that the paper extends over the long edges of the pan. This will make it easy to remove the cooled caramels from the pan without destroying the shape. To keep the parchment in place I use a few small binder clips attached to the top of the pan.

Thought for the day:
Where can I go from your Spirit?
Where can I flee from your presence?
If I go up to the heavens, you are there;
if I make my bed in the depths, you are there.
If I rise on the wings of the dawn,
if I settle on the far side of the sea,
even there your hand will guide me,
your right hand will hold me fast.
Psalm 139:7-10
What we're listening to for inspiration:
If you enjoyed this recipe, please come back and leave a star rating and review! It's so helpful to other readers to hear other's results and ideas for variations.
Scroll Down for the Recipe - or Save It to Your Inbox
We'll email you the recipe so it's easy to save, print, or share.
Easy Salted Chocolate Caramels
Ingredients
- 2 cups packed brown sugar
- 1 cup light corn syrup
- 14 ounces sweetened condensed milk
- 1 cup butter, I use salted
- 1 cup good quality semi sweet chocolate chips
- 2 teaspoons vanilla
- for sprinkling flaky sea salt
Instructions
For the prep:
- Spray a 9x13-inch baking pan with non-stick cooking spray and rub to coat (the bottom and the sides of the pan) with a paper towel. Line the pan with parchment paper with 2 sides of the paper extending over the long edges of the pan. Spray the parchment lightly with cooking spray. Set the pan aside on a hot pad or cooling rack.
For the caramels:
- Combine the brown sugar, corn syrup and sweetened condensed milk in a medium-size (3 quart) heavy gauge saucepan over medium-high heat. Bring to a boil and cook for 10 minutes, stirring frequently.
- Add the butter, chocolate and vanilla. Stir well to combine. At this point attach a candy thermometer to the side of the pot. Make sure the tip of the thermometer is not touching the bottom of the pot.
- Continue cooking, maintaining a steady boil and stirring every few minutes. (I like to keep my hand on the top of the candy thermometer when I stir so I don't knock it out of the pot with my stirring.)
- When the temperature reaches 230˚F begin to stir the mixture continuously to ensure that it doesn't burn.
- Continue to cook and stir until the candy thermometer reads 240˚F. Immediately remove from the heat and pour the the caramel mixture into the prepared pan. Smooth to an even layer.
To finish:
- Cool for 10 minutes, then sprinkle with the flaky sea salt.
- When fully cool, refrigerate the caramels for 10 minutes. (This will firm up the caramel a bit and make it easy to remove from the pan.)
- Use a small sharp knife to loosen caramels if needed from the short ends of the pan. Lift the caramel slab out of the pan and onto a cutting surface. Lift up the caramel and remove the parchment paper.
- Spray a long sharp knife lightly with cooking spray. Cut the caramels into squares or rectangles. Wrap with cellophane wrappers or cut parchment paper and twist the ends. (See the post for more details on cutting and wrapping.)
Notes
Nutrition
Shop Our Café Loves
We’ve gathered our favorite kitchen tools, tableware, and entertaining treasures in one place, the Café Loves store. It’s a wonderful spot to find something special for yourself or the cooks and hosts you love!


I’ve made these several times in recent years and they’re always a hit. I like to make and give food gifts during the holidays, so these are perfect. Please share more easy and special recipes for treats good to gift, things like these caramels that not everyone else makes. And I would appreciate having the labels. Many thanks.
Thanks for the review, Machrina! So glad you're enjoying the site!
Love to have the labels...and the wrappers, but Amazon says no delivery until Dec 23-28....no good, guess I'll be using parchment squares! !!
Hi Kathy, these will also work: https://amzn.to/4psYqq5
Hi again, Chris! I'd love the pdf for the labels, please.
And of COURSE I have a question. Did you use light or dark brown sugar when making these caramels?
The link for the cellophane wrappers took me to a blank page. Totally black screen - absolutely nothing on it. Hmm. 🤔
Hi Terry, I use dark brown sugar. I will check the link, thanks!
Hi Susan,
I think you could, but I would have to do some testing to give you "for sure" advice.
Happy Thanksgiving!
I apologize for this message today and hope you and your family are enjoying today!
I’m going to make your 8 minute microwave salted caramels and would like to know if there is any way I can use the microwave recipe to make chocolate caramels? I’d like to make the smaller batch but am wondering if I add cocoa or espresso powder would work?
As always, I appreciate any help you can give me.
Blessings to you, always! 🙏
Susan
May I please have the labels for the Chocolate Caramels? Thank you!
They look wo delicious and I can hardly wait to make them and give as gifts!
Thanks, Judy! Sending them your way.
I made these caramels last week, and they turned out perfect thanks to your very detailed instructions! I ended up with over 100 caramels, and have given some away as gifts with rave reviews. Can I please have the labels?
Thank you for an excellent recipe!
Wonderful! Thank you for the review, Barb!
Please send labels. Is there a recipe for chocolate caramels that uses the microwave oven like the salted caramel recipe ? These make wonderful homemade gifts. Wishing you all the blessings of Christmas. We appreciate all of your wonderful recipes. Thank you
Thank you, Andrea! This is the only chocolate caramel recipe on the site. We are happy to send the labels.
Can you send me the labels? I love making your gifts!
May I please have the PDF for the chocolate caramel labels? Thank you!
Sure, Carlos!
May I please have the labels? Thank you.
Sure, Sheila!
Please may I have these labels? Thanks.
Sure, Phyllis!
May I have the labels please?
Sure, Mary!
I just ordered everything I'll need to make these for holidays gifts
Please send me the labels
Thank you!
Sending them your way, Vonda!
please send labels - these look too good to eat -well, maybe just one or two
Many thanks and God Bless
Sending them your way, Glynis!
Thanks for another great recipe! Please send me the cute labels.
Sure, Bobbie!
Please send labels! Thank yo!
Sure, Bonnie!
I would love the labels, will be making these for my son and fdil wedding favors
Sending them your way, Angie!
I would like to make these chocolate caramels as Valentine's gift for the guys at work. Please send me the labels.
Sending them your way, Michelle!
May I please have a label. I look forward to make these for Vday. Thank you!
Sending them your way, Maryann!
Thank you Chris for sending the labels for the Easy Salted Chocolate Caramels. Another thing to make for Super Bowl.
Kathy
Sending them your way, Kathy!
Looks great! Mine are cooling now. They will be a Valentine’s gift for our grandson. Labels, please?
That's great, Diane! Sending them your way!
Hi! So excited to make these. Could I please have the label? Thx
Sure, Liz!
OH boy, another great holiday gift! Please send the labels.
Sure, Toni!
Oh I can't wait to make these! Please send the labels - they're so cute! Thank you!!
Sure, Kimberly!
Please send the labels for these. I can’t wait to make them! Thank you!
Sure, Teresa!
Please send the adorable labels for these out of this world caramels! My husband LOVES them and I want to share.
That's great, Jennifer! We will send the labels!
I love all your recipes, please send labels!
Sure, Gina!
I plan to make these for friends. Please send labels.
Thanks so much -
Melinda Kacal
Sure, Melinda!
Would love to have the labels for these delicious carmels !
Thanks
Sending them your way, Tina!
I want to try these chocolate caramels! Please send me the labels.
Thank you! Peggy
Sure, Peggy!
I would love to have the labels for the Easy Salted Chocolate Caramels, please! These sound absolutely delicious!
Sending them your way, Pati!
Please email me the printable label.
Thank you
Sure, Linda!
Do you think these could be made in the microwave similar to the other microwave caramel recipes?
I haven't personally tried making this recipe in the microwave but it should work.
I would love to make these for friends and family please can I have the label
Many Thanks
Sure, Sharon!
Hello, I would very much like to make these delicious looking caramels for family and friends this Christmas. Please send me the download of the label. That will definitely be nice touch!
Sending them now, Virginia! Enjoy!
I am going to make these beautiful caramels for my friends. Please send me the labels. They are wonderful!
Sending them your way, Kathleen!
I think my friends and neighbors (not to mention, me) would love these. May I have the labels, please.
Sending them your way, DoLee!
I’ve made these..easy and good. I’d love to now have the labels. merci.
Thanks, Kathryn! We will send the labels!
I’m anxious to try this recipe. Looks great. Please send the label PDF. Thanks for the labels & recipe
Sending them your way, Toni!
Can't wait to make these for gifts. Love your recipes!
Please send me the adorable gift labels.
Mille mercis.
Sending them your way, Connie!
I am making these for Christmas gifts. They look so good!! May I have the labels along with the link for the cellophane wrappers please? Thank you.
Sending them your way, Jennie!
Can you mix sea salt into the carmels rather than just sprinkling on the top? If so at what point would I do that
Hi Howard, you could mix sea salt in with the other ingredients but you would be missing the delicious little crunch as the salt will melt into the mixture.
Can I use heavy cream instead of sweetened condensed milk?
I, that will not work.
My son loves anything caramel.
It will be a lovely gift.
Please send me the labels.
Thank you!
Sure, Julie!
Great recipe! Love salted caramels. Please send the labels; thank you!
Sure, Sherry!
This caramels looks delicious , the trick with the bider clips to hold the parchment paper, Genius!!
I would love to have the labels, thank you.
Sending them your way, Monica!
These taste really good but I had trouble with the butter separating and I couldn’t totally bring it back together. I poured it into the pan anyway and it seems to have absorbed into the caramel. Do you have any suggestions for me to prevent the separation for my next batch?
Also, I would love to have the labels. Thank you!
Hi Diane, try stirring vigorously at the very beginning to incorporate the butter.
Please the labels, thank you so much.
Sure, Jim!
Kingdom of the Sweet Tooth is nondenominational . Spare the psalm and cult vibing christian new age music links.
Thanks for your thoughful comment, Johnny. Hope you enoy the recipe.
Please send the labels for the Easy Salted Chocolate Caramels.
Sure, June!
Please send the pdf for the labels. These look yummy. Thank you
Sure, Catherine!
I would love to receive the labels for these yummy looking chocolate caramels please. Thank you
Sure, Merry!
The caramels sound delicious! Please send the printable labels. Thank you!
Sure, Beverly!
Please send the pdf labels for the Easy Salted Chocolate Caramels. Also, thank you for the link to the cellophane wrappers.
Sending them your way, Jeannie!
Yummy. Labels please.
Sure, Dotti!
Hi Chris. These caramels look fantastic. Please send me the labels.
Sure, Christy!
Delicious and straightforward recipe.
I’d love the label please! Thanks!
Thanks, Catherine! Sending them your way.
Hi Chris - these caramels look fantastic. Please send the labels.
Sure, Suzanne!
Could I get the label please, I want to make these for gifts? Love your recipes.
Sure, Cathy!
Would love the label!
Sure, Melanie!
Making these for the holidays. They look delicious, May I please have the labels? Thank you!
Sure, Sheila!
I'd like to give these chocolate caramels. If they turn out well, I'll need the PDF gift labels soni can share them with friends! Thank you.
Sure, Phyllis!
Oh yum!! I’d love the labels for these little bites of heaven!
Thank you!
Sure, Pam!
Please send labels! I love your site!
Sure, Jeannie!
Please send the labels for these caramels, which look fantastic! I have already got a "stash" of vanilla sugar and Tuscan sea salt for gifts....this is my next project. Thank you and Happy Holidays!!!
That's great, Diane! We will send the labels.
I would LOVE the labels for these chocolat4e caramels and the walnut fudge. Thank you SO much, Chris. What a delightful post - all wonderful holiday recipes.
Sure, Sunny!
Would you please send me the labels? The candies look delicious. Thank you!
Sure, Julie!
Hello Chris- if they are still available, I’d love a copy of the labels please. Thank you
Sure, Beth!
Are you still emailing labels? If so, I'd love some. My dad is turning 80 next Tuesday and I know he'll love these caramels. Thank you so much for the recipe! P.S., have you ever dipped them in dark chocolate before adding the salt?
I haven't tried that, Sara. Let us know if you do. We will send the labels your way!
I am making these and the walnut fudge for my sister, sons, hubby, and biker group for Valentine's day. Love the box suggestion. Please send labels for caramels and walnut fudge. Thank you for your wonderful recipes and the pur joy of your blog.
Sure, Linna!
Chris...Everyone LOVED these carmels...they are absolutely the best!...ISo easy to make and so delicious. If you had a 10 star rating these would be rated a 12 !
Awesome! Thanks for letting us know, Linna!
Can't wait to make these chocolate caramels! I have been making caramels for many years, but never chocolate. Sounds and looks fantastic. Would love to have the labels. Thank you so much
Sure, Jane! Enjoy!
More fabulous recipes. Would love the chocolate caramel labels and chocolate fudge labels. THANKYOU!
Sending the labels your way, Lyn!
These look delicious and great for gifts. Please send the labels.
Thank you for sharing your recipes and notes and labels. It is much appreciated.
Sure, Linda!
Can’t wait to make these! Would love to have the labels. Thanks!
Sure, Bonnie!
We are definitely going to make these chocolate caramels. Your recipe looks delicious
Please email me the labels.
Sure, Jackie!
I would love the labels, please!
Sure, Laurie!
Chris, could you please send the labels for the delicious chocolate carmels? I need to make these!!
Sure, Ruth!
I’ve Been making salted caramels in the microwave for years, but will try this temptation..and your helpful tips for the whole process..esp Eclove ur wrapping and boxing ideas. If labels are still available,I’ll make good use of them this year! Thank you ever so much
That's great, Barbara! We will send the labels.
Dear Chris,
Please send the labels for the chocolate caramels. They look delicious!
Sure, Sue!
I’d love the labels, please. I’ve ordered Weck jars, your suggested boxes, and ribbons. I’m ready to roll.
Awesome! Sending them now, Elaine!
May I please have the labels? I have to make these this afternoon. Thanks
Sending them now, Donna!
Actually we went a little crazy and made a second batch of these. That batch got dipped in chocolate and then salted the tops before the chocolate was too set. My-oh-my were these good with the chocolate coating. I mean, how obsessed do you have to be to take something that is drop dead delicious and then amp it up a few notches. Not sure if enough of these are going to survive to get boxed up for gifts. Thanks Chris and the new inches on my hips thank you too.
Haha! I'm so glad you enjoyed, these, Lynn!
I NEED to make these soon, then I will obviously NEED to taste them before I gift them. Probably several of them... Could you please send me the label pdf? I enjoy your site - cooking and praising God at the same time - perfect day!
Sure, Jodi! So happy you are enjoying the site 🙂
these are wonderful. Would you please send me the pdf for the labels.
Thanks, Lynn! Sending the labels your way!
Please send me the label pdf.
Sure, Mary!
I just found your website today and am having so much fun looking through it! I would love the PDF of the caramel label. Thanks!
Glad you found us, Linda! We will email the labels!
Hi
May I have a copy of the PDF please?
Sure, Mary!
First time I ever made homemade candy! Oh my gosh! Delicious!! I Followed the recipe exactly and carefully monitored the temperature. I can’t wait to give these as gifts! Thanks for sharing this recipe! It was pretty easy too!
Thanks for sharing your results, Kelly! I'm so glad you had success with this recipe!
Can hardly wait to make these. Please send labels
Sure, Marg!
These look amazing and I love the label. Please send the file. 💗💗
Just sent them, Alice!
Great recipe. I would love PDF label
Sure, Karen!
Love the recipe. May I please have the PDF for the labels? Thank you.
Sure, Anna!
I just tried this and the microwave 8 minute caramel recipe. Both are delicious,but the microwave recipe was so much creamier, no crystallization. Have you tried a microwave version of the chocolate carmel?
Hi Eileen, I haven't. Chocolate caramels will have a little different texture because of the chocolate.
Hello Chris - I am excited to have found your food blog and look forward to making these caramels. I would greatly appreciate a copy of your sweet labels. I am also planning to make the danish apple cake, which looks wonderful. I'll keep you posted on how it goes! Happy new year, with thanks, Nancy
P.S. I also love the beautiful food photography on your site!
Thank you for the kind words, Nancy! I think you will love the caramels and apple cake 😊. The labels should be in your email.
This recipe is a must try and I would love to have the pdf labels emailed to me as well.
Thanks again,
Debbie
Hop you enjoy these caramels, Debbie. The labels should be in your email!
I've just discovered your website. Your restaurant and food would fit right in my old home town, Ojai, CA. Earth, classy, unique and delicious. Love your recipes. I'd love a label for the Shortbread cookies and if you can make one, for the caramels, as well. Thanks in advance. Robin Haney
Thanks, Robin! I've been to Ohai, such a pretty and fun little town! We'll be happy to send the labels, enjoy!
I am excited to try these caramels. I am not a candy maker, but I would love to learn. I would also be happy to have your label PDF. Thank You!
You're welcome, Margie! Hope you enjoy the caramels and the labels!
These caramels were wonderful and so very easy. They will go on my routine list of gifts to make for friends! Thank you.
Awesome! Thanks for letting us know, Jessie!
Made these yesterday as part of our Cookies & Candy making day. Absolutely delicious! We made salted caramels two weeks ago and decided to make the chocolate version today. Very easy to follow recipe too. Thank you!
I made these to give as gifts, and received lots of rave reviews! All the caramel recipes I've seen have you add the vanilla after the desired temperature is reached, and the heat is turned off. I noticed this recipe has you add the vanilla much sooner. Do you have any thoughts on whether it makes a difference to the finished product? Thank you for sharing the recipe. Yum yum!
These look wonderful. Please send me the pdf to attach. Thank you so much.
Love this recipe! I hope to make them soon! Please send me the PDF the labels. Thank you.
Merry Christmas!
Can't wait to make these...would love the labels.
Just sent off my Christmas Goodies to my kids...they will be enjoying the Rosemary Pecan crackers along with
all of the other traditional Christmas Sweets..
Thank you..
These would make delicious gifts! Would very much appreciate the labels. Thank you!
We'll be happy to send them, Rowena!
They look delicious and decadent. I would love the labels. Thank you and happy holidays.
The labels should be in your email, Renee! Enjoy!
What perfect little surprises for the mail carrier, the paper boy, my favorite librarian, the snowplow guy, and oh yeah, my husband!
Please send me the PDF for the labels. I better get in the kitchen.
Yes, they will be great! Enjoy!
Chris -
Would love a set of these labels please (just after asking for a set for the butterscotch cookies too 😕 ).
Thanks in advance from -25C Alberta. Brrr
No problem, Terry! Just sent them.
Hi, Chris, I think these caramels would make a big hit with the neighbors (and us). Please send the labels! I confess that I can't make fudge so let's see how I do with the caramels.
Sending the labels now, Doris!
Please, i would love the labels. Thanks
Sending them now, Charles!
Hi Chris,
I am going to make the Carmel’s this morning, they look so amazing. This is my first recipe from your site which I just joined. I would love to receive the labels as well.
Thank you so much and have a wonderful Christmas!
Dianne
Hello, Dianne and welcome to The Café! Hope you enjoy the caramels. The labels are on the way!
I would love the labels, thank you. My kids all love caramels and these look perfect. (We are friends with Jackie and John (from Crystal Lake). I believe we have met before. My daughter Hannah and Hillary were friends in high school. Love your site.. such beautiful food and photos! Laurie
Aww, any friends of John and Jackie's are friends of us! That's so cool that your daughter and Hilly are friends. Thanks for your kind words. We'll be happy to send the labels!
Hi Chris, I too would love the PDF labels for the caramels. I look forward to trying these. Merry Christmas to you and your family. Stay safe and God bless.
These look awesomely delicious! Please send me the PDF for the labels. Thanks.
Sure, sending them now, Barbara!
Hi Chris, thank you so much for all of your recipes & stories! I'd like to try making these, would you mind sending me the PDF for the labels? Thank you so much!
Hi Melanie, we'll be happy to send you the labels!
Chris, I read through this whole recipe and it looks delicious but you know how you really get me? You post scripture from Psalm 139, for goodness sake! And then you tell us that you're listening to Canyons so I go to my music app and I find it and listen to it. Now Cory Asbury is on my favorites list. You did that, Chris! You enrich our lives in so many ways. God bless you at Christmastime and all through the coming year!
Thank you, Theresa 💕 I appreciate you very kind words! I just recently discovered Cory, so good!
great addition to my caramel addiction. Thx. Would love to have the labels, also.
Sure! Sending them now, Mary!
Haha, I know what you mean, Mary! Sending them now.
Jyst in time for Christmas, and I can't wait to try them. Please send me the PDF for the labels. Thanks.
I would live the pdf of the labels! Thank you for another great recipe!
Hi Chris, I am looking forward to trying these. Everything that I have tried has been wonderful. One question, where do I find cellophane to wrap these in? Also, I would love the PDF for the labels. Thank you!
Looking forward to making these and would love the pdf labels.
This looks wonderful. Am ordering the wraps now. Would love for you to send me the sticker template. Thanks so much.
The wraps are great! We'll get the labels off to you now, Shannon.
Love chocolate caramels. Please send me pdf labels. Thanks!
We'll be happy to send the labels, Janelle!
Hi Chris,
If this recipe is as well-liked as the pumpkin-spice Rice Krispie bars then you will have another hit! My kids loved it. I’d love those labels.
Thanks, Shelly
That's awesome. I think they'll like these as much! The pdf should be in your email shortly.
I would love your PDF and instructions.
Thank you!!!!!
You're welcome, Fran. Sending them now!
Yes, please, send the PDF for these beautiful labels. These are already on my list of must make for the holiday!
Great! They're on the way, Nancy!
Chris, these look yummy— what a treat! Would love your label pdf. Thanks so much!
Peace and joy to you and yours,,
Millie
Hi Millie, I'll be happy to send the labels!
I am so eager to try making these! Your detailed instructions are so helpful! Would love a pdf of the labels too! Thank you and God bless!
Thanks so much, Marlene. Hope you enjoy the caramels. Will get the pdf off to you now.
I can’t wait to make these. I love all your recipes, especially the “easy” ones. Please send the pdf for the labels. Merry Christmas to you and your family.
Thanks, Peggy and Merry Christmas to you. Sending the labels now.
This looks marvelous as always, Chris. May I please have the pdf for the labels? Thanks.
Thanks, Linda! The pdf should be in your inbox!
I have many caramel lovers in my family! I would love to the the PDF for the labels! Thank you!
Ah, they will love these and you will be very popular! Sending the pdf now, Peggy!
Would love the PDF labels as I will be making these today. Thank you for your lovely site.
Sure, they're on the way, Jackie. Enjoy!
I would love the labels please! Thank you
Hi Wenda, you're welcom, they should be in your email!
Can't wait to try this recipe. May I have a copy of the labels please?'Thank you
Hope you enjoy it, Gwen! The labels are on the way!
I would LOVE the labels for the salted caramels, Chris!
Sure! Sending them now, Sunny!
Hi Chris,
I was on your site looking for the peppermint fudge recipe and found this on the front page. I want to make this sooooo bad and I'm a diabetic. . . . but hey, it's Christmas, one won't hurt, then I'll give the rest away.
First of all, can I please have the Label pdf for this recipe and the mint fudge recipe?
Second, I want you to know; a friend turned me on to your website and it has been like a breath of fresh air on the internet. I started reading when you guys were headed to North Carolina to do your freedom yell on Dave Ramsey. I was in his class at the same time, so that meant a lot to me.
I lost my wife 7 years ago from breast cancer and I have always wanted to have a magic day during Christmas where my kids and I could make fancy cookies and candies that we could do in a day. I have never done this since Linda passed. But today, all the kids and I are having a magical Christmas Day with most of your recipes. Thank you, for what you do, your blog has gotten me very excited this year and I'm finally going to do what I've always wanted to and recreate a baking day that Linda would have. I have tears as I write this, You and Scott (great name by the way), have really moved me this year. Thank you, and God Bless both of you!!
So nice to hear from you, Scott! Wow, what an awesome day you planned for your children. I know there will be some wonderful memories made!
I'm so happy you have enjoyed the website and our recipes and I appreciate your kind words!
I'll be happy to send you the labels. I'm smiling thinking of you all cooking together!
Chris,
Can’t wait to try these. I have made so many of your recipes to share with others for the holidays, so it will be fun to add this one.
I didn’t notice the link for the digital thermometer. Could you send along with the labels.
Thank you and Merry Christmas to you and your family!
Gayle
Thanks so much Gayle, I've added the link to the post. I appreciate you letting me know, somehow it slipped out. We'll be happy to send the labels. Merry Christmas to you too!
I would like a copy of the PDF for these labels.
Sure, they're on the way, Linda!
These look delicious, but I can't decide whether to make these or your regular caramels!
I'd love to have the pdf of the label-thank you!!! Merry Christmas to y'all-your blog brings me joy!!!
Haha! That is a hard decision, Jen! Sending the labels now!