
This post may contain affiliate links. For more information, see our privacy policy.
Don't fancy yourself as a fancy cookie maker? Check out these Easy Decorated Christmas Cookies, they're one-bowl, no-mixer and simply delish!
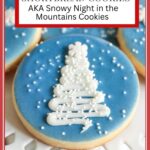
Four years ago, Scott and I moved from Raleigh, NC to the mountains of North Carolina near Asheville. We'd lived in Raleigh for almost 40 years and, though we still miss our friends, it didn't take us long to adjust to this beautiful little corner of God's creation. In early December of that first year in the mountains, we got 18 inches of snow! We were socked in for 4 days before the snow plow came to rescue us but we didn't mind as we had heat and power. We pulled out the Christmas decorations and enjoyed making the house look like a magical snow globe. The inspiration for these Snowy Night in the Mountains, Easy Decorated Christmas cookies came in the midst of that first mountain snow adventure.
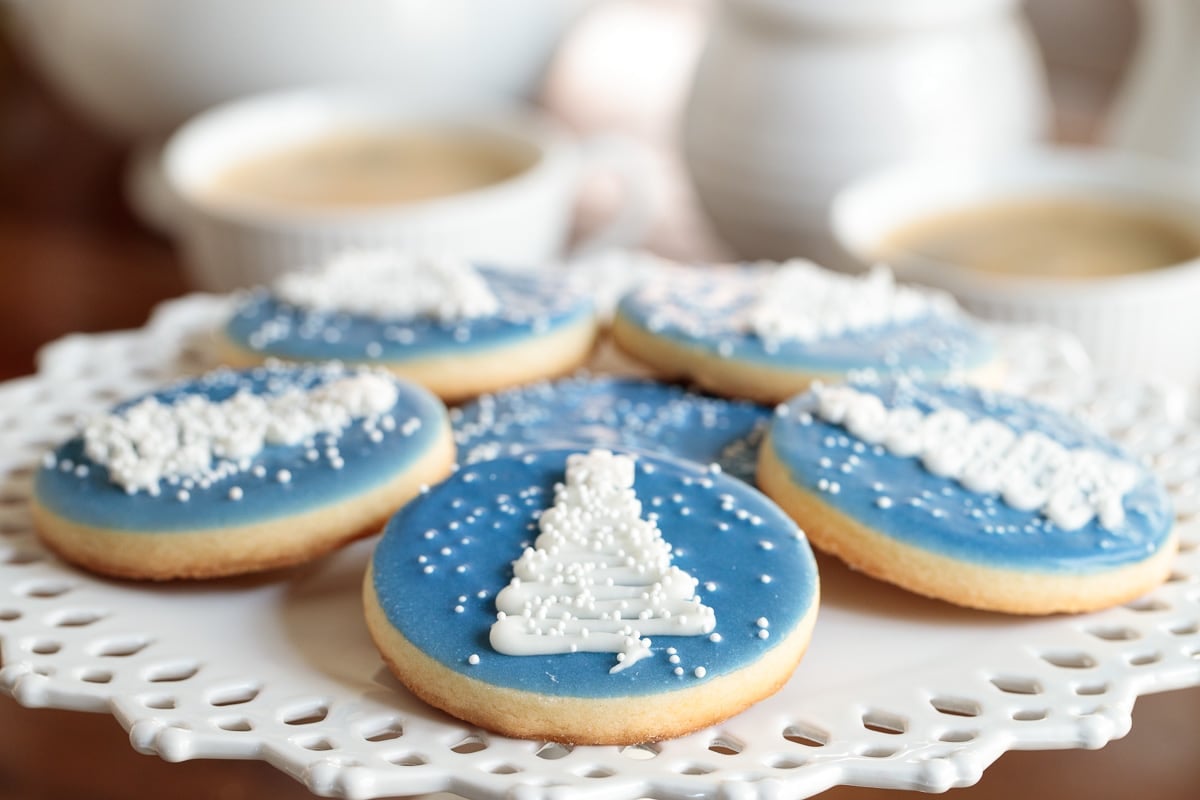
I wanted them to be a simple representation of an evergreen tree on a snowy night. It's an easy technique, as you will see from the step-by-step tutorial below. Stir together the buttery, delicious shortbread dough (one bowl, no mixer needed!) and roll it out. Cut the cookies, chill, and bake.
 - thecafesucrefarine.com")
These Easy Decorated Christmas Cookies are a take-off on my Christmas Shortbread Cookies, another fun and easy shortbread holiday cookie. I was thrilled to come up with a pretty Christmas cookie that didn't require any decorating expertise. Apparently, they made other bakers happy too, as I've gotten lots of comments and emails about these festive cookies. They've been pinned over 1,000,000 times!
I love that you can make these Easy Decorated Christmas Cookies in steps. Make the dough and roll out the cookies. At this point, they'll need to chill a bit but you can also freeze them for a baking day in the future. Once they're baked you can either decorate them right away, store them in an airtight container or pop them in the freezer. When you're ready to decorate, they will be too!
 - thecafesucrefarine.com")
Easy (and fun) decorating technique!
To decorate, make a simple two-ingredient icing in deep blue and dip the cookies to coat the top. I call this my Dip, Drip and Flip technique. After the top is dipped in the icing, let it drip back into the bowl for 20-30 seconds. When the dripping slows down, simply flip the cookies over and give it a gentle shake to even out the icing. It's an easy alternative to the more complicated, royal icing method of decorating cookies - and, unlike royal icing, this stuff actually tastes good!
 - thecafesucrefarine.com")
These Easy Decorated Christmas cookies then get a sprinkle of "snow" (tiny white nonpareils). After the cookies are set squiggle on a simple white tree (no fancy decorating skills needed!), add more sprinkles to the tree and you've got a "snowy night in the mountains" cookie!
What do I mean by "squiggle on a simple white tree"? Don't be intimidated! You'll need a disposable pastry bag and a plain decorating tip (links below under Café Tips). Make the easy buttercream (again one bowl and no mixer needed!) and start squiggling! You can practice on a small plate until you're happy with your squiggling.
I have a hard time piping Christmas trees in consistent sizes so I came up with a little trick to help me. I cut out a small paper tree, lay it on each cookie before piping and lightly cut along the sides of the paper with a small sharp knife. Then, starting at the top, I pipe (squiggle) my trees to cover the cuts. Voila! All the trees are the same size.
 - thecafesucrefarine.com")
We've created a video to demonstrate this fun, easy "Snowy Night in the Mountains" decorating technique:
[ad
I use this easy shortbread dough for so many of my cookies because it's a dream to work with. There's no chilling before rolling and it doesn't stick easily to the counter or rolling pin. A bit of cornstarch in the dough (and a stint in the fridge after being rolled) helps keep those nice, crisp edges in the oven.
How to roll dough to an even thickness
You might be a pro, but I have trouble rolling dough to a consistent thickness. There are several tricks to help remedial rollers like myself to achieve that even thickness. I've found that the easiest technique is to use a rolling pin with graduated rings on the ends. You simply choose the thickness you want (1/16, ⅛, ¼, or ⅜-inch) and roll away perfectly consistent cookies! The rings are removable, so you can use it as a conventional rolling pin as well.
We've added a video for this part too - so you can see exactly how this rolling pin makes things SO easy. Check it out:
A lovely gift idea!
We've created a free printable gift label for these cookies.
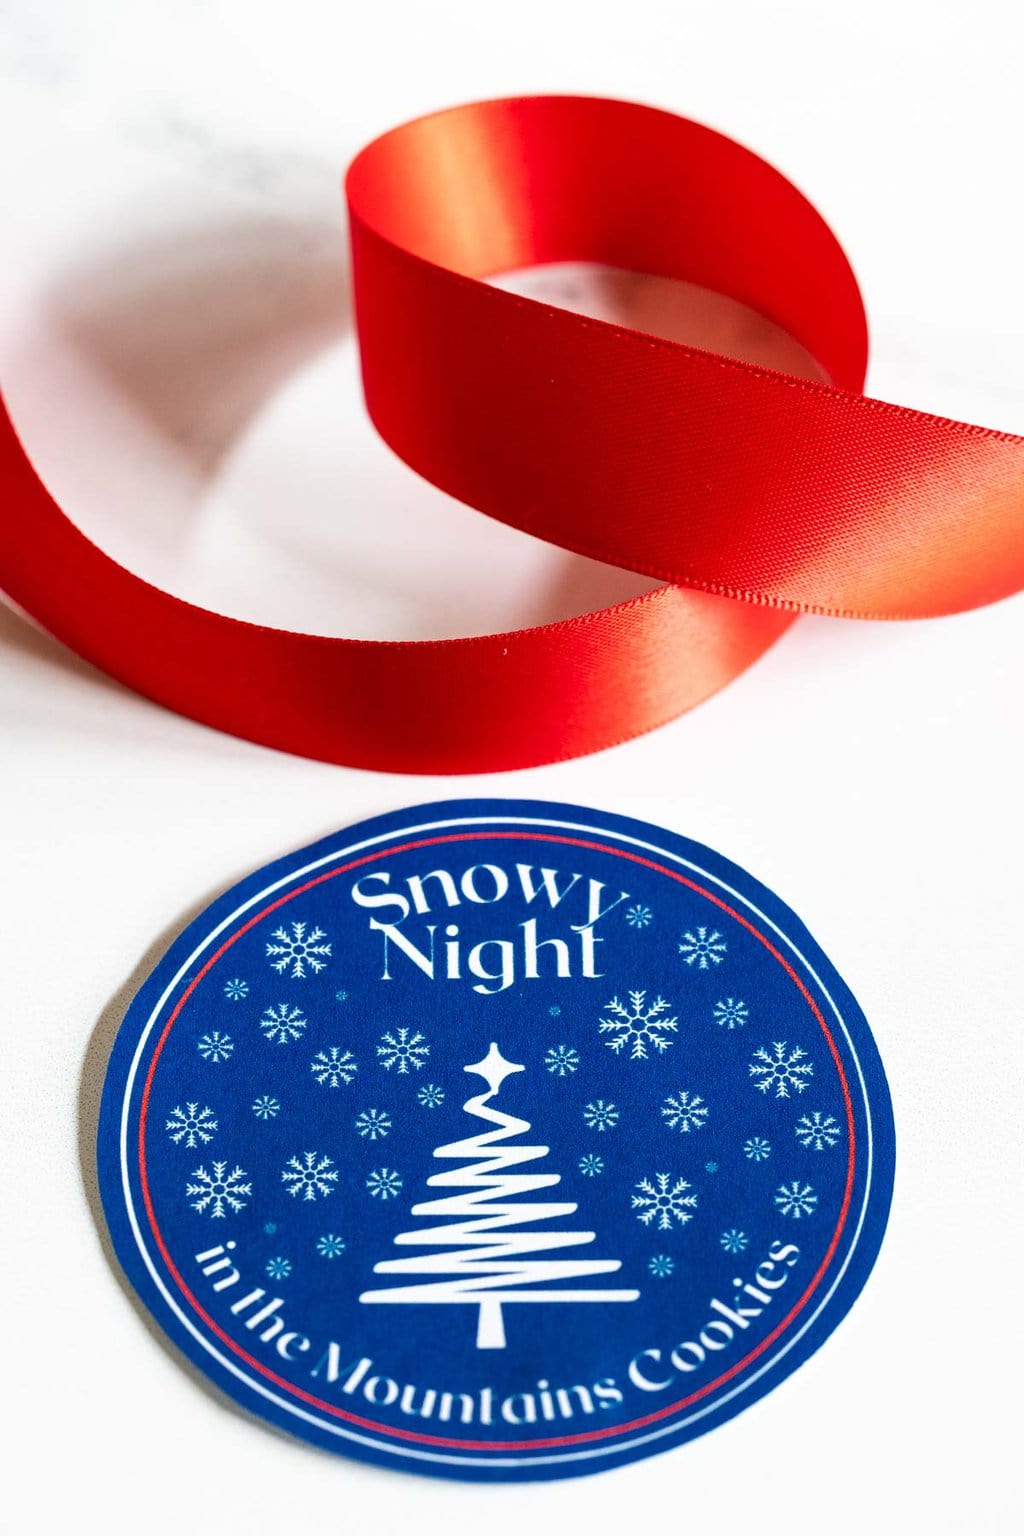
To receive the labels via email, simply leave a comment requesting them and we'll send the labels as well as instructions on how to use them.
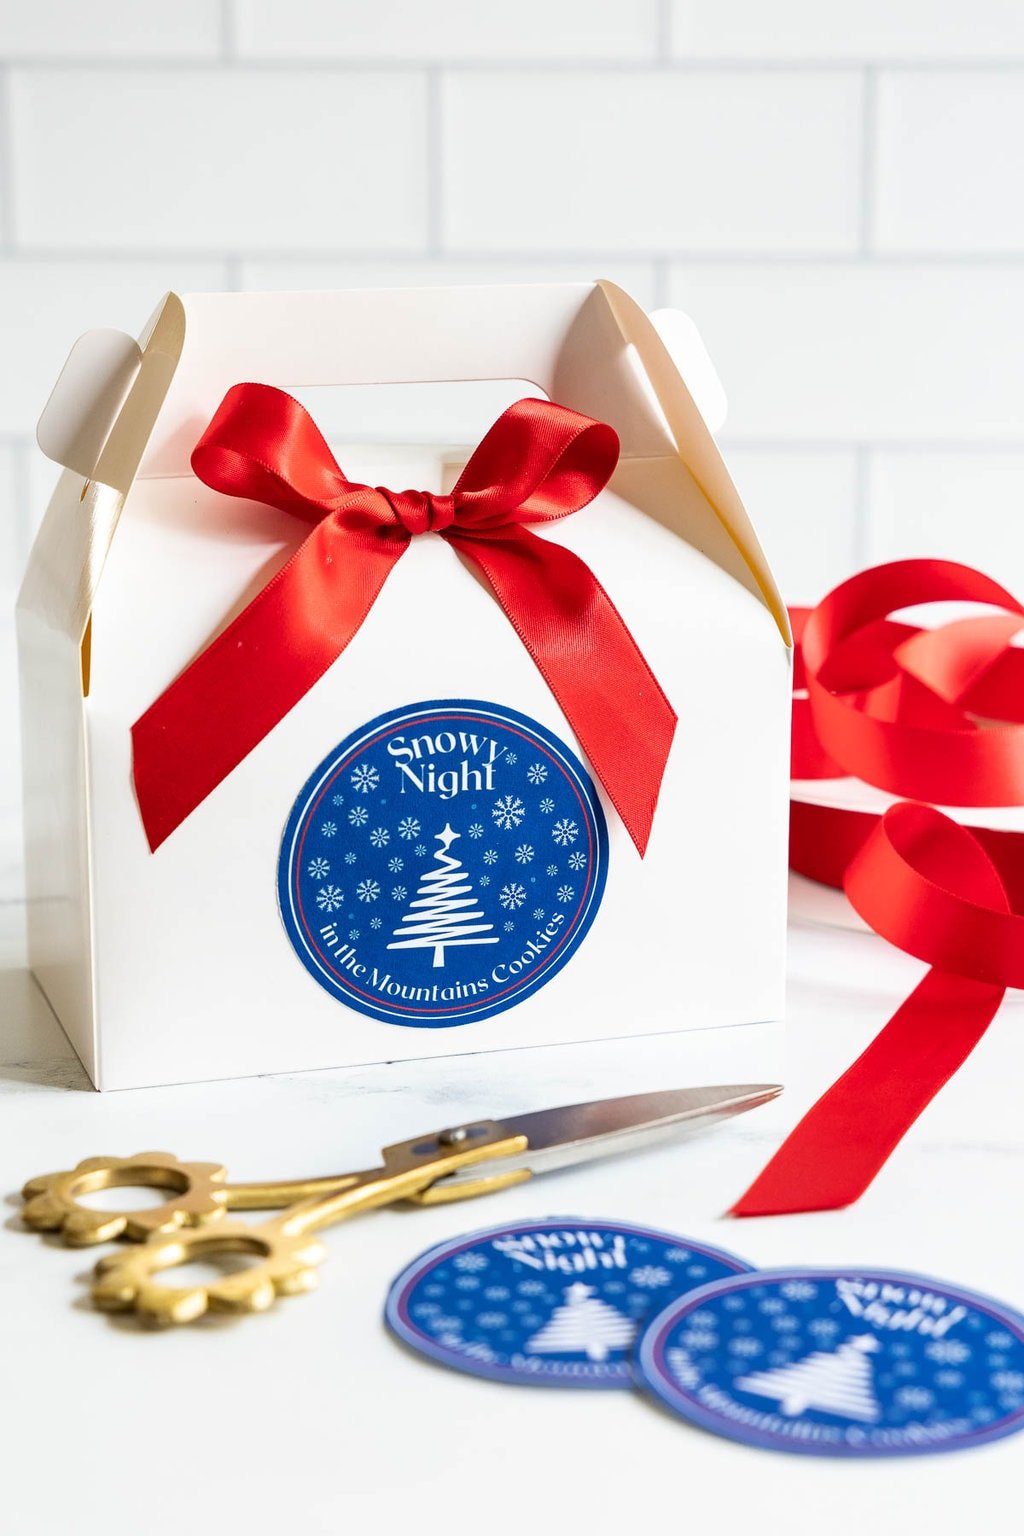
So you can stop looking for your signature holiday cookie! Whip up a batch of these Easy Decorated Christmas Cookies; I think you'll be sure to hear lots of oohs and ahhs when you pull out the coffee and cookie platter or the gift bags/boxes
 - thecafesucrefarine.com")
Café Tips for making these Easy Decorated Christmas Cookies
- Because there's no mixer used, the butter needs to be very soft when mixing up these Christmas Shortbread Cookies. That can be difficult at this time of year, even if you let the butter sit out for hours. A short stint in the microwave on the very lowest power level (on mine, it's 10%, check to see what yours is) works like magic to soften butter. You'll need to experiment a bit with your microwave though, as they're all different. Start with 20 or 30-second increments at power level 10 until you learn how long your microwave will take to get the butter nice and soft, but not melted.
- If you prefer to use a mixer, by all means, go ahead. We love not having to drag out the mixer and the ease of mixing up this dough by hand but it will work fine with a mixer. Just don't overmix the dough or it will get tough.
- I used peppermint extract in my glaze and buttercream. Feel free to use other flavorings. Almond, vanilla, orange, lemon and coconut extracts are also delicious.
- Flavor extracts can vary in intensity. It's better to start with a small amount in the icing, then take a little taste. You can always add more, but you sure can't remove it! If you're looking for a good peppermint extract I love this LorAnn Peppermint Bakery Emulsion.
- The recipe calls for a one-hour (or longer) chill for the cutout cookies. If I'm in a big hurry, I just pop them into the freezer for 10-15 minutes (don't tell anyone I cheat!).
- A few tips on rolling and cutting out cookies:
- Keep your work surface and rolling pin lightly dusted with flour.
- I also like to rub the cutting edge of my cookie cutter in a little flour in between each cookie.
- Press fairly firmly when cutting out the cookies, but don't twist the cookie cutter as the shape will get distorted.
- If you don't have room in your refrigerator to chill the cookies on two sheet pans, just transfer all of them to one pan after cutting. Then later, once they're chilled, you can divide them between the two pans for baking.
- When re-rolling the scraps, incorporate as little of the flour on the work surface as possible but enough so that the dough doesn't stick.
- The rolling pin mentioned above is WONDERFUL and makes rolling dough like this a breeze!
- Occasionally, some of the cookies will be slightly puffed on the top when removed from the oven. You can give them a nice flat top by pushing on the top gently with a flat metal spatula.
- Sometimes the glaze for these cookies will have lots of bubbles. These bubbles will cause imperfections in the surface of the glazed cookies. Simply stir the glaze very slowly to get rid of the bubbles.
 - thecafesucrefarine.com")
- I love to have a supply of these super sturdy decorating bags. They're not expensive, and a box will last forever. The bags come in a nice flat box, so they're easy to store. I used to buy my bags at the local craft store and got about 10 bags for slightly less than this whole box of 100 bags! Definitely a wonderful deal.
- The tip that I use to pipe the Christmas Trees is a Wilton #3 Round Piping Tip.
- I love these pre-cut parchment paper sheets when making cookies. They are the perfect size for a cookie sheet pan and also come in a nice flat box for easy storing. This 100-pack will last forever - and save you some time and hassle.
- I used Wilton Delphinium Blue paste food coloring.
- I like to add a little star on the top of the tree. I used these mini pearlized snowflakes for mine.
- Don't roll these cookies too thin, otherwise, they will be difficult to dip into the glaze when decorating. I roll mine to a ⅜-inch thickness and use an adjustable rolling pin. How do you roll them to the desired thickness? This reasonably priced rolling pin is a super-easy way to achieve the same perfect thickness for all your cookies. It has 1/16, ⅙, ¼, and ⅜-inch removable discs, making it easy to flatten your dough to a uniform thickness. Have a baker on your shopping list? This would make a lovely gift that can be used year-round. You might even be the lucky recipient of some perfect, even Easy Decorated Christmas Cookies!
Thought for the day:
For to us a child is born, to us, a son is given;
and the government shall be upon his shoulder,
and his name shall be called Wonderful Counselor,
Mighty God, Everlasting Father, Prince of Peace.
Of the increase of his government and of peace, there will be no end,
on the throne of David and over his kingdom,
to establish it and to uphold it with justice and with righteousness
from this time forth and forevermore.
Isaiah 9:6-7
What we're listening to for inspiration:

If you enjoyed this recipe, please come back and leave a star rating and review! It's so helpful to other readers to hear your results, adaptations and ideas for variations.
Scroll Down for the Recipe - or Save It to Your Inbox
We'll email you the recipe so it's easy to save, print, or share.
Easy Decorated Christmas Shortbread Cookies
Ingredients
For the cookies:
- 8 ounces very soft salted butter
- ½ cup powdered sugar
- 1 teaspoon vanilla extract
- 1 ¾ cups all-purpose flour
- ¼ cup cornstarch
For the mint glaze;
- 2 cups powdered sugar
- 4 tablespoons half and half, or milk, maybe more
- ¼-1 teaspoon peppermint extract
- blue paste food coloring, I used Wilton Delphinium Blue
For the buttercream piping:
- 1 tablespoon very soft butter
- 1 cup powdered sugar
- 1 ½-2 tablespoons half and half, or milk
- ½ teaspoon peppermint extract
- white nonpareils
- small white pearlized snowflakes for the tree topper, optional
Instructions
For the cookies:
- Line 2 sheet pans with parchment paper. Set aside.
- Place soft butter in a medium-size mixing bowl. Stir with a wooden spoon or sturdy spatula until nice and smooth. Add powdered sugar and vanilla. Mix together by hand for about 30 seconds, until fluffy and well blended.
- Sprinkle the flour and cornstarch evenly over the top. Stir until flour is incorporated and the dough is shaggy. Turn out onto a lightly floured surface and press dough in a ball. Knead a few times until fairly smooth then form into a ball again and press with your hands into a flat disk.
- On a lightly floured work surface, roll out dough to a ⅜-inch thickness. Keep work surface, dough and rolling pin lightly dusted with flour. Cut circles and place on prepared pans. Re-roll scraps as many times as needed to use up the dough.
- Place cutouts in the refrigerator for at least one hour or up to 24 hours.
- When ready to bake, preheat oven to 350˚F. Remove cookies from refrigerator and bake for 12-16 minutes or until just beginning to turn golden at the edges. Rotate pans halfway through for even browning. Cool completely before icing.
For the glaze:
- Combine powdered sugar, half and half and ¼ teaspoon peppermint (or other flavored) extract in a medium-size bowl. Mix until smooth. The glaze should be thick but pourable. Add a little more half and half if too thick. Taste the glaze and add more peppermint extract, if needed (see the note above in the post).
- Dip the tip of a small knife into the blue food coloring and swirl some of it into the icing. Stir well and add more food color until desired shade of blue is achieved. Transfer the glaze to a shallow bowl.
To glaze the cookies:
- Holding onto the edges of a cookie, dip the top surface into the glaze, being sure all of the surfaces touch the glaze. Pull cookie up and out of the glaze. Allow excess glaze to drip back into a separate bowl.
- When the glaze stops dripping, quickly flip the cookie right side up and give it a gentle jiggle to allow the glaze to flow evenly over the surface. Repeat with remaining cookies. Allow glaze to dry for 15-30 minutes.
For the buttercream piping:
- Place butter in a medium-size bowl and stir until smooth. Add powdered sugar, 1½ tablespoons of half and half and the mint extract and stir vigorously until smooth, adding a bit more half and half, if needed to achieve a fairly thick but spoonable consistency.
- Place buttercream in a pastry bag fitted with a small round icing tip (I used a Wilton #3 round tip). Starting at the upper edge of one cookie, pipe the Christmas trees by making increasingly wider lines, stopping about ¼-inch above the lower edge of the cookie (see pictures in the post). Immediately sprinkle trees with a few more white nonpareils. Set aside to dry.
Video
Notes
Nutrition
The Café Sucre Farine is a participant in the Amazon Affiliate Program. The Amazon Affiliate Program is designed to provide a means for sites to earn advertising fees by advertising and linking to products on Amazon. The price you pay as a consumer does not change, but if you make a purchase through one of our links, we receive a small commission - and we continue delivering delicious recipes to you!
Shop Our Café Loves
We’ve gathered our favorite kitchen tools, tableware, and entertaining treasures in one place, the Café Loves store. It’s a wonderful spot to find something special for yourself or the cooks and hosts you love!


How do you prevent rippling when they dry?
Hi Lori, if you let them drip well and then give them a little shake back and forth to smooth the surface, you shouldn't have rippling when they dry. You may need to let them drip a bit longer before flipping.
Thanks for your recipe i ideas i find it really hard to pipe in the bag so thanks so much for your ideas have a great day
Enjoy, Mill!
I haven't tasted the cookies yet, but they look great. It was so much easier to dip the cookies in the icing rather than flooding the cookie. For the piping, I did add more icing sugar than what the recipe called for. Looking forward to having them on my desert dish.
Thank you for the review, Julie!
I would love the labels for these shortbread cookies!
So creative, thank you for making it so easy for us to make these!
Much appreciated,
These are really special! Will make some more in a few days again., May I have some labels. They ' re great too. Thanks sooo much. Mecca J
Thanks, Mecca!
These are my favorite go-to Christmas (and all-year-long) shortbread cookies. They are relatively easy to make, the most appreciated gift to give, and my favorite cookie to eat! Make someone happy all-year and give them the gift they will love! Please send me the labels so I can make my gift-giving more exciting! Thank you so much for sharing your much appreciated ideas with all of us. Love them!
That's great, Stella! Thank you for your kind review!
These look fabulous. May I have the label? I just found your site and can't wait to start trying some of your recipes.
Thanks, Kisa! We're happy to send the labels.
Thanks for this lovely recipe! I just made them with my mom tonight. We made them in Christmas colors, but we’ll be making them again in your recipe’s colors to get that “snow globe” effect. So easy to follow. We did chill our dough just a bit before cutting the cookies out, but that’s just a preference to make it a bit easier. Here’s a picture of how ours turned out: https://ibb.co/6B6MQGG
They are beautiful, Jen! Thank you for the review!
Love love these cookies. Not only are they delicious but have a whimsical and classy look. This is my 4th year since making. They make great gift. Please send the labels. Will make it even more classier.
That's great, Edie!
Hello there,
Made these cookies for the first time last holiday season. So beautiful and they're delicious!
Plan on baking more this Christmas and would love to have the labels to go with them.
Thank you!
Larry
Thanks, Larry! Sending them your way.
Happy Holidays!
Kindly send this label! I love these!
Gratefully, Stella
Thanks, Stella!
I love this recipe. My coworkers love this recipe ;). It’s really the best tasting cookie.
This time I doubled it but the conversion says 2 sticks of butter when it’s actually 4 sticks. I couldn’t figure out why the mix wouldn’t come together.
Threw that out and started over.
Just a heads up
So happy you have enjoyed this recipe, Sarah.
Thanks for the heads up! My recipe converter did the ounces correctly but it has some limitations and, apparently, doesn't really know how to work with "sticks". So I have removed the "sticks" so others won't be confused. I appreciate you letting me know.
Thank you! My second batch turned out perfectly.
They’re beautiful!
Wonderful! Thanks for letting us know, Sarah!
Absolutely enjoy browsing through your recipes, may I please have the labels? Thank you
Hi Chris
I had so much fun making your cookies! I wanted to ask about the icing. It was hard for me to dip them and have the icing not spill over the sides. Any tips for that? Also the icing seemed to ripple a bit here and there once dried. Finally, can you stack these cookies once iced? It seems the squiggle on top doesn’t fully harden. I would love to get your labels! Thank you for the inspiration!
Hi Brigitte, to prevent the icing from spilling over the sides, let each cookie ddrip a little longer. You can also use a finger to wipe any excess icing off on the edges. Regarding the ripple, the icing might have been a little too thick. And lastly, you can stack these cookies if you let them harden for at least 24 hours.
Going to decorate my cookies today.
You make it look so easy.
I would love the printable labels please.
Sending them your way, Kay!
Hi Chris,
I couldn’t wait to make these but didn’t have much good luck. I don’t know what I did wrong and followed your directions and ingredients to a T!
I had trouble with the dough and maybe I should’ve rolled it thinner? I barely had enough for 15 cookies.
They are in the refrigerator now but probably won’t bake them until tomorrow morning.
I hope I can salvage them with the beautiful icing.
Please help as I want to make your other shortbread cookies also.
Many thanks.
Susan
Hi Susan, I'm so sorry you had trouble with these cookies. It's really hard to say what went wrong without having been in the kitchen with you. I made this dough this morning and it's a dream to work with. The cookies should be rolled about 3/8 inch thick, slightly thinner than a half inch. The yield of cookies will depend on the size of your cookie cutter. I would try to bake them and see how it goes.
Good morning Chris, Many thanks for your reply; I greatly appreciate it! When I tasted the cookie, it is delicious, to say the least! I’m going to ice them today and hope they look as nice as yours! Looking forward to trying your other recipes with decorations!
Wishing you and your family a Very Blessed Christmas!
Susan
Thank you, Susan!
Hi Lindsay,
I love these cookies but I didn’t have good luck the icing gel as it slid off the cookie; I probably didn’t have enough sugar. Could you please help me? I want to try your buttercream icing but want to add different layers and colors. Can this icing be “swirled” with a scribe or toothpick on top of the first base and, if so, would they be able to be stacked?
I greatly appreciate any help you can give me; it’ll be greatly appreciated!
Wishing you and your family a very Blessed Christmas.
Thank you.
Susan
Hi Susan, if you icing slid off, it wasn't thick enough. Check the post. There's a picture that shows the consistency.
If you want a swirled effect, I would go with a technique like this: https://thecafesucrefarine.com/christmas-tree-shortbread-cookies/
Yes, these cookies can be stacked after they have thoroughly hardened. If I'm planning to stack them, I let them dry for 24 hours.
The recipe calls for 8 ounces butter but then says 2 sticks. Isn't that 16 ounces?
Hi Michele, a stick of butter is 4 ounces. There are 4 sticks per pound.
This recipe looks so wonderful and I am excited to make these beautiful cookies! Happy Holidays! I’d love the free printable labels please.
Thank you in advance ❤️
Sure, Mari!
These are adorable! I would love the labels, please! Thanks for the scripture, all good & perfect things - and cookies - come from above! Have a joyfully blessed Christmas!
Thank you, Denise! Sending them your way.
I definitely want to make these beautiful cookies and would love the labels and where to get the boxes to match!
I LOVE your site and all the religious inspirations—THANK YOU!!
Wishing you a very Blessed Christmas!
Many thanks!
Susan
Thanks for the kind comment, Susan! Sending the labels your way.
Please send snowy mountain labels. Looking forward to making another fabulous recipe from you.
Sure, N!
I would just like to say how much I appreciate the detail you put in each recipe. I have tried several and they are all excellent. I think these are the same cookies I made for 4th of July only changing up the colors. They turned out wonderful!! I would certainly like the labels for these Snowy Night in the Mountain Cookies.
Thank you for the kind comment, Vickie! Sending the labels your way.
So glad for the detailed decorating instructions. I would also like to receive the labels. Thank you.
Sure, Beverly!
Would love to try these for a gift, the labels would give it such a finished look.
Thank you!
Jill Phillips
Sending them your way, Jill!
Hello! I found your Snowy Night On On the Mountains cookie recipe and how to easily decorate them.
Would you please send me an email with your adorable stickers?
Thanks for sharing such a great idea!
Kay
Kheilman2314@gmail.com
Sending them your way, Kay!
Hi! This recipe sounds perfect for what I was looking for. I am a teacher and am going to make these for my students. I also want to make some boxes of them for other teachers and o administration. Would it be possible to get some labels - not for all the students, but some for the boxes I will make.
Thanks !
Becky
That's great, Becky! Sending the labels your way.
Hi I tried these cookies and they are so easy to make and equally delicious. I'm going to add them to my Christmas boxes may could you please send the labels to me? Have a blessed day.
Great! Sending them your way, Deborah!
I can’t wsit to gift these! Please send me the labels for the Snowy Mountain Chrjstmas Tree Cookies. Another hit Chris 😘
Sending them your way, Paula!
I would Love to have the labels for these cookies 🙂
Stephanie
Happy to send them your way, Stephanie!
Se ven deliciosas.
Enviame las etiquetas por favor
Sending them your way, Milagros!
Hi Lindsey, could I get your labels sent to me for the cookies, Thank you.
Sure, Cheri!
Thank you for sharing your label design. I am hoping to use them this Christmas for some of my cookie boxes as we do live in the mountains here in New York. There are so many delicious recipes here to enjoy. I catered a wedding 2 years age and used one of your salad dressings (a basil vinaigrette one) and it was a huge hit. God Bless.
That's great, Cheri!
I've just made this recipe and something isn't working. I've checked the portions several times. The cookie dough is very soft, not kneadable at all. It has made about 2 cups of 'dough'. I know I need to refrigerate this, but it seems too thin, too soft. Like a thick pudding. Have I done something wrong? Is there enough flour is this recipe?
Thanks
Hi Dawn, I’m sorry you had trouble with this dough. It’s definitely the right amount of flour. It really difficult to say what went wrong without having been right there in the kitchen with you. The recipe results in a very readable dough. You might want to try it again as so many others have had good success.
So excited about this recipe! Please send me labels!
Sure, Cherie!
Such beautiful cookies for Christmas! I can't wait to try these. Can you please send me the labels? Thank you so much.
Hi, I made these for a Christmas party! They were a big hit! The event was on the Mountain and we have lots of snow, so, they were very appropriate!
I'd like to make the dough ahead, and chill for a day or so before I roll and chill them!
Do you think it will effect the quality of the cookie? I will bring it to room temp before rolling! Thank you!!
How fun! You could chill the dough ahead but you can also roll and cut the cookie and chill the cutouts for several days before baking. Either way will work!
I make decorated sugar cookies every year for Christmas, and when I saw these, I knew I had to include them this year. They are so beautiful, I can't wait to make them! Can you please send me the beautiful labels? Thank you so much!
Sending them your way, Cheryl!
Hi please send me the adorable labels for these winter
Night in the mountain cookies!
Sure, Jacquelyn!
I can't wait to make these this weekend at my girl's cookie party, can I please have the label? Thank you!
Sure, Brooke!
These cookies have a 5 star rating.
Please send me some labels, for gifting.
Thank
Michelle
Thanks, Michelle! Sending the labels your way!
Absolutely loved this post and recipe! Just made them and they are perfection! Thank you so much.
I would love a set of your labels to add to my holiday gift baskets please! Such a kind and generous thought.
That's great, Estelle! We will send the labels!
Easy to read instructions. Thanks - please send me the labels too if at all possible.
Sure, Erica!
Hi Chris, the cookies look so pretty! I plan to try them for my office Xmas party. I see that that the piping is butter cream. Can I just use white royal icing for that? I am making batches of cookies with a few different decorations, royal icing seems to be the most common one and I will make a big tube of that anyway. Just wondering if that also works for this recipe. Thanks!
Hi Vivian, that will work!
So excited to make these, I have to be gluten free and I love pretty foods, please send me the labels. Thank you
Sure, Susan!
Hi Chris, I am going to make these for my family for Christmas. Im trying to make the dough in advance. Can the dough be frozen?
I hope mine tun out as pretty as yours! Will you please send me the labels? Thank you!
Hi Jeanne, yes you can freeze these! We will send the labels.
Merry Christmas from Texas! Can’t wait to make your darling cookies! Please send me your adorable labels. Thanks!!
Sending them your way, Vickie!
I can’t wait to try these with my granddaughter. Our favorite place is in the mountains in Boone, NC. These will be perfect. Please send me the labels.
That's great, Kathy! Sending them your way!
These are adorable! I love Christmas cookies in blue. Please send me those labels please!
Sure, Crystal!
Thank you for your recipe and videos
I would love the stickers please
Effie
Thanks, Effie! Sending the labels your way.
I am so excited to try these cookies. They are so beautiful and look professional. No one will believe that I made them.
Can you please send the label also?
Thank you
Hi Cheryl, I missed this comment, but just sent the labels your way!
these are so going on our table at Christmas - beautiful and easy cookies. Thank you for sharing.
Please send me the adorable labels - a great gift for family and friends
Sending them your way, Jane!
What beautiful cookies! I would love to have the labels if you’re still sending them! Can’t wait to use your recipes for the holidays 😊.
Thanks, Becky! Sending them your way!
So beautiful for gift giving! Please send me the download for the Snowy Night labels. Thank you!!!
Sure, Sheila!
I would love your labels
Sending them your way, Lisa!
Another great recipe! 💕 Will you please share the labels to me… ☺️
Sure, Cathy!
Hi Chris,
Just wanted to let you know that I made these at Christmas and they were so delicious and melt in your mouth cookies. They were loved by all. I am not a professional baker by all means but I followed your instructions to a tee and decorated them as you instructed. They came out beautiful.
Thank you again for this lovely recipe.
I'm so happy to hear that, AJ! Thank you for letting us know!
I am excited to try theses! Christmas has passed, but it is still winter!
Could you please send me the pattern for the label?
Thanks!
Sure, Enola!
Lovely recipes. Would you Please send me the labels?
Sure, Maria!
What a delightful cookie! I have tried your dip, drip and flip method - and it works although the flipping is sometimes tricky if you're a bit clumsy or arthritic!
Please send along the labels!
Have a blessed Christmas!
Sending them your way, Pam!
Oh these are beautiful! I’d love a copy of the labels please!
Pam
Sure, Pam!
Hi Chris and Scott,
I am making these now and would love the labels if I am not too late. I have had wonderful success with every recipe I have tried. I especially love the ridiculously easy ones! Thank you so much for all your unique and wonderful recipes!
I'm so happy to hear that, Laura! We will send the labels your way.
I would like the print out label for Snowy Mountain Christmas Cookies. . These cookies look so pretty. Thank you.
Sure, Margaret!
Wow! These cookies look amazing! I'm probably too late to make these in time to gift them this year but I can make the cookies to leave for Santa. So please send me the pdf for the labels so I can be ready for next year. Thank you for such wonderful recipes and all the neat ideas that you come up with. Have a Merry Christmas and a Happy New Year!
Thanks, Jeanie! We will send them your way!
I'm looking forward to making these for Christmas. Please could you send me the labels, thank you?
Happy to send them, Judith!
I can’t wait to make these on a snowy day in Ct!
Maybe I’ll have time before Christmas!
Wait a minute! I’m retired. I can do it anytime I want I would love to have the labels beautiful cookies. Thank you for sharing.Nancy
Merry Christmas!
Happy Winter in the mountains!
Haha! I love it! Just sent the labels, Nancy!
Making these tomorrow. I’d love the cute labels for packaging. Thank you Chris. Merry Christmas.
Sure, happy to send them, Robin!
I would love the labels too. We just bought a house in the hills of western NC near Asheville too and these are perfect!m
That's awesome. Hope you're enjoying it, Maureen! I'll send the labels now!
Have made these delicious cookies three times now. Would love the labels for gifting.
Thank You!
Sure, sending them now, Barbara!
Please send the snowy night printable labels. Thank you.
Hi Kathleen, just sent them!
Hi Chris,
I would love the labels. Made these today plus another batch of shortbread cookies for the grandkids to decorate tomorrow. Love how they melt in your mouth.
Merry Christmas to you and your family♥️♥️
How fun! You're leaving them a great baking legacy! Sending the labels now, Gayle!
I would love to receive Snowy Night printable labels.
Thank you!
Sure, sending them now, Carol.
Love this recipe. I’ve made several times and they are iced by all. Can you tell me where you find your beautiful sprinkles as I have trouble finding them.
Thanks
Hi Mary, I get them on Amazon: https://amzn.to/3HSn8xc
Would love to receive Snowy Night printable lables!
Happy to send them, Diane!
Hello
I hope I am not late to request for this lovely printables Christmas cookies. If I'm not, can I request for the printables? I haven't organized what to give some few special friends for Christmas. I'm sure my friends will love to this.
Thank you so much for making baking more fun and exciting 😊
Hi Hope, you're not to late, sending them now.
These cookies are fabulous! Please send labels.
Thanks so much, Barbara! Sending the labels your way!
I would love the labels to make my cookies special. I will be making them this week and am excited to try this recipe. I love all your recipes and often find that ones I make are wonderful.
Many thanks for your inspiration!
Gayle
Sure, sending them now, Gayle!
Would love the labels, I am making these cookies this afternoon. Thank you!!
Awesome, hope you enjoy them, Diane!
Very excited to try these! Will you please send me the labels?
Glad to send them, Melinda!
Hi love these cookies please can I the labels to go with them please so I can give to my family and friends this Christmas
many thanks forall your lovely recipes
Hope you enjoy them, Sharon. Sending the labels now!
I won't have time to make these this year, but I can't resist saving all your recipes. I'd like to have the labels, please, so I'm all ready for next year. Merry Christmas.
Sure, happy to send them, DoLee!
I’m looking to make these and ship them! I know the icing is somewhere between buttercream and royal, but does it harden? Like if I touched it with my finger would it be hard or smoosh down? Thanks so much!
Yes, they will harden. Enjoy, Hope!
I email you every time you create a new holiday cookie from this shortbread recipe…because I make them ALL! I delivered an assortment of your cookies to my neighborhood young children. You should have seen their faces when they saw these beautiful cookies. I’ve been told by two adults they would like to see me open a bakery in town ! I am a retired (34 years) school teacher so I have no plans nor talent to do this. If I’m impressing others with my baking, I owe the credit to you and your husband for your talent , expertise, and creative ways to display. May God continue to bless you during this Christmas season.
I love hearing that, Jennie! Thank you so much for letting us know. Merry Christmas to you!
Did you use a Wilton #3 or #5 round tip? Above the printable recipe you mentioned using a #3, but in the printable recipe you said you used a #5. Could you please clarify for me? Thanks.
Thanks for noticing that, Alicia. It should say a #3 tip.
I live in southern Florida, these cookies look amazing, I would also like the labels please and thank you, do you by chance have a chocolate version of this recipe, I have done a lot of cookies this past week w/ royal icing, just so hard with 2 consistencies, this looks some much easier, Happy Holidays 😁
Hi Tammy, I do not have a chocolate version, but that's a great idea. We will send the labels your way.
We don’t like crunchy hard royal icing, even though I love the looks! Is this glaze hard?
Hi Karen, it's not a hard icing like royal icing. It's more like a thin buttercream glaze.
I love making your glazed shortbread cookies for the different holidays. I cannot do intricate details on my baked goods and these always look great and tastes fantastic too. People always compliment on how good they are. The last couple of times I made them I had a hard time getting the glaze to dry. Do you think I am making the glaze too thick? Thank you!
Hi Jill, if the cookies dipped and dripped well, then you're glaze wasn't too thick. I suspect that it might have been more humidity in the air or in your house. Generally if you just let them sit longer, the glaze will dry out.
The only thing I don't see is what size cookie cutter to use?
Hi Deb, I use a 3-inch cutter but feel free to use whatever size you prefer.
I make all of your shortbread cookies with holiday designs and am gathering supplies for these. Where do you purchase your sprinkles?
I always notice how unique they are for each season . Thank you so much. I use so many of your recipes and ideas to share with others. I was in Micheals this week looking for the supplies for these decorations (did not find ) and a nice lady was shopping for food coloring in blue also. I was so happy to share your site with her. She put info in her phone as I showed her so many recipes of yours on my Pinterest” saves”.
I hope you have another avid fan now!
Thanks so much, Jennie! We appreciate your kind words and sharing of the blog!
Regarding your question, I get most of my sprinkles from Amazon but I do often mix my own blend. For Christmas, I do like this blend: https://amzn.to/3EIJEnr
Dear Scott and Chris
Thankyou very much for the recipes to make for Christmas. They will be enjoyed over the holiday. Wishing you a wonderful holiday too.
Marlene
Thank you, Marlene! Happy Holidays to you too!
Hi Chris,
These cookies are beautiful and look very fun to make. Can’t wait to try. Where did you purchase the snowflakes for the top of the cookies?
Thank you,
Gayle
Hi Gayle, I used the larger white stars from this pack: https://amzn.to/3HWd97x
Thanks Chris,
Just placed my order eith Amazon😊. The other day I made the French Apple Tart - Amazing! I have made the Lemon Mousse 4 times and it is a favorite with family and friends. Your recipes are amazing and so fun to make!!
Thank you!
Have a blessed and very merry holiday with family and friends!!
Gayle
Thanks, Gayle! Happy Holidays to you!
Can the icing recipe be used on a sugar cookie?
Hi Cecile, I don't see why not.
Thanks!
The icing turned out thin and didn’t cover the cookies well. What did I do wrong?
It sounds like you need more powdered sugar. Brands can be different in consistency. Just add enough extra powdered sugar, a little at a time, until you get a fairly thick but pourable consistency.
4 ⭐⭐⭐⭐ made them twice to practice for Christmas 🎄 .today I made them with lemon 🍋 extract and did yellow 🟡 icing .lemon shortbread cookies a keeper .
Thanks so much, Janet!
Can you use just vanilla for the glaze if you dont like pepperment?
Absolutely!
Thank you!!!! Wooow, I used it to decorate my Xmas cookies and I find it as the best recipe online which I tried out.Its a minimum of mess with great result.I think we haven't half and half in my country (maybe is the cream for coffee I am not sure) but you can just mix equal ratio of light cream with milk.Beautiful blog and great tips also regarding the rolling pin with measures. where has this been all my life :)) thanks a lot ♡
Thanks, Lana, for your kind words! I'm so happy you had good results with these cookies! Yes, you're right, half and half is half milk and half cream.
Hello, I’m wondering if I can freeze these cookies after frosting, and for how long? Im sending them as Christmas gifts in the mail. I’ve made them twice now, they’re so yummy!
HI Gretchen, you can freeze them although they stay fresh in an airtight container for at least 10 days. So happy you've enjoyed them!
Chris, sorry, I can't see where to start a new question thread. Will the buttercream trees really dry enough that these can be stacked without damaging?
Hi Victoria, they will! I ususally let them sit out overnight or for around 12 hours to harden. After that I have stacked them without a problem. If I'm stacking them in a storage container, I'll use parchment paper between the layers.
Hello! These are beautiful and I’m going to attempt them. My food coloring is the liquid kind instead of the gel...it that ok for the glaze?
Yes, that will also work, Tammy!
Hi ! Can I make and cut out the dough ahead then freeze till I want to bake ? Or I should to bake and decorate before freeze ?
Hi Sarunrus, I often make the dough, roll and cut the shapes, then freeze them on my sheet pan. You don't even have to thaw them before baking. Just give the cookies a few extra minutes in the oven.
I’m so excited to give this a try! Maybe I missed this answer when reading, but can you tell me why no mixer? Is it to simply it? If I use my mixer will I mess it up?
Tia!
Hi Melissa, you definitely can use your mixer but it's so easy to do without and a lot of people don't have a mixer. Just don't overmix the dough or it will be tough.
Happy Halloween! I made these yesterday and they crumbled and tasted grainy. I followed the recipe, any ideas of what I may have done wrong?
Hmm... it's hard to say, Laura, without having been there in the kitchen with you. I've literally made dozens of batches of these cookies and they've never been grainy or crumbly. I suspect that you inadvertently measured something wrong but I can't say for sure. Did you use two sticks of butter?
I wonder, is it possible that you may have used regular sugar instead of the powdered sugar? That could be why they were grainy.
I was wondering if you have ever used a royal icing stencil on top of the hardened glaze? I love how it looks on the scalloped circles. I am doing pyo cookies for Easter and would love to try it on this glaze. Thank you...Kristine
Hi Kristine, I haven't tried a royal icing stencil. If you do, please share your results with us!
I’ve made cookies similar to these but , no corn starch I add cream of tartar to help them have a good snap and crispness. Have you ever tried that.
Hi Becky, I haven't tried that. It's good to know about that if I'm ever out of cornstarch.
Where's the milk at in the instructions for the cookies?
Hi Lauren, not sure what you're asking. There isn't any milk in the cookies, just in the icing.
How do u cook the cookies if u froze them? Do u let them sit out or do u cook from frozen? How long do u cook them? How do u store them? I
Hi Katie, I just pop them right in the oven frozen, then give them a few extra minutes of baking. They keep their shape really nicely.
I made these shortbread cookies and they come out delicious. I iced them too... though they are not as pretty as yours here, but they are decent! Thank you for great tips.
Hi Varsha, I bet they're beautiful!
You're welcome, Varsha! The more you do them, the prettier they get!
This was a very easy recipe. The cookies turned out cute!
Awesome!
Beautiful cookies! Maybe then this weekend. Do you use salted butter for the whole receipt?
Thanks, Liz! I use salted butter.
Made these beautiful cookies for the first time this year. Delicious, easy and gorgeous. Just love them. Thank you.
You're welcome, Ann! I love that you love them!
Thanks for the info. This will be my first year to do Christmas cookies with my grandsons and I’ve NEVER done sugar cookies. Your info is a huge help. First thing I need is that roller!!!
Hi Sharrimac, you will love that roller! Have fun! Baking with kids is wonderful, a little messy :), but wonderful! I've found it really helps to have all the ingredients measure ahead and in little bowls. That way they can add things without messing up the amounts.
Turned out perfect! Thank you!
Yay! That's awesome, thanks for reporting back, Stephanie Jo!
How far ahead could you make these cookies prior to icing them and how should they be stored? Could they be made and frozen?
Hi Jennifer,
I've made them up to a week ahead and they were perfect. Yes, they can also be made and frozen.
These are so beautiful !!! I can't wait to try and make them. Each snowy cookie reminds me of a beautiful winter nite spent eating cookies and drinnking hot cocoa in front of a fireplace!
Thanks, Judy!
Hello. Does the butter cream harden as well? I like to travel with mine.
Hi Elaina, the buttercream will harden. Just let the cookies sit out for a few hours.
Hello. Does the butter cream harden as well?
Can this recipe be doubled?
Definitely! I do it all the time!
I want to make these with my grandson. He loves to bake. Can this recipe be doubled?
Yes, it can definitely be doubled!
Do you think that I could add lemon or orange rind to the biscuit batter? Also may try freeze dried raspberry or grated chocolate??
Hi Karen, I think that would be delicious! I usually add some type of flavoring to the icing, peppermint, orange, lemon or almond extract but adding zest to the cookies themselves would add another punch of flavor!
Your cookies are beautiful! How long does it take for the icing to dry? Thank you!
Hi BethAnn, if you let them sit out, the icing dries within 30 minutes. I would let them sit out a couple of hours though if you were planning to stack them.
About to put cookies in the oven. I make fondant 3-D cakes but have never gotten the hang of making delicious cookies that look great as well. I had given up until I saw your post on Pinterest. Very excited to see how these turn out. Thank you for posting your recipe and detailed instructions.!
You're welcome, Dana! Enjoy!
This recipe looks delicious and beautiful! I will be trying them this year. I wanted to note that on my microwave, level 10 is 100%. I would need to choose level 1 in order to get 10% to soften the butter. Just sharing in case others have this type of setting on their microwave. Thank you for sharing these lovely cookies!
Thank you so much, Joyce for the heads up about the microwave. I have re-worded that part. Hope you enjoy the cookies!
If i want to freeze these before frosting should i do it it before or after baking?
Hi Jod,
I've actually done it both ways. The cookies can be cut out and frozen and then baked and frosted OR they can be baked, frozen and then thawed and frosted. If you're making them way in advance, they might be fresher if you froze them before baking and then baked and frosted them when it got closer to when you wanted to serve them.
I'm going to try your cookies for Christmas! Can I make them in advance and freeze them before I ice them? Thank you!
Absolutely!
Just thinking, maybe we can use the candy melts to drizzle the tree on top and use different colors. What do you think?
Hi Ela, you probably could but I think this technique is easier.
I made these cookies and they were delicious. I used lemon extract as I am not a fan of peppermint. Yummy. I also added fondant embellishments as I made snowmen and holly. Thank you for the recipe.k
Yes, lemon is wonderful in these cookies. Your cookies sound adorable!
I am all set for making these wonderful looking cookies. When you put the cut outs in the fridge for a few hours, should these be covered, or just leave them uncovered so they dry out a bit?
Hi Frits, that's a good question. I don't cover the cutouts while they're chilling. I think that does help them dry out just a bit which may also help with them not spreading.
Enjoy and Merry Christmas!
i love all of your recipes and have made these cookies with this type of icing for several holidays.... this year the icing got very wavy after frosting. Could it be because I placed it into an airtight container too soon?
Hmmm, that's possible Cathy. I usually let them sit out and get nice and hard before boxing up. So sorry you didn't have good results!
The color of cookies makes me feel sooo Christmassy. 🙂
These are just beautiful Chris! I love that beautiful blue color!
So pretty! I love the simplicity and beauty of the color and design, Chris! Great tutorial. BTW, I tried your tie-dyed turkeys at Thanksgiving 🙂 I still need practice - LOL.
Hi Chris,
If I'm going to mail out cookies,
will these get smooshed using
the buttercream tree? Would
I use royal icing instead?Just love these❤
Thank you
Absolutely beautiful! Loving the blue and white 🙂 And such great tips. Will be making these for sure!
Thrilled to see this cookie recipe from you! since I love your recipes. Thank you for posting and can't wait to start these Christmas cookies. I will have to skip the peppermint since these people here not fans. I also ordered the rolling pin - that should be a lifesaver for sure. Plus the no mixer is another plus.
They look so festive and beautiful!
Yeah, I'm not much for making fussy cookies, but this simple design is perfect!! Thanks for all your tips, too!!
You had me at "no mixer". Mine is in storage and I don't know what I was thinking I wouldn't need it for one year Ö
Your cookies look so pretty and definitely edible ♥ I just love shortbread cookies. Yum! Thanks for sharing!
Thanks, Tracy! I love the "no-mixer" too! Makes it so easy! Enjoy!
These are beautiful cookies. I am sure delicious also.
Beautiful. I'd like to make them. You said to stack in an airtight container, but how long is their shelf life before giving them as gifts?
I've kept these cookies for a week to 10 days. You can also freeze them with good results.
These are beautiful and sound delicious. I'm going to try this recipe. What did you use for the little "star" on top of the tree?
Hi Anne, thanks for noticing that. I put a link in the recipe for the stars I used.
Very pretty Chris! I want to make a plate of these 🙂 Love the color too.