This post may contain affiliate links. For more information, see our privacy policy.
These one-bowl, no-mixer Christmas Tree Shortbread Cookies are delicious and the pretty decorating technique is super simple!
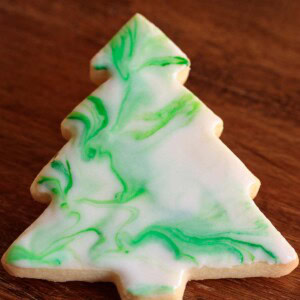
Are you ready for one more fun Christmas cookie idea? I was in the middle of rolling and cutting out my Easy Decorated Christmas Cookies when the inspiration for these Christmas Tree Shortbread Cookies came flitting through my brain. I was so excited that, right away, I had to pull out a Christmas tree cookie cutter and some green food coloring to give the idea a try. When I showed my swirly little trees to Scott, he loved them and thought each one was a work of art. I thought you might enjoy making (and giving) these easy cookies too!

Buttery, delicious and clean crisp edges - a win, win, win!
I searched for years for the perfect shortbread recipe. I wanted one that was not only buttery and melt-in-your-mouth delicious, but also one that would keep nice crisp edges when baked. I discarded one recipe after another until I discovered this one. Just the right proportion of butter, sugar and flour, as well as a small amount of cornstarch, are a few of the secrets to this delicious shortbread dough that keeps its shape in the oven.
On top of tasting fantastic and exhibiting good behavior in the oven, this dough can be made in one bowl with no mixer. I dearly love my KitchenAid mixer but when I'm in a hurry, (almost always) it's really nice to pull out just one bowl and a wooden spoon or sturdy spatula. Within minutes, my dough is mixed up and ready to roll!
A fun and easy decorating technique
The technique for these Christmas Tree Shortbread Cookies is nothing new here at The Café. I'm not much of a fancy cake/cookie decorator. So when I discovered this easy method of making cookies look like they came from a fine bake shop, I was thrilled. I call it my Dip, Drip and Flip technique and I've used it for several fun seasonal cookies, including these Glazed Shortbread Cutout Cookies, these Red, White and Blue Glazed Shortbread Cookies as well as my Easy Thanksgiving Shortbread Cookies. It's a foolproof way to decorate beautiful cookies!
How does it work? I thought you might want to see the technique in action, so I had Scott take a few shots while I iced these pretty Christmas Tree Shortbread Cookies. Check it out!

You can see it's pretty simple. Mix up a two-ingredient glaze then add your flavoring of choice. (I love to use peppermint extract at Christmas time, but lemon, almond, coconut and orange extracts are also delicious.) Next step is swirling a bit of green gel food coloring into the white glaze. Hold one of the Christmas Tree Shortbread Cookies over the glaze and dip the top side to coat. Pull straight up and let the icing drip, then flip the cookie over and voila! Bakeshop quality that even a child can have success with!
I thought I'd also share a video of this Dip, Drip and Flip decorating technique.
It's from my Red, White and Blue Glazed Shortbread Cookies but the technique is the same.

So pull out a bowl - you have flour, butter, powdered sugar, milk (or half and half) and vanilla, right? That's all you need, other than the green food coloring. But one more thing and this is essential! Find your favorite version of "O Tannenbaum" and be sure to have it playing while you mix, roll, cut out and bake. I had this wonderful version by the three tenors BLARING. I also love this rendition by Andrea Bocelli. It will put you in the proper spirit to make these Christmas Tree Shortbread Cookies!

Café Tips for making these Christmas Tree Shortbread Cookies
- Because there's no mixer used, the butter needs to be very soft when mixing up these Christmas Shortbread Cookies. That can be difficult at this time of year, even if you let the butter sit out for hours. A short stint in the microwave on power level 10 (10%) works like magic to soften butter. You'll need to experiment a bit with your microwave though, as they're all different. Start with 20 or 30-second increments at power level 10 until you learn how long your microwave will take to get the butter nice and soft, but not melted.
- Another technique I often use to soften butter is to put it in the oven or microwave overnight with the light on. To keep the light on in the microwave I put a folded paper towel in the door. It works like a charm!
- I used Wilton's Leaf Green and Kelly Green gel food colorings for my Christmas Tree Shortbread Cookies.
- Don't roll these cookies too thin, otherwise, they will be difficult to dip into the glaze when decorating. I roll mine to a ⅜-inch thickness and use an adjustable rolling pin. How do you roll them to the desired thickness? This reasonably priced rolling pin is a super-easy way to achieve the same perfect thickness for all your cookies. It has 1/16, ⅙, ¼, and ⅜-inch removable discs, making it easy to flatten your dough to a uniform thickness. Have a baker on your shopping list? This would make a lovely gift that can be used year-round. You might even be the lucky recipient of some perfect, even Easy Decorated Christmas Cookies!

- I used peppermint extract in my glaze and buttercream. Feel free to use other flavorings. Almond, vanilla, orange, lemon and coconut extracts are also delicious.
- Flavor extracts can vary in intensity. It's better to start with a small amount in the icing, then take a little taste. You can always add more, but you can't remove it!
- The recipe calls for a one hour (or longer) chill for the cutout cookies. If I'm in a big hurry, I just pop them into the freezer for 10-15 minutes (don't tell anyone I cheat!).
- A few tips on rolling and cutting out cookies:
- Keep your work surface and rolling pin lightly dusted with flour.
- I also like to rub the cutting edge of my cookie cutter in a little flour in between each cookie.
- Press fairly firmly when cutting out the cookies, but don't twist the cookie cutter as the shape will get distorted.
- If you don't have room in your refrigerator to chill the cookies on two sheet pans, just transfer all of them to one pan after cutting. Then later, once they're chilled, you can divide them between the two pans for baking.
- When re-rolling the scraps, incorporate as little of the flour on the work surface as possible.
- Occasionally, some of the cookies will be slightly puffed on the top when removed from the oven. You can give them a nice flat top by pushing on the top gently with a metal spatula.
- Sometimes the glaze for these cookies will have lots of bubbles. These bubbles will cause imperfections in the surface of the glazed cookies. Simply stir the glaze very slowly to get rid of the bubbles.
- If you let the glazed cookies drip into the same bowl over and over the glaze will get murky before you're finished icing all the cookies. Because of this, I like to let the glaze drip into a separate bowl.
- I used this set of Christmas tree cutters and this one.
Scroll Down for the Recipe - or Save It to Your Inbox
We’ll email you the recipe so it’s easy to save, print, or share.
Christmas Shortbread Cookies
Ingredients
For the cookies:
- 8 ounces very soft butter
- ½ cup powdered sugar
- 1 teaspoon vanilla extract
- 1 ¾ cups all-purpose flour
- ¼ cup cornstarch
For the glaze:
- 2 cups powdered sugar
- 4-5 tablespoons half and half (or milk)
- ½ teaspoon vanilla
- ¼ teaspoon peppermint extract
- 2 colors of green gel, paste food coloring
Instructions
For the cookies:
- Line 2 sheet pans with parchment paper. Set aside.
- Place soft butter in a medium-size mixing bowl. Stir with a wooden spoon or sturdy spatula until nice and smooth. Add powdered sugar and vanilla. Mix together by hand for about 30 seconds until well blended.
- Add the flour and cornstarch. Stir until dry ingredients are incorporated. The dough will be a little shaggy. Turn the dough out onto a lightly floured work surface and gather into a ball.
- Knead 5-6 times until fairly smooth and all the small pieces are worked in. Form into a ball again and flatten with your hand to form a flat disk. Turn the disk to coat both sides with flour.
- Roll out the dough to an approximate ⅜-inch thickness (see Café Tips above in the post). Keep work surface, dough and rolling pin lightly dusted with flour. Cut out Christmas trees (in one or more sizes) and transfer to prepared pans with a thin, metal spatula. Re-roll scraps as many times as needed to use up the dough.
- Place cutouts in the refrigerator for at least one hour or up to 24 hours. When ready to bake, preheat oven to 350˚F. Remove 1 pan of cutouts from the refrigerator and bake for 12-14 minutes, or until just beginning to turn golden at the edges. Rotate pans halfway through for even browning. Repeat with the second pan of cutouts.
- Cool completely before icing.
For the glaze:
- Combine powdered sugar, 4 tablespoons half and half (or milk), vanilla and peppermint extract in a medium-size bowl. Mix until smooth. The glaze should be fairly thick, but pourable. Add a little more half and half if too thick. Taste the glaze and add more extract, if a more intense flavor is desired.
- Transfer the glaze to a small shallow bowl (a little bigger than your cookies). With a toothpick, swirl a small amount of two green gel food colorings through the icing in the bowl. Don’t swirl too much or the icing will become a solid color. Use a light hand with the gel food coloring. A little goes a long way!
- To glaze the cookies, hold onto the edge of a cookie and dip the top surface into the glaze, being sure all of the surface touches the glaze. Pull cookie straight up and out of the glaze. Allow excess glaze to drip into another bowl or plate (this will keep the glaze from getting murky) for about 30 seconds. When glaze stops dripping, quickly flip the cookie to the right side up and give it a gentle jiggle to allow the glaze to flow evenly over the surface. Repeat with remaining cookies.
- Place cookies on a cooling rack and allow glaze to dry completely.
Notes
Nutrition
Shop Our Café Loves
We’ve gathered our favorite kitchen tools, tableware, and entertaining treasures in one place, the Café Loves store. It’s a wonderful spot to find something special for yourself or the cooks and hosts you love!


Hello,
Can't wait to make these today! Yummy!
Please share labels and box information.
Happy Holidays!
Donna
Hi Donna, we do not have labels for this recipe at this time.
I love the shortbread recipe which turns out perfect cookies every time. The link for the Christmas tree cookie cutters didn’t show up. I really like that they are different sizes.
Thanks for everything all of you do to share such wonderful cooking and entertaining experiences. I and always inspired.
Peace and blessings, Kathie
Hi Kathleen, so happy you've enjoyed this recipe! I added the correct links for both cutters!
Can you use food coloring instead of coloring gel?
Hi Vicky, you get more intense color with gel but regular food coloring also works.
Hi! Do these freeze well?
They do! Enjoy, Jennifer!
Where did you get your rolling pin with the rings on the ends?
Hi Amy, I've updated the link in the post for the rolling pin. It's this one: https://amzn.to/3CSUU4R
Love the royal icing recipe, easiest I've ever made. So easy to decorate and cookies look great. Thank you for the recipe.
Awesome! Thank you for the review, Sandy!
I made these last year and they were a hit. But I can’t remember if I used salted or unsalted butter. Please advise. Thank you.
Thanks, KK! We always use salted but either will work.
I like that theae are egg free as.my Grandaughter has allergy. I'd love some labels.pĺease ! Thank you !
Hi Mindy, we do not have labels for this recipe at this time.
Please forward label file for sugar cookies.
Hi Bonnie, we do not have a label for these cookies at this time.
They look beautiful - what a clever idea! Can you tell me if the icing will be hard enough that I can stack the cookies for gift giving ? Thanks so much, Mary
Thanks, Mary! Yes, these will harden enough to stack. Enjoy!
Thanks for the quick reply at this busy season - so appreciate it! Made my first ones last night - so easy and pretty - I’m making them for my little cottage foods shop here on the farm - I know they’ll be a hit! I admit I added a bit of corn syrup because I’d read that would make icing hard enough to stack cookies , but now I know I don’t need to. Again thanks for sharing this, Mary
Thanks for your review, Mary!
I left a comment on the Pinterest page but forgot to leave one here!
This was a Perfect recipe!! I used almond extract in the icing instead of the peppermint. Made 3 batches to practice on then had my cooking class high school students make them. The dip, drip and flip method is good, but you have to get new icing after 3-4 cookies when it gets murky. I decided to have the class ice all of them white first, then swirl in the colored icing with a toothpick, so I'm not throwing out icing after every 3 cookies. The cookies are delicious and the icing using almond extract is just delicious. I wish I could share pictures of how they turned out! The high school girls were so excited to bring these home to their families! Thank you so much for this recipe!! I’ve gone through culinary school and I say these are the best!!
Thanks for taking the time to leave a review, Paulette - I love that you did these cookies with your students.
If you do this again and want to do the swirls without having the icing get murky, just have a separate bowl to let the cookies drip into. That way the original bowl will work well for all of the cookies. I learned that trick after making them a few times.
Hello,
I love these... your dip, drip and flip technique looks amazing and simple. When I have tried it in the past the icing just over flows on the cookie after I let it sit. Any tips on that?
Also how long do you typically let icing dry for?
Hi Heather, you can try making the icing a tiny bit thicker. The other trick is to really let it drip before you flip them over so that you don't have too much excess icing. If you want to package them I would let the icing dry for several hours so they can harden.
Also, check out the video on this post- https://thecafesucrefarine.com/dip-drip-and-flip-shortbread-valentine-cookies/?swcfpc=1
I'm sorry. We froze them for four weeks.
Omg this is the best easy cookie recipe. We don’t stretch out the dough but just roll into balls and bake. They come out like Italian wedding cookies and with the icing are so good. Even better the next day as the icing softens the cookies. I have gotten so so many compliments on these cookies!
Thanks for sharing your results, Nita!
Hi, These cookies sound delicious. Do you use salted or unsalted butter? Do you use room temp butter or do you let it get even softer?
Thank you.
Hey! I use salted and I let the butter soften on the counter for a few hours. If It comes right out of the fridge I just microwave for a few seconds.
I am excited to try these because I am not good at decorating, and they are beautiful and look fairly easy. My niece and I do a lot of baking to sell at Christmas. This year we made 3500+ cookies. We want to make these next year, but I am worried about freezing and storing 300+ of these cookies. I know I can freeze the cookies before decorating, but can we glaze them also, let them dry, and then freeze them to be decorated later. I would put paper in between, but we'd need to stack them several high and probably freeze them for a month. Will this work? Any better advice? Thank you so much.
3500 cookies! Wow! That's amazing!
Regarding your question, I have frozen these for a week with good results. I would think it would work for longer but I think I would try a batch now (you could do a Valentine shape to be more seasonal), freeze them and then remove them in a month and see how they do.
Chris, we experimented and froze these cookies, both with and without glaze. Both were excellent. We have had a ton of compliments from the Valentine cookies. Thank you for an awesome recipe.
I'm sorry. We froze them for four-five weeks.
Such great recipe and love the frosting! But your page is so spammy and disruptive with all the popups. I almost clicked off numerous times.
Thanks for sharing your results, Kelly. So happy you enjoyed these cookies!
I'm sorry the page is a problem for you. The ads are the way we pay the expenses of running a website as well as earning a living. It's how we can offer our recipes to others for free.
This is the first time in 35 years of TRYING to bake cutout Christmas cookies that I’ve been truly happy with the results on two counts- these cookies taste delicious. Every other rolled sugar cookie I’ve tried tastes like cardboard by the time I’ve used enough flour to keep them from sticking to the rolling pin. The other aspect- this glazing process was fun and nearly foolproof. They look beautiful and my family was impressed. Mine don’t look quite as swirly as Chris’ but I’m learning not to use too much gel paste as you recommended. Thank you for all the tips. I ordered the rolling pin and it’s so much easier to get the right thickness. That company also sells a silicone mat that makes the rolling process a snap.
Thank you, Bonnie! I know what you mean, I'm always frustrated with pretty cookies that are tasteless. I'm so happy you have enjoyed this recipe. Thanks so much for taking the time to share your review!
Can you make the cookie/shortbread dough and refrigerate for a day before all the needing, cutting then freezing them before baking?
You can, just let the dough warm up a bit though before rolling. ENJOY!
Roll the dough between parchment paper in batches, then refrigerate. Less clean up and easier than rolling cold dough.
Wow! I consider myself a competent baker, but decorating had never been my forte. That is why I was delighted with this recipe. Not only were the cookies delicious, but they looked like they had been professionally decorated. I was so pleased with the results, that I made another batch with the pilped Christmas trees, and even got a bit creative with a star cutter and two shades of blue food colouring. These beautiful cookies will be adorning my holiday baking platter every year. Thank you!
I think we're two peas in a pod when it comes to decorating, Susan. So happy you've enjoyed this technique!
Hi,
Just wondering if the dough, before cooking, freezes well? Would like to get the mixing up out of the way but don’t want to cook them too soon as I have two weeks until Christmas 😬
Hi Maggie, I haven't tried freezing the dough in a ball but I have rolled out and cut the cookies and have frozen them on a sheet pan. I baked them frozen and just gave them a few extra minutes. That worked well!
Would love to know if you can double the recipe to come out the same?
Taking out of the freezer sometimes a cookie/frosting get damp -
warm air:cold cookie. How to avoid this? If it fors get damp will the color run?
I wondered if there isa way to add a metallic ‘color’ to these cookies without painting or topical treatments.
I will be making these this week. Triple batch to use as gifts. How would you pack these to ship? Only 1-2 days shipping time.
Thank you. Glad I found your site.
Hi Maureen,
You can freeze these cookies. I haven't had trouble with the color running. I just let them sit sout eparately until they're thawed.
I haven't experimented with metallic color.
For shipping, I would make sure to let them sit out for a day to harden then pack them between layers of parchment paper.
is it easy to transport the icing? like if i would make it beforehand and then decorate the cookies elsewhere?
Hi Brianna, you can make the icing ahead and transport it. Just whisk it together really well before using. And I would take a little extra half and half along as you may need to thin it out a little bit after transporting it. Just a few drops probably.
What do you use for the green icing to make the tree?
Hi Julie, I use two different shades of green gel food coloring. You can also use liquid food coloring.
HI Chris. These cookies are amazing. I made them last Christmas and not only were they beautiful, but they are great tasting cookie that everyone loved. I just finished making the recipe for by daughter's 21st birthday and using a "21" cookie cutter. For the glaze I swirled bright pink gel and orange gel food coloring and the effect is so pretty. My question is, I have a another cookie cutter shape that I'm going to be using and I was wondering if I used this glaze recipe and then wrote on the cookie with a decorating tip after the glaze was fully hardened (using a royal icing), will that work?
Hi Bernadette, I love how you have adapted this recipe and technique!
To answer your question, I think that should work fine as long as the glaze is nice and hardened!
Hi!
These sound delicious! Could you please tell me if the icing will set hard enough for me to be able to stack the cookies on top of each other in order to transport them?
Thank you 😊
Hi Mary, the icing does harden if you let the cookies set out overnight. I have often stacked them on a platter and it works well. I also stack them in storage containers with parchment paper in between with good results. I don't think I would stack them tightly for a long period of time though, like if you were intending to send them in the mail and they would be stacked up for days on end.
I love this recipe! The cookies turned out great, and the glaze added the right amount of sweetness to the cookie and was the easiest way to ice a cookie! (I just used it without the peppermint because I'm not the biggest fan of it!) I will definitely be using this again for other holidays as well!
Thanks, Christa! I'm so happy you enjoyed them. Thanks for sharing your results!
I will never “frost” another cookie again, these turned out beautiful and so much quicker than regular frosting. Thanks
Thanks, Terry! I love this technique too!
Do you have to put the peppermint on them?
Nope! You can use any kind of extract you like, vanilla, orange, almond...
Has anyone had to add more butter to get the cookies to form? I had to add more. The cookies were still amazing though.
Hi Angie, I use just what's called for in the recipe. You do have to make sure your butter is nice and soft though.
Thanks so much for the cookie recipe and the lovely technique of glazing them will be trying it this week I am sure they will be great
Hope you enjoy them Sushma!
i just made these and they turned out beautifully! They are all decorated and drying. How long should i let the glaze dry before putting them in a storage container?
Hi Debbie, I like to let them dry for 3-4 hours or overnight.
The cookies tuned out great!! Wanted to know if they can be frozen?
Hi Fatima, yes, they can definitely be frozen although they will keep well for at least a week in an airtight container.
Great recipe, they turned out really well. I was wondering can they be frozen?
These cookies turned out very nice. I did have to add a bit more flour to get the dough to come together, but believe I let the butter get too soft. Adding that extra spoonful or two of flour didn’t have any effect on the taste or texture though, which is wonderful! I also used your technique to glaze the cookies & love how they look.
Trying out your banana pound cake for a friend’s birthday this week—anxious to see how it turns out.
Thanks so much for sharing your results, Kathy. I'm so happy you have enjoyed the cookies!
Beautiful!
My icing is tacky/sticky and didn’t dry...troubleshooting tips? Tastes amazing just can’t figure out why!
Hi Tracy, hopefully, the glaze/icing is dry by now. It shouldn't be sticky but it's hard for me to say what could be wrong without having been in the kitchen with youl
My dough was so soft that the cut out trees wouldn't stay in shape, also they stuck to the bench and the rolling pin, despite using heaps of flour to coat. I double checked my quantities! It is hot here though! Any ideas on what went wrong?
If it's really hot, that could be the problem. I would refrigerate the dough for 15-20 minutes. Normally that's not necessary but it the temp is hot, the butter may be melting as you try to roll the dough
Hi did you use salted or unsalted butter? I am going to try this recipe for christmas trees.
I use salted butter. Enjoy!
Thank you for this frosting technique. I did my trees with the green coloring gel, but I had some stockings that I was going to do in Red, however I didn't pick up red coloring gel. What are your thoughts about using regular food coloring?
Hi Paula, you can definitely use red liquid food color. It might be pretty to mix a little red and a little pink if you have it. With liquid, you might have to add a few extra drops as you go along, but it should work fine. Enjoy!
Hi there - when baking do these cookies spread?
No, not if you refrigerate them before baking as indicated in the recipe. Enjoy!
Does the frosting harden like royal icing does? I’m wanting to try this as part of a cookie exchange but don’t want to leave a big mess. Lol
Hi Ashley, this icing does harden, not as hard as royal icing but you can definitely stack them in a container after they've sat out and dried well. They taste way better than cookies iced with royal icing.
I haven't tried them yet but I am going to make them this weekend with leaf shapes for fall, I plan on using yellow, orange and red colors and maple flavor in the icing... thank you for sharing this beautiful /easy technique!
Beautiful idea, Kim. I had thought of doing that myself this fall, even bought the cutters but I ran out of time. Take a pic if you can and share your cookies with us! ❤️ Chris
Do you have to use gel food coloring ?
Hi Andrea, No you could use liquid food color but you might have to add a few extra drops as you go along. Other than that, it should work fine. Enjoy!
This recipe is easy and delicious. Even after a week, they were still very yummy and didn’t taste stale. Even after glazing, the cookies weren’t overly sweet. We had great fun decorating them in all kinds of colors for Xmas. They turned out so well and were so much fun to do that we are making these as a graduation party favor for guests to take home.
Thanks so much, Diane for sharing your results. I'm so happy you made this a family affair 🙂 and love that you served them for graduation!
I made these last week and they were womderfu!. However once the icing dried it lost its sheen. They were dull. Why is that?
Hmmm, not sure why that happened, Christina. Mine aren't super shiny but they have a nice sheen once they're dry.
OK I'm slow I missed this for Christmas, I think I"m gonna play with it on some hearts. But really excited to try on Easter Eggs
It's such a fun technique Joyce. I will actually be posting a Valentine version today!
Hello! Love this idea - looks so professional. I'm seeing lots of comments about the icing hardening and am wondering does the glaze harden enough to package 2 cookies in a baggy together without ruining the icing or would royal icing be better for this type of idea? Thanks so much! Can't wait to try 🙂
Hi Nicole, if you let the cookies sit out for 12-24 hours, the icing will definitely harden enough to package them as you described! Enjoy!
Making these today. Cutouts in frig. now. Do these freeze well? Want to take them to a party in a week. Should I bake, freeze and frost later or can I frost now and freeze them? Will be traveling 12 hrs. so will take frozen and thaw on the trip.
Hi Hail,
These cookies will freeze fine. They also keep well for a week to 10 days without being frozen. If I was going to freeze them, I would freeze them un-iced and then thaw and ice. Enjoy!
These came out great!! But I also tried to use red food coloring, and um... the result kind of looks like my cookies are covered in menstrual blood LOL so maybe everyone avoid red.
Oh my! Good advice! Yes, stick with green 🙂
Made these and took them to a Christmas potluck.
Delicious!! Thanks for the “dipping” trick🤗
You're welcome Sandra, so happy you enjoyed them!
¡¡¡ Hola!!! Gracias por compartir. Lo voy a intentar y veamos cómo me queda. Una pregunta, qué quiere decir "4 cucharadas de mitad y mitad (o leche)"?
Gracias por la respuesta, saludos desde Guayaquil-Ecuador
Hola Maggy, mitad y mitad es un producto de conveniencia estadounidense que se usa a menudo en el café. Es una mezcla de media leche y media crema. Podrías usar leche entera en su lugar.
I made the cookies yesterday and I love the no mixing recipe. I made one batch and thought well I need more so whipped up another. I seemed to need a lot of flour for rolling but once I got that adjusted was a breeze cutting them out. I did use a 1/4 inch disc on rolling pin by mistake! but just baked them a bit longer. One broke so I had to eat that one and cookies are really delicious - so light and tastes amazing. 5 stars for sure. So happy I used your recipe. Icing them this morning and only have the liquid green food coloring - will give that a try. Thanks Chris for this recipe. Have yourself a Merry Little Christmas!
Have you ever tried more than one color in the icing or will they mix and get muddy?
Yes, you can definitely use several colors. Check out these cookies: https://thecafesucrefarine.com/red-white-and-blue-glazed-shortbread-cookies/
Hi there. Great recipe. Can these be frozen once glazed? Thx!
1Yes, just give them plenty of time to thaw
Hi. Where you use 1/2 and1/2 in glaze, you you have to refrigerate after they harden?
Hi Debbie, you just let them harden at room temperature.
THeyre asking AFTER they dry. Once the icing isn’t dried is it ok having dairy (whether milk or half and half ) sitting out or do they need to be stored in the fridge?
Thank you, Jackie, for being so kind as to clarify.
Good question! No, the small amount of half and half (or milk) is stabilized by the large amount of sugar and considered safe at room temperature for two to three days. That's why you see donuts and pastries with icing made with powdered sugar and milk sitting out at room temperature.
https://www.dispatch.com/article/20150318/LIFESTYLE/303189728
They are so pretty! You are the expert with this technique, Chris! I makes decorating cookies so easy too. Love them you shared such a great idea.
What a fun idea Chris, so cute!!
My family wouldn't allow me to give these away! So pretty!!
Just Beautiful -- cant wait to try them!
Chris -- What brand of extracts do you prefer and/or, for this one Do you have a favorite for peppermint ?
Thanks much!
So pretty and festive for the holiday season Chris! What beautiful gifts they would make too!
The perfect holiday cookie! Love your easy technique for decorating. I'm going to try it one of these days 🙂 Pinning!
They look amazing and festive! That glaze is really pretty, Chris.