This post may contain affiliate links. For more information, see our privacy policy.
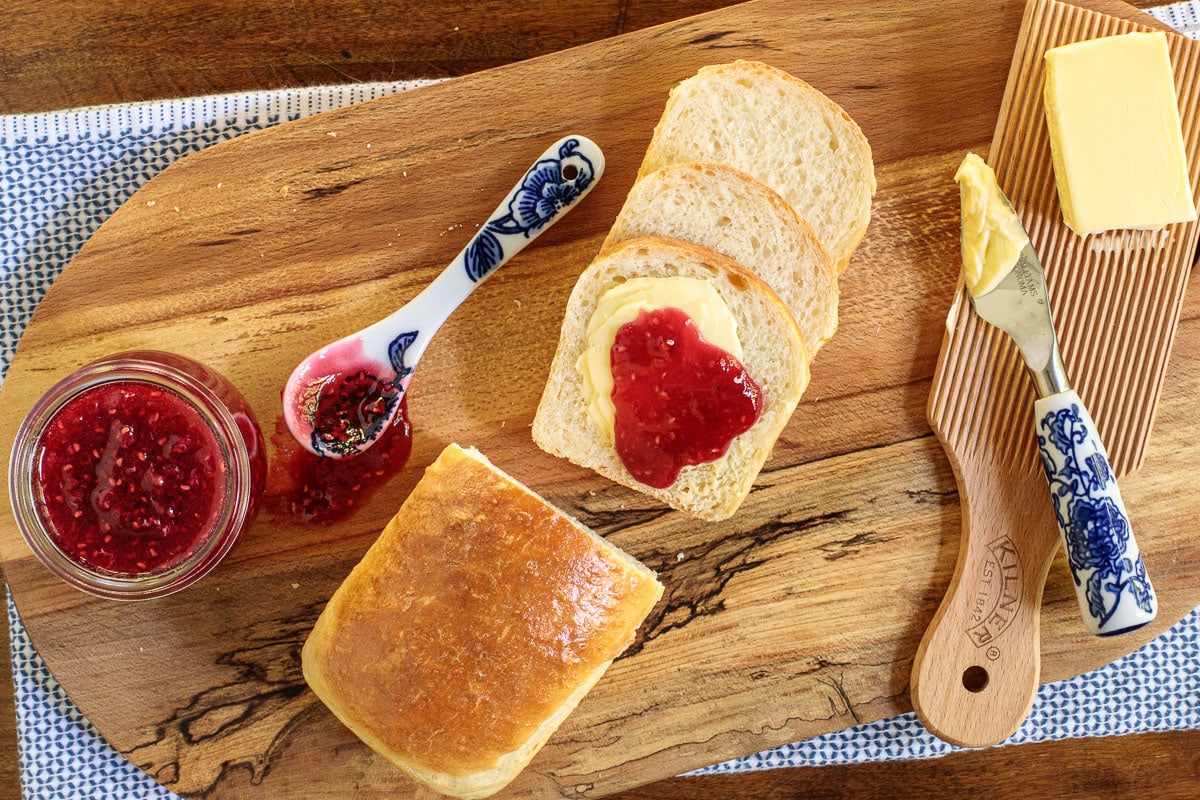
Stir together this one-bowl, Overnight No-Knead Brioche Bread before bed. When you rise, it will be ready to shape and bake. It's the most tender, buttery bread that's wonderful for toast, sandwiches or for your next dinner party!
My mom was famous for her fabulous homemade bread. She would bake ten (yes TEN!) loaves at a time and made it seem like it was child's play. We all loved her bread and enjoyed it toasted for breakfast, warm and crusty in the dinnertime bread basket or for sandwiches of all kinds. When I served this bread to our son Nick for the first time, he took one bite and said, "This bread! It's better than grandma's!" I knew we had a winner!

Better and easier than grandma's bread...
And guess what? I used to watch my mom make her homemade bread and this no-knead brioche bread is WAY easier than the way she did it. Of course, she probably had really shapely arms because of all that kneading, but I can think of more fun ways to get shapely arms (or "guns" as my kids call them!).

The magic happens while you sleep...
The whole process from start to finish will take 10-12 hours, on average, but it's 99% hands-off time. Good bread can't be hurried when it comes to rising. And that's exactly where the majority of the time is involved with this recipe.
Your part is super easy. You simply stir together flour, sugar, yeast, salt, eggs, butter and water until it's well-mixed. Cover the dough, refrigerate and have yourself some sweet dreams. The magic will be taking place in the refrigerator. You'll know what I mean when you check things out in the morning. The dough will be light, airy, will have climbed up the bowl and be ready to roll (literally!).

I like to make four small (my pans are 3x6-inch) loaves of bread with this recipe, but you can also make two larger loaves.
Keep a stash of this no-knead brioche bread in the freezer
This no-knead brioche bread freezes beautifully. It's so nice to pull a loaf out for breakfast, lunch or dinner. As soon as my stash is depleted, I make another batch since it takes so little time. If I'm making it during the day, I can run out, do a few errands, have lunch with a friend, pick up groceries, and the dough just does its own thing while I'm gone.
I like to pop the little loaves back in the oven after thawing and get the crust nice and crisp. The hot bread is fabulous served sliced in a breadbasket. It's also wonderful for sandwiches (grilled cheese are amazing!), with salads or alongside soup (pictured below is my Fresh Spinach Soup - delish!)

Even if you've never made bread before, give this no-knead brioche bread a try! Because the recipe calls for instant (or rapid-rise yeast) there are no worries about activating the yeast. Instant yeast is combined with the dry ingredients (flour, sugar, salt) and activates on its own when the warm liquid is added.
You might even get a reputation like my mom had as a famous little old bread baker!
Café Tips for making this Overnight No-Knead Brioche Bread
- This recipe calls for "hot tap water". What that means is water that feels hot if you dip your finger in it but not so hot that you need to quickly pull it out. If you want to use an instant thermometer, the temp should be between 118-122˚F (47-50˚C).
- This recipe calls for instant (or rapid-rise) yeast. Don't try to use regular dry yeast. Instant (or rapid-rise) yeast can be found at most grocery stores right next to the regular yeast. It usually comes in small packets which hold 2¼ teaspoons, but you can also purchase rapid rise yeast in bulk which is infinitely cheaper!
- When turning the dough out onto the counter to form the loaves, use plenty of flour. If the dough is sticking to your hands or the work surface, you need more flour. Just keep flipping the dough in the flour till it's not sticky.
- A baker's bench scraper is a wonderful tool when working with bread dough. It keeps your fingers from getting sticky as you can use the scraper to turn the dough in the flour to coat it. It's also a great clean-up tool to scrape any excess dough from the counter.
- I like to let the bread cool completely then slip individually into bread bags and pop them into a freezer. A few hours before serving I pull a loaf or two out to thaw, then re-warm the bread in the oven at 300˚F for about 10 minutes - or until it's nice and crusty.
- If you want to make the dough in less time, just don't refrigerate it. It will take 2-3 hours to rise and then you can proceed with forming the loaves. Bake as directed once the loaves have risen. The bread has a deeper flavor with the long, slow rise but if you're in a pinch, you can do it without the refrigeraton.
- You'll need 4 small baking pans to make this brioche bread, approximately 3x6-inches. I've had these Chicago Metallic pans for several years and really like them. They're non-stick and come out of the dishwasher looking like new.
- If you want larger loaves, you could also use two 8x4-inch pans.
- This no-knead brioche bread is fabulous with a smear of butter and a dollop of this Overnight Raspberry Freezer Jam (pictured above). If you missed the fresh raspberry season, no worries, the jam can be made from frozen berries.
Thought for the day:
Give thanks to the Lord, for he is good;
his love endures forever.
Psalm 106:1
What we're listening to for inspiration:

If you enjoyed this recipe, please come back and leave a star rating and review! It's so helpful to other readers to hear your results, adaptations and ideas for variations.
Scroll Down for the Recipe - or Save It to Your Inbox
We’ll email you the recipe so it’s easy to save, print, or share.

Easy No-Knead Brioche Bread
Ingredients
For the bread:
- 4 ¼ cups all-purpose flour
- ¼ cup sugar
- 2 teaspoons kosher salt
- 1 envelope instant yeast, 2 ¼ teaspoons,7 grams, or ¼ ounce
- 4 tablespoons butter
- ¼ cup milk
- 1 egg
- 1 ¼ cups hot tap water
For the egg wash:
- 1 large egg
- 1 tablespoon tap water
- soft butter , for greasing the pans
Instructions
For the dough:
- Combine flour, sugar, yeast and salt in a medium-large bowl. Stir well to combine then make a well in the center.
- Melt butter in the microwave for 30-45 seconds on high power, until just melted. Remove from microwave and add the ¼ cup of milk. Stir with a fork then add the egg and stir again until well mixed.
- Add the milk mixture to the well in the center of the flour. Add the very warm tap water to the well then stir to combine. Continue stirring until all flour is incorporated. Cover the dough rightly with plastic wrap and place in refrigerator overnight, 8-16 hours.
For prepping the pans and shaping the dough:
- Generously butter four 3x6-inch loaf pans and set them aside. (Alternatively, you could use two 8x5-inch loaf pans.)
- Generously flour a work surface and transfer the dough to the work surface. Turn several times with a bench scraper or spatula until the dough is well coated with flour.
- Using a bench scraper or spatula, divide the dough into four equal pieces. Turn each piece in the flour to coat all of the surfaces. Add more flour to the work surface if needed.
- Take one piece of the dough and flatten it out with your hands into a rectangle shape with the long side slightly longer than one of your bread pans. Turn to coat both sides with flour if any of the surfaces are sticky.
- Roll up tightly like a cinnamon roll, then tuck the ends under and shape with your hands into a loaf. Place in one of the prepared pans. Repeat with remaining pieces of dough. Cover the pans with a clean kitchen towel and let the bread rise again until the loaves look like they’ve doubled in size, about 1-2 hours (if your house is chilly, it may take a little longer.
When ready to bake:
- When the loaves are close to being doubled in size, preheat the oven to 350˚F. Prepare the egg wash by vigorously whisking together one large egg with 1 tablespoon of water.
- With a pastry brush, brush each loaf over the top with the egg wash. Try to be careful not to let the wash drip down the sides of the loaves into the pan.
- Place loaves in the preheated oven for 18-25 minutes or until golden brown. Check it after 15 minutes. If it's getting too brown on the top, cover it with foil for the last 3-8 minutes. (Larger loaves will take longer.)
- Remove bread from pans and transfer to a cooling rack. (If bread is stuck to the side of the pan anywhere (from the egg wash), loosen it with a small thin-bladed knife.) Allow to cool before slicing. Enjoy!
Notes
Nutrition
The Café Sucre Farine is a participant in the Amazon Affiliate Program. The Amazon Affiliate Program is designed to provide a means for sites to earn advertising fees by advertising and linking to products on Amazon. The price you pay as a consumer does not change, but if you make a purchase through one of our links, we receive a small commission - and we continue delivering delicious recipes to you!
Shop Our Café Loves
We’ve gathered our favorite kitchen tools, tableware, and entertaining treasures in one place, the Café Loves store. It’s a wonderful spot to find something special for yourself or the cooks and hosts you love!


I only have fast action yeast, can I use it in this recipe or wait until I go back to the UK to buy instant yeast which is difficult to find where I live !!
Cheers Lynda
I have tried making this brioche recipe twice and both times my dough has not risen.
I thought maybe the first time my yeast was not fresh, but this time I made sure to use very fresh yeast.
After reading through the comments, I see that no one else says they have had this problem and I am so puzzled!
I have made other bread recipes from your wonderful website and had excellent results, so I feel like I’m following the directions properly. Do you have any idea as to what could be going wrong?
Hi Jan, We're sorry to hear about your issues making this brioche - how frustrating! It's difficult to know without being in the kitchen with you, but here are a few possibilities to consider: Instant yeast is pretty reliable, so the two most likely culprits are either that something is wrong with the yeast or that you're starting with water that's too hot. In order to test your yeast: Mix 1 tsp sugar with 2 1/4 tsp yeast into 1/4 cup of warm water. After 10 minutes, if the mixture is foamy and doubled in size, the yeast is active. As for the water temperature, we recommend using an instant thermometer for accuracy. Hope this helps! Please let us know if we can try to help you troubleshoot further.
I appreciate your help!
I did test the water with a thermometer first and used what I believe to be fresh yeast.
The only other thing I can think of is that I did not have fresh milk either time and used evaporated milk mixed half and half with water.
Do you think that could possibly be the culprit?
Hi Jan, using evaporated milk can affect the texture and overall quality of the bread a bit, but it typically shouldn’t interfere with the dough rising.
I’m wondering if the dough may just need a warmer, cozier place to rise.
One little trick I love is to boil a cup of water in the microwave for a minute or two. Push the hot water to the side, then place your covered bowl of dough in the microwave as well. The warm, steamy environment creates the perfect cozy spot that yeast absolutely loves!
Hi Chris. I love your recipes, and I am looking forward to trying this bread.
I have a question regarding the hot water. You state that it would read 118-120 degrees Fahrenheit on a thermometer. When added to the flour, it reads very warm tap water. Am I to heat the water before starting the dough, then leave it to the side for it to cool a little?
I'm worried, as temperatures of 120 and higher can kill the yeast. I hope my question is not too confusing.
Thak you.
Hi Leslie, Instant or rapid rise yeast can handle slightly warmer water temperatures, ideally around 120°F and up to 130°F. Hope this recipe turns out well for you!
Delicious, soft bread and so easy to make! I made two loaves instead of four little ones. Also, I only have one loaf pan so I made a braided round loaf as well as a loaf. I also added raisins to one in the loaf pan - it was so good! Thank you for sharing this!
Awesome! Thanks for the review, Laura!
This sounds like a great recipe. Could I make this in my Bread Maker?
Happy Holidays
Pat
Hi Pat, I have to be honest, I don't have a bread maker so I haven't tested it with a bread maker which means I can't give you a "for sure" answer.
This bread and the porridge bread were a big hit at the Thanksgiving table. The brioche bread is particularly attractive with its shiny glaze. I baked and froze the breads, and reheated while the turkey was resting. There's only half a miniature loaf remaining -- so I will be baking again very soon!
So glad to hear that, Mimi!
Hello Chris,
Re Overnight Brioche Bread.
Question regarding the addition of the melted butter and milk.
Do you add the milk to the melted butter, and then add the egg to the milk-butter mixture?
Just wanted to clarify.
P.S. Love your website and your recipes.
Hi Eloise, yes, that is correct. So glad you're enjoying the site!
Yum! So good! Added chocolate chips and baked as a round boule on a parchment covered pie plate. 425 for 15, then 375 for 18 minutes covering with foil when brown. No need to buy the expensive chocolate brioche loaves anymore!
Awesome! Thanks for the review, Heidi!
Hello,
Can you describe how you measure your flour? I usually weigh mine in grams because using cups can vary so much. And I’ve seen equivalencies anywhere from 120 to 145 grams! I don’t want to get it wrong. Thank you!
Hi Carrie, yes flour can be tricky, even when you weigh in grams as difference sources have different opinions on how many grams are in a cup.I generally scoop the flour into a cup and then level with a flat edged knife.
I would love to make this recipe in a Pullman mold. Do you know if it would work? Thank you!
Hi Susana, I haven't tried a Pullman pan for this recipe but I can't see why it wouldn't work.
Really delicious with great texture. It rose up well in 3x6 pans, but never got over the top of standard loaf pans, despite rising well. I wonder if the 1x recipe is actually 1 standard loaf?
Hi Rose, if you're loaf pan is 9x13, 1 recipe should be perfect!
Can you use half whole wheat and half all purpose flour? Would that work? If so... should I increase or decrease the amount of liquid?
Hi Nik, I would start out with 25-30% WW flour and go from there. If you use a lot of WW flour you will need to add vital gluten to prevent the bread from being too dense.
Hi Chris, Normally I make 'healthy breads (whole wheat, ancient grains, etc), but yesterday thought I would try an enriched dough + this recipe sounded "no knead" easy. My loaves are rising right now. I didn't read through to the "older comments", so flipped to King Arthur to find out the internal temp of the bread when baked (190). Alert! Rabbit hole!! KA's recipe is SO DIFFERENT! Now I'm going to have to bake theirs as well - to compare. The KA recipe is MUCH more fiddly, & has some very distinct differences. I'm sure both will be wonderful, & it continues to amaze me that there is often more than one way to bake any kind of bread. Thanks for all your recipes - especially the ridiculously easy ones.
Thanks, Katy!
How could I make this dairy free?
Hi Sharon, we have not tested this recipe without the butter. The butter is what gives this bread its rich taste.
Could this be adapted for gluten free?
Hi Anita, I have not tried this with GF flour and I'm not an expert in the area. However, my nephew has a wonderful GF website with lots of fabulous recipes: https://cakesandcoriander.com.
Hello! Could I use active dry yeast if I activate it in some of the warm milk and sugar first? Thank you! Looking forward to giving this a try!
Hi Kimberly, yes, that will work!
Would it be alright to substitute bread flour in the recipe?
Hi Emma, yes, bread flour will work.
I plan to make 2 loaves in my 8 x 4 loaf pans. Should I store leftover bread at room temp in a ziploc bag? Thank you!
Hi Janet, that will work. If it's going to be more than a couple of days, we would suggest freezing it.
You mention that you can cook this in two 8"x5" bread pans. Mine are 9"x5" and that seems to be common based on what I could find at Amazon. Will I get the same results with 9"x5" bread pans? And how long should it take to cook the bread in the larger pans?
Hi Kris, 9x5 pans will work. The bread will be a little lower though.
So easy , buttery and delicious!
Awesome! Thanks for your review, Maegan!
A great Brioche! Thank you for sharing.
I have a question. Can you offer recommendations for baking with a Dutch Oven? Thank you!
Hi BK, so happy you enjoyed it.
Regarding your question, I would not make this bread in a Dutch oven. It would not do well. We have several Dutch oven recipes that you might enjoy:https://thecafesucrefarine.com/no-knead-seeded-oatmeal-bread/
https://thecafesucrefarine.com/5-minute-artisan-bread/
This recipe was great. Everything was explained clearly and it worked great! I used half to make a babka and half for regular brioche and both were perfect. Thank you so much!
Wonderful! Thank you for letting us know, Georgina!
Every Cafe Sucre Farine I have tried has turned out exceptionally well. I have made these loaves twice and both times they have been delicious. The second time the loaves didn't rise as high so I will try slightly hotter water as suggested by another poster.
Has anyone made this recipe substituting half or 3/4 whole wheat flour for the white, and if so how did it turnout?
So glad you enjoyed this, DeeDee!
Hii i wondering how to calculate the engridients in grams if you dont mind.. ^^ really want to rebake it. Thanks a lot
Hi Fa, there is an option to switch to metric measurements right under the ingredient list. Enjoy!
Oops my bad diddnt see it.. thank you for your reply chris!
Could you use bread flour for this? Also how long should the larger loaves take? I kept putting them back in because I wasn't sure. Great recipe. Thanks!
Hi Carol, yes you could use bread flour. Regarding the time, I would bake the larger loaves for 20 minutes then check every few minutes until golden or until an instant thermometer inserted in the center of the loaf reads 190˚F.
Nothing like getting excited for a great looking recipe and then unexpectedly reading a religious quote that brings childhood flashbacks of being told I'd be tortured in hell if I didn't believe in god and hearing the bible being used to justify domestic violence against my mom!
Hi Joshua, Thanks for taking the time to leave a comment. I appreciate hearing your point of view.
It makes me sad that men have so distorted God's beautiful Word, that Scriptures like this are offensive to you and I'm so sorry for the difficulties you experienced as a child. No child should have to go through that.
The Bible is not a book about religion but rather a relationship with the living, eternal Creator of the universe. I pray for God's richest blessings in your life.
Thank you for using your platform to give thanks, its really beautiful to see, especially in times like these. God bless you and keep you!!
Thank you, Elyssa!💕
Amen.
Dear Joshua, God Bless You. It sounds like you have been hurt and suffer due to lies and misdeeds conducted "under the guise of religion". Sadly, you are one of too many.
Please know you are Loved by the Father, Son and Holy Spirit. And, by me and my Christian Brothers and Sisters. I have prayed that you will be Blessed by true Christian Love and Faith. And, that your spirit will welcome the truth.
In Christ.
BK
I recently made and reviewed your moist and delicious Banana Bread recipe and just had to come back to tell you about your Brioche Bread recipe. I made your bread yesterday and it turned out fabulous. I had been trying to make it for the overnight rest in the fridge but I always run out of steam in the evenings. So, I made it in the morning and let it rise on the counter 4-5 hours and then proceeded with the recipe. It turned out great, wonderful, delicious! My Grands will love this bread. Will be making again. I'm new to your site and can't wait to try some of your other recipes. Thank you!
Wonderful! Thanks for letting us know, GrandT!
Can this be made into rolls?
I've seen uour recipe for dinner rolls but that requires 1 whole egg and 2 yolks...
Hi Rose, yes you could definitely make this recipe into dinner rolls!
Hi Guys,
Do you think this recipe would be okay for a bread machine? I'm very time poor and make all of my own bread, but in a bread maker.
Love your recipes,
Jodie-Anne
Hi Jodie Anne, I haven't tested this recipe in a bread machine but I would think it would work.
This bread is my family's favourite! My husband loves it because it reminds him of his grandmother's coffee can bread. I have to say, the recipe is perfect. I can't make it TOO often though, because we're trying to lose weight and buttery, soft, sweet bread does not help. I omitted the egg wash because I ran out of eggs and it still looks lovely. I did the 4-hour rise on the counter and it was every bit as delicious as when it rose in the fridge overnight. This is my go-to bread now, thank you so much for the recipe.
That's great, Meghan! Thanks for letting us know!
I just made this and I’m very upset!
This is too easy, too delicious and that is dangerous! But, calories and kidding aside, this is going to bring a LOT of JOY in my house! I had almost given up on making bread, as I’ve tried countless times to make so many kinds of breads and some were good, but, I just don’t have the patience , it all just beat down my bread making confidence …and then i found this recipe!
Can’t wait for my daughter to come home and welcome her with her favorite type of bread… soft yummy Brioche.
Thank you for making me a better mom!
Ha! Thank you for the kind comment, Gina! I'm so glad you had success with this recipe 🙂
This has become our favorite homemade bread. I, however, had to make some slight adjustments. My first try was good; subsequent loaves didn't rise enough. After some research, I learned that instant yeast rises best with water temperature at 120 to 130 degrees. I also make sure my milk is warmed and try to let the egg warm to room temperature. Using a Wheat Montana flour makes it so soft and buttery.
I noticed also that allowing the bread to rise from the refrigerator then kneading just a little into the loaf sizes helped my bread rise to a very nice size. I let it rise in the pans as stated on the recipe. Without this step, I wasn't getting a really light bread nor one that was rising as much as needed.
Seems I'm making bread twice a week now; my husband loves it and wants hamburger buns from it as well. Not sure it's hefty enough for that!
Thanks for sharing your review, Seena! So happy you've enjoyed this recipe!
Made this amazing recipe and it turned out great on the first try! My grandparents loved it as well. thank you!
That's great, Hannah! Thanks for letting us know!
So my 50 yr old fiance was talking about how he'd never had fresh baked bread and I couldn't believe it! We have very limited space so I went in search of an easy, simple recipe and stumbled upon this. It took almost no time (or space) to prepare and the results were phenomenal! I added a little extra sugar because I served it for breakfast and he has a morning sweet tooth. He's hooked! All of the bread was gone by that night (I got one slice, lol)! Thank you for sharing this awesome recipe!!
That's awesome, Lori! I'm so glad you enjoyed it!
I have 2 questions. I have pan, which I believe it’s made for mini cornbread loaves. The measurements are 2 1/2 x 4 1/2 inches with room for 8 mini loaves. I would love to use that pan to make mini sub rolls for lunches. Any idea one the yield or how many that it might make? Also, I know breads are usually cooked to a certain internal temperature for the most optimum outcome. Would you happen to have an idea of what internal temperature this dough should be cooked to to allow for carry over cooking to finish it. Thank you and I look forward to trying this recipe.
Hi Kevin, I honestly would have to test this recipe in your pan to be able to give you the yield. The temperature question though, I can answer. The bread should be right around 190˚F with an instant thermometer.
I wonder if this could be transformed into Cruffins???? I would LOVE a recipe!!!!!
Hi Sherry, I haven't tried that but it's a great suggestion. I will keep that on the back burner!
does the dough need to come up to room temp before dividing and shaping into loaves?
Nope, it will come to room temp as it rises. Enjoy!
I’m in the process of making this recipe and I notice there is no mention of oiling the bowl or the dough when you put it in the refrigerator to rise over night. In checking my dough after a few hours, I see a crust has formed and I took the dough out, oiled the bowl and top of dough and put everything back to rise. Have I messed up the dough for this batch and/or should the bowl be oiled?
Thanks, I do love your recipes and have used many
Joan
Hi Joan, you should be fine. Generally, when you cover the tightly dough with plastic wrap, the top does not form a crust.I will make that more clear in the directions.
Thank you, it was my assumption and I should know. It is covered but with a shower cap, not as tight as Saran type wraps
Hi - so do we oil the bowl? Thank you
You do not need to oil the bowl for this recipe, Cathy.
Thank you. Can’t wait to try this bread!
How would you recommend going about braiding it? Love this recipe but wondering if I could change the shape up!
Hi Milan, if I wanted to braid this bread, I would probably just make one loaf. I'd divide the dough into 3 equal portions, then roll each into a long log and braid them together.
Do you have a cook time for the two larger loaves? It just says “longer” and I don’t want to overtake them! Thanks!
Hi Kay, I would give them an extra 5-8 minutes and then check with an instant thermometer. The internal temperature for yeast bread should be 190˚F.
Good Morning, Chris. I'm not saying I messed up the recipe, but I WILL say it's very forgiving. I just took this bread out of the oven. My intention WAS one loaf tonight, one with Sunday dinner. (I baked the two larger loaves.) I'm glad there's time for me to get MORE of this lovely bread going so I can, indeed, have some with Sunday's dinner. Oh, my GOODNESS, this bread is beyond delicious. The recipe is easy and the bread is scrumptious. Thank yo so very much for sharing this recipe. Time for me to have a slice of brioche. Merry Christmas and Happy New Year to you and your family.
Thanks so much, M! Happy New Year!
My Family said this was pure perfection! Thank you very much for sharing this recipe.
Awesome! Thanks for letting us know, Sue!
Absolutely, perfectly delicious. Love this recipe. Thanks.
Yay! Thanks, Susan!
1st time bread maker here! This was truly AMAZING!! Nice crust, soft buttery dough. We eat 1 loaf fresh and I'm about to pull the other out of the freezer to have with dinner. What a great technique. I'm sure I'll be making this again. You've made bread-making approachable for me! Thanks for sharing.
Awesome! Thank you for sharing your results, Stephanie!
Happy Thanksgiving! I love your site and your recipes. I can't tell you how many pickles you have got me out of! When you say easy, it is! Bless you for all the amazing things you do.
I'm so glad, Sara!
This turned out amazing. Fluffy and buttery and perfectly soft. This is definitely my new go-to bread recipe.
Awesome! Thanks for letting us know, Ryan!
Was wondering if it would make a difference if you mixed it in the stand mixer?
Hi Jill, that will work fine!
Thanks so much for posting this recipe. I am going to try this with my granddaughter, she loves to help and is progressing along with her cooking skills. She is only 11 and we bought her own set of pans for Christmas.. She really liked this and I hope she likes this recipe and it sounds easy enough maybe with some help she can make it for her family. Pops and I get to be the testers first ..lol
How fun to bake with your granddaughter, Cindy! Let us know how it goes 🙂
I love this recipe, in fact all your 'ridiculously easy' bread recipes. After breaking my right arm and continuing to 'age' I appreciate not having to knead bread. I've made bread since childhood, learning from my Mom and an Aunt that baked her bread in a ranch house kitchen woodstove. I've shared your blog posts and recipes with many friends; we all appreciate your testings and tastings for us your loyal fans.
PS...many difficulties posting my comment today, finally had to take all safety precautions off my laptop to get it done. Is this new or just a problem using a laptop not a smart phone?
Hi Helen, I'm so happy you've enjoyed our recipes! Thanks for sharing them.
Regarding your issue with commenting, I'm sorry you had difficulty. I'm not sure what is going on but I will check with our WordPress specialist to see if he can figure it out.
Hi Chris..how do you store your yeasts?I've never tried the one you have linked to..but almost all others lol:)Thank you!
Hi Monique, I always keep a small jar in the refrigerator and the rest in the freezer. The frozen yeast is good indefinitely. I buy in bulk and have never had any problems with this. It works great!
This bread tastes really good and I love the texture. I baked it today and plan to make french toast from it tomorrow. I did the option of baking it in two 8" x 4" loaf pans. I definitely will make this again, but I would like a taller loaf and plan to see how it turns out with all the dough in one 9" x 5" loaf pan. The two smaller loaves this morning took 35 minutes in my oven. They browned nicely and were fully cooked.
Thanks so much for your review, Melisa!
Hi Chris,
When you say hot tap water for the bread, about what temperature would that be - 120º to 125º or hotter. My water get to about 131º for my tap water.
Thank you,
Hi Judy, wow, your water does get really hot! When I say hot tap water, I mean water that feels hot (not warm) when you dip your finger in it but not so hot that you have to immediately pull it out. About 118-122˚F.
Hi! Any particular type of milk that should be used? Would using oat milk be okay?
Hi Zoe, I use whole milk for this recipe. I can't say for sure about the oat milk since I haven't tested the recipe with it.
I made this last nite put in fridge for about 15 hours turned out fantastic. We truly loved it. I am very new to making bread. Only my 2nd time. My ? Is a made 2 loafs out of it
How do I store the other loaf for tomorrow??? We ate1 tonite it was so good.
Thank you
Finis
Hi Finis, bravo to you! 👏 So happy you enjoyed this recipe.
Regarding your question, I would probably pop it in the freezer and pull it out a few hours before you want to serve it then put the whole loaf in the oven (right on the rack) at 300˚f for about 10 minutes. Because the bread doesn't have any preservatives, it's better to freeze it, even if it's just for a day.
what an easy and delicious bread.....it was fun to make and delightful to eat.....thank you
Thanks so much, Nadine!
I have an abundance of bread flour. Would plan to make it with half bread flour — hard wheat- & half AP flour. Will let u know.
Thanks, Shirley.
Wonderful recipe! I often forget to make it overnight and just make it the same day. I even used this recipe and added in green chili and cheese. I also use the recipe to make great buns for hamburgers.
Thanks so much for sharing your results, Tammye! And green chili and cheese sound like delicious additions!
hi chris! can you clarify- once you take the dough out of the fridge, do you let the dough warm up a little prior to shaping ? or go straight to shaping from fridge? if there is await, how long? thank you and can't wait to try this receipe!
Hi Judy, I shape it right away and then let it rise in the pan. If you find it's hard to roll out, give it just 10 minutes or so to allow the gluten to relax.
Thank you! I’ve made this twice now and it’s the only bread my son won’t say- “mom! Please go to the store and buy sandwich bread!!
I love that! Thanks for letting us know, Judy!
Sorry, me again. Do you think the whole recipe would be used in this one dish ?
Your recipes are amazing. My friends are still talking about the French Apple Tart. It was delicious.
Thank you.
I have an Emile Henry Brioche dish. Would it work for this recipe? It is 1 1/2 qt capacity and 4 inches deep.
That would make a beautiful loaf, Peggy!
Hi! My dough is in the refrigerator and plan to bake it tomorrow morning. I read another post that says she let it come to room temperature before shaping the dough. Is this necessary? Or can I work with shaping the dough straight out of the refrigerator?
Thank you!
Is it possible for me to half the recipe to make 1 loaf?
can i half the recipe to make 1 loaf
Sure!
Can I let it it proof overnight for over 16 hours?
So maybe 20 hours?
Hi Aleena, I haven't tried proofing this longer than 12 hours so I can't say for sure.
I’ve been looking for a recipe for a brioche hamburger roll, and remembered this delicious bread that i made a few months ago. Do you think I would be able to use this dough for the rolls?
Hi Sara, you could use this for brioche buns or you could use this one: https://thecafesucrefarine.com/easy-buttermilk-brioche-buns/
Can I use melted butter instead of egg wash?
Hi Gen, you can. It will give a really nice flavor but you won't get the pretty shine of classic brioche.
Hi ... Y do u suggest not using active dry yeast . Cant v proof the same and thn add. .... What difference would that make 2 the bread if i don get instant yeast
Yes, regular yeast will work fine. Just proof it before adding to the rest of the ingredients.
I've made this twice now! The first time with cinnamon and raisins as 1 larger loaf and 3 small ones, and then today in a braided loaf form with different kinds of seeds on the outside of each strand. It was so good! (I increased the heat to 400 and checked it sooner given the different shape.) Taking its temperature really helped; when it was brown but not hot enough inside, I covered it with foil. I threw the dough together and straight into the fridge last night, I was exhausted, and then I got to enjoy giving it a couple kneads on the counter and leaving it to rest under the upturned bowl this morning as it came back to room temp before shaping. I think I will be making variations on this again and again in the future!
Thanks so much, Miss Jubilee, for sharing this detailed review! I love all the different ways you are using this dough!
If I want to use only half the dough, can I leave the rest in the fridge and bake the next day? Also, I want to say that I love your newsletters, recipes and website! Your Ridiculously Easy Orange Cranberry Scone recipe is my favorite! I make it all the time!
Yes, I think that would definitely work. Thanks so much!
Thanks, Sandy! I'm so happy you've enjoyed The Café
Yes, you can definitely use half of the dough the next day.
Beautiful loaves of delicious bread. Not hard to make. No problems with recipe. I am so enjoying your website.
Thanks, Debbie! 💕💕
Awesome! Thanks for sharing your results, Debbie!
can this recipe be made with gluten-free flour?
Hi Annie, I haven't tried this recipe with GF flour so I don't want to say for sure. Please share your results if you try it.
Hi! Can I use active dry yeast because that is all I have now? Thank you!
Hi Pola, you could use active dry yeast for this recipe but you would need to proof it first. Instant yeast doesn't need to be proofed. For instructions on how to do that, check out this post. https://thecafesucrefarine.com/no-knead-cinnamon-raisin-brioche-bread/
It's basically the same recipe but I explain in the recipe notes how to use regular yeast in lieu of instant yeast.
Thank you so much! Excited to try this out
Enjoy!
Hi! Is instant yeast same as instant dry yeast? And is there a way to use active dry yeast because that's what i have at the moment?
Instant yeast is the same as instant dry yeast. Instant yeast doesn’t need to be proofed. For instructions on how to do that, check out this post. https://thecafesucrefarine.com/no-knead-cinnamon-raisin-brioche-bread/
Hi Pauline, instant yeast is the same as instant dry yeast. If you use active dry yeast for this recipe vs instant yeast you will need to proof it first with some of the liquid from the recipe.
I made this bread and it turned out perfect and was delicious. One question, my dough did not rise while in the refrigerator overnight? Not sure why.
Hi Gayle,
It's hard to say why it didn't rise in the refrigerator. I wonder if your water was not warm enough. I"m glad it turned out well despite the problem.
Brioche are my favorite. I would definitely try this! Would it be fine if i make buns instead and cook it in a dutch oven?
Yes, that should work fine!
My loaves are fantastic. I made two loaves, didn’t have instant yeast, but it worked anyway. These loaves won’t last long, my husband already wants more!.
Haha! I love it! Thanks for reporting back, Sara! 💕
It’s probably too late, because my loaves are in the pan for the second rise, but I was wondering how flat the ough should be before rolling cinnamon bun style.??
Not super-flat, just flattened out enough to be able to roll it into loaves.
Thanks, I’ll let you know how they come out. I did find a tip about proofing that I thought I would share. Everyone who bake bread may already know it, but it’s new for me. I placed the loaves in the oven - oven of with the light on to proof and they rose up nicely.
Thanks, Sara. That's a great trick. Sometimes I preheat the oven for 1 minute then put the dough in to proof with the light on. That works nicely too!
This looked and seemed too easy to be true. I live at 10000+ feet and was sure this would not work. WRONG. It worked perfectly. This is a delicious bread, perfect texture, and taste. Thank you a million. Still going WOW!
Yay! Thanks so much for sharing your results, Sandra!
I have a question in this step
Roll up tightly like a cinnamon roll, then tuck the ends under and shape with your hands into a loaf. Place in one of the prepared pans
I can’t visualize this. How much do you roll like a cinnamon roll ?
Thank you
Hi Marsha, when you make cinnamon rolls you start with a flat rectangular piece of dough, add the filling, then roll it up into a long tube. With cinnamon rolls, you then cut the tube into a number of pieces. That's the same thing you do with this bread minus the cutting. After rolling, you tuck the long ends underneath to fit into the loaf pan.
Wow! Just made this and it was fantastic. This is more dense than traditional brioche, but such a great loaf of bread. I think you’ve just replaced my regular sandwich bread recipe.
Thanks, so much, Elizabeth! We had some for dinner tonight, it's one of our favorites!
I live in China and have tried several of your recipes, they have all been fabulous. I especially appreciate that most can be made with easily found basic ingredients since it can be challenging to get specialty baking ingredients here! I was wondering if I could bake half and freeze half this dough for later use? Thank you for sharing your baking wealth with the world.
Hi Lang,
Greetings all the way to China!
Yes, you can freeze the dough. I like to freeze it right in the pan. Then when I take it out of the freezer, I just cover and let it thaw and rise right in the pan. You can also bake the bread and freeze it then let it thaw and warm it up right before serving.
I noticed your comment about instant yeast. Can it be done with regular (I buy in bulk)?
On another note, I broke 3 bones in my foot as I was running around the car because I thought a kayak was falling off the racks. I feel your pain.
Hi Patty, Thanks so much for your empathy regarding my foot. I'm off of the roller and the crutches now, still not walking at my normal speed but I'm so happy to be able to walk!
Regarding the yeast, I also buy regular yeast in but I do purchase packs of the instant yeast for recipes like this as they do not require proofing. That's really nice when you want to make bread a little faster and more streamlined. If you have an Aldi near you, they sell the instant yeast for a really reasonable price. I usually stock up when I'm there.
That being said, if you wanted to proof your yeast and add it to this recipe instead of the instant yeast, I'm sure it would work!
Happy Bread Making! 💕 Chris
The best bread I've ever made! I couldn't believe how light and delicate this turned out! I made two bigger loaves instead of four smaller, and I was a bit worried since I had to leave it in the oven for 75 whole minutes before I was sure it was fully baked... But it was worth it for the fantastic result!
Thanks for sharing your results, Matilda! So happy you enjoyed it!!
Hi. I'd like to make this recipe. I will use two larger pans. Can you please tell me what you estimate the baking time to be for the two larger loaves? Thank you!
Hi Kathy, I would let them go for 25-30 minutes. Cover the loaves with foil if they're browning too quickly during the last 10 minutes.
Chris, I hope you're not in too much pain! To a knitter and crocheter like me, a few weeks off my feet per doctor's orders would give me time to finish my UFOs and WIPs and that's a good thing. But to a kitchen wizard like you, it must be a disappointment. Take it easy and just send us some of your "old" recipes until you're healed. The brioche sounds delightful and almost as easy as the bread machine. I even bought two more bread pans at my favorite thrift shop on Thursday.
Ah it was indeed a GOOD morning around here as I baked 2 loaves of this bread. Onel loaf was a bit smaller than the other and not evenly risen (I will weigh the dough next time)and do a better job of putting it in the pans) but the bread is really lovely, especially with some of your freezer strawberry jam. I am very pleased as I have struggled with bread making in the past and just never got it 'right'. This will be my go-to from now on as we are tired of spending between 6 and 9 dollars a loaf for nice bread. I will try adding a few extras like seeds and nuts and see how that goes. Just for a change. Thanks for this recipe. And how can you not love the way the house smells!!
This bread is the same as pandesal recipe calls for. The different is how you shaped the dough. All the method are the same except we roll the dough in bread crumbs before baking, and either you refrigerate it over night to rise or on the counter for couple hours. I'm just saying that you just figured it out that pandesal can be shape to anything too. I don't have my website anymore but I had the same post 2 years ago. But this is great. Glad someone like you figured it out to re-posted this.
Thanks, Dioza! I never heard of pandesal but it sounds wonderful!
Could you add cinnamon and or raisins to this recipe? Thank you.
Yes, that would be wonderful! I would probably add the raisins with the dry ingredients and, when you flatten out the dough before shaping into loaves, I would spread it with a bit of soft butter and sprinkle with cinnamon and sugar, then proceed with rolling up and shaping the loaves.
What a cute story you came up with about your mishap. I must admit that I totally bought into it and thought, how fun....until you got to the part about the broken foot. Oh no, I am so sorry! Life has a way of reminding us that everything can change in a heartbeat. I do hope your foot heals well and quickly!
The bread sounds wonderful! Thank you for sharing.
Sorry to hear about your foot! I did lol though at the thought of you jumping a picket fence 🙂 I'd stick with that story, too. Now this bread! While I've always found kneading a bit therapeutic, I'm just as happy to no-knead as well. And a brioche dough is especially nice. I will be making this one soon!
How much is one envelope instant yeast
Hi Debra, good question! I have amended the recipe to include that information. 1 packet or envelope of yeast (instant or regular active yeast) is 7 grams or ¼ ounce and equals 2¼ teaspoons. Hope that helps!
This bread looks delicious! I love baking bread and think I'll try this one next. Just to clarify....if I don't want to put it in the refrigerator overnight then the first rise is 2-3 hours and the second rise is 1-2 hours, correct? My husband and I are full time retired RV-ers and it's hard to free up enough fridge space for a large bowl of dough overnight! Thanks in advance for the clarification!
Bill loves brioche as much as I do. I've been wanting to remake a no-knead bread I have on the blog, but now I want to bake up yours instead! It looks fabulous! P.S. So sorry about your foot! Darn that curb.
So sorry about your mishap and yes, the first story is a good one! Hope you are on the mend soon. The bread looks fabulous and I can't wait to give it a try. I can smell it baking now 🙂 Pinned!
Oh the wonderful memories of your mom's delicious bread! I'd open the back door and that sweet aroma would be wafting through the neighborhood. I knew I would have to invent some excuse to ring your doorbell and hope your mom would notice that I would be drooling. I can't wait to try this!
I love this, Deb! Such a sweet comment and it brought me back in time too! Thanks 🙂
After step 7 where we form the rectangle, do we just place the rectangle in the pan, or do we roll it first like a sandwich loaf, and then place it in the pan?
Thanks, Terry, for noticing that. Somehow that step was omitted when I added the recipe to the post. I've added it back in now. I appreciate having extra "eyes" out there!
I feel your pain. A year or so ago, I was out on the back patio having a smoke. I had to pee and we don't smoke in the house so I walked off the patio, lost my balance (I have peripheral neuropathy. My feet are numb.) amd was flailing around trying to get my balance under control. Arms and legs going ever which a way. Broke my right Tibia at the ankle. I was yelling at my wife but she could not hear me. Finally she realized I had not come in the house. My wife is a Nurse with 40 years experience, (21 years in the Air Force, retired) Well she came out onto the patio an told me to get up. Well, I couldn't do that. She came over and made a half effort to help me stand. I told her that my ankle was broken. She didn't believe it. She kept telling to stand up. We went to the St. Joseph's/Chandler small emergency clinic. I was told to go to St. Joseph Hospital in Savannah. We did and they gave me a blow up cast and I was told to be in some city in Georgia and be ready for an Ankle Fracture Open Reduction and Internal Fixation. Well we hadn't slept much having been at the emergency clinic and then waiting at the ER at St. Joseph. So we decided to just stay in the clinic. I don't reccommend......
Yikes! You had quite a time! I'm so sorry! Hope all is healed now.
I have everything I need to put this together before bed time! So sorry about your foot! Lucky for your family, you will be “ up and running” before Thanksgiving!
Thanks so much, Gayann, that's a good point!
It would be helpful to know what approximate temperature the water should be. The recipe says hot and the instructions says very warm. Everyone's hot tap water is a different temp.
Nevermind, I see what you say about water temperature in the notes above. Disregard comment.
Hi Susan,
No, that is a good question. Normally I would give an exact temperature for the liquid but I've found that instant yeast isn't so fussy, it's not that big of a deal as it is when you're activating regular yeast. Also, the fact that the milk and butter mixture is already somewhat cool, adding nice hot water to the mix makes it perfect for the instant yeast to do its job. Thanks for asking.