
This post may contain affiliate links. For more information, see our privacy policy.
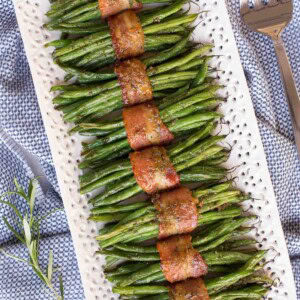
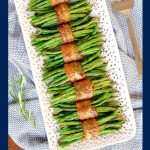
I can't believe I haven't shared these wonderful Bacon Wrapped Green Beans with you before. My daughter-in-law, Lindsay, has been bringing this delicious veggie side to our Thanksgiving celebration for years. She preps them at home and all we have to do is pop the pretty little bundles into the oven twenty minutes before dinner. They're always a crowd pleaser and are enjoyed by guests of all ages.

So... without further ado, here you go: Make-Ahead Bacon Wrapped Green Beans!
When you're shopping, look for the long, skinny green beans, also known as French green beans or haricots verts. They used to be found only at specialty stores but now French green beans can be found at almost any larger grocery store. I usually buy them at Costco or Trader Joes as they have nice size bags for a great price. In a pinch, you could use regular green beans but the baking time will be a bit longer.

There are lots of variations of these bacon-wrapped green beans out there. I decided to keep mine pretty simple, letting the delicious flavors of the green beans and bacon shine through. The beans are blanched and can then be refrigerated for up to 24 hours. The bacon is precooked so it will get nice and crisp when roasted around the beans. A small sprinkle of brown sugar and finely chopped fresh rosemary is sprinkled over each little bundle before baking.
What is blanching?
You might not be familiar with the term blanching. Blanching is a classic cooking technique. It involves boiling something vegetables (or fruit) for a short time and then quickly cooling them in cold water to stop the cooking process. It's often used when freezing fruits and vegetables to help them keep their optimal color and nutritional value.
Why blanch?
You might be wondering why one would go through the trouble of blanching the beans, especially when you're going to roast them. Can't you just throw the bean bundles in the oven and let all the work be done there?
Good question! The answer involves a bit of science as we need to look at what actually happens inside the beans when they're immersed in the boiling water and quickly cooled. To keep it simple, blanching breaks down and destroys enzymes and bacteria in the beans (or other veggies) that can alter flavor, color and vitamin content. In other words, your beans will taste more delicious, keep their bright green color and have better nutritional value! A win-win-win!
The other reason to blanch before baking in this recipe is that raw beans take a long time to get tender. The blanching gets the cooking process started and the beans don't have to be in the oven as long, another reason they keep their pretty green hue.

Prep ahead!
Prepping these Bacon Wrapped Green Beans in advance is a wonderful way to keep entertaining stress to a minimum. There are a few steps for the prep but they won't take long. While you're blanching the beans, crank up the oven and precook the bacon. You don't want it fully cooked, just starting to brown on the edges but still soft and flexible. This will ensure nice crisp bacon around your baked bundles.
Once the beans are blanched and the bacon is par-cooked it's time to roll the little bundles. Separate the beans into stacks of 10-12. Wrap each with a strip of bacon and secure with a toothpick. That's it, you're done with the prep. Store the prepped beans in the fridge.

Twenty minutes before serving, sprinkle each bundle with a teaspoon of brown sugar (combined with fresh finely minced rosemary). To finish, set a timer and pop the pan into a hot oven. Oh yeah, and wait for a wonderful aroma to fill the house!

When the timer goes off and you peek in the oven, a beautiful pan of deliciousness will greet your eyes (and the hungry eyes of every guest around your table)! Check out this video to see just how simple this side is to make!
Put these guys on your holiday menu! You won't be disappointed!

Café Tips for making these Make-Ahead Bacon Wrapped Green Beans
- Look for French green beans. These are the long, skinny beans you see at the market, usually pre-packaged in clear bags.
- You could use regular green beans in a pinch but you will have to add 5 minutes or so onto the baking time.
- Don't use thick-cut bacon for this recipe. I love the thicker types of bacon but they will take too long to bake and the underside will stay a bit raw.
- I like to use a smokey bacon for these Bacon-Wrapped Green Beans. My favorite is applewood-smoked but other smoked varieties will also work well.
- When you buy bacon for this recipe, look for a package that is fairly uniform in width for the whole length of the strips. Some bacon strips are thin on one end and wider on the other. This won't work as well for this recipe as you want the bundles to have a consistent appearance for a pretty presentation.
- You can prep these Bacon Wrapped Green Beans as far as 24 hours in advance. Follow steps 1-5 below then cover with plastic wrap and refrigerate till ready to bake. Remove from refrigerator and proceed with steps 6 and 7.
- For a nice presentation (and because I'm a food blogger) I like to arrange my bundles with the tips of the beans all facing in the same direction. This isn't necessary, it just looks pretty!
Thought for the day:
But whatever gain I had, I counted as loss for the sake of Christ.
Indeed, I count everything as loss
because of the surpassing worth of knowing Christ Jesus my Lord.
Philippians 3:7-8
What we're listening to for inspiration:

If you enjoyed this recipe, please come back and leave a star rating and review! It's so helpful to other readers to hear your results, adaptations and ideas for variations.
Scroll Down for the Recipe - or Save It to Your Inbox
We'll email you the recipe so it's easy to save, print, or share.
Make-Ahead Bacon Wrapped Green Beans
Ingredients
- 1 ½ pounds French green beans, also known as haricot verts
- 12 slices smoky bacon, not thick cut
- 2 tablespoons extra virgin olive oil
- 1 ½ teaspoons garlic salt
- ¼ cup light brown sugar, packed
- 1 tablespoon finely minced fresh rosemary, plus more for garnish, if desired
Instructions
- Preheat oven to 400˚F. Place several thicknesses of paper toweling on a work surface near the oven. Line a sheet pan with foil for easy cleanup.
- Arrange bacon strips on foil so they aren't overlapping. Bake for 10 minutes or until strips are beginning to turn golden, but are still soft. Remove the pan from the oven and transfer bacon to paper towels to drain.
- While bacon is baking, bring a large pot of water to a boil. Add beans, cover and cook for 1 minute. Place a strainer in the sink and drain beans. Immediate rinse beans with cold water for 1 full minute. Drain well and then transfer beans to a clean kitchen towel. Pat with the towel to remove as much water as possible.
- Place beans in a medium-size bowl. Combine olive oil and garlic salt. Drizzle oil over the beans and toss to coat.
- Arrange beans in 12 bundles of 10-12 beans. Place one bacon strip on a work surface. Place a bundle of beans on one end of the bacon strip. Roll bacon around the bundle and secure with a toothpick. Repeat with remaining bacon and bundles of beans. Arrange beans on a sheet pan lined with clean foil.
- Combine brown sugar and rosemary in a small bowl and stir well. Sprinkle one teaspoon of the brown sugar mixture over each bean/bacon bundle.
- Bake bundles for 15-20 minutes at 400˚F or until bacon is golden brown and beans are tender. Remove from oven and serve warm. Remove toothpicks and garnish with more finely chopped fresh rosemary, if desired.
Notes
- To make ahead, proceed through step 5 then cover and refrigerate until ready to bake. Remove from refrigerator and proceed with steps 6 and 7.
Shop Our Café Loves
We’ve gathered our favorite kitchen tools, tableware, and entertaining treasures in one place, the Café Loves store. It’s a wonderful spot to find something special for yourself or the cooks and hosts you love!


Can I blanch and freeze the green beans a week before?
Hi Pam, the green beans would be soggy if you freeze them ahead of time. We do have lots of recipes that do well in the freezer, but this is not one of them. They're fine prepped a day ahead though!
If I want to make these a month in advance, do you think I could I freeze and cook from frozen?
Hi Rc, I don't think you'd be happy with this recipe if made ahead and frozen. The green beans would be soggy and the bacon would not crisp up. We do have lots of recips that do well in the freezer, but this is not one of them. They're fine prepped a day ahead though!
Males for a beautiful presentation and so delicious!
Thanks for letting us know, Cathy!
Quick question about the blanching. Do you start the 1 minute time frame as soon as you put them in the boiling water, or do you let them come back to a boil and then start timing them? ( I hope that makes sense!) Are the green beans pretty firm after blanching? Thank you so much!
Hi Barbara, start the timer right when they go in the water. And yes, they are still firm once they are done. They cook more in the oven. Enjoy!
The beans are partially cooked and then finish cooking in the oven, right? I have a bag of steam-in-the-bag beans and am wondering if they'll get overcooked if I steam them and then cook. Could I just steam them and then warm them up in the oven? Or would I steam them halfway?
I am planning to make these for thanksgiving. Can I use frozen hericot vert?
Hi Lisa, I would be concerned that the beans would get quite soggy if you use frozen hericot vert.
Lisa Mormile, I have made these for over a decade and I always use frozen green beans. I tried blanching them last time and did not notice a difference at all.
These look delicious. Any advice if oven will be set at 350 degrees?
They will need to cook longer, until the bacon is crispy. If you could crank up the heat near the end, that would really help.
Made these for Thanksgiving, and they were fabulous. Beautiful presentation, and wonderful blend of ingredients. Thanks!
Great! Thank you, Tama!
I made these for the first time tonight and they are delicious! Definitely making more to take to Thanksgiving dinner! They got two thumbs up from my family!
Wonderful! Thank you for letting us know, Darci!
I wanted to let you know that when I clicked on the "it's pronounced like this" in you recipe, it took me to a trojan web site that I had to call Apple to help me get out of it. I don't know if that is something you have added to the instructions, or if someone has hacked into the recipes and added it. You might want to check it out. It is in this recipe instructions and in the pot de creame recipe.
Hi DoLee, I'm so sorry you had problems. I checked both of those links and they didn't take me to a trojan site but I did remove them nevertheless.
I made this for Thanksgiving and adored them! What a clever recipe! I can always count on you guys. Even though I have to be gluten free, so many of your recipes are either easily adaptable or gluten free already.. Thank you very much.
Awesome! Thanks so much for letting us know, Al!
Hi I'm wondering, when making this a dayahead and only cooking baking 10 min is that enough to avoid any potential bacteria?
* I meant cooking bacon for only 10 minutes... sorry!
Hi Jaye, the bacon is pre-cooked so 10 minutes at 400˚F is just perfect to finish it off.
Oh my goodness these are amazing. I made these for Thanksgiving and I did the day ahead prep. So easy to do. Thanksgiving day I pulled them out of the fridge and brought them up to room temperature and finished baking them. Oh WOW!! New item for Thanksgiving menu. They also reheat so nicely. Thank you for this amazing recipe!!
Awesome! Thanks for letting us know, Lisa!
Yum, yum, yum! I live overseas so I had to make a few substitutions but these turned out great. I used frozen green beans (can’t get fresh here) and put them on a towel to dry out and I can’t get rosemary so I left it out. We are getting together with a large group, so I cut the bacon in half and made smaller bundles (4-5 beans). Everyone loved them! P.S. I forgot about the toothpicks and just rolled them and it worked fine. I would post a picture but there’s only an empty plate left!
Haha! Thanks for sharing your results, Trisha! So happy you enjoyed this recipe!
Your "thought for the day" just warmed my heart! I've made these in the past and they were a HUGE HIT at the holidays.. I came here again to get an accurate cooking recommendation since I'm making an edible 'thank you' gift for a gluten-intolerant friend and want her to easily bake them fresh. This is so perfect, I really appreciate your blog!
Thank you for the kind words, Dana!
Thank you, Chris, for posting this easy make-ahead recipe again in time to try it out for Thanksgiving. I made this tonight and it was excellent.
Yay! Thanks for letting us know, Tulsi!
Denise LaGasse here: Look, you two need to compose a cookbook (said the intellectual property and licensing attorney). Just another note of encouragement, but I am sure that you could secure a fan club to help with such an endeavor.
Thank you, Denise. I really appreciate your kind words. I've had a few cookbook offers but I felt like, right now, that would interfere with my priorities which are my faith, my family and my community, which includes the blog.
Can these be made ahead and frozen instead of refrigerated?
Hi Dru, I'm afraid they would get really soggy if you froze them. It's better to prep them the night before or early in the day.
What Temp do you do the final bake? 350?
Hi Bill, continue to bake at 400˚F.
I made these as a test run a few weeks ago and they were fantastic. How do you think these will do if I bake and then put in a warming tray? I’m limited in oven space.
I'm so happy you enjoyed them! I think that would work fine to keep them in a warming drawer.
Looks wonderful. and would love to have on our Thanksgiving table. Since we do not eat pork, what could you recommend for a bacon substitute? Would turkey bacon work (or something else?)
Hi Celine, yes you could use turkey bacon!
I can’t seem to find any fresh rosemary anywhere. Do you think they’d still be good if I subbed the TBSP of fresh with a tsp of dried rosemary instead?
Hi Bekki, yes you can do that, just crush the dried rosemary between your fingers so it breaks up.
I'd like to make this for a neighborhood potluck. Is there a way to partially bake these before taking to the dinner and then just pop in the host's oven at the last minute to "reheat" them? If that doesn't seem ideal, I'll see if I can borrow a corner of the host oven for the full 15-20 minute timeframe. Thanks in advance for the help!
Hi Peg, yes you could definitely partially bake these. I'd probably do about 15-18 minutes at home and then do the last 5 minutes right before dinner. Enjoy!
Thanks so much, Chris. I think I'll try this approach in a "test dose" before the event. I'll let you know how it goes!
Amazing! Thank you!
Thanks so much, Marilyn!
I noticed the toothpicks were not in the final presentation pictures. Will the bundles hold together, after baking, if the toothpicks are removed?
Good question Benita! Yes, they definitely hold together well. I will add that to the recipe, thanks!
I love buying French green beans at Costco and I prepare them every which way. Yours are picture perfect and I love ideas that help get prep work done ahead of time. Whew! It was a whirlwind week through Thursday. Now, on to Christmas! 🙂
The bacon wrapped green beans were not only delicious they looked beautiful too. I especially like that it was a dish I could prepare the day before. Popped them into the oven along with the rolls. A big hit for Thanksgiving. Will definitely be making these again. Thank you for another great recipe!
Thanks so much, Patty! So glad you enjoyed them!
I don't have any rosemary, is there another seasoning that can substitute ?
Thyme would be delicious!
Chris these are amazing! I made them for Thanksgiving and they were a big hit. It was so nice to have them done in advance. Keep up the great work. Love your recipes.
Thanks so much, Alice! I appreciate you taking the time to share your results. Hope you had a wonderful Thanksgiving!
Did the bacon wrapped beans and sweet potatoes along with Ina Garten's lemon chicken thighs, FABULOUS!!
Luckily the haricots are on special..so bought more to do again. Wishing you and yours a very Happy Thanksgiving. Up here in Canada we have had ours.. but am enjoying all the tasty recipes.
Chris...when are you going to write a cookbook?? My file with recipes from you is overflowing!! barb
Thanks so much, Barb! I'm so happy you enjoyed them!
I would love to write a cookbook, it's just hard to find the time with everything else. I really appreciate your encouragement. Maybe life will slow down one of these days...
Yes the bacon wrapped beans look awesome and will make for Christmas since T-giving veggie already planned! Do you think I could substitute thyme for the rosemary?
Thanks and Happy T-giving!
Thank you, Kathleen! And Happy Thanksgiving to you too! Yes, thyme would also be delicious.
I don't have any rosemary, is there another seasoning that can substitute ?
Hi Pat, try a little Italian seasoning, about 1 teaspoon.
What a pretty side Chris! So perfect for both Thanksgiving and Christmas! And they sound just delicious!
I adore these! But I haven't made them in years. All your tips will make my next batch the best ever!!! xo
These are so pretty! They'd look fabulous on a holiday plate. And bacon wrapped is always good 🙂 Happy Thanksgiving!
They look so inviting and delicious! I love how you presented them too.
How pretty! I want to try these next time we have family dinner. We're having our Thanksgiving tomorrow so I've already got the plan well under way. But next time I'm making these - thanks Lindsay and Chris!
Thank you for your inspiration! You have become my go-to site for ideas for Thanksgiving dinner. Your recipes are fantastic!
Thanks so much, Holly! Happy Thanksgiving!