This post may contain affiliate links. For more information, see our privacy policy.
This fabulous Buttermilk Sugar Biscuits recipe creates tall biscuits with lots of beautiful layers. It was originally published on the New York Times Cooking site. With our ridiculously easy technique, it's super easy, in addition to being crazy delicious!
I was intrigued when this Buttermilk Sugar Biscuits recipe from the New York Times Cooking site came through my inbox. I wondered how the recipe would differ from the Buttermilk Biscuits we published a few years ago. A picture of the tall, multi-layered biscuits caught my eye and I was hooked into clicking on the link. The recipe sounded interesting but after reading the rave reviews (like the ones below) I knew I had to try this unique recipe.
I've made this recipe three times now, and each time they came out perfectly. I'm not a pro baker, but these are easy!
My family is from the south and I was raised on Southern buttermilk biscuits. When I saw that this recipe involved sugar, I'll admit I was dubious, but I've gotta say… these are some of the best biscuits I've ever made (or eaten). I make rough puff pastry quite often, but it never occurred to me to apply that technique to biscuit-making. The resulting biscuits are light as a feather with layers upon layers upon layers. Simply wonderful.
These biscuits are divine! They were wonderful with strawberries fresh from the field and equally as good as a snack. As noted by the author, they are not traditional Southern biscuits, but they are absolutely some of the best I have ever eaten, and I was raised on Southern biscuits.

It turns out that the NY Times recipe is from Tandem Coffee & Bakery, a popular converted gas station in Portland, Maine. Tandem was one of Bon Appetit's 50 nominees for America's Best New Restaurants. I've never been to Tandem but I know (after making this recipe numerous times) that these Buttermilk Sugar Biscuits are incredibly delicious.

The difference
If you've made our popular Buttermilk Biscuits, you might be wondering how these NY Times Buttermilk Sugar Biscuits differ. Although both recipes yield delicious biscuits there are lots of variances. First of all, as the name suggests, the NY Times biscuits are a little sweeter as the recipe calls for more sugar. The proportions of flour, butter and buttermilk are also different, with the NY Times recipe producing a super crisp exterior with a tender, layered inside. The last difference is the shaping technique. With the original Café recipe, the dough is rolled out and cut into circles with a biscuit or cookie cutter. The NY Times recipe instructs to roll the dough into a rectangle and then fold the rectangle over 4-5 times, creating the tall, flaky biscuits you see pictured.
The Ridiculously Easy way
If you're new to The Café, you might not know about our Ridiculously Easy technique for making biscuits and scones. (If you're a long-time follower, just skip to the next section.)
This is how it came about... years ago, I was reading an article in Cook's Illustrated magazine. The author shared an easy alternative to "cutting" butter (or other types of fat) into flour, a common term in baking that means incorporating cold butter into dry ingredients (usually flour) so that the butter stays in little clumps throughout the mixture. These little lumps of butter create magic in the oven as they melt and create tiny pockets of steam, giving good biscuits and scones that iconic light, flaky texture.
Normally this "cutting" is done with a pastry cutter, a pair of knives or forks or by rubbing the flour and butter together with your fingers. Some folks swear by freezing the butter and then grating it into the flour, creating the same cold lumps of butter distributed throughout the flour mixture.
To be honest, I didn't make biscuits or scones very often, not because this "cutting" technique was super difficult - it was just a little more fuss than I wanted to go through most of the time.
Many bakers, pastry chefs and home cooks believe that there is no alternative to this "cutting' technique. Yes, different tools can be used (as mentioned above) but that's really the only variation Even experts at KitchenAid (the baking gurus), say that this "cutting" creates "the light and flaky texture that can't be replicated with any other technique". I believed it too- but not anymore!
The Cook's Illustrated article explained a MUCH easier technique. I jumped off of the couch (where I was reading the article) and literally RAN to the kitchen. I measured buttermilk in a cup and placed it in the freezer. Then I melted butter in the microwave and let it cool while the buttermilk chilled. In the meantime, I took a few minutes to stir together the dry ingredients in a big bowl. I was skeptical... but when the super cold buttermilk and butter were combined together, this is what I saw:

Yep, tiny lumps of butter suspended throughout the dough! All that was left to do was to combine the wet and dry ingredients, shape the biscuits and pop them in a hot oven.
The results? Spectacular! Some of the BEST, EASIEST biscuits ever! But don't take my word, check out almost 200 5-star reviews on those first biscuits!
Run with it!
After discovering the great little trick from Cook's Illustrated, I tried it with lots of biscuit and scone variations and it works like a charm every time. So when I found the NY Times Buttermilk Sugar Biscuits, I knew I had to apply it here as well. Once again... success!

TALL biscuits
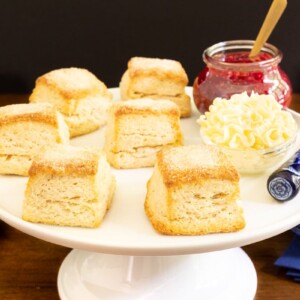
One of the things that intrigued me about the NY Times Buttermilk Biscuit recipe was the technique for creating tall biscuits with lots of layers. After the wet and dry ingredients are combined, the dough is transferred to a work surface where it's rolled or simply patted into a rectangle. The next step is folding half of the dough onto the other half and repeating this patting and folding several times. After making the recipe, I found that it was much easier to just cut the rectangle in half then stack the two halves. After patting and stacking the dough several times it's patted or rolled out one last time and then cut into rectangles and baked. (I like to chill the dough before baking but that's not part of the original recipe.)
It was a thrill to open the oven door the first time I tried this recipe and see the beautiful, tall biscuits that greeted me. I've been making these NY Times Buttermilk Sugar Biscuits on repeat over the last few months and serving them to family and friends - they ALWAYS bring rave reviews and guests find it difficult to eat just one!
We love to serve them with our Raspberry Freezer Jam that you see pictured in this post. They're also great with Strawberry, Peach, Blueberry and Blackberry Jam. Or just a pat of butter or a drizzle of honey... so delicious!

Even easier
The patting and stacking technique mentioned above does create beautiful tall biscuits as you can see from these pictures. But one day when time was short, I decided to try a quicker, easier way. I simply mixed the dough (using the cold buttermilk, melted butter technique), scooped it up with an ice cream scooper then followed the baking instructions and made drop biscuits. Although I recommend the patting/stacking method for tall, beautiful biscuits with lots of layers, this scoop technique produced delicious biscuits with pretty craggy exteriors and delicious results.
Make them!
Put this Buttermilk Sugar Biscuits recipe on your must-make-soon list. You'll feel like a fancy bakeshop baker when you bring the beautiful platter of tall, golden biscuits to the table. And when guests take the first bite and you hear the "ooh"s and "aahs", just sit back and smile... no need to say that there was minimal effort on your part!
P.S. One final thing - last night, I decided to try these biscuits as shortcake. Oh my! So delicious. I warmed them for 10 seconds in the micrwave then split them in half. I had some fresh blueberries so I pour some into a bowl and crushed a small portion with the back of a fork. Then I added a large spoonful of our Strawberry Freezer Jam (any jam would work well) and spooned the mixture over the bottom half. A dollop of whipped cream and a sprig of mint was the crowning glory. Definitely some of the BEST shortcakes we've ever had!

Café Tips for making these Buttermilk Sugar Biscuits
- I've found that stirring up the dough for these biscuits is much easier if you use a nice BIG bowl. That will give you room to toss the dough around as you add the dry ingredients.
- I really like using a bench scraper when shaping biscuits like these. It works well to push the dough together and to cut it into squares or rectangles. It's also a great tool to clean a messy countertop after you've finished the biscuits.
- If you don't have buttermilk, make your own. Place 1 tablespoon of fresh lemon juice or vinegar in a measuring cup. Fill to 1 cup level with milk and stir well. Allow to sit for 5-10 minutes or until slightly thickened. The mixture may curdle a bit - that's okay! Use in recipes in lieu of buttermilk.
- Don't skip chilling the buttermilk. If the buttermilk isn't really cold, the little butter globules won't form that create those coveted flaky, tender biscuits.
- If you add the melted butter to the cold buttermilk and you don't see the little butter globules, your buttermilk may not have been cold enough. You can remedy this by placing the mixture in the freezer for another 5-10 minutes, then stir again and you should see the magic globules.
- I like to use a bench scraper to bring the dough together into a rectangle on the counter. It also works well for patting and stacking the dough and for cutting it into rectangles before baking.
- These biscuits freeze well, both unbaked and baked. To freeze them unbaked or baked, place biscuits on a sheet pan or a plate spaced at least a half-inch from each other. Freeze till frozen, then transfer biscuits to a ziplock bag or air-tight storage container. If you've frozen them unbaked, bake them as directed in the recipe right from the freezer. Give them a couple of extra minutes in the oven to compensate for the fact that they were frozen.
- If you decide to freeze these buttermilk biscuits after baking, allow them to thaw, then warm in the oven for 5-8 minutes at 300˚F.
- I made the original Ridiculously Easy Buttermilk Biscuits several years ago while visiting my daughter in London. I learned the all-purpose flour (Plain flour) in Britain is a bit different and it seemed that I needed more, probably closer to 2 ¼ cups.
- I like to sprinkle these biscuits with a bit of cane sugar before baking. It creates a pretty presentation and it gives the tops a little extra crunch. Cane sugar is a little coarser than regular sugar but not as coarse as Demerara or Turbinado sugar. You can find cane sugar at most larger grocery stores in the same section as granulated sugar. It's also available online.
- If you decide to skip the patting and stacking technique with the dough and prefer to just scoop up your biscuits, creating drop biscuits, this is how I do it: I use a large trigger ice cream scooper to scoop up my dough into nice consistent-sized mounds. Spray the scooper with non-stick cooking spray for easy scooping.
- I often use a double sheet pan as sometimes my biscuits get a little too brown on the bottom. If you don't have any problem with this, just use one sheet pan and bake until the tops are light golden brown.
Thought for the day:
So we say with confidence,
"The Lord is my helper; I will not be afraid.
Whom shall I fear?
Hebrews 6:13
What we're listening to for inspiration:
Whom Shall I Fear

If you enjoy this recipe, please come back and leave a star rating and review! It's so helpful to other readers to hear your results, adaptations, and ideas for variations.
.
Scroll Down for the Recipe - or Save It to Your Inbox
We’ll email you the recipe so it’s easy to save, print, or share.
NY Times Buttermilk Sugar Biscuits (The Ridiculously Easy way!)
Ingredients
- 1 cup butter, I use salted
- 1¼ cups buttermilk, I use whole milk buttermilk
- 3⅓ cups all-purpose flour, plus a bit more for rolling
- ½ cup granulated sugar
- 1 tablespoon baking powder
- 1½ teaspoons kosher salt, I use Morton's
- coarse or cane sugar for the top, for sprinkling on top, if desired
Instructions
For the prep:
- Line a sheet pan with parchment paper for easy cleanup.
- Measure the buttermilk into a medium size bowl or measuring cup and place it in the freezer for 15-20 minutes.
- Place the butter in a medium-size microwave-safe bowl and microwave on high power for 60-90 seconds or until just melted.
For the biscuits:
- Combine the flour, sugar, baking powder and salt in a large bowl.
- After the buttermilk has been chilling for 15-20 minutes, add the melted butter and stir the two together with a fork until small lumps form. (See the picture above in the post.)
- Add half the buttermilk/butter mixture to the dry ingredients and toss with a fork. Take your time with this and keep tossing until most of the flour is incorporated and large lumps form. Add the remaining buttermilk mixture and continue tossing/stirring with the fork, from the bottom up to incorporate any loose flour. The dough will still be a bit crumbly.
- Lightly flour your work surface and dump the mixture directly onto it. Push the dough together with your hands and turn it several times to coat it with flour. Using your hands or a dough scraper, gently press the dough together into a 6-8-inch square, about 1-inch tall. You don’t have to be exact at this point.
- Using a bench scraper or large, sharp knife, cut the dough in half and stack one half over the other. The dough may still be a little crumbly -that’s okay at this point. Repeat this patting and stacking procedure 4 more times, using a knife or bench scraper to straighten the edges as needed. The dough will come together as you do this.
- Now roll or pat the dough to create a square approximately 6 inches x 6 inches. Trim the edges just a bit with a knife or the dough scraper to create a nice square. Discard the scraps or just push them together to make a crazy-shaped extra biscuit.
- Using a bench scraper or a sharp knife, cut straight down into the square to create 9 2-inch biscuits. You can also cut the square into 12 biscuits (2-inches x 1.5-inches) which will be more rectangular in shape. Sprinkle the tops with a bit of cane sugar, if desired.
- Transfer the biscuits to the prepared sheet pan and place in the refrigerator for 25-30 minutes to chill.
- While the biscuits are chilling, preheat the oven to 400˚F.
- Place the biscuits in the oven and bake for 15-20 minutes or until golden brown, rotating the pan after 15 minutes. Serve warm with butter and jelly or honey.
Nutrition
Shop Our Café Loves
We’ve gathered our favorite kitchen tools, tableware, and entertaining treasures in one place, the Café Loves store. It’s a wonderful spot to find something special for yourself or the cooks and hosts you love!


Love the details in your recipe and can’t wait to try it as a base for strawberry shortcake. I plan to halve the recipe and make four slightly larger biscuits. Have you done this? Any idea how much extra time that might add? I appreciate any advice you can give me. 😊
Hi Erin, Thanks for your kind comment! Making these slightly larger should not affect your baking time by more than a minute or so. Just be sure to chill before baking, then start checking them at the 15-minute pan rotation and watch carefully for the next few minutes until they're golden brown. We hope these turn out beautifully for your strawberry shortcakes!
Thanks! Can’t wait!
Wow! I’m southern and have never been able to find a biscuit recipe that blew me away. Search over!!! These are absolutely amazing!!! I used Bob’s Red Mill Fine Pastry flour and Plugra butter. I’m going back for seconds!
Awesome! Thanks for the review, Niki!
I love a good biscuit, and will try these with a thinly sliced bit of ham!
Enjoy, Dawn!
These biscuits are FANTASTIC! Will definitely make again, and the butter & buttermilk technique works like a charm!
Thank you, Krissy! So glad you enjoyed these!
These Buttermilk Sugar Biscuits are an 11/10!
Awesome! Thanks for the review, Joy!
Hi Chris,
I follow your blog, which is my favorite.
Tonight I made the first recipe that didn’t work for me. I made the NYT Buttermilk Sugar Biscuits. Although they were good, they were flat and not tall. My dough was very wet and not crumbly. What did I do wrong?
Hi Pam,
I'm sorry this recipe didn't work for you. I hate wasting good ingredients!
It's difficult to say what went wrong without having been in he kitchen with you. The dough should come together nicely with 3⅓ cups of flour and 2`¼ cups of wet liquids.
3 1/3 cups of flour plus more for rolling & 1 1/4 cups buttermilk✅ I hope this helps, Merry Christmas and Happy Holidays to all.
Hi Louise, I was referring to the “wet”ingredients which include 1¼ cups of buttermilk plus 1 cup of melted butter.
Tried your scones before, and this method worked even better with these biscuits. So easy and the results are fabulous. Biscuits turned out flaky and tall.
Awesome! Thank you for letting us know, Leburta!
Can these be made and store in the fridge for a day before baking?
Hi Sharon, yes, you can definitely do that! Just bake them right from the refrigerator!
The one cardinal sin that I always heard about biscuits was to not overwork the dough. You seem to really work this dough a lot. What’s the difference?
You might want to check with the NY Times about that. I just know it works.
One thing I'm curious about - just how tall are those "tall, golden biscuits" in the photo? Pictures are deceptive - those biscuits look beautiful, but just how high are they? What height should we be aiming for when the biscuits come out of the oven so we have an idea that the recipe worked properly? Thanks!
Hi Bryan, I have never measured them so I can't give you and exact figure. They do double in height in the oven if that helps!
I tried them with melted butter first, and they were fabulous! Then I tried them with almond milk, and coconut oil for a vegan friend.... WOW! It still worked perfectly. I added some lemon juice to the almond milk to make it sort of like buttermilk, before I put it into the freezer. Anyway if you're vegan give this a try.
That's great to know, Lisa! Thanks for your review!
What size pan should I use and how far apart should the biscuits be placed?
Hi Eli, we use a half sheet pan (18″ x 13″) and space them evenly, about 1-2 inches apart.
I made these over the 4th of July weekend for friends/guests! What a hit! They kept coming back for more! Thank you once again for sharing!
Awesome! Thanks for your review, Barb!
Made this recipe this morning for a women's breakfast. Everyone loved them!! Will definitely make these again and again! Thanks Chris!
Aww, thanks so much, Sue Ellen! That makes me smile 🥰
Delicious! Made these this weekend company. Everyone loved them. Thank you once again!
So happy to hear that, Barb! Thanks for your review!
my buttermilk says reduced fat cultivated buttermilk...will this work?
Hi Rosemary, that will work!
I’m headed to the kitchen with my last jar of your freezer jam(but the season is approaching here in Oregon). Your recipes have amped up my all ready pretty developed cooking skills. Merci beaucoup.
So glad to hear that, Kathryn!
Can I incorporate dried blueberries (or any other dried fruit ( cranberries, raisins, etc..) if yes, are any modifications necessary? I assume they would get mixed in with the dry ingredients at the start?
Hi Elsie, you could definitely do that. And yes, I would combine the dried fruit with the flour mixture.