This post may contain affiliate links. For more information, see our privacy policy.
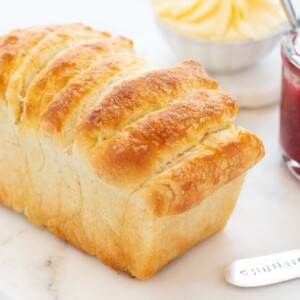
No one would guess that this beautiful, buttery, incredibly delicious Pull-Apart Brioche Bread is super easy to make with just one bowl and no mixer!
I started making this Pull-Apart Brioche Bread last year around Christmas time and filled the freezer with loaves of it to serve with holiday meals. It was a whimsical adaptation of our Overnight No-Knead Brioche Bread. Family and friends went crazy over it and everyone loved that they could tear off their own little piece (or pieces).

After the holidays I continued to make this delicious Pull-Apart Brioche Bread and enjoyed pairing it with all of our favorite soups, including this delicious Thai Broccoli Spinach Soup...

... and lots of hearty comfort foods like this fabulous Slow Braised Italian Beef Stew.

Freezes well!
This summer it's been great to serve with salads and wonderful to pull out of the freezer and pop in the oven for a quick accompaniment for dinners from the grill and special breakfasts with the grandchildren. This delicious Pull-Apart Brioche Bread has become such a popular staple for us that as soon as my freezer supply is depleted, I throw together another batch, since it's super easy with just one bowl, no mixer and no rolling.
And though the recipe takes a few hours, from start to finish, most of that time is hands-off, while the dough does its own thing on the countertop.

I love how the buttery crust gets nice and crisp and the interior is tender with a touch of sweetness.
What is Brioche Bread?
Brioche bread is a French-inspired bread, but is quite different than the well-known classic French baguette. It's an enriched bread and, besides flour, salt and yeast, brioche bread also contains butter and eggs, giving it a super tender crumb and beautiful golden hue.
How do you make brioche bread? It can be quite complicated, involving a mixer, lots of kneading, rolling the dough into long strands and then braiding the strands before a final rise. Not so with this Pull-Apart Brioche Bread. As mentioned above, there's minimal hands-on time and no mixer, no kneading and no rolling. Let's check out how it's done! We took some pics of the parts of the process that might be new to you.
Steps to making this Pull-Apart Brioche Bread
- Generously butter 4 small bread pans. Set aside.
- Combine flour, sugar, yeast and salt in a bowl. Make a well in the center.
- Melt butter in the microwave, then add milk and eggs and stir to combine.
- Add the butter mixture and hot water to the bowl with the flour and stir until all the flour is incorporated.
- Cover the bowl and let the dough rise while you go about your business.

- Once the bread has nicely risen, turn it out onto a floured work surface and turn it a few times to coat with flour.

- Using a dough scraper or a sharp knife, cut the dough into four fairly equal portions.

- Now roll each of the quarters to coat with the flour. Working one at a time, cut each quarter into 8 pieces. It's fine if you don't get them all the exact same size.

- Coat each piece with a little flour then form them into balls, again, this doesn't have to be perfect. In fact, the more imperfect the pieces are, the prettier and more whimsical the finished bread will be!

- Now just flatten each ball with the palm of your hand then spread it out a bit with your fingers.

- Spread a half teaspoon of soft butter on one of the flattened circles.
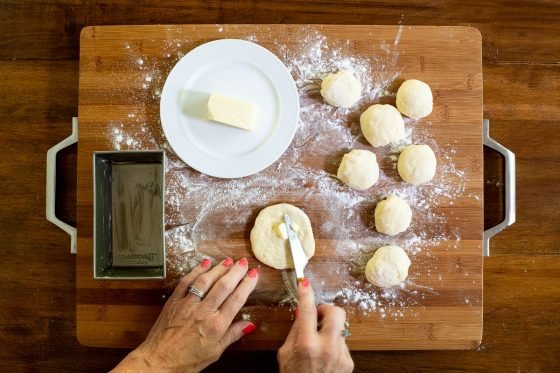
- Then fold the buttered circle in half.

- And place it in the pan with the open edges up and the folded edge down.

- Continue with the remaining seven dough balls, stacking them side by side as you go.

- Fill the pan with the eight folded circles of dough.

- Repeat the process to fill all four pans.

- Cover with a clean kitchen towel to let the dough rise. It will take 30-40 minutes, depending on how warm your kitchen is.

- Now you're ready to bake!

So that's the process. You'll love the wonderful aroma as the Pull-Apart Brioche Bread bakes and will have to practice patience and discipline to let the beautiful loaves cool a bit before diving into them. The loaves are fabulous for dinner, rewarmed for a short time in the oven and served in a pretty breadbasket. They are also wonderful for breakfast. Just pass a warm loaf around and let everyone break off a piece or two. Serve it with butter and jam for a fantastic treat.
A treasure in the freezer!
Take the time to stock your freezer with a batch or two of this Pull-Apart Brioche Bread. When you're thinking about making dinner and want to make it a little more special, pull out a loaf of this fabulous homemade bread. I guarantee there will be lots of happy faces around the table!
Cafe Tips for making this Pull-Apart Brioche Bread
- A baker's bench scraper is a wonderful tool when working with bread dough. It can also be used to cut pizza. I love that this one has measurement marks to create even portions.
- You'll need 4 small baking pans to make this Pull-Apart Brioche Bread, approximately 3x6-inches. I've had these Chicago Metallic pans for several years and really like them. They're non-stick and come out of the dishwasher looking like new.
- You could also use 2 round 8-inch pans for circular loaves. Just divide the dough in half instead of quarters and divide each of the halves into 16 smaller portions. Then proceed as directed to shape into balls, flatten the balls, spread each with a bit of butter and stack in the pan.
- This recipe calls for "hot tap water". What that means is water that feels hot if you dip your finger in it but not so hot that you need to quickly pull it out. If you want to use an instant thermometer, the temp should be between 118-122˚F (47-50˚C).
- As mentioned above, don't feel like you need to make perfect circles for this Pull-Apart Brioche Bread. The more imperfect the circles are the prettier and more fun the finished loaves!
- This bread freezes well. I usually store them individually in plastic bread bags (they're super reasonable online.) That makes it easy to pull out one or two loaves at a time. I let them thaw, then re-warm in a 325˚F oven for about 10 minutes before serving.
Thought for the day:
Teach us to number our days,
that we may gain a heart of wisdom.
Psalm 90:12
What we're listening to for inspiration:

If you enjoyed this recipe, please come back and leave a star rating and review! It's so helpful to other readers to hear your results, adaptations and ideas for variations.
Scroll Down for the Recipe - or Save It to Your Inbox
We’ll email you the recipe so it’s easy to save, print, or share.
No-Knead Brioche Pull-Apart Bread
Ingredients
For the dough:
- 4¼ cups all-purpose or bread flour
- ¼ cup sugar
- 2 teaspoons kosher salt
- 2¼ teaspoons instant dry yeast
- 4 tablespoons butter
- ¼ cup milk
- 1 large egg
- 1 large egg yolk
- 1 ¼ cups hot tap water, 118-122˚F (47-50˚C)
To finish:
- 4 tablespoons soft butter
For the egg wash:
- 1 large egg
- 1 tablespoon tap water
Instructions
For the dough:
- Combine flour, sugar, yeast and salt in a medium-large bowl. Stir well to combine, then make a well in the center. Set aside.
- Melt butter in the microwave for 30-50 seconds on high power, until just melted. Remove from the microwave and add the ¼ cup of milk. Stir with a fork then add the egg and egg yolk. Stir again until well mixed.
- Add the milk mixture to the well in the center of the flour. Add the hot tap water to the well then stir to combine. Continue stirring until all flour is incorporated. Cover the dough with plastic wrap and set aside in a warm place to rise until double in size, about 1 hour.
To finish:
- Generously butter 4 3x6-inch loaf pans and set aside. You can also make 2 rounds of bread by using 2 8-inch cake pans.
- Sprinkle 2 tablespoons of flour onto a work surface. Transfer the dough onto the floured surface and turn several times with a bench scraper or spatula until dough is coated with flour.
- Using a bench scraper or spatula, divide the dough into four equal pieces. Turn each piece in the flour to coat all of the surfaces. Add more flour to the work surface if needed.
- Set 3 of the dough balls aside and cover with a clean kitchen towel. Place the 4th ball of dough onto the floured work surface and, using a bench scraper or sharp knife divide the dough into quarters. Cut each quarter in half. You should have 8 fairly evenly-sized pieces of dough. With your hands, tuck the edges of the dough balls underneath to form 8 balls of dough. (Don’t worry about perfect shaped balls here, the more imperfect, the more whimsical and pretty the finished loaves.)
- Flatten one of the dough balls with the palm of your hand then push it out with your fingers to make a circle of dough approximately 2½ inches in diameter. Spread the circle with a scant ½ teaspoon of butter and fold it in half. Place the folded circle in one of the prepared pans with the open edges facing up. Repeat this sequence with the remaining portions of dough to fill up one of the prepared pans.
- Repeat the above process with each of the remaining 3 portions of dough, filling up the 4 prepared bread pans. Cover the pans with a clean kitchen towel and allow to rise until doubled in size, 30-40 minutes.
For the egg wash and bake:
- Towards the end of the rising time, preheat the oven to 375˚F and prepare the egg wash by vigorously whisking together the egg with 1 tablespoon of water.
- When the oven has reached 375˚F, use a pastry brush to brush each loaf with the egg wash. Try to be careful not to let the wash drip down the sides of the loaves into the pan.
- Place loaves in the preheated oven oven for 18-25 minutes or until golden brown. If the tops seem to be getting too brown before the end of the baking time, just cover them with foil for the last few minutes. Remove from the oven and tip the loaves on their sides to remove them from the pans. Transfer the loaves to a cooling rack. If the loaves don’t want to release from the pan, run a small sharp knife between the edges of the loaves and the pan to loosen. Enjoy!
Notes
Nutrition
Shop Our Café Loves
We’ve gathered our favorite kitchen tools, tableware, and entertaining treasures in one place, the Café Loves store. It’s a wonderful spot to find something special for yourself or the cooks and hosts you love!


Any reason I can’t form the loaves and refrigerate overnight, allowing them to finish rising the next day?
I’ve had great luck cooking according to your directions but would like to try a fresh bake next day. Thx.
Hi Linda, that should work fine. Just be sure to let the dough double in size and come back up to room temperature before baking.
Yes, it worked great! Took about 3 hours to warm up and do its 2nd rise - which was perfect! Took out when I got home from church; ready to bake for dinner. 😊❤️
Thanks for letting us know, Linda! So glad to hear how well this recipe turned out for you!
How do you freeze the loaf. Before baking or after? Thank you
Vonnie
Hi Vonnie, you can freeze it after baking. Enjoy!
Question about using two round cake pans: how do you "stack" the flattened rolls in a round pan? I'm picturing just making concentric circles around the inside of the pans. Am I on the right track? Hoping to try this and the Potato Rolls this weekend as practice for Thanksgiving.
Hi Ashely, you don't stack them in the round pans, just snuggle them into the pan.
A bit confusing since your note on forming dough for cake pan size does say “stack”them in pan.
Hi Celeste, they are stacked side by side in a round pan.
Fantastic recipe!! Very quick and easy. Great instructions
A keeper for sure!!
Thanks, Maria! So glad you enjoyed this!
Delicious! Even after the main course and sides served to friends, they ate more bread!
Wonderful! Thank you for the review, Sandy!
This bread turned out fabulous! I spend way too much time reading all your recipes and deciding which one to try next. Never disappointed. And thanks for the videos 🙏
Awesome! So glad to hear that, Terry!
I'm on my second time making this bread and as a cancer patient there is alot I can't have but this was amazing I got to enjoy bread for the first time in a long time! However I used half of it to stuff with lamb incandescent veggies it worked out amazing.
Thank you if you have any good recipes would love them have to fresh make everything I eat.
Hi Marla, so glad to hear you enjoyed this bread and that you were able to enjoy bread again! Our website has hundreds of recipes, including lots of bread and baked goods.
Can this recipe be used for pull apart rolls instead of bread? Make small dough balls in a 9x13 baking dish… rise etc… and bake in that dish???
Hi Sharon, yes, you could do that.
Hi, In the directions above regarding the egg wash, in step 1, you discuss how to make it and how to spread it onto the dough. However, in step 2, you repeat it. Are there 2 egg washes on top of this dough?
Thanks
Hi Gail, thanks for pointing that out. I have clarified it in the recipe so it should be clear now. There is only one egg wash.
Hi Chris. I am curious as to what your preference is in this recipe of using all purpose flour and bread flour. I made this a couple of years ago and I think I used half all purpose and half bread flour. So yummy!
I love your recipes, your worship, your sharing of scripture. God bless you as you ‘feed’ us.
Thank you, Colleen! 🥰
I can't wait to try making The No-Knead Pull-Apart Bread. Reviewing all the comments it appears you have given us a (another) "Winner". Thanks for the excellent job you do on all your recipes. I will update my comment when I make the bread. Also, could you please send me the "Free Printable Labels"? Thanks
Enjoy, Kitty! Regarding the labels, we do not have them for this recipe at this time.
Absolutely FABULOUS Brioche, Chris. I made these loaves this afternoon and shared them with neighbors this evening. Indulged in one of the loaves, for ourselves, for dinner.
Love your website, your recipes, and your inspirational life story. I smile each time I reach the end of a recipe you have posted.
Blessings
Marian
Awesome! Thank you for the kind and encouraging comment, Marian!
Thank you for this recipe! I enjoyed baking this delicious bread and eating it was a delight. I highly recommend it. Honestly, I hadn't touched yeast in a decade and this was my re-entry into what had become an intimidating kitchen experience -- it was a piece of cake! It worked and I'll do it again!
Thanks for your review, Linda! So glad you enjoyed this recipe.
You have in the instructions that the dough is supposed to be sticky I added more flour thinking miss measured as it didn't say it should be sticky.
Hi TJ, the recipe works pretty well as written. Overnight doughs tend to be looser and a little stickier than doughs that you knead and bake right away.
Would this work out if the dough was kept in one big piece, as would a typical loaf? Or is it necessary to divide and fold? Thanks!
Hi YP- check out this recipe for a full loaf- https://thecafesucrefarine.com/easy-no-knead-brioche-bread/
Yum! Really good! Putting them in my freezer as we speak! Looking forward to pulling them out to enjoy! Another great recipe!
Wonderful! Thank you for letting us know, Melinda!
Can I substitute sugar for honey in this recipe?
Hi Wendy, yes that will work fine. You may need a bit of extra flour when you turn the dough out since honey is a liquid.
Omg, this pull apart brioche bread is AWESOME. Very moist and fluffy. I was hoping to freeze it, but unfortunately never made it to the freezer. I’ve shared with my walking buddy and she couldn’t stop raving how de t is. Thanks for sharing this receipe
My walking buddy could not stop raving how delicious the pull apart bread is.
Awesome! Thanks so much, Wendy!
This was such an easy, pleasing recipe. I halved the recipe, regretted it as soon as we tasted the bread, and started on the full recipe the next day. And it’s the closest thing I’ve tasted to a proper brioche since I’ve been to Paris. I’m tempted to send the recipe to my local “French” bakery!😂
That's awesome, Nichole! Thanks for letting us know!
This was my first bread bake of the fall. My loaves turned out golden an fragrant. The instructions for freezer to table will come in handy. I had several requests to share your recipe.
That's great, Tere! Thanks for letting us know.
Tastes wonderful. This wqs my first attempt at a bread made with yeast, so perhaps I could have started on a slightly easier recipe, but it turned out amazing. The pictures were extremely helpful as well. Thank you for sharing your recipes!
Awesome! Thanks for letting us know, Kim!
I'm making this bread now and need to ask if this dough is supposed to be sticky once the flour is mixed in? I am forced to give it a rating but my bread is not finished yet. (Which I know is not fair)
Yes, it’s a sticky wet dough!
thanks! the bread was very good.
Great! Thanks for letting us know!
Hi Candace, you could definitely make this in a larger Pullman pan. I can't give you the exact time since I haven't tested it in that type of pan but it will be longer. You could use an instant thermometer to determine when the bread is done. The temperature should be right around 190˚F or within 1 or 2 degrees.
Thanks Chris. Think I will try it for Mother"s Day dinner.
Hi Chris,
Could this bread be baked in a 13 x 4 inch Pullman pan? How would I adjust the baking time?
Thanks for your advice.
Would dearly love to try this bread but only in as far as using two pie pans, dividing dough in two and simply forming a ball for each pan, covering and continue from there. Not to take the fun from this but to eliminate all the balls and bits. I hope l can Ruth
Hi Ruth, you might be interested in this recipe instead- https://thecafesucrefarine.com/easy-no-knead-brioche-bread/
This bread was easy and delicious! My husband and I can’t stop eating it 🙂
Awesome! Thanks, Arianna!
Hi !
I made this bread and its crumb was VERY dense... almost like it wasn't completely baked.
We've enjoyed commercial brioche and they were "light, fluffy and airy".
I followed the recipe to the letter with one small issue:
I wasn't able to flatted the dough into 2.5 in circle.. it kept shrinking back to less-than 2 inches.
Might that have been the issue ?
I'd like to try again.
Hi Doug, not sure what went wrong, it's hard to say without having been right there in the kitchen with you. This bread is very light. It sounds like somehow you added too much flour if the dough kept shrinking back. It should be really easy to flatten the circles to the right size.
Thanks for your suggestion I may have added too much flour.
I'll give it another whirl.
The oven-spring was amazing and the bottom thumped like it should have.
Chris:
Another thing that may have caused my situation:
I used Bread-Flour (all flours have a different absorption ration).
Next time I'll start with four cups of flour and add the remaining 1/2 cut, by TBSP, as needed.
Amazing. I made it this morning for breakfast. My husband couldn’t believe I didn’t have to knead it.
Yay! Thanks so much, Marie!
My husband LOVES all your recipes I’ve made. Unfortunately, I need to be gluten free so don’t get to enjoy them. Any suggestions on making your recipes gluten free?
Hi Donna, I've been trying to experiment a bit with converting some of our recipes to GF. I've made all of our biscuit and scone recipes with King Arthur Measure to Measure GF flour with great success. I've also done the bran muffins with oat bran instead of wheat bran and GF all-purpose flour (again, King Arthur) and they are wonderful!
Hi, I was wondering about the prodding process for the regular yeast.... Do you change the liquid amount for the recipe? Can you explain what you did please?
Thanks
Maureen
Hi Maureen, to use regular yeast you would need to warm some of the liquid from the recipe (about a quarter cup) and dissolve the yeast and let it get nice and foamy. Then proceed with the recipe. Don't change the amount of liquid.
You missed the oven temps! In fact in all your bread recipes.
Hi Val, it's in step 2 under "the egg wash".
This was my first ever attempt at making bread. I am excited to say this bread is simple to make and tastes delicious. My biggest critic, my 21 mo old daughter, keeps asking for more. Thank you for sharing this!
Bravo, Elizabeth! 👏 That's so awesome! My grandchildren always come over and ask "do you have any pull apart bread stashed away anywhere?" Sounds like they love it as much as your daughter!
I made theses loaves and my husband and I both loved it. It sure looked like it should not work but as I have used thecafesucrefarine.com recipes before, I decided to give it a go.
Absolutely fantastic Give it a go, you’ll love it
Thanks for letting us know, Laura!
This bread was easy to make and delicious, although be aware that cutting the loaves and buttering the pieces does take a bit of time. I didn't judge my time correctly for that part of the recipe (the loaves need to rise after you put them in the pans) so be sure to give yourself time to do the cutting and buttering steps AND the second rise. I purchased the mini loaf pans (4) and my husband and I split a loaf with dinner. The loaves look small, but don't be deceived! I thought we'd easily devour a loaf with dinner (and we were really hungry... because I had to wait for the loaves to rise in the pans!). LOL! We actually struggled to eat one loaf, but we were determined! 🙂 Thank you for the recipe!
Thanks for sharing your review, Terri!
I was sure this was going to be a flop! After the first rise, my dough was horribly sticky and very loose. It oozed out of the bowl and onto the countertop. I kept going. I sprinkled it with flour to lessen the stickiness, cut all the little pieces, patted them out, added the butter and folded in half and put in the pan. I had to prop the pan up so my little dough patties didn't fall to the bottom. To be honest, the whole thing going into the oven looked like crap! I just kept going...I figured worst case I was out some flour and eggs. Coming out of the oven they look FANTABULOUS! How cute! As an added bonus, they even taste good! I'm so glad I kept going! I didn't make any changes and followed the recipe verbatim. If I can do it, you can do it! Just keep going...
Bravo, Sandi! 👏🙌👏
If the dough seems really sticky next time, just use more flour on your counter and with your little dough balls. The type of flour you use as well as the weather can have an effect on this so don't be afraid to use extra flour if your dough is sticky! Thanks for sharing your fun review!
Thanks a lot to you, Chris. This pull apart bread is the recent recipe of yours that I tried, and it came out beautifully!!! I have tried your other recipes too - poppy lemon curd cake, cherry almond cake, your recipes are always a hit!!!
I made all these in my air fryer- excellent results & happy family! 😊
That's awesome, Priya! Thanks for taking the time to let us know!
Chris,
This was so easy to make and came out perfectly. I didn’t have the exact same size bread pans, mine were just slightly larger. I needed to proof my yeast and deducted the teaspoon of sugar and 1/4 cup water from the ingredients. I also added chopped black olives and garlic slices, when I added the egg/milk mixture in. Took it to a dinner party and everyone raved over it. Your recipes are amazing. Thank you so much!
Awesome! Thanks for sharing your results, Tamara!
1. Combine the egg and water and stir vigorously with a fork. With a pastry brush, brush each loaf over the top with the egg wash. Try to be careful not to let the wash drip down the sides of the loaves into the pan.
2. Towards the end of the rising time, preheat the oven to 375˚F and prepare the egg wash by vigorously whisking together the egg with 1 tablespoon of water. Set aside.
Something seems to have gone amiss in the editing of these two steps... or else I'm preparing an egg wash twice only using it once 🙂
Thanks Lisa, I will correct that right now. It's just one egg wash.
This looks really good. I need those little pans😁😁😁.
Thanks, Fazia!
What size are the small loaf pans?
Hi Judith, my pans are 4x6. There's a link to them in the post.
Please I will love to have a recipe for a smaller batch because I live alone🙏😊
Hi Rosemond, you could halve the recipe for a smaller batch. It also freezes perfectly or makes a wonderful gift for a neighbor or friend.😊
I am curious. I am busy making your bread and thought it would be awesome to add garlic and herb to the butter on the circles. What do you think.....I haven't tasted anything yet as the bread is busy rising in their pans. So thinking about the sugar content vs spicy additions like kalamat olives or sundried tomatoes, etc. Have you ever played with "filling"? Did you adjust the sugar?
Hi Myrna, I think it would be fantastic to add some savory flavors to this bread but I would definitely reduce the sugar in the dough. Now, if you wanted to go with some cinnamon and sugar in the filling, that would be DELICIOUS!!
Oooh. Cinnabons. Add a cream cheese topping and hey presto! Dessert. Sounds like an awesome idea. I think your recipe could the be basis for a 3 course meal 🙂
Ha! Let us know if you try it!
Made these today and wanted to tell you they are delicious. I'm so happy I made them. Thanks for sharing your recipe. Now I will try and find your no knead Brioche because I am told Brioche is the best bread for French toast. Thanks again 💕
Thanks so much, Anne-Marie! I'm so glad you enjoyed the bread!
Oh my, Chris! When the loaves came out of the oven, I asked my husband if he’d like some warm bread. We had some with peach jam (also your recipe.) The two of us finished a loaf. I guess we’ll have a lighter dinner tonight. So nice to have a stash in the freezer now!
I love that, Sue! Thanks for sharing your results!
Classic brioche dough is laden with eggs and butter. For this amount of flour at least double the butter and 4 to 5 eggs total is standard. There is also just enough water to make a sponge, but the bulk of the hydration is done with the eggs.
I'm sure this bread is delicious, but it seems more like an enriched white loaf or dinner roll rather than a true brioche.
Hello Donald, thanks for sharing your thoughts.
You're right, it's not a "classic" brioche recipe and you're also right, it IS incredibly delicious!! Call it whatever you want but, if you enjoy great bread, done the easy way, you'll love this recipe! Bon Apétit!
I'm on a Sourdough kick try to use it for everything how would this work and how much sourdough start for the recipe
Hi Dale, I'm honestly not a sourdough expert so I can't tell you exactly how to go about it.
I only have regular yeast and not instant. How should I proceed?
Hi Sue, you will need to proof the yeast before adding it to the other ingredients.
I had tried your lovely No Knead Pull-Apart Brioche Bread recipe today. I am too excited to bake it and overlook the egg wash. But it turn out great n delicious 😋
Yay! Thanks for sharing your results, I'm so happy you enjoyed it, Junie!
I would love to try this recipe today but only have the traditional size loaf pan. Do you have a suggestion for this?
Hi Kristen, I haven't tested this recipe in a regular size pan (8x5) but if I was going to try it, I would just divide the dough in two and make 8 larger balls from each section and use 2 loaf pans. If your loaf pan is really large 9x6 or larger), you could take the entire batch, divide it into 12 pieces and use one pan. The baking time will be longer, I can't say exactly since I haven't tested it.
Chris, I make Brioche Bread by the loaves and always freeze them all the time so we're never without. Can't wait to try sectioning the dough for the pull apart version. Have you tried making them in larger loaf pans or should we stick with the small size you recommended or round pans for better results.?
Hi Ruth, you could also make this bread in two 8x5-inch pans.
Wondered if you’ve tried making French toast with this bread.
I have not, Lisa, but I bet it would be delicious!
My husband prefers freshly ground whole wheat flour. No white flour!! How would that work in this recipe ?
Hh Kathy, I would probably go for recipes that are specifically tailored for WW flour.