This post may contain affiliate links. For more information, see our privacy policy.
Although this French Plum Galette looks quite fancy, it's ridiculously easy to make and more than ridiculously delicious to eat!
I made this French Plum Galette several times over the past few weeks. It makes a gorgeous dessert that never fails to delight family, friends and guests around the table.

We're actually on a French culinary inspiration trip as I write this post. We spent a week in Paris and then hopped on a Viking riverboat headed for Normandy. One amazing stop along the way was Vernon, France, just a stone's throw away from the home of Claude Monet. We were able to take a delightful bike ride and tour through Monet's garden. It was truly a spectacular experience but even more amazing was the sight we woke up to the morning we arrived in Vernon. Take a look:
As I stood there, stunned at the sight before me, the church bells began chiming! I felt like I was PART of a Monet painting - but the artwork was painted by an even greater Artist, the Creator of Monet!
Crazy delicious!
In addition to being a beautiful dessert, this French Plum Tart is SO delicious. The ingredient list is short; purchased pie crust, fresh plums, a pat of butter and granulated sugar. That's it! This simple combination of ingredients allows the plums to really shine. An easy plum glaze, made in the microwave with chopped plums and sugar and brushed on the galette after baking is the sweet crowning glory.
Served warm with a scoop of vanilla ice cream or a dollop of lightly sweetened whipped cream, this French Plum Tart is a perfect plum season dessert. Here in the U.S., plum season lasts for a good 4 months, from July through October and I'm certainly seeing them all over France right now. 🙌

Ridiculously Easy
If you're new to The Café, you might now know that one of our trademarks is Ridiculously Easy Recipes. We have an entire collection of recipes with this designation, sweet, savory and in between! You can check out all of them here and read more about these Ridiculously Easy recipes in this post. My super condensed description of our R.E recipes is this: These are the recipes that make you look like a kitchen rock star with minimal effort on your part. Like that? Yep, me too!
What makes this French Plum Galette so easy? Well, instead of a time-consuming from-scratch pie crust, we employ a store-bought crust. Actually, two store-bought crusts. Stacking the two on top of each other then rolling them to a larger circle, seals them together and allows for a larger tart.
We also use a few tricks to make the purchased crust taste crisp and like homemade. An initial blast of heat, created by heating a cooking sheet in the oven while the oven is rising to the correct temperature, prevents the bottom of the tart from being soggy. A brush of melted butter and sprinkle of sugar on the top crust edges before baking also make the crust crisp and delicious, with a crunchy hint of sweetness.

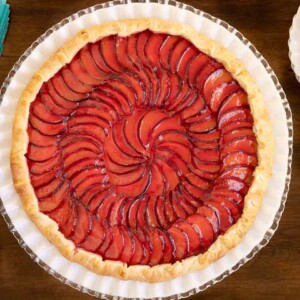
The plums can be arranged in concentric circles as pictures or simply piled on top of the crust for a more rustic look and a quick, easy prep time.
While this French Plum Galette bakes, a super simple glaze is created by combining chopped plums and sugar in the microwave. You'll need a fine-mesh sieve to strain out the plum pulp resulting in a brilliant glistening glaze to adorn your beautiful dessert.

Want to take a trip to France without leaving home? Make this Ridiculously Easy French Plum Galette and invite some friends to celebrate! Want to feel really fancy? Call it a "Galette de Prunes Française" (Glazed Plum Galette).
We'll just keep the ridiculously easy part to ourselves! Deal?

Cafe Tips for making this French Plum Galette
- What type of plums to use for this recipe? Although there are more than twenty varieties of plums available these days, the two most common types are red and black. Either one will work for this recipe. The plums pictured in this post are red plums but I've also made it with black plums which makes a beautifully dramatic presentation. If you have another variety, go for it. Each one is uniquely delicious!
- You'll need a package with two refrigerated pie crusts (at least that's how they are sold here in the States). These are fresh, rolled pie crusts (not frozen) that you find in the dairy section of most grocery stores.
- I've been trying a lot of store-bought refrigerated pie crusts lately and have found that some of the generic ones are the best. Aldi makes a good pie crust as do two of my local grocery stores. I love the way Aldi packages their crusts with parchment paper rolled with the dough, making the crusts super easy to unroll. Trader Joe's also makes a good crust.
- When you slice the plums for this galette, you may have several slices with each plum that end up too small or slightly bruised. Throw those in a microwave-safe bowl to use for the glaze. It won't matter that they're not perfect.
- You'll need a fine-mesh sieve to make a clear, smooth glaze for this French Plum Galette. Fine-mesh sieves are really handy in the kitchen and can be used in lots of different ways.
- I like to make this galette on a piece of parchment paper. That makes it really easy to transfer the galette to the hot sheet pan before baking. I love these pre-cut sheets of parchment paper as they are the perfect size for sheet pans, super convenient and they save lots of time when baking.
- Are you in the market for sheet pans? These OXO pans are my favorite - they're sturdy and very good quality.
Thought for the day:
Grace and peace be yours
in abundance through the knowledge
of God and of Jesus our Lord.
2 Peter 1:2
What we're listening to for inspiration:

If you enjoythis recipe, please come back and leave a star rating and review! It's so helpful to other readers to hear your results, adaptations and ideas for variations.
Scroll Down for the Recipe - or Save It to Your Inbox
We’ll email you the recipe so it’s easy to save, print, or share.
Ridiculously Easy Glazed Plum Galette (Galette de Prunes Glacée Ridiculement Facile)
Ingredients
For the crust:
- 2 refrigerated pie crusts, I use Pillsbury or my generic store brand. Aldi is also good
For the plum filling:
- 10 medium-sized black or red plums, 1¾-2 pounds
- 3 tablespoons granulated sugar, more for sprinkling on the top edges of the crust
- 2 teaspoons melted butter, I use salted butter
For the glaze:
- left over plum slices plus more to equal 1½ cups
- ½ cup sugar
Instructions
For the prep:
- Line a sheet pan with parchment paper. Set aside.
For the crust:
- Sprinkle a work surface light with flour. Unroll the two pie crusts. Place the two circles of dough on top of each other. Roll out into a slightly larger circle, about 11-12 inches in diameter. Trim any irregular edges to create a clean circle. Transfer the circle to the prepared pan and chill in the refrigerator or 15 minutes.
- While the dough in chilling, halve 8 of the plums and remove the stones. Slice each half into ¼ inch slices. Have a medium-size microwave safe bowl nearby to collect any irregular or bruised bits of plum.
For the plum filling and to finish the tart:
- Preheat the oven to 375˚F. With one rack on the lowest position.
- Remove the galette dough from the refrigerator and slide the parchment paper (with the dough circle on top) onto your work surface. Place the sheet pan on the lowest shelf of the oven as it preheats.
- Sprinkle the tart with 1½ tablespoons of sugar then arrange the plum slices in slightly overlapping concentric circles on top of the sugared dough, leaving a 1-inch border. Sprinkle the plums with another 1½ tablespoons of sugar.
- Roll the border of the dough towards the plum filling. Brush the top of the border with melted butter and sprinkle lightly with more sugar.
- When the oven is heated to 375˚F, remove the pan from the oven and, using the parchment, slide the galette and parchment onto the hot sheet pan.
- Bake on the lower shelf for 35-45 minutes, until the crust is golden brown. Remove from the oven and cool for 10 minutes then brush with the glaze. You may not need all of the glaze. Allow the galette to cool for 20 minutes before cutting and serving. Serve warm with a scoop of vanilla ice cream!
For the glaze:
- While the galette is baking, prepare the glaze. Add enough plums to the microwave bowl or cup (that you used for the imperfect plums) to equal 1½ cups. Add the sugar and stir to combine.
- Microwave on high power for 4 minutes. Put the plum mixture through a fine-mesh sieve and push on the pulp to remove most of the juice. Discard the pulp. The strained plum juice should be a syrupy consistency. If it’s too thin, return it to the microwave and cook on high power for another minute or two. Set aside until the galette is finished.
Notes
Nutrition
Shop Our Café Loves
We’ve gathered our favorite kitchen tools, tableware, and entertaining treasures in one place, the Café Loves store. It’s a wonderful spot to find something special for yourself or the cooks and hosts you love!


Chris,
I have purchased the plums and pie crust and am going to bake this beautiful looking creation tomorrow morning for an afternoon luncheon dessert. I note in step #3 it says to sprinkle the plums with another 1 1/2 tablespoons of sugar, but I don't see where you use the first half of the sugar. Am I missing an important step? Please help. Our local plums are ripe and ready to be showcased, and I can't wait to try this.
Suzanne
Thanks, Suzanne for noticing that. I have clarified it in the recipe in step 3.
Thank you! It is on the oven and looks and smells delicious.
Thank you for the clarification. I baked this today and it turned out beautifully! Received rave reviews. You really do make me look like a rock star baker again and again.
Suzanne
🥰
Chris- I love your recipes! My question is about that ‘lowest shelf in the oven’. Does it make a difference if your heating element for the oven is in the top or in the bottom? I have had both. Are you trying to get the tart nearer the heat or farther from?
Hi Vicki, thanks for your kind words!
Regarding your question, most electric ovens have two heat sources, at the top and the bottom. In most ovens both of these work to preheat the oven - then the bottom heat source kicks in on and off to maintain the heat. That's why, if you want the base of a cake or pie to brown and get crusty it works well to use the lowest rack.