This post may contain affiliate links. For more information, see our privacy policy.
This Ridiculously Easy Press-In Tart Crust is buttery, crisp, and perfect for both sweet and savory tarts. Stir it up in less than 5 minutes, no mixer or food processor necessary!
If you absolutely love making homemade crusts for tarts and quiches, this post might not be for you. I'm talking about the kind of crusts that require cutting butter or shortening into flour, chilling and rolling the dough, fitting it carefully into your tart pan, filling the unbaked crust with beans, rice, or pie weights, then (finally) baking, often twice (with and without the weights). But if you'd like to learn how to make a super delicious, crisp, buttery tart crust that you can stir up in less than 5 minutes with no chilling or rolling involved, this Ridiculously Easy Press-In Tart Crust has your name written all over it! It definitely has mine!
 - thecafesucrefarine.com")
A rose by any other name
I had a hard time deciding on a name for this recipe. Why? Well, in addition to being a Ridiculously Easy Press-In Tart Crust recipe, I wanted to include the word "French" because I actually perfected this recipe while we were in France this summer.
I also wanted to incorporate "French" in the title because there are so many French tarts that I'll be making and sharing with this easy crust recipe.
Lastly, I served a tart with this crust to a French friend in France, who ran a cooking school in Paris for many years and she raved about it. That makes it "French" approved!
Another descriptive word I wanted to slip in was "shortbread" as the simple ingredient list for this recipe is the same as classic shortbread; butter, flour, sugar and salt. It also produces crisp, buttery, shortbread-y results for both sweet and savory tart crusts.
I invited a friend for lunch this week and served a Ratatouille/Goat Cheese Tart with this recipe as the crust. She said to make sure that I included something in the name that would explain how the crust didn't require any fancy culinary skill, although "it looks like it came from a fancy bakery".
You might laugh, at one point I actually thought of calling it The Lazy Person's Shortbread Tart Crust because I'm definitely a little lazy when it comes to cooking (but only if the results are spectacular), hence all the Ridiculously Easy recipes in our arsenal.
As you can see, in the end, I settled with Ridiculously Easy Press-In Tart Crust (for Sweet or Savory Tarts). Hopefully, that will relay how easy and versatile this recipe is!
 - thecafesucrefarine.com")
Ridiculously Easy
Oh, and speaking of easy, you may have noted that we call this recipe Ridiculously Easy. It is super easy, but we also call it that because we have a large category of recipes called Ridiculously Easy. You can read more about this collection of recipes here and can find all of them here, but in a nutshell, my definition is "the recipes that make you look like a kitchen rock star with minimal effort on your part".
A picture's worth a thousand words
I realize that you might not believe that such a fancy-looking tart could be easy so we shot a few pics to show you the simple process:
 - thecafesucrefareine.com")
Stir the dough together in less than 5 minutes then press it into the pan. No mixers, no food processors, no chilling, no rolling, no fuss! A lazy smart cook's dream come true!
Press the dough into the pan
Okay, so once the dough is mixed, how do you press it into the pan? There are a few easy little tricks so we took some pics of that, too! You'll need a 9 or 10-inch tart pan with a removable bottom (see the link below under Café Tips). These pans are reasonably priced and super versatile as you can make zillions of variations of beautiful, delicious tarts and quiches.
Pressing the dough in the pan is easy and quick. Here's how I do it:
 - thecafesucrefareine.com")
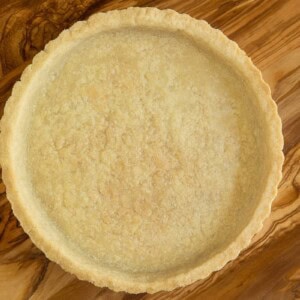
When your dough is all pressed into the pan, it will look like this:
 - thecafesucrefarine.com")
Finishing up!
The crust will be a little uneven but a quick smoothing with the bottom of a measuring cup or flat bottom glass will take out all the lumps and bumps:
 - thecafesucrefareine.com")
All that's left is to prick the crust with a fork (this will keep it nice and flat in the oven), then pop the whole thing in the oven for 15-25 minutes, no beans or pie weights needed! (The timing will depend on whether you use a filling that needs further baking or a no-bake filling.)
Here's a video that shows exactly how it's done:
 - thecafesucrefareine.com")
I love that this crust can work for both sweet and savory tarts - we've got recipes for both, coming up!

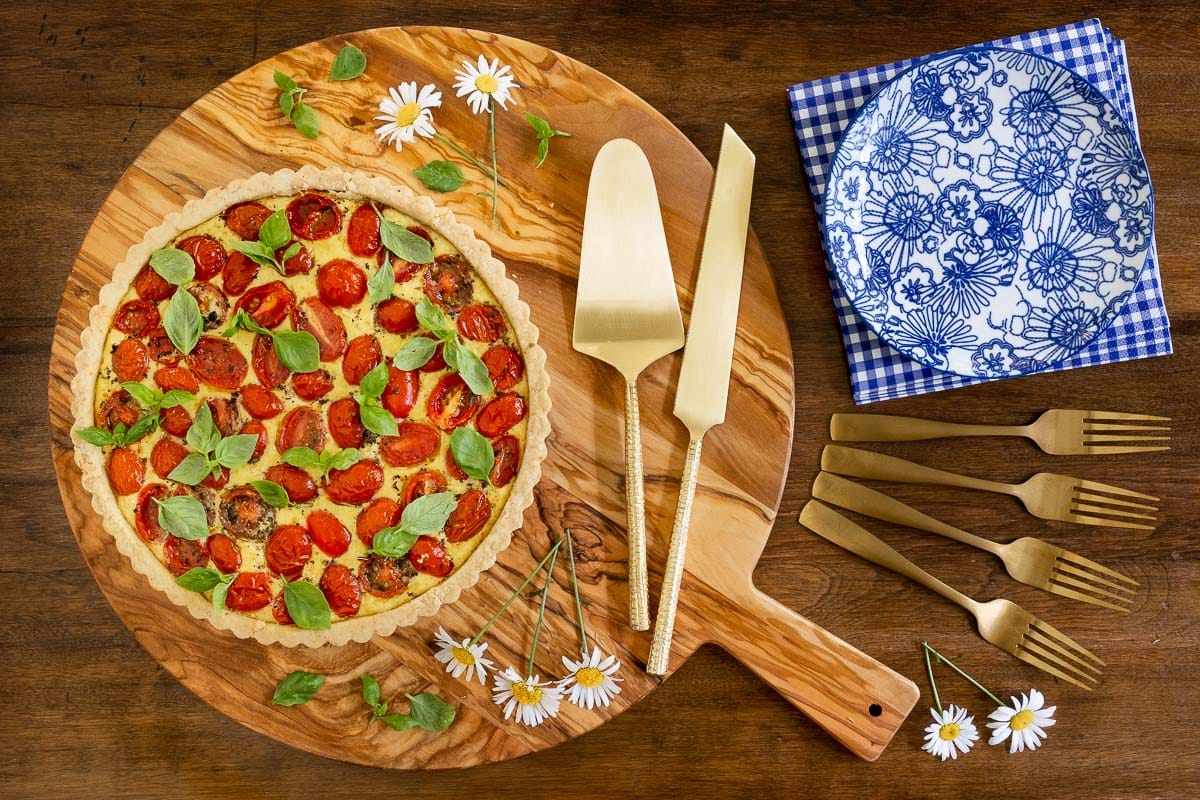
Pictured above is one of our favorite savory variations for summer, a fabulous Tomato Ricotta Tart that we'll be featuring later this week and below, another coming-up-soon recipe, a delicious French Almond Plum Tart. Truly, the sky's the limit as far as different options for filling these crusts!

And what does this Ridiculously Easy Press-In Tart Crust taste like? Everyone who tries it says, "DELICIOUS!" and I think you'll agree. The crust for sweet tarts is just mildly sweet with lots of buttery flavor and a lovely crisp texture. The savory crust retains the buttery crispness but is a slight bit saltier and cuts back to just a teaspoon of sugar (just enough to round out the flavor).
I hope I've convinced you to try out this recipe. I know it will be a staple for me and my head is swimming with delicious tarts and quiche ideas for the days ahead. Bon Appétit!

Café Tips for making this Ridiculously Easy Press-In Tart Crust
- The recipes for the sweet and savory crusts are slightly different. Both renditions are included below in the recipe card.
- This recipe works best if you stir up the dough and pat it into the pan while the butter is still warm. If you wait and let the butter cool, the dough can dry out.
- You may have a bit more dough than you need, depending on how thick you make the bottom crust of the tart.
- You will need a 9 or 10-inch tart pan with a removable bottom for this Ridiculously Easy Press-In Tart Crust recipe. These pans are reasonably priced and are wonderful for tarts, pies and quiches. If you use a 10-inch pan, the crust will be a little bit thinner.
- It's important to spray your tart pan with nonstick cooking spray and also line it with a round of parchment paper to make it super easy to remove the tart from the pan. You don't want to make this beautiful tart crust and have it stick to the pan. You can cut your own or purchase these precut parchment paper rounds which are super convenient.
- I like to bake my tarts on a sheet pan lined with foil or a sheet of parchment paper. Since the pan has a removable bottom a bit of butter will sometimes leak out. The pan prevents a mess in the oven. Even the tiniest bit of butter on the floor of a hot oven can cause smoke and burning.
- I use my microwave to melt the butter for this recipe. It's important to use a microwave-safe bowl, which means that it's made of a material that won't heat up, melt or transmit harmful chemicals when used in the microwave. You should see a symbol like this on the bottom of a microwave-safe bowl or plate:

- One other trick for the microwave. If you cover the bowl with a slightly damp paper towel (I just run my hands under running water) and place it over the top of the bowl it will prevent spatters in the microwave and the moisture will keep the paper towel from blowing off.
- I really love these large pyrex bowls with a handle. They're perfect for the microwave and so much more!
Thought for the day:
Those who wait on the Lord
will renew their strength.
They will SOAR on wings like eagles,
they will run and not grow weary,
they will walk and not be faint.
Isaiah 40:31
What we're listening to for inspiration:

If you enjoy this recipe, please come back and leave a star rating and review! It's so helpful to other readers to hear your results, adaptations and ideas for variations.
Scroll Down for the Recipe - or Save It to Your Inbox
We'll email you the recipe so it's easy to save, print, or share.
Ridiculously Easy Press-In Tart Crust (for Sweet or Savory Tarts)
Ingredients
For a sweet crust:
- 1¼ cups all-purpose flour
- ¼ cup cornstarch
- ½ cup powdered sugar
- ½ teaspoon kosher salt
- 8 tablespoons butter
- 1 tablespoon water
For a savory crust:
- 1¼ cups all-purpose flour
- ¼ cup cornstarch
- 1 tablespoon powdered sugar
- ¾ teaspoon teaspoon kosher salt
- 8 tablespoons butter
- 1 tablespoon water
Instructions
For the prep for both sweet or savory crusts:
- Preheat oven to 350°F. Spray a 9 or 10-inch tart pan with a removable bottom generously with non-stick baking spray. Line the pan with a round of parchment paper. Set aside.
- Line a sheet pan with foil or parchment paper (for easily clean-up). Set aside.
For the dough for both sweet or savory crusts:
- Combine the dry ingredients (flour, cornstarch, powdered sugar, and salt) in a medium-large size bowl and stir to combine. Make a well in the center and set aside.
- Place the butter in a microwave-safe, medium-size bowl. Cover with a slightly damp paper towel. Cook on high power for 1 minute or until melted. (if you don't have a microwave you can melt the butter on the stovetop in a small saucepan.)
- Pour the butter into the well, making sure to scrape the bowl to include all of the butter. Add the 1 tablespoon of water and stir until the dry ingredients are incorporated and the dough comes together and/or forms large crumbles. If the dough seems dry, you can add a tiny bit of extra water.
- While the dough is still warm crumble two thirds of it around the edges of the prepared tart pan. Press it evenly around the sides and out onto the outer edges of the bottom of the pan.The sides should be a little thicker than the bottom for structural support.
- Crumble the remaining dough into the open space in the pan. Press it in firmly with your fingers and the palm of your hand until the tart pan is completely lined with dough. If the dough seems sticky, you can dust your fingers with a small amount of flour.
- Use a straight-sided, round measuring cup or a flat bottom glass to smooth out the edges and further compact the dough in the bottom of the pan. Dip the cup or glass in flour if there is any problem with stickiness.
- Prick the dough all over the bottom with a fork to prevent puffing.
- Place the tart pan on the prepared baking sheet and bake for 10 minutes. Remove the sheet pan (and tart pan) from the oven. Using the same measuring cup or flat bottom glass, gently press the edges again (if they have shrunk down a bit, you can press them back to be even with the top of the pan) and smooth out the bottom if there are any bumpy places.
- For a crust that will have a baked filling, return it to the oven and bake until the crust is pale golden brown, another 5-7 minutes. (Allow the crust to cool for at least 10 minutes before filling and returning to the oven.)
- If using a no-bake filling for your tart, return to the oven and bake until it's a medium golden brown, about 12-17 minutes longer. Set aside to cool completely before filling.
Notes
Nutrition
Shop Our Café Loves
We’ve gathered our favorite kitchen tools, tableware, and entertaining treasures in one place, the Café Loves store. It’s a wonderful spot to find something special for yourself or the cooks and hosts you love!


In UK and just used this recipe converted to gm. Noticed that the dough was very buttery / wet. When I looked at the weight of the flour 1 1/4 cups compaired to gm, the gm are short by about 30gm. When I added this to the dough it looked like yours. Hopefully the other measurements are not out, but for those who convert I'd just be careful, or just get your cups out.
Hi Anna, thanks for sharing your results. We use standard metric conversion of 120 grams per cup but flour can vary. When our daughter lived in England and I would bake over there, I often found that I needed to use a bit more plain flour than when I use American all purpose flour (I always use King Arthur unbleached AP flour). I have added a note to the recipe to address this issue, thanks again!
Hi! Have you used this crust to make small tartlets, and if so do you have any specific tips? I’m looking for a dough to press into 2” fluted aluminum tins that don’t have removable bottoms to make small dessert tarts. Thank you
Hi Gina, I haven’t tried that, so I can’t say for sure. I think it would work, but I would have to do further testing.
Thank you for your quick reply! I just found your Ridiculously Easy Lemon Curd Tarts recipe - the only difference is that I’ll be using fluted tart pans instead of similarly sized mini muffin tins. I’ll start there…then may keep going with caramel 🙂
That sounds like a great idea, Gina! Hope the lemon curd tarts turn out beautifully for you (and the caramel tarts as well!).
I used this paired with your almond tart recipe for mother's day and my mom absolutely loved how it turned out, thank you!
One thing we noticed is that the crust was surprisingly salty. Is the sweet crust supposed to have a salty aftertaste? I used Morton's kosher salt and unsalted butter. Thanks!
Hi Laleh, so happy you enjoyed this recipe.
Regardign your question, the crust shouldn't be noticeably salt. Not sure why yours was salty with unsalted butter but it would be fine to cut back on the salt.
I love this recipe and process! An amazing tart with little effort, but I was curious about using almond flour instead of gf flour. I would sub almond flour 1:1. Any advice?
Hi Kirsten, I haven't tested this recipe with almond flour. My guess would be that you could sub some almond flour for AP but I'm hesitant to say you could just use 100% almond flour.
I've made this crust several times now and it is just fabulous! Lives up to it's name...If I can do it, anyone can!
Hi Debbie, Thank you for the kind words and excellent review! So glad to hear that the crust worked well for you. Enjoy!
Hi! I’m wondering if you might be able to send me the recipe you had previous to Nov 2024? The old one never failed me and came out perfect every time, but this new rendition hasn’t been as fail proof. Would greatly appreciate if possible! Thanks so much.
Hi Colleen, the recipe is similar. I just subbed cornstarch for ¼ cup of the flour and use powdered sugar instead of granulated sugar. This makes the crust a little more tender as some readers found it too hard.
Thank you for your ridiculously easy recipes Chris!
Can I use this tart recipe as a base for making quiche? I just don’t have consistent success with regular pie crust type recipes.
Merry Christmas to your beautiful family!!
Hi Myrna, yes, that will work well! Use the savory option for quiche!
Can the dough be made in advance and frozen until ready to use?
Hi Maureen, I've made the dough, pressed it in the pan and then froze it until I was ready to fill and bake. That works well. I haven't tried making the dough, freezing it and then pressing it into a pan.
I love this recipe and use it for almost all of my tarts now.
Have you ever used it to make mini tarts? I talking tassie or mini muffin sized tarts. I’m looking for bake time recommendations for both blind baking and filled.
This is not the only recipe of yours I love; I use many of these recipes regularly!
Thanks so much, Louise, for your kind words. I haven't used this for mini tarts but I think it would work. I would have to do further testing to give you precise times but it will defiitely be less time. I would check them after 10 minutes.
I just want to say thank you for posting this. I made a tart for Thanksgiving and used your recipe for a sweet crust and it turned out amazing. This will be my go to recipe for tart crusts from now on.
Wonderful! Thank you for the review, Katherine!
Hi, this looks great. I will attempt as is but just wondering for a gluten free friend if you have tried this substituting the all purpose flour with a gluten free flour with success? Thanks.
Hi Toki, all of our shortbread cookie recipes do well with gluten free flour but I haven't tested this recipe with GF flour.
“ Line the pan with a round of parchment paper. Set aside.”
This is confusing. Why do I need to line it with parchment paper if I already sprayed it? Wouldn’t the parchment paper soak up the cooking spray?
Hi AJD, as I explain in the Cafe tips, it’s important to do both. I tried it without the spray and without the parchment and both times, I had problems releasing the beautiful tart from the pan. Trust me, it works!
Got it, thanks for clarifying!
About to make the Tomatoe ricotta basil tart for a get together.
Can I make and bake the tart shell the night before and then fill it with the filling and bake the next day? If so, how can I store the tart shell to keep it fresh?
Thanks!
Hi Tami, yes, that will work well! You can store the crust in a large ziplock bag or wrap it with foil over night.
I am confused about the parchment paper lining. When does it get removed? I would like to make this ahead for Thanksgiving and freeze it. Thanks.
Hi Bernice, usually the parchment will stick to the bottom of the pan but if it doesn't, you can just peel it off before serving.
Made this and it’s really good! Testing out different tart recipes for Thanksgiving and made the praline pumpkin one with this crust, will definitely make again.. Question: could I use pie weights when baking the crust instead of taking it out and pressing it down during the bake? I bought pie weights recently but not sure when to use them. Thanks!
Hi Marianne, you could use pie weights but I would take them out during the last 5 minutes to give the crust a chance to crisp a bit.
Hello 🙂 would you kindly help me with the cook time and temp for making mini 4” tartlet shells? Thank you so much!
Hi Jackie, the temperature will be the same. I haven’t tested this recipe using tartlet pans so I can’t give you an exact time. I would just check frequently and go for a pretty golden color.
I have used the crust for your wonderful raspberry tart several times. Do you recommend this one now instead of the other one. Thanks.
Hi Linda, the raspberry tart crust is perfect for that recipe but would work well for a lot of other fillings, as the crust is a lot thicker. This one is perfect for just about any filling, whether it's sweet or savory!
I just love this tart crust recipe. I have used it multiple times for several different sweet tarts and it is delicious, crazy easy to put together, and so easy to get into the tart pan. Works like a charm and tastes great every time. Thank you!
Awesome! Thanks for the review, Dianne!
This is my first time to make this .
Somehow I did not have enough material for 10" so I switched to 10"
Also , not enough for bottom part. Still baking , but I know that the bottom will be thin
Hi Danka, yes, the crust will be thin in a 10-inch tart pan but crisp and delicious! If you prefer a thicker crust, go with 1½ times the recipe.
This recipe is amazing and such a life saver for a first time tart baker like myself! I need some help though. When I mix the ingredients, they don’t form crumbs like yours but become smooth like the other classic crust recipes. Even though the crust turns out fine, I have a feeling it would be much better if I can achieve the same pre-baked texture like yours! It also puffs up quite a bit in the oven. Kindly help troubleshoot, please.
Hi Donaya, so happy you have enjoyed this recipe. Regarding your question, it sound like you need a bit more flour. Every flour is different so sometimes recipes need to be adjusted.
Both versions of this recipe are solid. I live in Alaska and depending on the weather, I will increase the butter or water just a bit to make it moist enough to handle well. As a long time baker I appreciate the upgrades to include the cornstarch and reduce the flour, it works. I am attempting to make miniture frangipan tarts using a mini-muffin tin, wish me luck.
Awesome! Thank you for the review, Deborah!
I would love to make this tart but my pan is perforated. Would you suggest that I line it all with parchment or can I still use the (gentle) press method that you describe?
Many thanks for your advice.
Hi Celia, I would line the bottom of the pan with parchment and bake it on a foil lined pan to prevent any butter from dripping through the perforations.
Great thanks Chris! I am about to start baking so I will let you know how it all turns out!!
I doubled the recipe to make 10-4" fresh fig tarts. Turned out great!
I did reduce the cornstarch to 1/4 c. and increase the flour by that much after reading some of the comments. I'd show a pic but can't get it to copy here.
Thanks, Vicky!
For me, using the metric measurements, this cracked in the oven. Was very tasty but made it unsuitable for more liquid-y fillings.
Can't wait to try this for my next quiche! I've used a press-in crust for sweet tarts but never for savory so I'm looking forward to testing it next weekend. However, I think the metric conversions are still a bit off. I always bake by weight, and it didn't look quite right since 1 cup of flour is generally 120 grams so 1.25 would be 150 grams not 188. I'm printing your recipe for next weekend, so here are the conversions if you'd like to update the metric conversions.
Thanks!
SWEET
150 grams flour
30 grams cornstarch
60 grams powdered sugar
3 grams kosher salt
114 grams butter
15 ml water
SAVORY
150 grams flour
30 grams cornstarch
7.5 grams powdered sugar
4 grams kosher salt
114 grams butter
15 ml water
Hi JB, thank you for bringing this to my attention. I measure with cups and tablespoons as most of our readers are in the United States. I use an app that's part of my recipe plugin to do the conversion and sometimes it's a little scewed. I have put the recipe through my converter again and it's much closer to yours. Thanks again!
Thank you so much afor your recipe. I plan on making this tart crust one day ahead, do I pick it and cover it and then refrigerate it overnight? Can I then parbake it directly from the fridge the next day?
Hi Angie, you can actually bake the crust a day in advance then just fill the next day and finish baking, if needed.
Perfect! I found this when I realized a sweet tart crust used so much sugar, even on a recipe that pointed out the custard filling only had 2 tablespoons! I’m very sensitive to overly sweetened food, and I really didn’t want to screw up my crusts by not adding weights (no way I was doing all that), so I’m glad to have found this easy recipe with a much less sweet version too.
That's great, Pixie! Thanks for letting us know!
Thank you for this recipe!!! I was too lazy to do the traditional pate sucree for my fruit tart and found your recipe. This turned out great and didn't crumble too much when I cut the tart, like my usual tart crusts. I substituted some flour with almond meal and added a bit of almond extract to make it an almond-y crust. I think I may use this recipe more often than the traditional crusts going forward.
Wonderful! Thanks for letting us know, LW!
I just made this crust for the frangipane tart and it is was so delicious! I could eat the crust all by itself, Is it possible to use the tart dough and make it into cookies. I am wondering what the baking time for cookies might be?
Haha, I know just what you mean, Araceli. I have a crust on my counter right now and I've been tempted all day to just break off little pieces! Regarding your question, this is the same recipe (or very similar) that I use for all of my shortbread cookies. Here is the basic recipe: https://thecafesucrefarine.com/easy-irish-shortbread-cookies/
Hi Chris. Could I use the sweet version as a cheesecake crust?
Thank you for all your wonderful recipes.
God bless,
Leslie
Hi Leslie, that would be delicious!
What would you recommend for creating a chocolate version of the Press In Crust? I am thinking about making this and adding some unsweetened cocoa powder.
Hi Sara, that is actually on my recipe devlopment list. I would have to do some testing but I would think cocoa should work!
Yay! My first ever homemade crust and it’s going so beautifully on this lovely Mother’s Day ( happy Mother’s Day to all!)
I’m sick using a square 9” tart pan with removable bottom.
(I’m planning on making your Frangipane tart to fill it! Yum!)
Question-I noticed after the first 10 minute bake, it looked good, I reshaped it, brought the edges up and found a straight edge flat bottom glass to help with my square corners. I make plenty of poke-holes- it looked more like a rash! Ha ha! But after the second 7 minute bake, the bottom was puffed up super high- my many fork holes didn’t seem to work. I poke a few more- I got it down, now there’s a tiny crack where I can see the parchment…
Before making the frangipane I wonder if I should make more dough and plug the little hole and cracks in bottom. Edges are perfect & solid!
Hi Ali, you’ll be fine with the frangipane. It’s so thick it won’t seep through like a thin cake batter. Happy Mother’s Day!
Thank you so much! Made it a few times and it's a winner!!
That's THE recipe I'll be using from now on!
"Ridiculously" awesome 👍
Awesome! Thanks for the review, Berry!
I made my first sweet tart using this crust and it is fantastic-- everyone commented on how delicious the crust was! I will definitely be trying the savory version soon.
Awesome! Thank you for the review, Siobhan!
I used to LOVE this recipe, I used it for all my lemon tarts but recently I went to make it and I swear the recipe had changed.. Im positive I never used to put cornstarch into it and now it calls for a quarter cup?! I've tried it three times since, twice sweet, once savoury and it's turned out very powdery and ruined the goods. Not a fan. The sweet one is slightly better but it totally destroyed my quiche today 🙁
So sorry you had trouble with this recipe, Connie. Others had trouble with it being too firm so I revised it just a bit with the cornstarch to tenderize the crust. I actually like it better now myself. But you could definitely use all flour instead of the cornstarch. Otherwise, it’s the same recipe.
Okay interesting! I thought before it used to granulated sugar and powdered sugar but who knows. I have baby brain and could be making things up haha I will play around with it and see if I can get it to work.
Let us know, Connie!
That’s an interesting point! Some tarts may call for an all flour crust while others might call for the lovely softer cornstarch crust.
Could I make this crust gluten free by using almond flour instead of all purpose?
Hi Bev, I haven't tried this with almond flour so I can't say how it would turn out.
Good morning! Made the crust yesterday for a fruit tart I was planning on serving for dinner. I bake a lot, but not pies or tarts very often and I usually buy premade crusts. Since no ready made was available I chose the easiest recipe I could find, yours! Well, it certainly was easy and delicious, but I couldn’t get it out of the pan! It was very hard and stuck like crazy. Partly my fault, as I decided to use baking goop rather than parchment paper, figuring that everything slides right out when I use goop. Wrong!! I also realize I should have left the tart out of the fridge for a while before I tried to chisel, um, cut it. Honestly, we all were hysterical laughing. We basically had a nice trifle. So, any other hints to prevent future disasters? Thanks!
Hi Eileen, I'm so sorry you had problems with this. Yes, the parchment paper is super important. I had the same thing happen when I was testing the recipe. I'm glad you were able to make things work with a trifle! Good thinking!
I just pam sprayed my pan with no parchment and it came out so well. I was lucky, I guess!
Glad it worked out, Linda!
Hiya love this recipe. can I freeze this and defrost it?. I doubled the batch because the first time I used it I was short but now I have a lot haha. It’s ok tho because it is very yummy. ◡̈
Hi Hodel, so happy you’ve enjoyed this recipe! Yes you could freeze the dough in an airtight bag.
Haven’t made it yet- I want to know if I could use almond flour for the crust, so it’s gluten free?
I'm planning to make 4in mini tarts instead of one larger one. Do you know approximately how many I would get with a single batch?
Hi Candace, I haven't tried that, so I can't say for sure. I would guess 3-4 mini tarts.
I used European butter that came in a block and I apparently didn't measure it accurately. My crust is practically oozing butter. I haven't baked it yet. It seems the only way to fix this is to put it back in the bowl and add more dry ingredients. Any other suggestions?
Hi Patricia, it should not be oozing with butter at all but it's hard to say how much of the other ingredients to add without knowing the amount of extra butter that you added. You might be better off to just start again with the right amount.
I followed the recipe and it is too much butter for the amount of flour; I'd look at a regular single pie crust recipe as a guide for the correct amount of butter. I wish I'd have thought of that before I made this crust -- I had to add over a cup of flour!
Hi Cheryl, so sorry you had trouble with this recipe. I'm wondering if you used 8 ounces of butter instead of 8 tablespoons. The amount of butter given in the recipe is the perfect amount to make a press in dough. As you can read from other commentors, the recipe turns out very well as written.
Can I bake the crust a day ahead? Refrigerate or keep at room temp?
Yes! That works well. I keep it at room temperature in a large ziplock bag.
I haven't tried it yet - have just found it and will certainly give it a go and let u know. I've been making tarts and quiches etc for decades. No one ever told me before to add crust to the sides of pan first - love your tips - love idea of rediculously easy. Love frangipane. It's summer where I am and berries abound. Do u think I could add berries before adding the frangipane to the crust mix?
Thanks, Rosa! We love Ridiculously Easy too!
Regarding your question, I would add the frangipane first and then tuck the berries into the frangipane.
Hello! I'd like to use this recipe for friendsmas coming up this Saturday. Wondering if all ingredient measurements will be the same if I'm using a rectangular tart pan with the measurements of 3 7/8"(L) x 4 3/8"(W) x 1"(H)?
Hi Erin, you'll have a little more than you will need.
Hello, it appears the metric measurements are incorrect. Thank you
Thanks, Vanessa. I've recalculated everything. Things should be correct now.
Did this recipe use to include almond flour? I remember making this for the frangipane tart and I thought it included almond flour. I have used the recipe and have had great success.
Hi Jasmine, no this recipe did not include almond flour. So happy you've enjoyed it!
I’ ve made this dough several times for sweet tarts, and it comes out perfect every time. I’m not a great crust maker, and always dread having to use even a Pillsbury crust for my pumpkin pies. The idea of making a pumpkin tart instead of a pie is much more appealing to me. I wonder if any filling recipe can be used for this? . I have my pumpkin pie filling made up already and in the refrigerator ready to bake tomorrow.
Hi Donna Jo, so happy you have enjoyed this recipe.
Regarding your question, it will definitely work with your filling! Just par-bake the crust as directed and go from there!
Could I make this ahead of time and freeze or have in the fridge instead of immediately baking?
Hi Fay, yes, that would work well!
Hi there. I’ve made the sweet pastry twice. As you so rightly say, ridiculously easy. Both times the crust has come out very hard (as in one other comment above). I’m wondering whether an egg yolk could be added to remedy this and if so would one have to adjust the quantity of flour and by how much. Thanks so much and look forward to your reply.
Hi Beryl, that would be worth a try. I have been working on this recipe and will update when I'm happy with it. I have had success with subbing a portion of the flour with cornstarch.
I used the sweet version for your fabulous Frangipane dessert, it was a very big hit with our dinner guests, but the outer crust was a bit hard and one guest while trying to use his fork ended up sending the crust flying onto the floor... everyone including myself had a big laugh over that, and this prompted everyone to eat the outer crust by hand... and then ask for more!! Not sure why the crust was so hard, maybe there was not enough moisture in the dough, although the dough looked exactly like your photos before pressing into the pan, or maybe I used too much pressure to get it to stick to the edges of the tart pan. The Frangipane tart was a big hit, I will make it again and again!
Hi Donna, I'm happy you enjoyed the frangiapane recipe but so sorry you had a problem with the crust. I'm going to experiment a bit and see if I can come up with a solution for that.
Thank you for your reply, I am hoping to make this Frangipane recipe a few more times this summer and also uses the crust recipe for other deserts, so much easier than pie crust and the presentation is beautiful . . I have found that the best place to purchase almond flour is Walmart, (in Canada at least) but it was tricky finding it on the shelves, it was where the cereals are! I look forward to the outcome of your experiment!
D.
Sound great. Will this work with gluten free flour???
Hi Susie, it does work well with GF flour!
Hello! I'm trying this recipe for mini quiches for "care packages". Can this crust recipe be prepared and refrigerated for a day or two? or possible frozen?
Hi Kristie, this freezes well. Enjoy!
Chris,
I just made the savory crust. The dough was terribly sticky even after adding more flour. I had to bake the crust 30 minutes to even get a hint of golden color. Not sure why this went so wrong but feel sure it will not come out of the tart pan. I need this for a brunch on Sunday so will make my old standby crust from Cooking Light. If you could tell me what went wrong, I will try it again.
Polly
Hi Polly, I’m so sorry you had trouble with this recipe. It’s difficult to say what went wrong without having been in the kitchen with you. I’ve made this crust dozens of times and never had it be sticky. If you spray the pan and use parchment it pops easily from the pan. If you didn’t prep the pan it will be difficult remove it. Again, sorry you had trouble with this his. I hate wasting good ingredients.
Hi I'm just curious if the nutritional info is per serve. I'm guessing it would be, going by the numbers. Beautiful recipe. I put fresh raspberries on top instead of almonds. It came out beautifully.
Hi Sarita, so happy you enjoyed it!
Regarding your question, yes, it's per serving.
Could you let me know the depth of the 9” tart tin. I’m hoping to try this recipe but want to be sure I am using the correct tart tin sizes
Hi Dianne, my tart pan is 1 inch tall.
Hi Elsie, thanks for this easy recipe. I had made this for a couple of times but somehow it always come up a little tough. Do you know what I am doing wrong?
Hi Dylan, you may be overmixing the dough. Just mix it until the dry ingredients are incorporated. This crust should be crisp and tender. Another thought is that you could be pressing it in too hard. It's difficult to say without having been right in the kitchen with you.
Hi... Love your recipes and I've also made this crust a few times but found that it comes out quite stiff, especially the edges. After a couple of days it feels like I'm sawing through it to cut a slice. It tastes great and compliments the filling so we don't mind but not ideal if giving to someone else. I did try to reduce how much I push and spread the dough into the pan but I find that there is just enough that I do have to push and squeeze so there's no gaps or particularly thin areas. Any other tips?
Thank you for the great recipes! French almond plum tart is particularly good for anyone that hadn't tried it yet. Going to try the plum raspberry next.
Hi Vik, I'm so sorry you've had trouble with this recipe. What size pan are you using? If you're having to push and squeeze the dough that much to get it to cover the pan, you might want to go with 1½ times the recipe.
Just made your tart recipe, came out perfect. Will now be my go to recipe. Thanks!
Awesome! Thanks, Janet!
1. Yes this recipe is really a press and bake recipe. No evil rolling pin required.
2. Yes the tart shell looks like it is professionally made.
3. Yes I have made it several times and it never fails to come out perfect.
4. Yes the recipe is so loved that I made it into a "cookie" and is giving it as a gift because my friend loves the tart shell so much. Why not?
Thanks, George!
I would love to try this recipe….would this work if I replaced the butter with oil (like olive oil for instance)?
Hi Radhaks, oil should work fine, you will have a stronger olive oil flavor but it will be delicious!
I have a question. In an effort to elevate the butter flavor, have you ever browned the butter (a beurre noir) before making the dough? If so, are there any adjustments you would recommend?
Hi Gregory, I haven't tried this with brown butter so I can't say for sure how it would have to be adjusted.
If I use unsalted butter for the savory crust could I leave out the sugar? In other pie crusts I don't usually add sugar for either sweet or savory pies. I am British by birth and my mother made pastry with just butter, flour, a pinch of salt and water. Thanks.
Hi Barbara, you can leave the sugar out if you use salted or unsalted butter.
I have made the sweet tart recipe twice now and it always comes out perfect! The recipe is simple and easy to follow. I do not like using a rolling pin so a press and bake tart is perfect for me! Thank you for sharing the recipe.
Wonderful! Thanks for your review, George!
Made a tomato tart with the savory recipe and it turned out great! Added some Greek seasoning to the crust and pre-baked it a bit longer (did not want a soggy bottom). So glad I found this recipe! Super easy and fast to make, and much better than a pie crust in my opinion. Thanks!
Awesome! Thanks for letting us know, Terri!
I realized as I was pressing this dough into the pan that there was no way I would have enough for the whole 10 inch tart. Luckily it’s very quick to make so I whipped up a second batch and had a bit left over. Maybe it was a little thick, but I really don’t think one recipe would be enough for my pan. I froze it after shaping, then blind baked and used for a quiche the next day. I was really impressed with how easy the dough was and that it didn’t need pie weights, no slumping or puffing! However, I thought it was way too salty, I used unsalted butter but would still use way less salt next time ( I am not a salt averse person but was surprised at how salty it seemed for the amount called for!). I think I should have blind baked a bit longer than you recommended, the quiche mixture in such a shallow pan cooked pretty quickly, but it was definitely still servable. A great recipe and technique to tweak to my liking!
Hi Kelly, so sorry you had difficulty with this recipe. I make it quite frequently and always have enough dough, even for an 11-inch pan. Not sure why you were short. You can easily adjust the salt but ½ teaspoon for 1½ cups of flour is a pretty normal amount.
I used the savory recipe which calls for 3/4 teaspoon, and I used the metric measurements which called for 5 grams. When I later weighed 3/4 teaspoon it was 4 for me, so I’m guessing my initial measurements were just enough below 6 grams to show 5 and it all just added up. It still seems a little weird that it was so salty, but I would just do 1/2 teaspoon next time and not try to weigh it.
That makes sense!
This worked a treat, I used it for a lemon tart and was amazed that it didn’t shrink. Thank you for this 5 stars recipe… will definitely make again!
Thanks for sharing your results, Mimi! We love this recipe too!
Thank you for this recipe! Would this tart crust work for a quiche? I am trying to figure that out. Would I parbake the tart crust and then pour the filling into it before baking it in the oven? Or would I just simply pour the savory filling into the crust and then bake it? Do you recommend chilling the tart crust dough after it is formed in the pan?
Hi Elizabeth, yes, I have used the savory recipe for quiches. I do the par-bake, just to make sure the bottom will not get soggy.
Have you tried using this dough for individual tartlets?
Hi Pauline, I haven't tried it for small tarts but it should work fine!
I am excited about trying this recipe for a number of the delicious tarts you have. However I only have a 4” x 13” tart pan with a removable bottom. Would I half the recipe for this crust, and also half the recipes for fillings for the French Lemon Tart, French Chocolate Tart, and French Almond Plum Tart?
Hi Kirsty,
I think you should be okay with a full recipe. You might have a bit of crust left over. The 4x13 inch pan has 52 square inches where my 9-inch round pan has 63.5, so it's fairly close.
I’ve made both the sweet and savory crusts. I made a lemon tart with the sweet crust, and the ricotta tomato tart with the savory crust. The ricotta tomato tart was so good! Both came out perfect. I was wondering if the crusts can be made in advance to save time, frozen, then defrosted and pressed into the pan?
Thanks.
Hi Donna Jo, so happy you have enjoyed these crusts. Thanks for taking the time to leave your review.
Regarding your question, yes the crusts freeze well and are perfect for making in advance!
Hi, Chris.. Sounds wonderful. I am looking forward to your recipes for the fillings for this crust. Did you use salted or unsalted butter? Thank you...
Hello Bernice, I always use salted butter.
Lamentations 3:22-23
22 The steadfast love of the Lord never ceases;
his mercies never come to an end;
23 they are new every morning;
great is your faithfulness.
Thanks, Debbie! Not sure how that got messed up.
SAVED. This sounds like the recipe I've always wanted but could never find. It's in the category of luggage with wheels -- meaning, why didn't somebody think of this sooner? Will try on my next quiche and report back.
Yay! Let us know, Bernadette 🙂
This sounds amazing especially for someone like me who struggles to make good pastry, I will give a rating once I try it which will be very soon. Thank you for all these easy recipes.
Let us know how it goes, Jayne 🙂
Is this dough only suitable for tart pans or can I use it in other baking pans, such as pie plates?
Hi Elsie, I’ve only tested this recipe as a tart crust so I can’t say if it will work in other pans But I will try it and let you know.
Thank you. I'm 76 and have been baking since I was 12. I also took the viennoiserie course at Le Cordon Blue and so can churn out croissants, Danish pastries, etc. but I have never been able to master a pie crust. I'm going to give it one more try using your recipe. I have made a number of your recipes and they have turned out perfectly.