
This post may contain affiliate links. For more information, see our privacy policy.
When a celebration cake is in order, and this 6-Layer Ombre Cake with Truffle-Fudge Icing definitely fits the bill!
I needed celebration cake and it had to be fun, festive and quite fabulous. We're not only celebrating The Cafe's move to it's new home (web site), but today is our three-year anniversary! Yes, it was three years ago that we began this crazy adventure called The Café Sucré Farine; an unusual name, French in origin, with a fun story behind it. This 6-Layer Ombre Cake with Truffle-Fudge Icing was the perfect way to celebrate!
I had a dream for many years of opening up a small cooking school. I've been crazy about all areas of food preparation for as long as I can remember and had been reading food blogs for several years. I thought it might be a good way to stick my toe into the culinary world.
My dear husband, Scott, with a background in photography, offered to capture the images ........... easy peasy, right? Little did we know that blogging would be an endeavor that would be unbelievably challenging, extremely exhausting and super fun, all at the same time.
In the beginning, I didn't know a url from a html from SEO, but I bought the book Blogging for Dummies and "so it began". We learned quickly that there was a whole new language to learn, lots of technology to harness and so much more. Though Scott was quite skilled in photography, taking pictures of food was a "horse of a different color".
Three years later, we're still learning the language, harnessing the technology, acquiring new photography, culinary and social networking skills as we go, and so much more. There have been tears (lots of them), prayers (even more) and laughs (many) as we've traversed through these past three years.
And the cooking school? It's funny, but I realized about a year and a half in, that my true joy and passion is being in the kitchen, tinkering, testing and creating and then sharing the results with you, hopefully making your meals more fun, interesting and delicious!
Oh and speaking of you, YOU have been one of my very favorite parts of blogging. I've enjoyed getting to know people from all around the world and love hearing from you in comments, emails; even meeting a number of you in person! Without you, it wouldn't be worth the time, energy and commitment. Get this: I'm still in my jammies at 1:30 in the afternoon, after a morning of cooking, creating, styling and photo shooting!
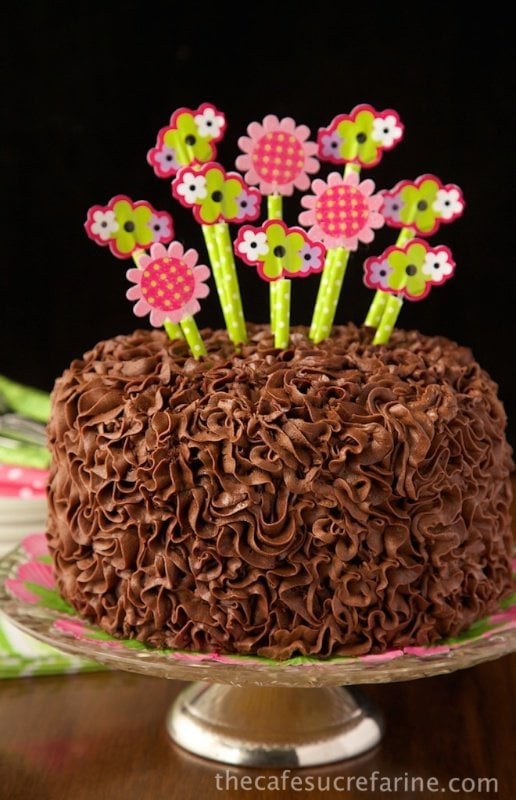
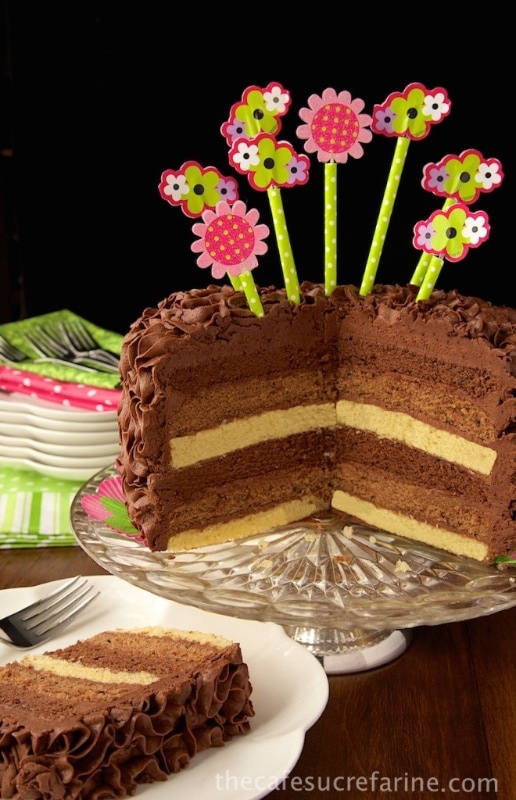
So you see, it's a day to celebrate; our new home/web site (Thanks Shay & Julie!), a three-year Café anniversary and YOU! This 6-Layer Ombre Cake with Truffle-Fudge Icing is perfect; though it would brighten up even the most dreary uncelebratory day. I used one of my favorite cake recipes and changed it up a bit. I wanted something unique and fun.
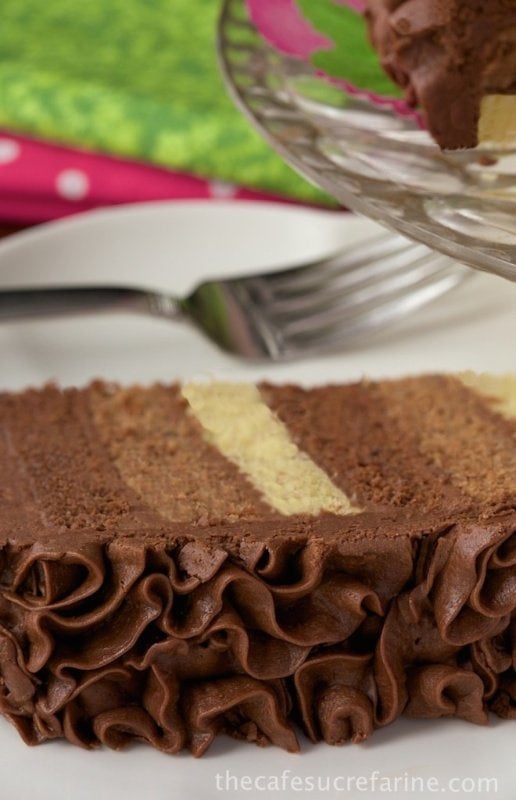
After a bit of experimenting, I came up with this ombré cake. If you're not familiar with ombré, it just means layers of color. I chose the simple, natural color of the yellow cake for one of my layers, then added a bit of cocoa for another color and then a deep chocolate hue was achieved by adding more cocoa.
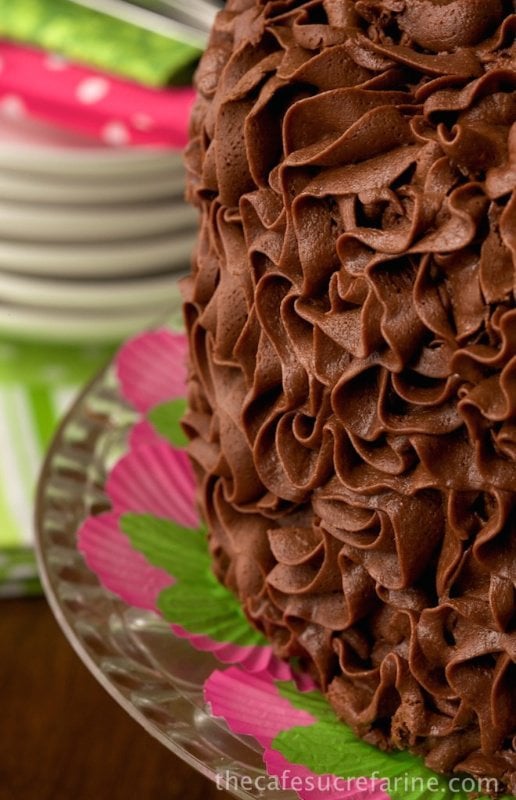
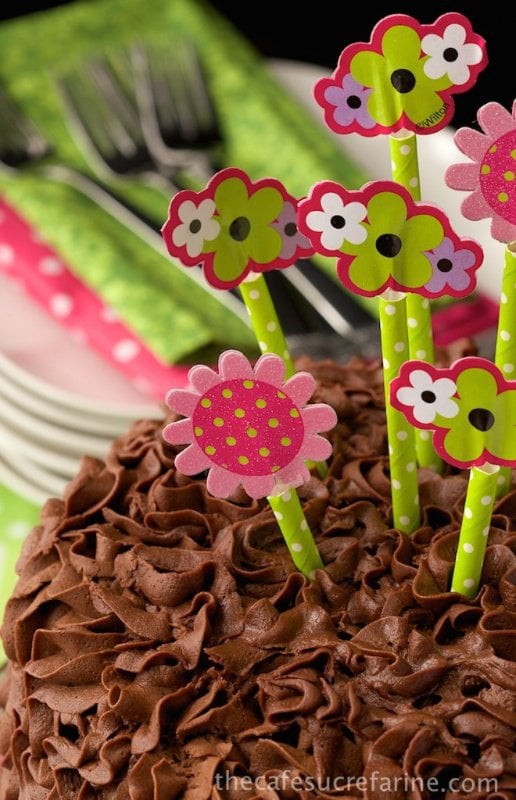
I used my favorite technique for icing. Some of my friends think I'm spoofing, (because I cook so much) but I'm horrible at frosting a cake. Give me a bowl of icing and a knife and I usually come up with a pitiful looking mess. This pretty ribbon-like technique is, to me, like magic; you just start swirling and twirling in a random fashion and next thing you know, you've got a whimsically lovely cake sitting in front of you.
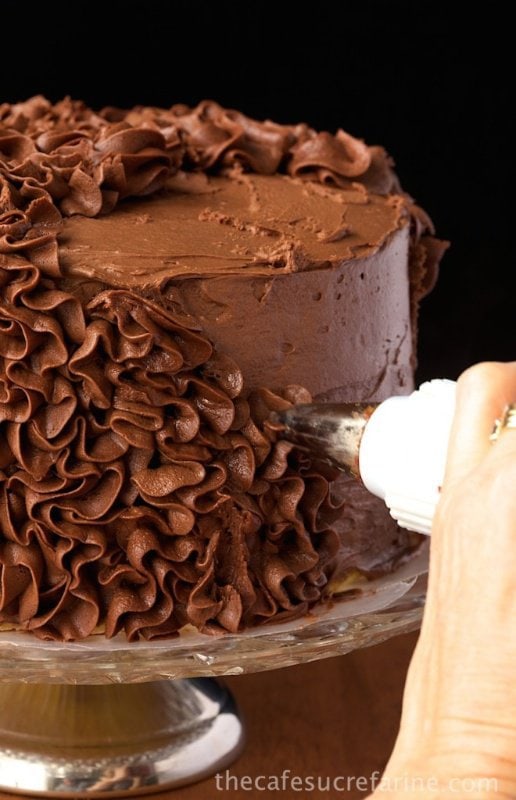

Try it! I promise I won't tell anyone your secret, that it's really quite an elementary piping technique. You do need a pastry bag and a large decorating tip, either a 1M or a 2D (both made by Wilton). To prevent a huge mess, I like to use a simple technique I learned from my friend Claire in this post. Check out how she makes it so easy to use a pastry bag. I love learning tricks like this one.
I need to run and get a shower before my husband disowns me, so I"ll sign off for now. I hope you like our new site. I know you'll love this fabulous 6-Layer Ombre Cake with Truffle-Fudge Icing! Yum!
Scroll Down for the Recipe - or Save It to Your Inbox
We’ll email you the recipe so it’s easy to save, print, or share.

6-Layer Café Ombre Cake w/ Truffle-Fudge Icing
Ingredients
- 3 cups all-purpose flour
- 3 teaspoons baking powder
- ½ teaspoon salt
- 1 ½ cups butter, at room temperature
- 2 ½ cups sugar
- 6 large eggs, at room temperature
- ¾ cup buttermilk, (plus 3 tablespoons needed for cocoa layer)
- 2 teaspoons vanilla extract
- For the layers:
- 6 tablespoons cocoa powder
- 2 tablespoons buttermilk
- 2 tablespoons cocoa powder
- 1 tablespoon buttermilk
- Truffle Fudge Icing, recipe below
Instructions
- Preheat oven to 350˚F. Spray 3-8-inch or 2-9-inch pans with baking spray* and line with parchment paper. Spray parchment paper lightly and spread to coat with a paper towel. Set aside.
- Combine flour, baking powder and salt in a medium bowl and stir to combine. Set aside. Set out four medium-size bowls. You will use these later after batter is made.
- Combine butter and sugar in the bowl of a heavy-duty stand mixer. Beat until light and fluffy, about 2 minutes.
- Add eggs, one at a time, beating well after each addition.
- Add flour mixture alternatively with the ¾ cup buttermilk, starting and ending with the flour. Stop the mixer and scrape the bowl several times in between. Add vanilla and mix well.
- Divide batter as evenly as possible between 3 bowls, about 2 ½ cups in each bowl. Add 6 tablespoons of sifted cocoa powder and 2 tablespoons buttermilk to one bowl. Add 2 tablespoons of cocoa powder and 1 tablespoon buttermilk to second bowl. Third bowl will not have any extra ingredients added.
- Place half of the plain batter in two of the prepared pans. Place half of one of the cocoa batters in third prepared pan. Cover the remaining batter lightly and set aside in a cool place. (The counter is fine if it's not super warm in your kitchen. If it's a really warm day, place the batter in the refrigerator.)
- Bake first three cakes at 350 for 14-16 minutes or until surface springs back when lightly touched and/or a toothpick inserted in the center comes out clean or with just a few crumbs. Cool on cooling rack for 5 minutes, then turn cakes out onto rack to finish cooling. Wash and dry cake pans and repeat pan preparation and baking instructions for remaining three layers.
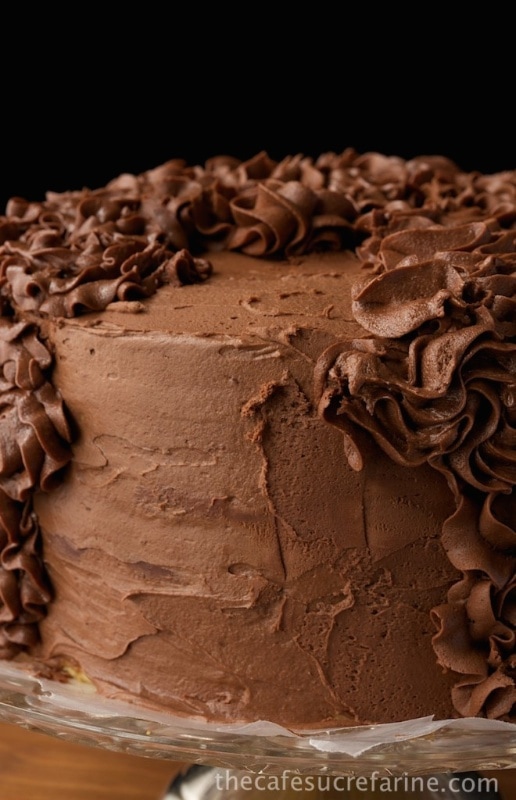
- Transfer 2 cups of the icing to a medium size bowl. Add 2 tablespoons of milk and stir well to combine. This will be the crumb coat for the cake which will help your icing to adhere well. It also prevents any bare cake from peeking through the icing.
- To assemble cake, place a small dab of icing in the center of a platter or cake stand. (This will help secure your cake. Set a yellow cake layer on the platter and top with ⅓ cup of the thinned icing. Spread to edges. Add a light cocoa-colored layer next and repeat with icing then the dark cocoa cake layer and another ⅓ cups of icing. Repeat sequence to result in 6-layer cake. Spread the remaining icing over the entire cake in a very thin layer. It's fine if there are crumbs in the icing. Set cake in the refrigerator for 15 minutes to set the crumb coat.
- For the icing technique, place about ⅓ of the remaining icing in a pastry bag fitted with a 1M tip. (you could also use a 2D tip). (Don't try to put more than ⅓ of the icing in the bag at a time or it will get too warm from the heat of your hands and will not swirl nicely.) With tip perpendicular to the cake begin swirling the icing in a random pattern (see how-to pictures). I usually start at a bottom edge and work my way to the top, then over the top edge, twirly and swirling as I go. Then I begin again at the bottom right next to where I started the last time, and work my way up. Continue working around the cake till you come back to where you started. If you missed any spots you can go back and add a little swirl here and there. Allow icing to set for 20-30 minutes before slicing. This recipe makes a large cake, but it freezes well.
Scroll Down for the Recipe - or Save It to Your Inbox
We’ll email you the recipe so it’s easy to save, print, or share.
Truffle-Fudge Icing
Ingredients
- 12 ounces semi sweet chocolate chips
- 4 ounces baking chocolate
- 12 ounces butter, room temperature
- 4 ounces cream cheese, softened
- 1 2- pound bag powdered sugar, about 71/2 cups
- 10 tablespoons milk, plus more for thinning
- 2 teaspoons vanilla
Instructions
- Combine chocolate chips and baking chocolate in a medium size microwave-safe bowl. Microwave on high for 1 minute. Stir and return to microwave for 30 second intervals, stirring in between, until chocolate is melted and smooth. This will take about 2-2 ½ minutes. Set aside to cool.
- In the bowl of an electric mixer, combine butter and cream cheese. Beat for 1 minute until smooth. Add cooled chocolate mixture and beat until incorporated.
- With mixer on low speed, add powdered sugar and ½ cup milk. Beat until smooth, adding more milk, as needed to achieve smooth, fluffy consistency. Beat on medium-high speed for 4 minutes. If spreading icing with a knife, you'll want a fairly loose consistency. Piping requires a somewhat stiffer consistency. You made need to add a bit more milk or powdered sugar to get it just right. If you're doing the swirly piping, try a small amount in your pastry bag to see if it is "right". It should flow easily out of the bag but create distinct swirly patterns when you pipe. You don't want it to be so loose that the pattern "wilts" or so stiff that you have to use a lot of pressure.
Shop Our Café Loves
We’ve gathered our favorite kitchen tools, tableware, and entertaining treasures in one place, the Café Loves store. It’s a wonderful spot to find something special for yourself or the cooks and hosts you love!


I don’t see the how to pics.
Hi Gina, the how to pics are lower down in the post, just showing the crumb coating and the piping technique.
WOW!!! This is doubly beautiful,; the photography is fantastic, and the cake is a work of art. Has anyone ever told you that y'all work well together? 😉 I love checking my email and seeing that I have a new post to check out. Your site is so clean and refreshing, and your recipes are divine. Keep up the awesome work!
Hi! I was wondering what variety you mean when you say "baking chocolate" (as in unsweetened vs. semi-sweet). The icing beautiful and I'm hoping to try it. Thanks!
Carly, unsweetened chocolate is also known as baking chocolate. Sorry for the confusion!
Thank you! I made it and it tastes and looks delicious.
A truly special cake to celebrate so any things Chris. A new look and 3 years of blogging. Keep doing what you're doing, both of you!
What an incredible cake, I love the truffle icing!
Congratulations, Chris & Scott! You continue to inspire so many of us! Your blog is so polished and lovely. I've enjoyed getting to know you in the blogosphere & hope to meet you in person one day!
Thanks Susan, I've really enjoyed getting to know you as well!
Just came across your site. What a gorgeous looking cake! the interior, the exterior everything is just perfect 🙂
congratulations! love your site and this cake looks incredible.
Happy Anniversary! Your blog and gorgeous pictures have inspired me to try many of your recipes. You even instilled confidence (because all of your recipes have turned out well) for yeast-challenged me to make your brioche rolls for Christmas. I was really proud of me as was my family. Maybe I will tackle the lovely frosting too since grandchildren's birthdays are in my future. Love the new site…..nice work!
Thank you Diana, I love hearing that your yeast phobia has been challenged! Thanks for taking the time to leave a comment, you're so encouraging to me 🙂
What a beautiful cake! I do believe that I will try your technique....I too, can end up with a not se pretty cake when turned loose with a knife and bowl of frosting! Your new site it great...fresh, clean and simple! Very nice.
Hi Kate! Thanks so much and do give the swirly technique a try. It's my go-to cake decorating trick.
This cake look absolutely wonderful Chris!!
hi chris, i hv been away for a month, was in vietnam too 2 weeks ago and now slowly catching up with all of you. . Congratulations on your new site! The Cafe Sucre Farine is one of my favourite blog and your writing is always full of fun, fabulous recipes and beautiful pictures. This is a beautiful ombre cake, your frosting skills are superb..i still remember your previous stunning avocado cake! catch up later, i think i will be back to blogging soon. take care!
Welcome back Lena! That must have been quite a trip! Can't wait for you to share some recipes from your journeys. Thank you for you precious compliments!
Ahhh, Happy Blogversary!! I love the cake and what a wonderful way to celebrate your special day! I am looking so forward to seeing all of the fun creative recipes that you come up for the next 3 years!!
Wow, does that look sinfully delicious. Congratulations on 3 years of blogging, Chris....I look forward to another 3!
Happy Bloggerversary Chris! Your cake looks amazing! I love how your husband helps with the blog too! It's great to have help and someone to cheer you on! Now if my fork could just reach my fork through the screen for a bite I would be one happy lady but I guess I'll just have to pin it instead!
Thanks Serena, I certainly could not do this without Scott. We are a team. He doesn’t cook and I’m not much of a photographer so we’re quite symbiotic 🙂
Love your recipes & your scriptures! How could I do a chocolate marble cake in the yellow cake portion? I'm familiar with the technique, but not what or how much cocoa, etc to swirl in? Lord willing, my Dad's 90th birthday is in March. Sadly, he has bad dementia, yet still loves chocolate cakes (or tortes as he now calls them). I'm looking forward to making this show stopper & seeing his eyes light up, even if but for a moment.
Hi Leslie, thanks for your kind words!
I love that you're making this cake for your dad's birthday, so sweet!
Regarding your question, I would have to do some testing before I could give you a good answer!
WOW! So finger-licking-licious!
And keep up your passion - which inspires us all. 🙂
Oh, you're so kind Alex!
Three years? Congrats! You've created one of the better blogs in the interwebs, IMO. The new site looks great, and this cake looks even better! Good stuff -- thanks.
Thanks so much John, that means a lot. I'd love to share a piece of cake with you and Mrs.Kitchen Rifts if you lived a bit closer.
CONGRATULATIONS!! The double celebrations certainly called for that special cake. It looks absolutely beautiful and sinfully delicious! You so rightly put it...Blogging certainly is time consuming, challenging, exhausting and fun. I too realised that in my three years of blogging. We happen to share the same day to celebrate it 😀
Thanks, I love that we share the same anniversary!
Congratulations on three wonderful years of blogging. I had to laugh about Blogging for Dummies, I bought Blogging for Idiots when I was thinking of starting my blog. 🙂 I can't understand why you think you are terrible frosting a cake, I think each and everyone of the cakes you have shared with us has been a work of art.
Thanks Karen! You just haven't seen me with a bowl of frosting and a knife. Scott will affirm this; not so pretty! 🙂
Chris and Scott, absolutely amazing what you've done with your blog! I know it's a joy and passion for you both and how cool it is that you two have such complimentary gifts - and the results speak for themselves. I wish you the best as you move forward - and I keep passing your blog info on to my friends far and wide! Glad you make instructions so easy to follow. Hope my results will look and taste like yours! I'll let you know. Your 3rd anniversary cake is awe-inspiring!
Oh, how fun to see your comment here Anne! Thanks so much, your sweet words mean a lot!
What a beautiful cake! And great tip for icing it! I have enjoyed your emails and recipes for quite a while, happy birthday! I love the story of how you arrived at your name!
Thanks Elizabeth, I love hearing from people like you!
Gorgeous! I kept scrolling down thinking, "Show me the inside!" You did not disappoint. Love it and happy blog-o-versary.
I'm always worried when I cut a cake to see what the inside will look like, sometimes it's not so pretty but I have to admit I squealed a little when Scott cut it (I can't cut straight if my life depended on it) and I spied the interior>
LOL! I thought the same thing. I was like, quit teasing us here. The tease was well worth it! 😉
Congrats on three years Chris! Your cake looks beautiful:@)
Thanks Lynn, it's a really fun cake which is what I wanted for this celebration 🙂
Ok, I am drooling all over my screen! This looks amazing!
Thank you Paula, I'm going to save a piece in the freezer for you!
This is just decadent! And the frosting looks so beautiful, Chris.
Thanks Angie!
Looks decadent! Love the fifth shot.
The cake is Fabulous and festive and froufrou:-)
Pinning..I have to try that frosting technique..now that you showed me the roses:-)
I still don't know HTML and what the heck is SEO?:-)
Congratulations on everything coming up roses...well flowers:-) ..3 yes..and thanks for everything!
Thank you Monique, you're the best!
Congratulations all around! I would give my right arm for a piece of that cake. Maybe my left. I'm right-handed. 🙂
If only we lived closer Maureen. Neighbors would be even better. Then again, I have a feeling we'd get quite fluffy with lots of "you have to try this" and "I saved this for you" and "this is the best" and on and on. We probably wouldn't get much done either as we'd be chit-chatting continually!
3 years! You have really outdone yourself and your new site is wonderful. I think the photos even got better, which I did not think was possible. Congratulations to you both.
Now, I have to check out the tutorial because my decorating skills certainly need help.
Thank you friend, do try the technique. Scott's been trying to talk me into doing some tutorials. If I ever get the courage, this would probably be one of the first 🙂
I know you are so busy, but I would love any tutorial you could manage. I am researching pastry tips. The ones I have are for cookies. I really need some larger ones. Also, any preferred pastry bag? Brand? size?
I love the Wilton 1M and 2D. Just buy them at Michaels or AC Moore (really cheap) and make a batch of icing and practice. After you use up all the icing, you can pile it back in the bag (with Claire's trick) and start all over again. At first it won't look real great but you'll start to get it after awhile. As far as pastry bags, I like have a large 18-inch and a smaller 10 or 12-inch, Using that trick with the saran wrap that Claire shows on that link has saved a lot of mess. It works just great. It also saves money as you don't need the disposable bags. I think most of my stuff is Wilton but there are also other great brands.
You set the bar pretty high, Scott and Chris. I really am quite impressed with your new site. It's so easy to navigate and understand. Very clean. This cake and your photography are a perfect send-off. I had never heard of an ombré cake before. Today I saw two! Your frosting technique is probably not something I can aspire to doing but I will read Claire's instructions and maybe, just maybe, give it a go. Again, lovely. Just lovely.
Thank you Mary. If I can do the frosting, so can you. I promise, I am not a cake decorating guru, that's for sure 🙂
This cake looks wonderful! Congratulations on three years! You have a great blog! This cake looks so delicious and so beautiful! Love it!
Thank you Jodee, I've really enjoyed you and your blog as well!
Congratulations on your 3rd blogiversary and new home, Chris and Scott! The site is lovely. Chris, your chocolate and yellow ombré layer cake looks moist and delicious! The piped ruffles look beautiful and as if you spent hours decorating it. (Love those easy piping techniques!) Thank you for sharing your story. Wishing you both a boatload of blessings as you move forward in your journey with the Café ! xo
Stacy, you're always so encouraging, thanks! I'm do glad I've gotten to meet you and your wonderful blog!
Congratulations on your 3 year anniversary and on your new home. I love your blog. Your recipes are delicious and beautiful. I have pinned many of them.
Thank you Patti, I really appreciate your kind words 🙂
Congrats on the third bloganniversary of your wonderful Café. Wishing it many happy returns!!!! The cake looks decadent and pretty. You are the piping lady!!! I love its new design as well!
Thanks so much Denise. We're still trying to find our way around but we're learning every day!
Congratulations! This cake looks luciously yummy!
Thanks much Cathy!
Chris, you outdid youself on the Ombre Cake. I was surprised to see different layers and love it. Cannot wait to make it next weekend. We're excite about Emery's very first birthday party. What a little doll that we all love so much. Hope your make her birthday cake. look forward to seeing you.
Thanks Linda! hope you enjoy it as much as we did. So looking forward to seeing you too!
Congrats on your new blog home and your three year anniversary! Your cake decorating skills are right on point and this cake is nothing short of amazing. I look forward to trying it and to many more delicious visits here.
Thank you Sandra. You're one of friends I was talking about. You think I'm a good cake decorator - I'm okay with a pastry bag and a 1M or 2D tip, otherwise not so great but I love your confidence in me 🙂
Looks delicious!! I"m thinking I'd add peanut butter to the gold layer....mmmmm!! Thanks for always sharing the yummiest stuff!
Oh what a great idea, why didn't I think of that? 🙂
Hi Chris,
Congratulations on your 3rd anniversary of blogging!!!! Your cake looks gorgeous. I love your recipes and you have really inspired me. I can always count on your recipes to be delicious even when I make them for company first. Thanks again, Linda
Thanks so much Linda, I really appreciate hearing from people like you 🙂
Chris this is such a beautiful cake! I love the way you've decorated it too. Glad you like the icing trick. It's a goodie isn't it?
Happy Blogoversary!
I'm only phone so can't see the full new design but love the colours x
Thank you Claire, and thanks for teaching me that great trick. Hope you are doing well!
I can't wait to try this cake! It looks so pretty and I'm sure it's delicious!
Thanks Donna, we ate a piece for lunch today 🙂