This post may contain affiliate links. For more information, see our privacy policy.
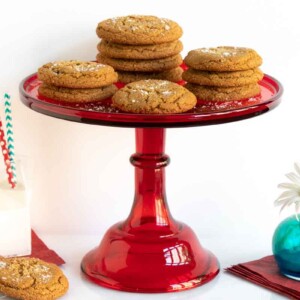
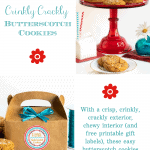
With a crisp, crinkly, crackly exterior and a chewy, intensely butterscotch interior, these one-bowl, easy-to-put-together cookies always bring rave reviews. And the free printable labels make these delicious Butterscotch Cookies perfect for gifting!
I've been intrigued by the idea of butterscotch cookies for quite a while, but most of the recipes I've come across call for butterscotch chips. And while I'm a huge fan of good old semi-sweet chocolate chips (and even white chocolate chips), those overly-sweet, fake-tasting chips labeled "butterscotch" never really appealed to me. But after thoroughly enjoying the flavor of real butterscotch in our Ridiculously Easy Butterscotch Sauce, I decided to explore recipes for butterscotch cookies without chips. I'm so happy I did and I think you will be too with the first delicious taste!

I tried a few recipes before finding one on the trustworthy Simply Recipes site. It looked promising and after making a few minor adaptations (to simplify), the recipe is ready for your baking pleasure. You don't need any special ingredients, just butter, dark brown sugar, eggs, vanilla, baking soda and powder and flour - all things you can probably find right in your pantry or refrigerator.

Brown butter, so much flavor!
This cookie recipe is made in a pot, rather than a bowl. Why? Because the first step in the recipe calls for browning the butter. If you're not familiar with the concept of brown butter, you're in for a treat! Although butter is delicious on its own, taking a few minutes to brown it, adds incredible flavor to just about any recipe that includes butter. The butter concentrates just a bit as any extra moisture is evaporated in the process and the it also takes on a deep, rich flavor that's often described as "nutty".
How to brown butter
Although browning butter is a step that many chefs use to create delicious flavor in both sweet and savory dishes, it's not difficult at all.
It's a culinary skill that will be useful over and over again. How does it work? This is my technique which prevents a potential mess on the stovetop:
- Melt the specified amount of butter in a medium-size saucepan. Swirl the butter a bit as it melts to evenly distribute.
- When you hear it start to sizzle, it will soon start spittering and spattering. This is the point that I cover the pan but leave the lid vented slightly. Don't cover it completely as you want the excess water to be able to evaporate and escape but the cover will keep the spitter-spatter contained.
- Tilt the pan occasionally as the butter is sizzling. It will sizzle for a minute or two and then you will hear the sound soften. Remove the cover at this point and you will notice that the butter is now foaming. Watch it carefully at this point, swirling the pan a few times to redistribute the butter.
- When you see a few golden spots bubbling up in the foamy butter and smell a nutty aroma, you're done! Remove the pan from the heat and swirl the butter a few more times. Voila! Brown butter, ready for your culinary enjoyment!
An easy recipe, great to make with kids!
The first time I made these cookies, two of my grandchildren, Emmy and Hayes helped. I had them join in after the butter was browned as they're too young to be working with hot butter. When working with young children, I like to measure the ingredients ahead and have them set out in small bowls. The kids can take turns adding ingredients and stirring.
After we had the dough mixed up, we set up a little assembly line with Emmy scooping up the dough, me rolling it into balls and Hayes coating the balls with sugar. It was fun and, of course, a little messy. But that's what vacuums are for and we all had a great time working together. And when the delicious aroma began to fill the kitchen, we could hardly wait for the timer to go off.
We served the cookies that evening for dessert for mom and dad with ice cream drizzled with butterscotch sauce. Everyone LOVED the dessert and the children were so proud to have helped!

A wonderful gift
A bag or box of these Crinkly Crackly Butterscotch Cookies will be sure to delight any recipient. They would be a wonderful way to welcome a new neighbor, express your appreciation to co-workers, hairdressers, mailmen, delivery persons, teachers... And, if you've had an argument or dispute with someone, these delicious cookies would be a great way to begin to mend the fence.
I created a fun little label which makes a gift of these cookies even a little more special. If you'd like a free printable PDF for the labels, just leave us a comment below in the comment section. (Just a note, if you have trouble leaving a comment, place your cursor in the lower left-hand corner of the comment box instead of at the top as you normally would. You should then be able to leave your comment.)

When you receive the PDF for the labels, just click on it and that should open up the PDF reader on your computer. Once the reader is open you can go to the menu at the top, click on "File" and a dropdown menu will appear which should give you the option to "Print".
I hope you enjoy them as much as we have! I've made a LOT of cookies over the years but I must say that these little gems rank up in the top-ten category.

They're pretty crazy-delicious with that crisp, crinkly crackly exterior and chewy, butterscotchy interior. The sprinkle of flaky sea salt takes them right over the top!

Café Tips for making these Crinkly Crackly Butterscotch Cookies
- Dark brown sugar gives these cookies a deep butterscotch flavor. The darker, the better! You might have to experiment a bit to see which brand is available to you that's a darker brown in color. In my area of the country, my local grocery has a generic brand (Laura Lynn) that's nice and dark and I've found that Dixie Crystals are also a deep, rich brown.
- One of the beauties of this recipe is that it can be stirred up in one pot without a mixer. That being said, it is a thick dough so if you have trouble stirring, feel free to use a mixer. Either way, mix it just until there is no longer any visible flour. Don't overmix!
- It's also important not to over bake these cookies. You want the center to remain moist and chewy so watch them carefully during the last few minutes. Every oven is different but with my oven, 12 minutes is the perfect bake time for these cookies.
- I find it best to scoop and then roll all the dough at once even though I only bake one sheet at a time. The dough is easier to shape and roll and the rolling sugar sticks better when it's slightly warm.
- I use a 2 tablespoon retractable scoop for these cookies. A cookie scoop is a great way to get consistent size cookies. I love having a variety of sizes for different types of cookies. We also use them for ice cream and they're great for scooping out the seeds of pumpkins and winter squash. A set of these scoops would make a wonderful gift for someone who enjoys baking.
- You can also use a kitchen scale to get uniform size cookies. I really like this uniformity when giving these cookies as gifts. The scoop that I mentioned above creates cookies that are right around 35g. Kitchen scales are invaluable for people who enjoy cooking and would make a great gift.
- These cookies call for a sprinkle of flaky sea salt before baking. Flaky sea salt is not the same as kosher salt although, in a pinch, you could use kosher salt. Flaky sea salt is a finishing salt that adds a fabulous gourmet touch to so many sweet and savory dishes. I like Maldon Flaky Sea Salt which is a favorite of chefs all over the world. A small box will last a long time and is worth every penny!
- I love these little treat boxes for putting these cookies in to give away. They're a great size, make a pretty little gift with the labels and they're reasonably priced. They come in a set of 24, enough for all your friends, neighbors, etc. I use this turquoise raffia ribbon to decorate the boxes. The ribbon matches perfectly with the labels.
Thought for the day:
As a deer pants for flowing streams,
so pants my soul for you, O God.
My soul thirsts for God,
for the living God.
Psalm 42:1&2
What we're listening to for inspiration:
If you enjoyed this recipe, please come back and leave a star rating and review! It's so helpful to other readers to hear other's results and ideas for variations.
Scroll Down for the Recipe - or Save It to Your Inbox
We’ll email you the recipe so it’s easy to save, print, or share.
Crinkly Crackly Butterscotch Cookies
Ingredients
- 12 tablespoons butter, I use salted, 1 ½ sticks
- 1¾ cups dark brown sugar, packed
- 1 large egg
- 1 egg yolk
- 1 tablespoon vanilla extract
- ½ teaspoon baking soda
- ½ teaspoon salt
- ¼ teaspoon baking powder
- 2⅓ cups all-purpose flour
- Demerara or Turbinado or raw sugar, for rolling
- flaky sea salt, for sprinkling (I use Maldon)
Instructions
- Preheat oven to 375°F and line two baking sheets with parchment paper.
- Heat the butter in a medium-size heavy duty sauce pan over medium heat until it’s melted and starts to make a sizzling noise. Cover the pan with the lid vented and continue cooking until the sizzling sound reduces and the butter begins to foam. Swirl the pan occasionally to redistribute the butter.
- Remove the lid at this point and watch carefully. As soon as the foam starts to begin turning golden in spots and the butter takes on a nutty aroma, remove the pot from the heat at swirl the pan to move the butter around.
- Add the brown sugar and vanilla and stir well to combine. It will look wet and grainy and it’s okay if the butter looks a bit separated at this point. Allow this mixture to cool for 5 minutes, stirring occasionally, before proceeding.
- Whisk in the egg and egg yolk until the mixture is smooth then add the baking soda, salt and baking powder. Stir until well combined.
- With a sturdy spatula or wooden spoon, add 2 cups of the flour and stir until combined. Add the remaining ⅓ cup flour and stir, scraping the sides and bottom of the bowl, just until the flour is incorporated. The dough will be thick.
- Scoop up the cookies in 1½-2 tablespoon scoops. Roll the scoops into balls then roll them in the sugar to coat. Scoop and roll the dough balls for both sheets right away as the dough will get stiffer as it cools down.
- Place the the rolled balls on the two baking sheets, spacing 2-inches apart. Sprinkle each ball with a little flaky sea salt, if desired. Bake the first pan for 11-14 minutes until the cookies are puffed and cracked and the edges are just beginning to brown a bit. Be careful to not overbake. Repeat with the second pan. Sprinkle with a little more flaky sea salt, if desired.
- Allow the cookies to cool on the pan for a few minutes, then transfer to a wire rack to cool completely. Store in an airtight container.
Notes
Nutrition
Shop Our Café Loves
We’ve gathered our favorite kitchen tools, tableware, and entertaining treasures in one place, the Café Loves store. It’s a wonderful spot to find something special for yourself or the cooks and hosts you love!


I've made these several times. The first time as is, they were yummy. Next timeI added freeze-dried raspberries that I ground up. It added a little special flavor and they were even better. This time i tried freeze-dried blueberries. The color was a bit grey, but they still tasted great. (Couldn't really taste that blueberry flavor though). I'll be making these again.
Hi Linda, Thanks for the excellent review! So glad to hear how well the cookies turned out for you, and thanks for sharing your creative additions. We appreciate you taking the time to let us know how much you enjoyed this recipe!
Hey there, deeeelicious cookies thanks!! Homemade are soooo much better than bought. I’d love to gift some and would love the labels if possible please. Many thanks. Paul
Thanks, Bob!
I would love the printable labels from this cookie recipe 🙂
Thanks so much.
Another great recipe from you. And you make it even greater with your pretty labels. I would like to have them po. Salamat.
Thanks, Nancy!
May I have the labels please? Thanks
Looks like a great addition to a Christmas treat tray! May I please have the labels? Thank you
Sure, Nicole!
I'd like the labels please.
Sure, Jackie!
May I have the labels please. Thank you
Sure, Dotti!
Love butterscotch! Can’t wait to try these. Please send the labels.
Sending them your way, Alice!
Labels please!
Sure, Barb!
Label please- thank you!
Sure, Tricia!
Hi Tricia, the labels could not be delivered. Could there be an error in your email address?
Would love to have the labels. Thank you.
These look amazing, can't wait to make!
Can I get labels please?
Sure, Angela!
Sure, Joyce!
I have never tried making my own butterscotch so I an anxious to give this a go. Would love the label as well. Thank you!
Sending them your way, Teresa!
This looks the perfect gift-giving recipe, thank you! Love that you give the weight for each dough ball!! Please can you send me the labels?
Sending them now, Jane. Enjoy!
I love butterscotch! Please send me the labels for gift giving.
Sure, Toni!
Brown butter. Butterscotch. Crinkly, crackly...what's NOT to love? And no-mixer? They're scrumptious!
Please send label pdf, and thanks so much for all you do, including the inspirational, and song links, which I often email to my friend. 🙏
Thanks for the kind comment, Terry! Sending the labels your way.
I am baking these cookies and would love to receive the label if possible. Thank you!
Sure, Heidi!
Looking forward to making these as my husband loves butterscotch! Could you please send me the PDFs? Thanks!
Sure, Karen!
I am also not a fan of the fake tasting butterscotch chips. Making these cookies tomorrow, they look so good! Thanks in advance for the printable labels, they will be great when giving a little gift of cookies this time of year!
Sure, Suzanne!
Please send the labels for the caramel cookies.
Baking week, love the recipes.
Thank you
Sure, Margaret!
Can't wait to try these. Please send labels.
Sure, Liz!
Getting ready to try these and replace my old butterscotch chip recipe. I love brown butter!!! 😜
Please send the labels! Thank you!
Sure, Kathie!
These sound delicious and perfect for the holidays.
Love your easy "one bowl/pot" recipes! Please send labels for gift giving. Thank you for making them available.
Sure, Alice!
So yummy. Would like the label please.
Sure, Jana!
Interested to try. Don’t usually bother wit recipes that call for brown butter, wil this time. Would like label Aldo, thanks!
I think it's worth making the brown butter for this one! We will send the labels, Jen!
Would also love to get the labels! On a bit of a butterscotch kick
Sure, Emm!
I'd love to have the labels. Thank you!
Sure, Jacqueline!
These sound delicious. Am I able to still get the labels.
Thank you
Sending them your way, Sandra!
I’d love the labels.
Sure, Elaine!
10 out of 10! what a hit! Thanks for the great experience.
Would love the label!
I'm so glad, Krista! Sending the labels your way 🙂
I would love the label, please!
Sure, Laurie!
Thank you for sharing your recipe! I made these cookies for my boyfriend today and he loved them! Could you please send me your cookie labels?
Thank you!
I'm so glad, Martha! We will send the labels now!
This recipe is a keeper, anything that begins with browned butter and dark brien sugar, yum. My five year old grandson likes to help me bake. Upon tasting that initial mix, he was in heaven. He is a kid who is not addicted to sweets and will pass up candy, but he does like butterscotch flavors, these cookies are the first time I’ve ever seen him eat several cookies. They are a winner!
I love that, Coleen! What special memories you are creating with your grandson! 💕
I delayed making these, as all I could think of was; if I burnt the butter, then I would have a pot to scour and it would just be a waste of product. Anyway, I bit the bullet and they were scrumdidlyumptious! Hubby's new best flavour.
I have a question though; the cookies did not spread as in the photos. After scaling and rolling the dough, should I have flattened the dough balls slightly before baking?
Thank you Chris for all your wonderful recipes & to Scott for the photographs, after all we eat with our eyes first.
Hi Charleen, so happy you enjoyed these cookies!
Regarding your question, I don't flatten the dough balls but the moisture content in butter can vary a lot so that may have been the issue for you.
These cookies are delicious! I would love to have the PDF labels. Thank you!
Thanks, Margaret! We will send them now 😊
5 stars! Beth from Raleigh, NC here... These cookies are deceptively easy to make, and if you love the flavor of caramel, you won’t be disappointed! I had left the sea salt off because I was out, and I was so incredibly pleased with the results. Thank you so much for sharing this recipe—I’ll definitely be trying your others.
Thank you so much for your review, Beth! I'm so happy you enjoyed the cookies.💕
Good Morning Chris, from a glorius Summer morning in South Africa.
Not too long ago whilst researching Shortbread Cookies, I happened upon your Website - oh my - now each morning I look forward to your Newsletter.
Please kindly send this PDF label.
Take care, Stay Safe & have a wonderful New Year!
Thank you so much, for your kind email, Charleen and welcome to The Café! 💕 We'll be happy to sent the labels. Happy New Year, all the way to South Africa!!
These cookies have a pleasing texture as well as taste. It's great to hear someone comment that chocolate chip is no longer their favorite!
Mine did not spread as much as in the photo, but they tasted really good.
Thanks so much, for sharing your review, Tulsi!
I look forward to making the recipes I found today. Please send me the pdf file for the labels.
Sure, just sent them, Tillie. Enjoy!
I love all of your recipes - I can't wait to try this one! Looking forward to sharing with family and friends!
Thanks, Marsha! Hope you enjoy it!
I have just found your site! So far, love it!!! I am with you on the awful tasting butterscotch chips!! So glad to have a recipe without them. I too, would love the labels for these cookies and your pumpkin bread! Happy Holidays!
Thanks, Karen and welcome to The Café! Just sent the labels. Happy holidays to you too!
Can't wait to make these. Do you think I can mail them? Could you please email me the label? Thank you!
Hi Mare, just sent you the labels. I think they should mail well. I would just make sure they don't bounce around in the package.
Hi Chris!
I'm in awe of all the great recipes on your site (& the photos too). I think I've probably emailed about 50 of them to myself (waiting for
new printer ) & I'm really looking forward to baking a batch of these within the next week.
Would love the pdf labels as I plan on doing gift trays for friends & neighbors. Will have to drop @ end of the sidewalk as our Premier FINALLY decided to put Alberta (Canada) on lock down for minimum 1 month starting today - about 6 weeks too late. No in-person socializing with anyone not living with you - including outside. All non-essential businesses closed. Grocery stores & pharmacies max 15% allowable capacity. And on & on.
Glad I stocked up on baking supplies 2 wk ago!
Thanks so much for the "Thought of the Day" & telling us what you're listening to. I find them inspirational
Oh boy. Verbal diarrhea. Sorry!
Best of the season to you & yours. Stay safe.
Haha! I appreciate you taking the time to leave a review, Terry!
Oh no! Shutting down again, yikes! We're being very careful but not shut down yet.
So happy you've enjoyed looking through our recipes and I love that you have enjoyed the inspiration as well!
Thanks and holiday wishes to you too!
These cookies look delicious. I am going to try them tomorrow. I would love to have the printable labels.
Sure, we'll send them now, Cindy!
I’m making these today and I would like to give them as gifts. Would you please send me the labels?
Thanks!
Hi Lynn, they should be in your email.
I plan to make the cookies for gifts, also the pumpkin bread. Would love to have the labels.
Sure, we'll get those off to you now, Barbara!
Hello,
I made these last week. They're a definite do-over! Your advice not to over bake is important.
Thank You
LOVE your site! I would love to have the labels for the butterscotch cookies. Thanks for all you do.
Thanks so much, Lynn! The labels should be in your email.
Looking forward to making these cookies. Would you please send the label template.
Thank you!
They're on the way, Julie! Enjoy!
Going to try these today. Can you please send me the labels? I can also use the labels for the fabulous Pumpkin Bread!
Many thanks,
Anne
You're welcome, Anne! The labels should be in your inbox!
Ahhhh. the sea salt issue. Perfect example of why one should read a recipe from beginning to end prior to baking, according to my Girl Scout Troop leader 60 years ago. It worked out perfectly for me. As usual, OUTSTANDING recipe.
Haha! Good advice 💕
These look so good and I can't wait to make them! May be perfect for gifting our neighbors this Christmas. If you could send the printable label, I'd appreciate it so much!!
Sure! Sending the labels now, Barbara!
Why on earth is the sea salt sprinkle not included in the recipe? Because I followed the recipe, I didn’t sprinkle them with salt, and thus a key flavor was missing. Please revise the recipe so it is complete. (The cookies are great without the salt, but it’s very frustrating to miss an ingredient.)
I have corrected the recipe, Natalie. Thank you for pointing this out.
Thank you—the cookies are super good. I will be making them again.
Great! 💕
Hello Chris- think I may have "cracked" my spreading problem. I cooked the butter for a little less time and I baked the cookies at 175°C for longer, giving the butter time to spread & they turned out beautifully.
I have to tell you; I am a little OCD about greasy, sticky hands - but these delectables make it all worthwhile - thank you from Sunny South Africa
Thanks, Charleen!
Whoops, I did mean to say labels for the COOKIES, not the fudge. I TOLD you I've been downloading all freaking day, and I believe there are MANY fudge recipes listed. Clearly I have fudge on the brain. ANY labels are appreciated, of course 🙂 Have a blessed day.
I've been downloading your recipes nearly ALL DAY, trying to pick which one to start with -- fact is, I'll probably still be downloading when it's dinnertime, so it may be too late to do any of them! The irony! At any rate, I look forward to trying ALL of these, shopping at Aldi's, and my Amazon "New Cooking List" is ALSO growing by the minute. In the meantime, could you please send along the PDF of the labels for this fudge? If there is any left at Christmas, I may gift it; if not, I'll enjoy looking at the label as I devour it myself or let my hubby and kids share it with me. And glad to see you're near Asheville/Black Mountain, as I'm in Travelers Rest, down the mountain a bit, and Ingles and Aldi's are both a hop, skip and a jump away! Coincidence?! I think NOT!! Thanks!!
Hi Vickie, welcome to The Café! So nice to meet you. We love Travelers Rest as we pass through there on our way to our occasional trips to Greenville. Love Sidewall Pizza!
Hope you enjoy the recipes you try. Sent your the labels!
Another recipe solidifying my reputation as Queen Baker on my street!!!! This cookies are quite large and delicious! I had the printed recipe over at my work counter, so didn't read when to put on the flake salt. Honestly, forgot it the first pan and then the next couple of batches I guessed sprinkled it on before baking. Oh, I didn't have enough Demerara, so rolled in brown sugar, they were still fabulous. Sooooo very good!
Ooops, forgot, would love to have the PDF of the labels.
Your recipes are so inspiring. I can't wait to make these butterscotch cookies to give as gifts. They sound wonderful and different. Please send labels and thank you. I always enjoy the quotes you include, too.
Thanks so much, Lenore! Just sent the labels, hope you enjoy the cookies!
Hi Chris
These cookies look amazing, I think this will be a nice baking adventure with my 9 year old granddaughter she is proving to be a good little baker. We do a lot of baking together, it would be lovely to get your PDF label for these cookies so we can gift them to her friends.
Thank you for sharing your recipe and your lovely labels.
What a fun project, Brigitte! She will be so proud to gift them to her friends! The labels have been sent. Enjoy!
Chris,
These cookies sound wonderful. Can't wait to share them with my Grandchildren.
Please send me the PDF for the labels.
Linda
Sure! They're on the way, Linda!
I have made so many of your wonderful recipes and they never disappoint! When I visit your site for a recipe I don’t ever wonder if it is going to be good...I know it will be based off years of making your recipes. Thank you for your careful attention to the notes and the details. All of your talent and efforts are appreciated & enjoyed!
I just came across this cookie recipe and have a question. I make your Sea Salted Brown Sugar Cookies on a regular basis as they are often requested, but I notice the ingredients are mostly the same with some variations on measurements. Will these cookie render a noticeably different outcome?
Thank you and Merry Christmas to you and yours,
Monica
Hi Monica, I really appreciate you kind and thoughtful comment! It makes my day to know people are having success with our recipes!
Regarding your question, it's so funny, I had forgotten about the brown sugar cookies, they are pretty similar, although I got them from different sources. If you love the brown sugar cookies, I would just stick with that recipe!
My practice batch is stellar. I use so many of your recipes but this one will be going out for Christmas. May I please have the label pdf? Cheers, Tere
I love butterscotch, but have always felt the same way about the chips! 😉 Can't wait to make these with my grandson! Would also love the pdf for the labels. Thank you so much!
What great memories you're creating for your grandson, Gloria! Sending the labels now!
Can't wait to try this recipe. I'm following you on Pintrest. Want to make your simple Christmas cookies. Please send me the PDF for lables
Nice to "meet" you, Thayla, I'll send the labels now!
Thank you so much for sharing your recipe, I can't wait to make them.
You're welcome, JR! Hope you enjoy them!
Hi,
Can’t wait to make this cookies, can you please send me the PDF file for the labels
Thanks Angela
Sure! They're on the way, Angela, hope you enjoy them!
These cookies look so delicious. What a wonderful addition they will make to my family cookie exchange. I would love the PDF please. Thank you!
Thanks, Abby! The labels should be in your email!
These look delicious! Would love the pdf for labels!
Mary Ann Truex
Sending them now, Mary Ann!
They sound really good and less cleaning up! I'd love the PDF then I can make extra to give away, and make them look 'gift-y'! Thank you and merry Christmas.
So true, Ruth! The labels are on the way!
Wonderful! Easy, too! Would live the labels. Thank you.
Sharon
Sure! Sending them now, Sharon!
These look amazing! I always make up gift bags for family and friends and was looking for something different this year. These will be perfect. Of course I might have to do a test batch for me and hubby first....
I would also love the PDF
Thank you so much
Judy
These cookies will be a great idea for your gift bags, Judy! The labels are on the way!
Thanks Chris,
Big cooking day today!
Have fun!
Will try these biscuits and butterscotch sauce this week.
Can i please have your labels for both, thank you.
Sounds like a great pairing! Sending the labels now!
Thank you so much for the recipe, will be trying them this week and will come back and put a star rating. Please may I have the pdf for the labels.
Stay safe and have a blessed Christmas.
Hi Amanda, hope you enjoy them. The labels should be in your inbox.
I am going to try these cookies! Is the sugar measurement in cups? Please would you send me the pdf for the labels?
Hi Renee, yes it is cups, I've corrected that and appreciate you pointing it out. The labels are on the way!
I love butterscotch and am looking forward to trying these soon. Thank you so much for posting this recipe. I would also love to receive the PDF for the labels. Thanks again.
If you love butterscotch, I think these cookies will become a favorite! Sending the labels now!
Thank you. Please may I have the labels?
You're welcome, the labels are on the way, Doo!
The crinkly, crackly butterscotch cookies sound so delicious, I would love the labels to go with them thank you. Now that I have found your site I shall be in the lookout for it in the future.
Welcome, to The Café Margaret! I'll send the labels now!
Hi! I have all ingredients on hand for these cookies, and would like to have the PDF for labels.
Thank you Lynners🇨🇦
I'll get them off to you now, Lynners!
Thank you for sharing another delicious recipe to add to my growing list of favourite recipes. I would love the PDF please. Thank you!
Sure, they're on the way, Jacki!
Would love the label file. Cookies look delish. Thanks.
Sure, sending them now, Sally!
Hi about how many of these butterscotch cookies fit into the featured box? Thanks.
Hi Barbara, of course it depends on the size but I can fit 8-10 average size cookies in one of these boxes.
These look amazing. I will be adding these to my cookie trays. Would love to have the pdf labels to use. So appreciate you doing this. Hope you have a Merry Christmas.
Sure, sending them now, Bobbi!
I would love to receive the labels for these cookies. Thank you.
Hi Jacqueline, the labels should be in your email.
Can I please receive your labels? LOVE your sight. Such an inspiration!!!!!
Thanks, Mary! Just sent the pdf for the labels, enjoy!