This post may contain affiliate links. For more information, see our privacy policy.
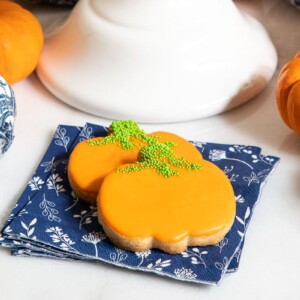
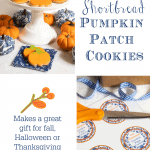
These Irish Shortbread Pumpkin Patch Cookies are fun and delicious with an easy decorating technique. They are sure to brighten any day and, with the pretty printable labels, make a great gift for celebrating fall, Halloween or Thanksgiving!
Each year when fall rolls around, ideas for pumpkin recipes start rolling around in my head, especially pumpkin cookies. If you check our archives we've got a bunch of fun pumpkin cookie renditions like these Pumpkin Shortbread Cookies, our Crispy, Chewy Pumpkin Cookies and even some Pumpkin Whoopie Pies, to name a few. This year, I've spent the last couple weeks working on these Irish Shortbread Pumpkin Patch Cookies! It took a number of tries and lots of sugar, flour and butter, but I think they're perfect now and ready for your fall enjoyment!

A shortlist of ingredients.
Speaking of flour, sugar and butter, that's about all that's needed for these fun Pumpkin Patch Cookies. A little cornstarch, a splash of vanilla and a pinch of salt finish off the list of ingredients. It's my beloved shortbread recipe that I've had in my collection for what seems like forever.
Scott brought this treasure home one day many years ago from work. An Irish co-worker had brought in a plate of these shortbread cookies and they were so good my husband knew that I had to have the recipe! I've tweaked it a bit over the years and made lots of fun cut out cookie variations, like these Easy Christmas Shortbread Cookies, these Valentine Shortbread Cookies, these Red, White and Blue Shortbread Cookies, these Snowy Night in the Mountains Shortbread Cookies and many more! The cookies always come out perfect; crisp, buttery and melt-in-your-mouth delicious.
Perfectly rolled cookie dough
There was one problem though. All of these cut out shortbread cookies involve rolling the dough then using cookie cutters to cut the various shapes. But rolling evenly consistent dough has never been my forte. It seemed that some of my cookies were always too thin while others were way too thick.
A couple of years ago I learned a little trick to make rolling out this shortbread dough super easy. The trick is actually an amazing rolling pin that makes it impossible to mess up. It's adjustable with removable discs (in 1/16, ⅙, ¼, and ⅜-inch sizes) that make it so easy to roll perfectly even dough (even for me!). Just screw on the desired size disc and roll away!

Easy dough, easy icing
The icing or glaze ingredient list is also short and sweet (literally!); powdered sugar, half and half (or milk) and vanilla. A few drops of orange food coloring make it come alive with beautiful, vibrant fall color.

One-Bowl, No-Mixer
On top of having a super simple ingredient cast of characters, these Pumpkin Patch Cookies can be stirred up with one bowl and no mixer. Of course, if you prefer to use a mixer, that's totally up to you. Both ways work! Personally, I love just pulling out one bowl and a spatula or wooden spoon.
Dip, Drip and Flip
I'm not much of a cookie decorator, but I've discovered a really easy and fun technique that produces beautiful results with minimal labor. I call it my "Dip, Drip and Flip" technique and the name explains exactly how it works. They say a picture is worth a thousand words, so Scott took a few shots to show you just how easy this decorating method is. Ready?

- Pick up a baked cookie and hold it on the edges between your thumb and forefinger, with the top of the cookie facing the icing.
- Lower the cookie down into the icing and tilt it slightly in all directions to make sure all the surface is coated.
- Pull the cookie up out of the icing and let the excess drip back down into the bowl.
- Admire your beautifully glazed cookie!
Before the icing dries, I like to add a little finishing touch that makes these Pumpkin Patch Shortbread Cookies look like they were just snatched from the pumpkin patch (or a fancy bake shop). With nonpareils and a small spoon, I sprinkle on a green stem and a few dangly leaves, a simple touch that adds lots of pizzaz. Check out how easy it is:

These cookies are not only delicious, but they come out looking so festive and pretty - pretty enough to share! So for you, I made two gift tags to go with them. They're the perfect treat to brighten up a family member, neighbor or friend's day! If you'd like a free printable PDF for the gift tag labels, just let me know in the comment section below and we'll be happy to email them to you.

In addition, I thought these Pumpkin Patch Cookies would also make a lovely Thanksgiving gift, so I'm including a "Happy Thanksgiving" gift tag as well. If you request the tags, both will be included as printable PDFs.

So pull out butter, powdered sugar, flour and cornstarch and celebrate the season with a batch of these Pumpkin Patch Cookies! They're sure to bring smiles, appreciation and lots of "mmmmms" when they bite into these crisp, buttery melt-in-your-mouth cookies!

Café Tips for making this Irish Shortbread Pumpkin Patch Cookies
- Because there's no mixer used, the butter needs to be very soft when mixing up these Pumpkin Patch Cookies. That can be difficult if your house is cool, even if you let the butter sit out for hours. A short stint in the microwave on the very lowest power level (on mine, it's 10%, check to see what yours is) works like magic to soften butter. You'll need to experiment a bit with your microwave though, as they're all different. Start with 20 or 30-second increments at power level 10 until you learn how long your microwave will take to get the butter nice and soft, but not melted.
- Different brands of butter will vary in their water content which can change the consistency of the dough. If your dough seems too wet to roll out, just knead it in some extra flour until it's more pliable and rollable.
- I usually just use vanilla extract in my glaze, but feel free to use other flavorings. Almond, vanilla, orange, lemon and coconut extracts are also delicious.
- Flavor extracts can vary in intensity. It's better to start with a small amount in the icing, then take a little taste. You can always add more, but you sure can't remove it!
- The recipe calls for a one hour (or longer) chill for the cutout cookies. If I'm in a big hurry, I just pop them into the freezer for 30 minutes.
- A few tips on rolling and cutting out cookies:
- Keep your work surface and rolling pin lightly dusted with flour.
- I also like to rub the cutting edge of my cookie cutter in a little flour in between each cookie.
- Press fairly firmly when cutting out the cookies, but don't twist the cookie cutter as the shape will get distorted.
- If you don't have room in your refrigerator to chill the cookies on two sheet pans, just transfer all of them to one pan after cutting. Then later, once they're chilled, you can divide them between the two pans for baking.
- Occasionally, some of the cookies will be slightly puffed on the top when removed from the oven. You can give them a nice flat top by pushing on the top gently with a metal spatula.
- Sometimes the glaze for these cookies will have lots of bubbles. These bubbles will cause imperfections in the surface of the glazed cookies. Simply stir the glaze very slowly to get rid of the bubbles. If you do end up with a bubble when you flip the cookie over, just pop it gently with your finger.
- I love these pre-cut parchment paper sheets when making cookies. They're the perfect size for a cookie sheet pan and also come in a nice flat box for easy storing. This 100-pack will last forever - and save you some time and hassle.
- You'll need a pumpkin-shaped cookie cutter to make these Pumpkin Patch Cookies. I used the smaller one in this cookie cutter set.
- You'll also need some bright green nonpareils for the stem and leaves. You can find these at your local craft store or online.
- I like to place my cookies on a cooling rack set over a sheet pan after glazing and before adding the green sprinkles. The sheet pan will catch all the runaway sprinkles which can otherwise end up all over your kitchen.
Thought for the day:
He will wipe every tear from their eyes.
There will be no more death
or mourning or crying or pain,
for the old order of things has passed away.
Revelation 21:4
What we're listening to for inspiration:
If you enjoyed this recipe, please come back and leave a star rating and review! It's so helpful to other readers to hear other's results and ideas for variations.
Scroll Down for the Recipe - or Save It to Your Inbox
We’ll email you the recipe so it’s easy to save, print, or share.
Irish Shortbread Pumpkin Patch Cookies
Ingredients
For the cookies:
- 8 ounces very soft salted butter, 2 sticks
- ½ cup powdered sugar
- 1 teaspoon vanilla extract
- 1 ¾ cups all-purpose flour
- ¼ cup cornstarch
For the glaze;
- 2 cups powdered sugar
- 4 tablespoons half and half or milk, maybe more
- 1 teaspoon vanilla extract
- Orange food coloring (I used Wilton Orange)
- green nonpareils
Instructions
For the cookies:
- Line 2 sheet pans with parchment paper. Set aside.
- Place soft butter and vanilla in a medium-size mixing bowl. Stir with a wooden spoon or sturdy spatula until nice and smooth. Add powdered sugar. Mix together until fluffy and well blended.
- Sprinkle the flour and cornstarch evenly over the top. Stir until flour is incorporated and the dough is shaggy. Turn out onto a well-floured surface and form it into a ball. Knead the dough a few times on the well-floured surface until fairly smooth then form into a ball again and press with your hands into a flat disk.
- On a floured work surface, roll out dough to a ⅜-inch thickness. Keep work surface, dough and rolling pin dusted with flour.
- Using a pumpkin-shaped cookie cutter cut into shapes and place on prepared pans. Re-roll scraps as many times as needed to use up the dough.
- Place cutouts in the refrigerator for at least one hour or up to 24 hours.
- When ready to bake, preheat oven to 350˚F. Remove cookies from the refrigerator and bake for 12-16 minutes or until light golden brown. Rotate pans halfway through, if needed, for even browning. Cool completely before icing.
For the glaze:
- Combine powdered sugar, half and half and vanilla extract in a medium-size bowl. Mix until smooth. The glaze should be thick, but pourable. Add a little more half and half if it's too thick.
- Dip the tip of a small knife into the orange food coloring and swirl some of it into the icing. Stir well and add more food color until the desired shade of orange is achieved. Transfer the glaze to a shallow bowl.
To glaze the cookies:
- Holding onto the edges of a cookie, dip the top surface into the glaze, being sure all of the surface touches the glaze. Pull the cookie up and out of the glaze. Allow excess glaze to drip back into a separate bowl. When the glaze stops dripping (this will take a while, quickly flip the cookie right side up and give it a gentle jiggle to allow the glaze to flow evenly over the surface. See the picture above in the post.
- After each cookie is glazed and still wet, immediately add the green sprinkles for the stem and leaves with a small spoon. See the picture above in the post.
- Repeat with remaining cookies. Allow the cookies to dry thoroughly before packaging and/or stacking to store. I usually let them sit out overnight.
Notes
The recipe makes 15 large (3-inch) or two dozen smaller (2-inch) cookies.
Once cookies are dry, they can be stacked in an airtight container.
Nutrition
Shop Our Café Loves
We’ve gathered our favorite kitchen tools, tableware, and entertaining treasures in one place, the Café Loves store. It’s a wonderful spot to find something special for yourself or the cooks and hosts you love!


I can’t wait to make these cookies tomorrow.
I’m going today to pick up some of the ingredients today. Please send me the labels.
Do you suggest putting them in a cellophane see-through bag or small box., That accommodate two or three cookies. Thank you so much for the label.s.
Hi Dotti, either one would work well! We will send the labels your way.
Please send gift label. Thank you.
Please send me the labels. Thank you very much.
I made the shortbread cookies and they were outstanding!
Thanks, Jane!
I got air bubbles in my cookies. What would have caused those? I live in Colorado Springs. Should I be altering your baking recipes for my altitude.
Thank you
Hi Debbie, it's hard to say why you got air bubbles. Generally, that is caused by overmixing but that shouldn't be the case with this recipe so my guess would be that it could be your elevation. I live in the mountains of North Carolina at 2700 ft. but I don't have to make any adjustments. I'm not an expert so I'd suggest following these directions from King Arthur baking: https://www.kingarthurbaking.com/learn/resources/high-altitude-baking
Im wondering why in many of your recipes you "stir" the butter with a wooden spoon rather than using a hand mixer? I could mix it so much easier and faster with a hand mixer, unless stirring produces better outcomes?
Hi Jody, absolutely feel free to use a hand mixer. I love not having to get out any extra equipment and we have readers all over the world, many of them who don't have stand mixers, hand mixers, etc.
I love the ginger doodle cookies and will definitely make the pumpkin ones. May I receive a pdf of labels for the pumpkin cookies thank you.
Sure, Diane!
Hi Chris,
Can you please send me the pdf of the labels. The cookies look adorable! I love the green stem and vines and can't wait to try them. Thank you!!
Hi Chris, Can you please send me the pdf of the labels. The cookies look adorable! I can't wait to try them. Thank you!!
Sure, Liz!
Could you please send the labels. The cookies look so pretty.
Thank you,
Marcia
Sure, Marcia!
Please send the PDF for the labels. What a wonderful gift idea!
Thank you
Sure, Ann Marie!
Please send the PDF for these shortbread pumpkin cookies. I love these!
Sure, Linda!
I would like the labels. Thank you!
Sending them your way, Diane!
Thank you Chris for this wonderful cookie recipes. I enjoy all your recipes o much. I love your presentation ideas as well, I’ve ought the gift boxes, which the receivers ove! I’ve also bought the rolling pin you suggested, loved it so much, gifted one to my daughter and my granddaughter as well. We do a lot of baking and pierogi making and it’s perfect dough thickness every time for every application.
I would appreciate receiving the labels as mentioned.
Thank you again for all your wonderful recipes and ideas. God bless!
That's great, Joan! So happy to hear you are enjoying the site. We are happy to send the labels your way.
These do melt in your mouth, Delicious!
Making again this year for gifts.
Please send labels, thank you Chris.
Jacquline
These are a hit! I made these last year and am getting ready
to make them again this year. Delicious!
Thank you Chris, love this site.
Please, can I have labels?
J*
Thanks, Jaqueline! Sending the labels your way!
Hi Chris... I love your site and recipes. Would like to have both sets of labels, they are so nice. I hope to make these soon. Thanks so much! Have a great week!!!
Thank you, Sandy! Sending the labels your way.
Hi Sandy, the labels could not be delivered, it says they were blocked. Do you have another email address?
Please send me the pdf for the labels for the pumpkin cookies.
They look delicious. I can’t wait to make them. My grandson will
love them.
Thank you.
Thanks, Sandi! Sending them your way!
I would love the labels please!
Sending them your way, Laurie!
Could I please get the label pdf? Thank you!
Sure, Francine!
Hi! Your shortbread cookies recipe has been my go to recipe for the last three years since I discovered it. I even won a couple of Cookie decorating contests using your recipe and some of your decorating tips. When I bring your cookies to work, they disappear so quickly and everybody loves them. Can I get a copy of your PDF for the labels? Thank you so much.
That's awesome, Cindy! We will send the labels.
Thannk you so much for a lovely web site suberb recipes and the added bonus of these labels. what a great idea for a gift for those hard working teachers, along with several others I can think of. Now to find some hours to bake
Enjoy, Shirley!
Thanks Chris for the quick response. I made the recipe as directed and will try pumpkin pie spice next time. Of course, I tried them even though I made them for Thanksgiving Day... Delicious as as all of your recipes. Easy and quick to make. Happy Thanksgiving..
Hi Chris, I going to make these cookies today and was wondering if I could freeze them after glazing them so I started to read the comments to see if the question had already been asked and answered so I wouldn't have to bother you. While doing so, I saw a response to a different question that indicated these cookies had pumpkin pie spice in them. It was from October 2021. I don't see pumpkin pie spice as an ingredient. Should there be? Sounds wonderful I might use it.. Thank you.
Hi Bernice, the recipe doesn't call for pumpkin spice but it would be delicious!
And yes, you can freeze them with the glaze. I like to freeze them between sheets of parchment after they are well dried.
Hi, I would love to get a set of the lables for these beautiful cookies., Thank You
Sure, Kathleen!
Hi Chris,
Thank you for another great recipe. PLs send pdf for the labels.
Sure, Bernice!
Great Thanksgiving idea! Please send the label pdf and the size of box that you use.
Thanks, your recipes are always a hit, Rebecca
Sending all that info your way, Rebecca!
Would love to have the label for the Irish shortbread cookies. I just love all of your recipes! Thank you
Thanks, Cindy! We will send the labels.
I have made this shortbread recipe before, and it is awesome! The pumpkins are so cute and look easy. Definitely want to try them this fall. I would love to get the labels too, if possible. I think these will make cute gifts.
Thanks, Janine! We will send the labels.
My friend asked me for a good Shortbread cookie recipe. This recipe sounds perfect! We will make them together.. The labels would be a perfect finishing touch for gift giving. Please send them my way. Thank you so much.
Sandra Lee
Sending them your way, Sandy!
I have made these delicious cookies several times around Christmas. The pumpkins are very cute. Would love the labels to gift them.
Thank you,
Barbara
Sending them your way, Barbara!
I see you use half &half in recipes and cream.. I am lactose intolerrant.
Can I use a replacement for the recipes
Hi Dee, I am not an expert on lactose-free diets and haven't tested this recipe with any substitutes so I can't advise you on this. If you have a sub that works well, I would try it!
I would love to get the labels!
Just want to tell you that I get so many texts and emails, I go through the list and delete delete delete! Until I come to yours, and then, if at all possible, I open it immediately to see what new surprise you have for me this time. Love hearing from you
Jean, retired culinary teacher
So happy to hear that, Jean! Thanks for the kind comment. We are happy to send the labels!
Could you please send me the labels for the pumpkin cookies. The cookies look so good. Can’t wait to make them.
Sure, Debbie!
Hi forgot to rate the recipe! Love it and would love the two labels. Thank you
I love shortbread and found this to be a great way to make different shapes for different holidays!
Would really like to have both labels, they’re so pretty! Thanks, Judy Rodda
That's great, Judy! We will send the labels.
I can’t wait to make these!! Please email me both labels for these super cute cookies!! Thanks!!
Sure, Tammy!
I would love to have these printed labels! Thank you so much!
I love your recipes!
Thank you,
Carol
Sure, Carol!
Would love to have the labels for the Irish shortbread cookies!! Your recipes are amazing thank you.
Thank you, Maureen! We will send the labels your way.
Chris,
Thank you for creating the most amazing, delicious recipes! When planning a meal, your site is the first place J go! I’m planning on baking the pumpkin and turkey cookies for Thanksgiving gifts. Could you please send me the labels? That will make the gift even more special! How long before Thanksgiving can these be made?
Again thank you! You are truly a gift to those of us who love cooking and eating!
That's great, Nikki! You can make these cookies up to two weeks ahead of time if you store them in an airtight container. They also freeze well. Enjoy!
Chris, I just got my labels! Thank you so much! Can’t wait to share these cookies with my family!!
These cookies look delicious! Can't wait to try them. Would you please send pdf for these cookies. Thank you so much!
Sure, Cindy!
These shortbread cookies are delicious! Please send labels when you have a moment. Wonderful gifts for our family and friends. Thank you.
Sure, Jane!
WOULD YOU PLEASE SND ME THE LABELS FOR THESE YUMMY COOKIES, THANKS
Sure, Katherine!
Thank you so much for sharing your fabulous recipes. I love your recipes, and my family loves them, too! I can’t wait to make these adorable pumpkin cookies for Thanksgiving. I would love to have your beautiful labels, as well. They really make a beautiful presentation for gifts. Thank you so much for your amazing recipe site and generosity❣️
Thank you for the kind comment, Nancy! Sending the labels your way.
Looking forward to making these cute cookies. Please send me the PDF for the labels.
Sure, Barb!
Thanks for sharing.....can't wait to make them . Could you email me the labels . Thank you again
Sending them your way, Libby!
Please send the labels. Thanks so much!
Sure, Marilyn!
Looking forward to making these cookies for my Granddaughters for Halloween. Please send labels. Thank you!
Sending them your way, Janet!
Please send me the labels. The cookies will be going to my grandson who is away at college. Thanks!
Sure, Barbara!
Would love the labels for these cute cookies. Your recipes are great and the tags are such a wonderful finishing touch that make sharing them with others special (and professional). Thanks!!
Thank you, Linda! Sending the labels your way.
Cannot wait to try the cookies! I would love the pdf for them ! Thank you!
Sure, Andrea!
I would love the labels for gift giving. Thank you Chris!
Sending them your way, Sharon!
Love your labels! And your recipes are some of my favorites. Thank you! Please send me the pdf of these labels.
Thank you, Caryn! Sending the labels your way.
Hello Again,
This recipe looks so delicious! We are going camping this weekend and I am going to make them for a treat. 🙂
Could I please have the label for these? I am so glad I found you and that you also are a Christian+
Thank you so much for blessing me,
Rosemarie
Thank you for the kind comment, Rosemarie! We are happy to send the labels your way.
What will happen to these cookies if you don't chill them? Hoping to do them in school but don't have a long session. Love the recipe xxxxx
Hi Emily-Rose, the chilling keeps the cookies from spreading in the oven. If you don't chill them, they will still be delicious but might not be quite as pretty.
My granddaughter will love these cookies as will the rest of us. Please send me the PDF for the labels.
EVERYONE will love them! The labels are on the way, Patricia.
Good morning Chris - I’ve gathered all ingredients and ready to bake shortly. Can’t wait to take my first bite into the Irish Shortbread Pumpkin Patch Cookies. My husband’s favorite are sweet potatoes. We’ll see if I can convert him. If not- I’ll be trying with sweet potatoes. I think it’ll work- do you think I should be concerned with any variation?
Also- would you kindly forward the pdf of labels and tags! Much appreciated ❤️ RM
Hello Gina, Hope you enjoy these cookies!
Regarding your question, you could call them Sweet Potato Cookies instead of Pumpkin Patch Cookies if you thing that would be more appealing to him but, since there isn't actually pumpkin in these cookies (just pumpkin pie spice), it will work whatever you call them!
Plan on making them soon. Thank you for the labels!
K
Sending them your way, Kathy!
Love your recipes! This one sounds wonderful. Would love the label PDF! Thanks!!
Thanks, Mary! We will send the labels!
I can't wait to make these for Halloween. Your recipes are wonderful and I get many compliments. Please send PDF for the labels. Keep the recipes coming. Love them!
Sure, Donna!
Hi, I made the pumpkin cookies and they are delicious! However I had trouble preventing the glaze from dripping down the side. In the end I just spread with a small knife just short of the edges and they look fine!
I would love a gift tag!!
Thank you
Hi Carmen, if the icing was dripping down the sides, you didn't let it drip long enough. We'll be happy to send the labels.
Hi Chris, I just made your Smokey Black Bean Turkey Chili and it was delicious, my husband had second helping. I would love to make this cookies. So if you could please send labels
Thank you,
Laura
I'm so glad, Laura! We will send the labels!
How far ahead can I make the cookies before icing them? Can I freeze the cookies baked before icing?
A friend of mine just had surgery recently and I wanted to make an easy-to-heat-up meal for her. Instead of the usual pie or cake to finish it off with, I plan to make these fall cookies! They're sure to bring a smile to her face. Please send pdf for label.
Thanks so much.
Great idea! Sending the labels now, Robin.
Good Morning Chris. You always have unique recipes and easy to follow instructions. I have used your recipes on many occasions and they have never disappointed. I would love to have the PDF for the labels as well, if it’s no trouble. Thanks!
Thanks so much, Colleen! Just sent the labels!
I would love to have the PDF file, too! Wonderful idea for neighbors and friends!
Sending them now, Debbie!
Would very much appreciate the pdf file. These look terrific and will make very nice favors or gifts with such a professional label. Thank you.
Sure, Caryn!
Our grandchildren would love these cookies. What wonderfully clear directions and tips you provide. I would appreciate the labels for gift giving.
Thanks, Mary! We will send the labels now!
these will be gifts for sure, (you cant get any easier than this) could you please send me the labels and thank you very much
Sure, Louise! Enjoy!
I remember the night not too long ago when I discovered your website. I stayed awake far longer than I intended pouring over your recipes and reading your stories. You have a beautiful testimony of commitment to Christ and your work reflects His greatness.
I look forward to baking these cookies with my 9 year old son and gifting them to neighbors, friends, and family. Thank you for the idea and the labels.
Thank you for the kind words, Amy! We will send the labels now. This is a great project to make with your son!
Yes please on the labels! That is so kind of you, I love having them, it dresses my cookie gifts up perfectly. I wish you could see all the smiles your recipes bring to my family and friends!
I love that! Just sent the labels, Carolyn. Enjoy!
Good morning, Chris. These are cookies are works of art. I hope mine are as lovely as yours. May I kindly ask for the labels? Thank you for your recipe and the generous offer of labels. God bless.
Thanks so much, M! Just sent the labels!
Chris, I love your site. I have used your recipes and labels. Thank You for all the work you put into creating the wonderful recipes and labels..please send the labels for the pumpkin cookies... Thank You, Linda
Thanks so much, Linda! Sending the labels your way now.
Hi would like those labels I want to make those wonderfull cookies they seem so easy . Thank you!
Sure, Ellen! Let us know how they turn out!
I'll be making these today for Thanksgiving. Thanks for all the tips! Could I please have the labels sent to me?
Sure, I'll send them now, Allison!
First, thank you for your wonderful recipes and I love the shortcuts you offer. I love this shortbread recipe and would love the PDF files for the beautiful tags. Thank you for all of your time spent.
Thanks, Kay! I appreciate your kind comment. Sending the labels now!
Hi Chris
I made these cookies this weekend for my little ghost and goblins, your technique with the icing worked out beautifully. I was so proud of these cookies they looked like they came from a fancy bakery. Thank you for your recipe. I would have liked the labels but when I wrote to you telling you about my troubles leaving a comment I got your reply back but unfortunately the labels didn't make it thru. I would still love the labels when you have the time to send them to me . Thanks again for all your lovely ideas and delicious recipes.
Regards,
Brigida
Can not wait to make these for the grandkids today! They will be a great hostess gift at Thanksgiving too. I would like the PDF for the labels too, please.
I have loved every recipe of yours that I’ve tried, especially muffin recipes!
Thanks, Marsha! Yes, these cookies will be a really fun hostess gift! The labels have been sent!
Can not wait to make these for the grandkids today! They will be a great hostess gift at Thanksgiving too. I would like the PDF for the labels too, please.
I have loved every recipe of yours that I’ve tried, especially muffin recipes!
I would love the PDF labels for my pumpkin cookies. Thank you for great recipe.
You're welcome, Linda! The labels have been sent!
Made a double batch of your Irish Shortbread into spiderweb cookies today for the grandcritters, and they turned out perfect, as always! This is my go-to recipe when I want to make decorated cookies, and I love your dip, drip and flip method. Thanks so much!
Victoria
Thanks so much, Victoria! I appreciate you sharing your review!
Love the shortbread! Delish. I would also love so.e of the pdf tags for the cookies. Music students get seasonal cookies this week when they come to my house!
That's so awesome, Joyce! I wish I was one of your students 🥰 The labels are on the way!
I would also love a PDF of the labels. Thank you!
They're on the way, Shelia!
Love, love this recipe!! I’ve been making these cookies since I found your recipe couple years ago. Make them for every holiday and the family loves them. I would love a copy of the gift tags😊 The grandkids now call me Grammy Cookies😂
Kathy
That's awesome, Kathy, I love the "Grammy Cookies"! The labels should be in your email.
Hello! I just love your recipes! Especially the ridiculously easy ones!!
Could u send me the pdf printables of these tags? I am going to try to make them for our neighborhood halloween party!
Do u know how this recipe works with the all purpose gluten free flour?
Thanks again!
Thanks so much, Julia! The labels have been sent! I haven't tried this recipe with gf flour so I can't say for sure.
I would love some tags. They look sooo good!
Thanks, Olivia, the tags should be in your email. Enjoy!
I would like a the pdf file of the tags. Great cookie recipe!
Thanks, Molly! The labels should be in your email!
Would love copy of your tags- Cookie and Thanksgiving
thank you in advance!
Best regards,
Tricia Ann
They should be in your email, Tricia! Enjoy!
Hi, would you please send labels, going to make soon, Thanks so much !!
Sure! They're on the way, Betty.
Thank You for all of the delicious recipes you provide! Your website is my "Go To" !! The pumpkin cookies are great!
Yes Please I'd love the PDF sent for the fall season! And you have a Lovely blessed fall! Thank you also for your bible verses!
j
Aww, thanks, Janet 💕 I'll get the labels off to you now.
Hi Chris,
Your recipes are consistently delicious, beautiful, doable (many "easy") and reliable - also great fun like these.
The Irish shortbreads are on constant rotation at our house, often with help from the "grands" who especially enjoy the dipping part. We are in a family bubble and cooking together with your successful recipes has been a joy in these strange days.
Please share the pumpkin cookie labels.
Jan
p.s. we are making caramel apples this weekend - special request - and I knew you would have a great recipe!
I love that you have been enjoying the shortbreads with your grandchildren, Jan! You are creating some wonderful memories with them. Hope you enjoy the pumpkin cookies as well. Sending the PDF now.
Your recipes are awesome, I’m looking forward to making these cookies today. I would love to have the PDFs for this cookie. Thank you!
Thanks so much, Jacki! The labels are on the way.
I am going to for sure make this recipe for Halloween. These cookies look delicious. I would love the printable labels please and thank you so much!
Thanks, Monique! I'll send the labels now!
Too late for this year as our Thanksgiving was this past weekend, but would love to make next year. Please send the PDF for the labels.
Thank you very much!
Carol
Hope you had a wonderful Thanksgiving, Carol! I'll get the labels off to you now.
Would very much appreciate the PDF file for the labels. Thank you!
Sure! Sending them now, Rowena.
Hi Chris,
please can I have the PDF file for the labels too.
Thank you
Rita
Yes, I'll send them now, Rita!
Please send me the an email with the printable labels. I can’t wait to tm maketheses cookies. They look delicious.
I love your recipes. The cookies look so wonderful.
Thanks
Thanks so much, Nancy! I'll send the labels now.
Hi Chris
These look lovely. I am going to send them to my grandsons in the UK. I would appreciate the means of making the labels to go with them.
Many thanks
What a great idea, Marion. I know he'll love receiving them! Sending your the labels now!
Would love the PDF to make my own labels. Made the cookies today with an old fashioned rolling pin and they turned out great. thanks.
Bravo to you, Susan! I can't believe you made them already. And you're a way better roller than I am, using an old fashioned rolling pin! Sending the labels now.
I love your recipes! Especially the dip, drip, and flip techniques—it’s life changing! I would love both the pumpkin and the thanksgiving labels. Many thanks!
Thanks so much, Shawn! I'm send your labels off now.
Looking forward to making these with my older Grands! We, too, would love the PDF for the labels! Thanks! Eager to share with our new neighbors! Happy Autumn!
This will be a really fun project to do with your grandchildren, Beth. I'll send them off now.
Please send me the PDF for the pumpkin cookies. I know they will be great and I want to be ready for Thanksgiving presenting!
Sure, they're on the way, Barbee!
This has become my 'go to' for glazed cookies.
Will give these as this Fall's neighbor gifts.
Would appreciate the PDF file for it because, well,
it just MAKES the gift even more perfect!
Thank you!
Mic
That's so awesome, Mic! The labels do make a special gift. Sending them now. ENJOY!
I would love the PDF for both labels please. Can't wait to try to make these! Thanks, Adrienne
Have fun, Adrienne! The labels are on the way.
Just love your recipes, and the pictures are fabulous! Would love to have the pdf for your beautiful tags.
Thanks, Barb! 💕 They labels should be in your email shortly!
Wonderful! I think these would make beautiful gifts for Thanksgiving and would love both sets of gift tags! Cheery tasty treats are just what's needed this year especially.
Thank you!
Agreed! Sending the labels off to you now, Stephanie.
I love the idea of dipping the cookies in the frosting instead of trying to spread it. It make a nice smooth finish. I would love the labels
I'm TERRIBLE at spreading frosting on cookies. They look like a kindergartener made them 😂 But this is easy and fun! Sending the labels now, Jan.
Chris love your Christmas and Patriotic shortbread cookies. Love swirling the red,white and blue frosting for the patriotic cookies. I’m anxious to make the pumpkin shortbreads now. Would love to have the pdf labels as well. Thanks so much.
Thanks, Bobbi! They are really fun to make! Sending these labels now!
These look perfect for the fall holidays! What a nice idea to share with those we are thankful for! This year,we need cheering more than ever!
So true! Thanks, Madonna! 💕
Can't wait to try the Pumpkin Patch cookies. They look so good! Would appreciate the 'Happy Thanksgiving' gift tags. Also, are the 'Cinnamon Raisin Brioche Bead' labels available yet just in case you didn't get my original request Thanh you,
L
I'll send both of them now, Linda. Sorry you didn't get the brioche labels.
Hi Chris...great pumpkin cookies, please send along the tag PDF. Thanks
Thanks, Kevin. Sending them now!
Yes, please, I would love the labels, Chris!
Kathy
They should be in your email shortly, Kathy! Enjoy!
i have the dough made just going to get the icing ready, could you please send me the beautiful labels thank you
Oh my goodness, you are speedy, Louise! I'll get the labels off to you now. Enjoy!
Yes, please I would be so happy to get the cute labels to use for gift giving of these cookies. You are so kind to include them to make life easier for us. I plan to make some of the cookies later today and gift them to people who need a boost in their lives during these dark autumn days. Thank you in advance.
These will definitely bring a smile, Jackie! Sending them now!
Please send email with printable labels. Since we cannot visit, due to Covid-19, I will drop these off on the door step of family and friends for Halloween. Love your emails with such a variety of recipes.
Hi Cheryl, that will be a wonderful surprise for your family and friends. Sending the labels now!
These are so cute.Would love the labels.
Sure, they're on the way, Vicki!
Please send the printable labels. Your pumpkin sheet cake is delicious! I baked it for a birthday celebration along with a chocolate fudge cake. The pumpkin cake was the first to go.
Thank you, Sandy! 💕 I'm so happy you enjoyed the pumpkin cake! I send the labels to you now.
Please send the email with the printable labels. These cookies look delicious and I love the green dot decoration where each pumpkin is the same yet unique. Thank you.
You're welcome, Ann. Just sent the labels.
Hi there . Have yet to try these cookies but so far you make the absolute best cookies I have ever tried. Recently made the brown sugar shortbread cut out in a heart shape and half dipped in chocolate for wedding shower celebrations at work. Loved by all.
Can’t wait to try these. Would you kindly send me the labels..so cute.
With greetings from Canada. Anne-Louise
Such a kind and encouraging comment Anne-Louise. I love your rendition of the brown sugar short bead! These labels are coming your way!