This post may contain affiliate links. For more information, see our privacy policy.
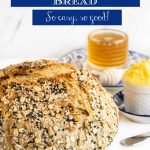
Give this No-Knead Seeded Oatmeal Bread a try! It's easy, versatile and so... delicious! The hands-on time is minimal and the fabulous results are maximum!
Yikes! Thirty-five pounds of flour later and many recipes rejected, I'm super happy to introduce you to this delicious, super-easy No-Knead Seeded Oatmeal Bread. Yes, thirty-five pounds of flour! Scott struck gold early one morning a few weeks ago and nabbed seven 5-pound bags of King Arthur flour at our local grocery store, as he knew I was working on a new bread recipe.

On top of that, a very kind reader from Utah, hearing that my supply of instant yeast was dwindling (and the stores in our area were experiencing a "yeast drought") mailed me a 1-pound package of instant yeast. "Yippeee!", I yelled when the lovely package arrived. I can now come up with fun new bread recipes "till the cows come home" (a saying that means a lonnnnnggggg time - and one you might not have heard, unless, of course, you originally hail from the fine Dairy State of Wisconsin like I do).
If you'd been a mouse in my house, you probably would have laughed as you watched me trying so many different bread recipes and variations (slow rise, quick rise, overnight in the fridge, rise on the counter...). It got to the point where I had so many bowls going, I had to label them to make sure I didn't get confused. Below is just one day of testing, see what I mean?

The one problem I ran across with many of the recipes was inconsistent results. Sometimes the bread turned out great and other times just so-so. Some recipes were too dense, some too puffy and light and some just didn't have a lot of flavor. So I kept going, working my way (fairly quickly) through all that flour.

In the end, I adapted and tweaked a simple recipe from Baking from Scratch. I'm happy to say that I think the recipe's perfect now and pretty much fail-proof if you follow the easy directions.
Don't believe me about the "easy" part? My daughter, Cait didn't either. Last week, I was scrolling through Instagram and saw that one of our nieces was attempting to make bread for the first time that day. Then I noticed that Cait had left a comment on the post. She said, "Haha, I've been trying too... mom swears it's so simple, but I haven't had much success yet, good luck!"
So I sent Cait the recipe and we did several FaceTimes to give her some tips and encouragement. Check out the pic below that Cait sent this week of her bread!

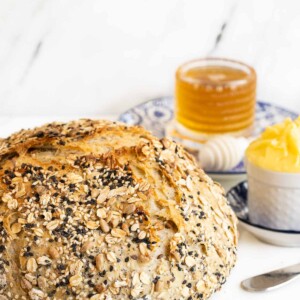
Gorgeous, right? (I'm wondering if Cait should be the one with the food blog!) Even if you've never attempted homemade bread from scratch, you can do this too!
Our daughter-in-law, Lindsay was also a bit reticent. She said, "I'm not a bread baker". It was so fun to, again, make a few loaves of bread with Lindsay via FaceTime and then see the great the picture she sent me with her iPhone:

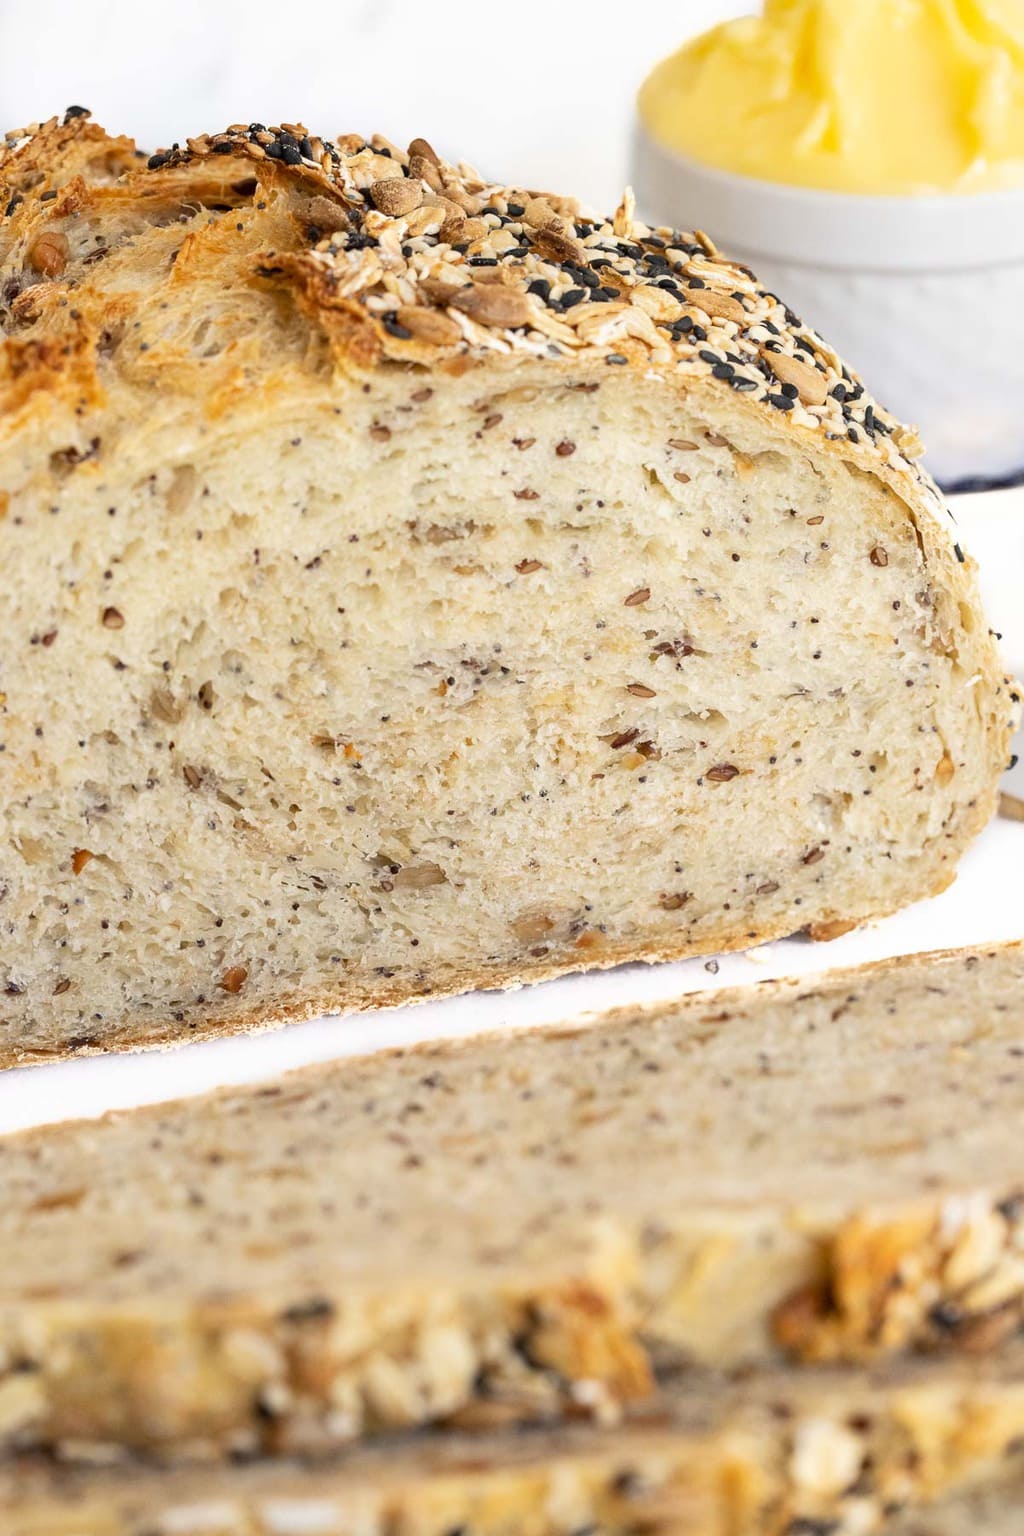
Although this bread needs a stint in the refrigerator, the actual hands-on time is quite minimal. I like to mix the dough up at night (simply combine flour, brown sugar, yeast, salt and seeds in a large bowl, add hot tap water and stir well) then form the loaf and bake the next morning. After forming, the dough gets a little rest/rise on parchment paper while you get the oven and a large pot with a cover (or Dutch oven) nice and hot. Right before baking, the loaf is brushed with water, covered with seeds and then dropped right into the hot pot via the parchment paper. Cover the pot and let the oven do it's magic!
Since you and I can't make bread together via FaceTime, we took a few pictures of the process to help you out:

Your work's done for now. You'll just cover the dough with plastic wrap, let it sit out for an hour then refrigerate for at least 8, but up to 48 hours.

The dough is easy to form into a loaf. Starting on one side and, turning the dough as you go, fold the edges toward the center, pressing lightly to keep all the ends together. Once all the edges are turned in, flip the loaf over so the bottom (smooth) side is up. Now cup the dough all around the edges with the palms of your hands to form a smooth, tight ball.

At this point, transfer the ball of dough to a sheet of parchment paper that's been lightly sprinkled with flour. I like to put the parchment on a sheet pan so I can easily move the dough if needed. Give your pretty little ball of dough about 20 minutes to warm up and start to rise then place a Dutch oven or large pot into the oven and preheat it to 425˚F.
By the time the oven is nice and hot, your dough will be ready to go. Now's the time to add the seeds. Simply brush half of the loaf with water and sprinkle with the seed mix. I like to cup my hand right below the area I'm sprinkling to catch the runaway seeds. I just press those seeds onto the lower half of the dough.

Repeat the brushing and seeding then pick up the parchment paper and drop the whole works into the heated pot. Cover the pot and let the oven work it's magic for 40 minutes.

You'll be so delighted when you lift the cover and see the beautiful loaf of bread. It will need to bake another 10-20 minutes without the cover to brown and crisp.

The aroma of this bread as it bakes is unbelievable. If you have any family members, roommates or friends staying with you who are difficult to coax from the bed, this is a no-fail, no-coercing, no-words-necessary technique for getting them out of bed!
This No-Knead Seeded Oatmeal Bread makes delicious sandwiches and wonderful toast. I like to heat a little olive oil in a pan then add a slice or two of this bread and toast each side until crisp and golden - a wonderful accompaniment for soups and salads!
So versatile!
I love that there are so many ways to "do" this bread. My daughter, Cait's four children don't like seeds, so she's learned to make the bread with just oatmeal. It still makes a gorgeous loaf and is quickly gobbled up by her little herd. If there are certain seeds you don't like or don't have available, just skip them. I love to use sunflower seeds, sesame seeds, poppy seeds, and flax seeds but pepitas, hemp seeds, amaranth, millet, and even flaked barley are all great candidates. The only seeds I wouldn't use would be chia seeds, as they soak up so much water and the recipe would need to be adjusted to compensate.
Café Tips for making this No-Knead Seeded Oatmeal Bread
- If you're using the American way of measuring flour (cups), be sure to whisk or stir the flour up a bit before measuring. If you don't, the flour will be compressed and you'll end up with more flour than is ideal for this recipe.
- Feel free to make this bread with your own mix of seeds. Keep the total amount the same, but adjust to your taste.
- No Dutch oven? No problem. This bread can be successfully made in any large pot. The pot should be at least 5 quarts or as large as 7 quarts. You can also divide the dough in two and make two loaves in medium-size saucepans with covers.
- I like to make the dough for this recipe at night, then it's ready to bake in the morning. You can also make the dough in the morning and bake it later in the day.
- If you like a really crisp crust on your bread, remove the bread to a sheet pan after the first, 40-minute bake in the Dutch oven then bake on the sheet pan for another 5-20 minutes, depending on how golden and crisp you like the crust.
- The water for this recipe should be hot tap water. Let the water run until it's nice and hot. If you check the water with your finger, it should feel hot but not so hot that you pull your finger back.
- Once you mix in all the water, if the mixture still seems a bit dry, you can add more water, 1-2 teaspoons at a time. It should be a shaggy, fairly stiff dough but it's important that all of the flour is well-incorporated.
- This No-Knead Seeded Oat Bread can be a little messy to cut with seeds flying here, there and everywhere. I find that place a cutting board on a sheet pan helps eliminate and contain most of the wayward runaway seeds.
- Be sure to cool this bread completely before slicing or it will become dense and a bit gummy.
If you enjoyed this recipe, please come back and leave a star rating and review! It's so helpful to other readers to hear other's results and ideas for variations.
Scroll Down for the Recipe - or Save It to Your Inbox
We’ll email you the recipe so it’s easy to save, print, or share.
No-Knead Seeded Oatmeal Bread
Ingredients
For the bread:
- 4¼ cups all-purpose flour (I use unbleached)
- ⅔ cup old-fashioned oats
- 2 tablespoons brown sugar
- ¼ cup roasted, shelled sunflower seeds
- 2 tablespoons flax seeds
- 1 tablespoon poppy seeds
- 1 tablespoon light or dark sesame seeds
- 1 tablespoon kosher salt
- 2¼ teaspoons instant yeast
- 2 cups hot tap water, see Café Tips above in the post
For the seeded topping:
- 3 tablespoons oatmeal
- 2 tablespoons sunflower or pumpkin seeds
- 1 tablespoon light or dark sesame seeds
- 2 teaspoons poppy seeds
- 2 teaspoons flax seed
Instructions
- Combine flour, oats, brown sugar, seeds, salt and yeast in a large bowl. Stir well to combine. Make a well in the center of the flour mixture.
- Add about ¾ of the hot water and stir with a rubber spatula, scraping the sides of the bowl, then bringing the mixture to the center. Rotate the bowl as you stir. When the mixture gets difficult to stir, add more of the water in increments, stirring as you go until all of the water is added and all of the flour mixture is well-incorporated. The dough should be thick, but a little shaggy. If it still seems a little dry and all of the flour is not mixed in, add another tablespoon of hot tap water, one teaspoon at a time.
- Cover the bowl tightly with plastic wrap and allow to sit at room temperature for one hour then refrigerate for at least eight hours and up to 48 hours.
- Place a piece of parchment paper on a work surface and sprinkle it with about 2 teaspoons of flour. Set aside.
- Sprinkle about 1 tablespoon of flour onto a work surface (counter). Transfer the dough from the bowl with a spatula to the prepared surface. Sprinkle the top of the dough lightly with a little more flour.
- Gently press dough just to level and even it out a bit. Then, starting on one side and turning the dough as you go, fold the edges of dough toward center, pressing lightly in the center. Now turn the dough ball over, and using both hands, cup dough around the edges to form a smooth, tight ball. Place the dough onto the prepared sheet pan and cover it with a clean kitchen towel. Allow the dough to rise for 20 minutes.
- After 20 minutes of rising time, place a 5-7 quart Dutch oven on the center rack in the oven. Turn the oven to 425℉ and allow it to preheat for 30-40 minutes. The dough will be puffing up at this point, but will not have doubled in size.
- Brush half of the top of the loaf with water, and sprinkle with the seeded topping. Cup one hand along the bottom edges as you sprinkle the seeds catching the excess in your hand, then gently press the extra seeds onto the side of the loaf. Once half of the loaf is sprinkled with seeds, brush the other half with water and repeat the sprinkling and pressing process. Don’t worry if some seeds are on the parchment paper.
- Remove the Dutch oven (it's hot!) and place on the stovetop. Place the sheet pan with the dough next to the Dutch oven. Pick up the dough ball by the parchment paper and lower it into the Dutch oven. Be careful as the pot will be very hot. Cover the Dutch oven and return it to the oven.
- Bake for 40 minutes, covered then remove the cover and bake for another 5-20 minutes or until the bread is a nice golden color. (Check it every 5 minutes at this point.)
- Remove the Dutch oven from the oven and lift the bread, using the parchment paper onto a cooling rack. Gently slide the parchment paper (and excess seeds) away from the bottom of the loaf and discard.
- IMPORTANT - Allow the bread to cool completely before slicing.
Notes
Nutrition
The Café Sucre Farine is a participant in the Amazon Affiliate Program. The Amazon Affiliate Program is designed to provide a means for sites to earn advertising fees by advertising and linking to products on Amazon. The price you pay as a consumer does not change.
Shop Our Café Loves
We’ve gathered our favorite kitchen tools, tableware, and entertaining treasures in one place, the Café Loves store. It’s a wonderful spot to find something special for yourself or the cooks and hosts you love!


Making my fourth loaf. My favorite bread. So hearty and delicious. Quick question: The bottom is browning a little more than the top. I cannot adjust my oven rack as the only rack in my old O@M that will accommodate my dutch oven is the bottom one. Any other solutions? Thanks so much.
I love this recipe.So easy and so delicious. My 2nd loaf and it was perfect- no chia seeds this time. Lol This time I added a few chopped walnuts. Can you add raisins?
Thanks for coming back to let us know how well your second loaf turned out, Sandy! This recipe has been tested with raisins and it was wonderful. The dried fruit does make the bread a little heavier though so you need to give it a little longer rise time.
Hope your third loaf turns out well!
Hi Sandy, so happy you've enjoy this recipe! Regarding your question, you could place you Dutch oven on a sheet pan which would protect the bottom. Or even do this half way through the baking time or when you remove the lid so you will get a nice golden color on the bottom but not too much. Hope that helps!
I've had success with your other bread recipes as well as this one. Do you have one made with whole wheat flour or can these be adapted?
Hi Sandy, I haven't tested this recipe with WW flour. I would start with 25%, see how that goes and increase from there.
Unfortunately, I did not see the note about not using chia seed until the dough was together. After proofing, the dough was stiff but easy to work with and the bread turned out beautifully delicious but a little heavy. Was it suppose to be a dense loaf or did the chia seed throw the recipe off by absorbing too much liquid. Thanks for your help.
Hi Sandy, Thanks for the great review! Yes, it's likely that using chia seeds in the dough was the reason for the heaviness of your loaf because of their tendency to absorb liquid. But so glad to hear that the bread still turned out well for you!
will this still turn out if reduce or omit salt?
Hi Pam, it's a little tricky - salt not only adds flavor but it also adds to the structure of the dough and has an impact on the rise. I feel you can reduce the salt a bit but can't guarantee success with leaving it out completely. That said, there are low socium and/or no sodium websites out there that specialize in recipes with minimal or no salt. That might be a better option for you.
I’d like to leave a picture as the bread looks wonderful! I forgot that all I had was active dry yeast. I still followed the recipe as printed and the bread turned out perfectly.
Thanks for the review, Barbara! You can tag us on social media with a picture or send it in an email 🙂
Hi! The bread is currently in the oven but i'm a little pessimistic. I think it's gonna be really dense. It started out well rising on the countetop for the first hour. But it stopped rising completely when a put it in the fridge leaving the dough a little hard and not fluffy at all... should I let it rise 24h on the counter instead of the fridge?
Thanks!
Hi Annie, I hope your bread turned out. I'm wondering if the problem was your yeast. It should slowly rise in the refrigerator, not on the counter, for 24 hours but if the yeast didn't activate, that would cause an issue with rising.
Well, I just put this bread together and started reading comments and the mention of instant yeast rang a bell that I didn't know there were different types of yeast. I thought it strange that the yeast wasn't added to the water with the sugar but it didn't click during the process. Anyways, made this with regular yeast accidentally. This is probably the issue with people bread coming out dense. Some of us are new to yeast. I’ll bake it anyways and probably eat it as Im sure it will still taste good.
Can this be made with regular yeast?
Hi Danielle, I'm sorry you had trouble with this. Instant yeast is easier to work with as it doesn't have to be activated - that's why I almost always use instant. Yes, this recipe could be made with regular yeast but the process would be different. You would have to activate the yeast in some of the warmed liquid before you add it to the dry ingredients. Regular yeast is a lot more fussy so if you're new to bread making, I would advise to get instant yeast. I purchase it in bulk and it's very inexpensive.
https://amzn.to/42N9Uvy
The yeast can be stored in the refrigerator or freezer for a long time.
I have my ingredients ready.....had every kind of seed you mentioned in my freezer. I'm afraid to begin, however, until I ask one question.....HOW do the seeds stay on? I have used just water in the past and the seeds just roll off after baking. An egg wash seems to work better, but I would love to know what your experience is with "seed stickage" ! I'm ready to give this recipe 5 stars just based on your photos! What a beautiful loaf!
Hi Reba, the seeds adhere quite well with the water. However, when you slice the bread some will, inevitably, fall off.
Good Morning!
I am a new subscriber. I am going out today for all of the seeds for this bread. Question: How do you feel about adding Hidden Valley Ranch powder and if so, how much would you add?
Thank you and I enjoy each of your emails with the excellent ideas!
Hi Jackie, that sounds delicious! I would start with a tablespoon and see if you like it. You can go with more or less next time.
I have found sing metric measurements give a more accurate measurement , especially for the flour. I will try your method of fluffing the flour prior to measuring. I just stumbled onto your sight today and looking forward to making this bread and the focaccia!!
Thanks, Debra! Enjoy!
You mentioned Cait had learned to make this bread with just oatmeal rather than using all the seeds. Would you share the 'all oatmeal' recipe with those of us who would prefer it that way?? Would love to try it!! Thanks
Hi Susan, she just skips the seeds all together but follows the rest of the recipe.
I scored my loaf awaiting your reply and it came out beautifully! Great recipe! Thank you for sharing!
Will the loaf split on its own as shown, or could it be scored after topping with seeds? Thank you.
Hi Linda, I haven't had my loaves split at all.
This is my second time making this. We all love it. I cut it in slices after everyone has had the first warm pieces, and put in freezer. Always have a great slice of seeded bread.
Wonderful! Thank you for your review, Karen!
Worked perfect the first time. Now I’m onto my 3rd batch. Family is loving this fresh bread with homemade soup. I also add all the seeds to inside and outside the bread, it creates great texture. I’m tempted to try splitting the loaf into x2 and make long loaves? I also use a huge Casserole dish (high lid) as I don’t have a Dutch Oven. It’s working great! Thank you so much for your recipe.
Awesome! Thanks for letting us know, Sandi!
Wow. HOT WATER KILLS YEAST. No wonder some loaves didn't rise and turned out dense. Not a single no-knead bread recipe I've read calls for hot water. They call for warm or room-temperature water and many specify a temperature range.
Hi MV, thanks for sharing your opinion.
This recipe uses instant yeast. The temperature to activate instant yeast is 120-130˚F. If you stick your finger in water at 120-130˚F it will feel HOT, not so hot it would be painful but definitely hot. Lukewarm water is between 95˚F and 105˚F. Lukewarm water is not going to activate instant yeast. Hot tap water, unless you run your tap water so hot that you can't comfortably wash your hands is the perfect temperature to active instant yeast.
We LOVE this bread. It's our regular everyday bread now, and I can't keep up with the demand. I don't do overnight refrigeration; I just put the bowl into my proofing box at about 88 degrees for 2 hours or so, and then I take it out and stretch it and shape the loaf in a long baking loaf pan with cover (since it's a large loaf it needs an oversized loaf pan if you want to make sandwich slices, rather than a boule). Then I put it back into the proofing box for 60-90 minutes, heating the covered baker in the oven. I don't usually add the outside seeds, because they do mostly fall off, and I bake it for 40 minutes at 450 with the cover on, and then 5-10 minutes with it off. Delicious and healthy!
Wonderful! Thank you for sharing your review, Jane!
This bread is AMAZING. Simple, works well every time. We have opted NOT to use seeds on the exterior since they tend to just fall off. Thanks so much for this recipe.
Wonderful! Thank you for your review, Paula!
Dear Chris
This bread is delicious - it’s in my weekly rotation now. The only problem is that I can’t stop eating it… often toasted with peanut butter or butter !
Have you tried making these as rolls? If so, what adjustments would you make in baking them off?
Hi Nancy, I haven't tried these as rolls but I'm sure they would be delicious! The baking time would be less and, since you probably wouldn't be using a Dutch oven, I would put a pan of water on the lower rack when you preheat the oven. The steam will help the rolls rise nicely and will give them give a nice crisp crust. As far as the baking time, I can't give you an exact time. I'd set a timer for 10 mintues then watch them carefully until they're a nice golden brown. ENJOY!
Hi
Have you tried this with whole wheat flour or white whole wheat?
Looks yummy.
Thank you
Peggy
Hi Peggy, this recipe works well with half white WW flour and half all-purpose flour.
Without reading your entire blog post I didn’t realize the bread needed to sit for 8-48 hours before baking. Your recipe states “total time 1hour 15 minutes” it would be helpful to include resting time without having to read post.
Hi Gwen, thanks for sharing your thoughts. Sorry for the confusion. At this time, I don't have the option of adding "resting" or "rising" times to my recipes. Hopefully, when we do our next redesign, we'll be able to add that.
Delicious! Substitued bread flour for AP and still turned out great. Bread interior was the perfect texture and had a crispy crust on the outside. Thank you for a great recipe!
That's great, Kristen! Thank you for letting us know!
I've made your easy rosemary bread (love it) and would like to try this oatmeal bread. I note the rosemary bread uses 1 tsp yeast while this one uses 2 1/4 tsp. Can I reduce yeast in this recipe to 1 tsp or is it too dense and needs the extra yeast?
Hi Lou, you could reduce the yeast in this recipe, however, the rising time will be much longer and with all the seeds plus oatmeal, the bread may be a little heavier.
I've been checking out your recipes and the site. I like what I see. Please add me to your mailing list. KL
Thank you, Kim! You can sign up for our emails at the very top of the site on the home page. 🙂
I made this bread last night and while it’s delicious, it turned out dense. I followed the recipe to the T. Do you this I mixed it too much?
I’m doing craft services for a movie. Mena Suvari ate a piece!
Hi Amy, it's difficult to say without having been right there in the kitchen with you. If it's dense, it may be that the ingredients were not combined enough or perhaps it's an issue with the yeast.
I have been making this bread for the past 2 months, and we LOVE it. My only problem is that I often start it in the late morning, and the timing, with 8 hours minimum in the fridge, is tough. I would like to try a shorter, non-refrigerated, rise (we use a proofing box, set at 78 degrees or so), and I am wondering how long you would recommend?
Hi Jane, the long slow rise does improve the flavor but you could definitely let it rise at room temp and it will still be great. I wouldn't go so much by time but rather by how quickly it's rising. Once it's doubled in bulk, you're good to go!
Thank you! We are loving this bread!
I ended up with a dense and unfortunately not full cooked bread. It looked beautiful but gooey inside so not what I had hoped. I too have made other no-knead breads where I left it out but covered overnight (~8 hours) and then baked. I will try that next time but want to know how to make sure it is fully cooked. Please advise.
Hi Nina, the best way to tell if bread is properly baked is to use an instant thermometer. The internal temperature should be 190˚F.
I can't leave well enough alone I guess. I used 1 cup vital wheat gluten and 3.25 all purpose and regular sugar. I then baked in a loaf pan. I was looking for a no knead oat bread with seeds and wanted high protein to compliment vegetarianism. Man is it good. Chewy and the toasted seedsI Now I am going to make up packets of the dry mix with a baggie of the topping inside, one for each week in the month. I can have bread made in minutes!
Awesome! Thanks for letting us know, Lorraine!
Hello Scott and Chris,
Today, I baked you wonderful bread, and oh! what joy! I used the metric measurements and followed your very well written recipe to the letter. Everyone enjoyed it immensely, especially my little grandson. He gave me two thumbs up, so you see, it must have been very good. My loaf was large, light and airy, despite the addition of seeds and oats.
I would happily to recommend this recipe to anyone who is new to bread-making. The instructions are super clear and the photographs are a great support to anyone who is a little hesitant.
Many thanks from myself and my grateful family.
Awesome! Thank you for taking the time to let us know, Sandra!
I decided to make half recipe but I did a mistake. Everything half recipe except all seeds. Sigh! I hope it will turn out well, finger crossed.
Oh man! Hope it was ok, Modd. Give it another try soon!
Hi! Do you have gram measurements for the flour and water in this recipe? I saw you gave tips for "if you're using the American way of measuring" but I didn't see an alternative. I followed the instructions but at first the dough was VERY wet once I used all of the water, so I added a very small amount of flour to even out the texture of the dough-- it did successfully rise some before I put it in the fridge, so the yeast was good. But once I took it out of the fridge it was very hard and difficult to mold-- definitely didn't end up with a smooth finish. So, all that is to say -- I would love the grams measurement so I can try to be more precise! It's delicious anyway, just dense!
Hi Rebeca, if you look under the ingredient list, you can click where it says metric and convert the ingredients to grams. Hope that helps!
Can I use this formula to make bun/roll sizes? Can you just bake this bread on a sheet pan; with out using a pot or Dutch oven?
You could make rolls with this recipe as well as making it on a sheet pan will work. The crust just won't be as crisp but it will still be delicious!
I'm not a bread baker but my husband really likes bread. I had printed this recipe when it was posted and finally took a deep breath and attempted to bake it. It is so easy, it turned out perfectly, and he loved it! I too liked the dense texture and hearty flavor. Now I have a bread recipe!
Bravo! That's so awesome, Bev! Thanks so much for sharing your success! 💕💕
Made this last week. Awesome and easy. Gave half to some friends and they are still raving about it. Another ridiculously easy recipe! Thank you.
I'm so glad! Thanks for letting us know, Janet.
Should I use large flake oats?
Are the old fashioned oats the same as oatmeal?
Thanks, love your other recipes.
Hi Janet, thanks so much! Old-fashioned oats are perfect for this recipe! Enjoy!
Made this amazingly detailed recipe (thank you!!) today for a friend who is having Stem Cell Transplant for Nultiple Myeloma next week. The thorough instructions are much appreciated...the seeded bread, delicious and visually impressive...and the taste is spot-on.
Great bread!
Oh, I know your friend really appreciate getting a yummy loaf of bread from you. Hope the transplant goes well! We have a friend who underwent that and he is doing fantastic! Thanks so much for sharing your results, Vicki!
Hello-I'm not sure what happened to my first attempt. I followed your instructions and when I took it out of the fridge it was a big solid lump there was no way to shape it or or knead it at all. I tried to do what your photos showed (which I really appreciate and think are very helpful) I baked it anyway and the taste was wonderful but it was (not a surprise) a very dense stodgy texture. My sweet husband ate several pieces-can't resist fresh bread from the oven no matter how it looks. Any imput would be appreciated...I'm going to give it another go today. Thank you for all of the instruction-very easy to follow.
Hi Rebecca, I'm sorry you had trouble with this recipe. It sounds like it might have been an issue with the yeast. Did you use instant yeast? Did you let it sit our for an hour? By the time you put the dough in the refrigerator it should be starting to rise if the yeast is active.
Make sure the water is hot to the touch, not so hot that if you put your finger in the water, you have to pull it out but it should feel hot to the touch.
Hi! Excited to try this recipe! Would one be able to use half all purpose flour and half whole wheat?
Thank you!
Lee-Ann
Hi Lee-Ann, I might start with ¼ WW flour and increase from there. I'm afraid the bread may be too heavy with too much WW. You may have to add some vital gluten if you use ½ to lighten it a bit.
Thank you!
My dough has been in the fridge overnight, so I need to sit dough at room temp for any length of time before next step or can I dive right in?
I appreciate your help ☺️
Nope! Just go ahead with the recipe. By the time you’re ready to put it in the oven it will have had about an hour at room temperature. Which is just perfect. If your kitchen is really chilly, you might give it a little bit longer. Otherwise just go with the recipe directions. Enjoy!
This recipe is absolutely perfect, thank you Scott and Chris for your quick answers to my probably obvious questions 😊
You're welcome, Lee-Ann! We love to help you become proficient in the kitchen!
Can this bread be made without the seeds.
Hi Loriraine, it can but I would use an extra ½ cup of oatmeal in the bread.
On my 7th bread!🥰🥰
Giving them away to family, friends!
Thank you,
Have Great Moments!
I love it! Thanks for taking the time to leave a comment, Booge!
Hi Chris:
I'm a newcomer to your website and have already made quite a few recipes. Today I baked the oatmeal seeded bread. It was fun making it since everything went perfectly. I'm a bread baker from years ago and usually use bread flour. This recipe was so easy with all-purpose flour. It wasn't sticky. We just took it out of the oven and it looks exactly like yours. I was so happy when I saw the finished loaf. I'll let you know how we like the taste once it has cooled. I make plain artisan bread twice a week. Maybe this will replace it once in a while. Thanks for a great website. I always look forward to tour emails. Kathy
Thank you, Kathy, for sharing your review! I'm so happy you enjoyed this bread and appreciate your kind words 💕
This bread is delicious even if it was a little heavy but that is probably due to the oats I used. In Canada, I suppose I should have used rolled oats or large flake instead of quick oats (not minute) so will try again since this bread was really good with a dab of butter, as toasts and used as garlic bread.
Thank you Chris for all the efforts you put in developing these recipes and all the help so we can look good.
Thanks, Claire! I really appreciate you sharing your results!
Can you use a pizza stone to make the bread rather than a dutch oven?
Hi Carol, that will work fine too!
Hello Chris
Have you ever made this in a regular loaf pan? 8x4 or 9x5 ? If so what temperature would you recommend and how long would you bake it? With thanks
Nancy, Belwood Ontario
Hi Nancy, I haven't tried this in a loaf pan but I think it would work in a 9x5 pan. I can't say the exact time without having tested it but I would bake it to a nice golden brown color.
This is an excellent bread! I have Made 3 loaves in the last 2 days! It’s A very forgiving bread recipe. Don’t hesitate to try this, you won’t be disappointed!
Thanks, Melinda! I'm so happy you enjoyed it. Thanks so much for taking the time to share your results!
Bread was wonderful. also made the Strawberry muffins today. Delicous.Ottawa.🇨🇦
Thanks for sharing your results, Elizabeth!
Hello from Montréal, Québec !
I would like to know why you leave the dough rest in the fridge, and not at room temperature like many other no knead bread recipes? I made your recipe last week and the dough did not rise much in the fridge. I took the dough out of the fridge the next morning and followed your instructions. After 45 minutes the dough was still very cold and did not puffed at all, I know your recipe mentions that the dough would not double in size, but mine didnt do anything. Was wondering if I should have waited longer before cooking the bread? The bread had a great taste, but it was dense and heavy texture. (excuse my wording, as I am a french canadian ). Can I let the dough at room temperature for 8 to 12 hours? What would it change?
Your web site is really great! Glad I discovered it. Thanks for your help!
Thanks for your kind words, Louise!
Regarding the bread, it's refrigerated to give it a long, slow rise which helps develop a more flavorful dough. You could go without the refrigeration but then you will need to give it a shorter rising time as it wouldn't need the 8-12 hours.
Yes, when you remove the bread from the refrigerator, go more with how it looks rather than the time. The time can vary, depending on the temperature of your room and other factors.
Since you had a bit of trouble with the dough rising, the next time you make the bread, try letting it sit on the counter for 30 minutes before refrigerating. That will make the yeast happy.
This was absolutely wonderful!! You are my go to source for recipes. I've made the pumpkin bread, several of the salads, and salad dressings, which all turned out just as you said. I can even make quinoa now. And I keep my herbs in a jar in the kitchen window, per your advice. So, thank you for your efforts and hard work!!!
Thanks so much, Marie, for sharing your results. I'm so happy you've enjoyed our recipes! 💕💕
I made this for my family tonight. I cooked it as two smaller loaves rather than one big one, because I didn’t have a big enough dutch oven. I used two casserole dishes instead. The loaves turned out perfectly! They had such a great texture. All my kids went back for seconds, and my husband gave it a big thumbs up. I really like the moist crumb produced by the slow rise, combined with the hard crust. This is definitely going to be made again!
Yay! So happy you and your family enjoyed this bread, Rita! It's so nice to be able to make our own bread!
The bread aroma was wonderful and couldn't wait until tasting time. I make and bake bread every week. We had the bread with our dinner and loved the taste. My bread was done but had some spots that were more doughy. It was golden brown and also baked to internal bread temperature. The bottom of bread was also nice and crispy. Do you have any ideas why that would have happened so I can adjust before baking the next loaf??
Hi Ruth, I'm wondering if there might have been a few pockets that didn't get completely mixed and that may have left a few doughy areas. It's a pretty dense dough so I find that after I think it's completely mixed, I stir it a few more times.
Hi Chris, thank you for getting back to me because I am making another loaf today. We couldn't stop eating it. I will double check to make sure that the dough is completely mixed this time. Thank so much!!
Hi! The bread looks amazing! Do you think I can swap out AP flour for bread flour?
Absolutely! That will work fine, Tammy!
Yes, I think that will work fine.
Wow! I made this last night and this morning, yum! Thanks for the instructions not to cut until cool or I’d never have waited. I did see one error in your instructions, don’t discard the extra seeds in the parchment paper, instead smoosh it onto your butter so you don’t waste any seeds!
Trader Joe’s used to make a seed sourdough baguette that I loved, so added caraway to mine. Fantastic loaf, so tasty.
I’m sorry you have to deal with ‘shame’ comments, I’m sure the less than perfect foods you make still get eaten by some one, otherwise you would not know which was the good one!
Thanks for your sweet comment, Coleen and for sharing your results. I love your suggestion about the extra seeds!
This bread is the second recipe from your site that I have to give 5 stars!!!! I don't know how many times you test a recipe but THANK YOU for making them so easy to make something delicious!!!! I have baked bread over the years off and on and this is by far my favorite! I look forward to cooking my way through your site!
Thanks so much, Marcie! I'm so happy you enjoyed the bread. I do spend a lot of time testing recipes, that's my job 🙂 I love for readers to have success so I don't like to post anything unless I'm certain it's going to work. Thanks for taking the time to share your results. That really helps other readers who are contemplating whether or not to try a recipe. 💕
Love this hearty bread. It is our new favorite for avocado toast. Making another loaf tonight 🙂
Yum, that sounds wonderful! Thanks so much for sharing your results, Tracy!
I just made this bread this week and REALLY loved it. My dough was a bit wetter than other recipes, but it all came together in the end. I used a mixture of seeds that I already had and the loaf baked up beautifully! I did need additional 15 minutes for browning. It looked beautiful! This is a dense bread, and when we had it for supper, my hubby said he didn't need anything else but a salad and this bread. I will definitely be making this again and again! We really liked all the seeds as it gave it extra chewiness too.
Thanks so much, Cyndi for sharing your results and experience with this bread. I'm super happy you enjoyed it!
So is this made with plain flour or strong white bread flour? Or can you use either with the same results? The situation in the UK doesn’t seem to be improving with regards to buying flour! 🙁 Excited to try this!
Hi Kathy, I've used all-purpose flour (which is similar to plain flour) and bread flour for this recipe, both with good results.
Delicious! My husband was still eating his first slice when he asked me to please make another loaf right away. I added finely chopped walnuts and substituted with the seeds we had on hand. Wonderful and so simple! Thank you!
Haha! I love it. Thanks for sharing your results, Gail. I love the addition of walnuts!
Enjoyed making this and my toddler is loving every bite 🙂
Thanks so much for taking the time to share your results, Rebecca. I know that with a toddler you extra minutes are few and far between. 💕
I Used bread flour and no seeds. It came out beautifully and is tasty too.
Yay! Thanks, Ruth! So happy you enjoyed it!
i am such a fan of oatmeal bread. It's always moist and stays moist for days! Loving your rustic loaf and that seed topping 🙂
I’m trying to keep up baking along with you! Another great recipe,followed recipe exactly and turned out exactly like you said it would! No surprise there I guess😂 thanks again for the post👏
Woops...forgot to rate!
Haha! I know what you mean, Karen. Thanks for taking the time to leave a comment 💕
This bread is AMAZING!! Thank you for all of your work to produce yet another excellent recipe! I made it today and it's almost gone!
Thank you, Karen! 💕💕
We're going through a flour shortage in North America, in the middle of a pandemic... And you went through how much flour trying to perfect a recipe that doesn't need any perfecting? 44lbs?
I understand you just REALLY want to make the perfect loaf, but hoarding flour and wasting that much during these times is just feeding the problem of fear and panic.
You've got a great process and storytelling ability, let's not let that go to waste too.
Thanks for your concern, Scott.
Actually, the recipe was far from perfect and did need a lot of work and the flour was not hoarded but rather used carefully to create a recipe that can achieve delicious, and just as important, consistent results.
I think I need to clarify that this website is a business (not a hobby) and I create recipes and do lots of testing and tweaking so that other people don’t have to waste precious flour (and other expensive ingredients) with faulty recipes that don’t turn out. Just like a farmer needs seeds to plant, a dressmaker needs fabric and an artist needs paint, paper, pencils, etc, I need product to be able to create recipes so readers like you can have success.
I have this website to teach and help others to make tasty, delicious food without a lot of fuss. My desire is to create recipes that readers know they can trust. Delicious food that they can use to nourish and feed family and friends while creating lasting memories.
Kind regards,
Chris
Just so you know, the star rating is there for those who have tried the recipe and want to share their results.
I for one am grateful for your work on this recipe and the others on the site. I'm sure the bread didn't go into the garbage so the flour isn't wasted. As the baker of many a failed loaf, I applaud your efforts. You are a blessing! (Ps. My oven is preheating now. I have never made a no knead loaf and am a little anxious.)
Thanks so much, Angie 💕 Hope you enjoyed the bread!
Can't wait to try this! Do you think Gluten Free flour would work in this recipe?
Thanks, Lorna
Hi Lorna, I haven't tried this with GF flour so I don't want to say for sure. If I was going to try it, I would just use a good all-purpose GF flour.
Hello
Love all your recipes..
For the flax seeds do they need to be grounded out just regular flax seeds?
Thank you
Nathalie B
That's a great question, Nathalie. You can really use either. If you use ground flax, you'll get more of the nutrients (some of the flax seeds will pass through without being absorbed) but flax seeds are a great source of fiber. I love the look and texture of the flax seeds but either will work in this recipe.
I think this would be good with dried cranberries. Thoughts on that?
Dried cranberries would be wonderful. I did try this recipe with raisins and it was wonderful. The dried fruit does make the bread a little heavier though so you need to give it a little longer rise time. Hope you enjoy it!
Fabulous!!! I have made quite a few of these no-knead breads and this is the best one. It rises more than others which I really like and the additions of nuts and seeds is lovely. I am so pleased! Thanks for working this out for us. This will be my go-to for no-knead from now on. AND I even goofed up with the timing, letting it sit less time than stated; 24/48 hours - somehow I got lost. ANYWAY, worked beautifully so it is very forgiving. I am using my flour wisely and this was such comfort food. THANK YOU>
Yay! Thanks so much for sharing your results, Judi! I always love it when I get the first real review back from someone who's tried a recipe 💕
Hi Chris,
I have the bread rising as I send this email to you. Just wondered if you ever include chia seeds for the topping. I didn't put them in the dough as I was concerned they may absorb the water. What do you thnk? Thanks - love all your no knead breads. Linda
Hi Linda, sorry I couldn't get to this right away. Yes, I think chia seeds would be great in the topping mix.
You mentioned your daughter using only using oats and not the seeds - can you give me an idea how much extra oats I might need if I leave out all the seeds?? Thanks.
Hi Susan, don't use any extra oats for the dough. You don't need it. Extra oats will soak up more of the water and make the bread dry. .
For the topping, use about 1/4 cup of oats in lieu of the seeds.
YUM! The more seeds, the better! I'm making potato bread this weekend, but once I analyze my seed supply, this ill be on my baking list!! xo
Thanks, Liz! Potato bread sounds wonderful too!
Can this bread be made in a long bread pan? Would I adjust the cooking time?
Hi Gramma, I haven't tried this bread in a pan so I don't want to say for sure. I know you wouldn't get the nice crisp crust without a cover. I think I might use a different recipe for a loaf pan, perhaps this brioche bread: https://thecafesucrefarine.com/easy-no-knead-brioche-bread/
Pretty cruel to buy seven 5-pound bags so you can blog, when a lot of people can't even buy one 5-pound bag to feed their family.
Hi Gandia, thanks for your thoughtful comment.
I think that perhaps a little clarification might be good. This is a business and I create recipes and do lots of testing and tweaking so that other people don't have to waste precious flour (and other expensive ingredients) with faulty recipes that don't turn out. Just like a farmer needs seeds to plant, a dressmaker needs fabric and an artist needs paint, paper, pencils, etc, I need product to be able to create recipes so readers like you can have success.
I don't have a food blog to create recipes to show off what I can do but rather to help others to make tasty, delicious food without a lot of fuss. Food that they can share with family and friends and create wonderful memories.
Kind regards,
Chris
This will be a must try if I can ever get flour again.
I know, it's a crazy time. They say the supply is supposed to get better though!
Thanks, Paula 💕 Hope you enjoy it!
I can’t wait to try this, Chris. Looks yummy! I love all the seeds.