
This post may contain affiliate links. For more information, see our privacy policy.
These tall, flaky, Ridiculously Easy Buttermilk Biscuits take less than 10 minutes to throw together. They're also ridiculously delicious!
"Brilliant, simply brilliant!" That’s what I said, right out loud, when I read the unbelievably easy directions for preparing these buttermilk biscuits.

The technique was created by the super-smart folks over at Cook's Illustrated. When I read their method for making drop biscuits, I figured it was too good to be true. But being a curious cat when it comes to all things culinary, I couldn't resist giving it a try.
You would have probably laughed if you saw me just after I read the article. I ran to the kitchen, turned on the oven and pulled out a bowl, along with measuring tools and the necessary ingredients. All super basic ingredients that I had in my pantry and fridge (you probably do too!). The simple cast of characters includes flour, baking soda, baking powder, salt, sugar, buttermilk and butter, that's it!
Classic Technique
Why did this sound too good to be true? Well, buttermilk biscuits can be a bit tricky. The technique usually calls for combining the dry ingredients, then “cutting” in cold butter with a knife, a pastry cutter or between your fingers. The liquid is then added and everything is gently combined.
If done correctly, the tiny pieces of butter, evenly distributed throughout the flour mixture, are what give classic buttermilk biscuits their lightness, flakiness and layers of peelable, buttery deliciousness. It’s not a difficult technique, just a bit time-consuming, and the results are not always consistent. The Cook's Illustrated technique is totally different... and ridiculously easy!
Ridiculously Easy Technique
How does it work? Well, I'm glad you asked... start by placing a cup of buttermilk in the freezer for a few minutes while you melt the butter in the microwave. Let the melted butter sit while you prep the other ingredients. Then, it's just a matter of combining all the dry ingredients in a bowl and giving them a good stir. The melted butter is then combined with the super-cold buttermilk. And this, my people, is when the magic begins!

When the warm butter hits the cold liquid, small, buttery globules form as you can see in the picture below.

Do you see where this is going? When this buttermilk mixture is added to the dry flour mixture and it's all stirred together, you'll notice tiny pieces of pale yellow butter dotting the simple dough. Yep, it will look just as if you spent the time to cut them in!
Would this technique work for traditional, rolled biscuits?
The Cook's Illustrated recipe is for simple drop biscuits, meaning you just drop spoonfuls onto a sheet pan, then bake. Would this technique work for a more classic, cut-out style biscuit, I wondered? You never know until you try, so I decided to give it a whirl!
I turned out the dough onto a floured work surface, kneaded it a few times, then patted it into a small, square. Dipping a round biscuit cutter in flour, I cut four circles, then rerolled the scraps and cut two more for a total of six. (Since then, I've also used a smaller cutter, yielding 8 biscuits.)

It was easy enough; actually ridiculously easy! The biscuits rolled out of the oven tall and golden brown with a heavenly aroma. But you're probably wondering how this version tastes and how they stack up to traditional buttermilk biscuits, right?
The results?
When Scott and I took the first bite, we looked at each other incredulously. The biscuits were light, tender, buttery, flaky and crazy-delicious. "Wow, these are amazing!" Scott said. I agreed.
In fact, we ate far too many that day, smothered with melted butter and strawberry jam. You'd probably frown on us if I told you these biscuits also ended up being dinner that night, so I won't share that bit of information. I guess I'll just say, it wouldn't have been a good day for counting calories!

I've had quite a few happy taste-testers since then, and everyone is shocked when they hear how easy these wonderful buttermilk biscuits are to make. In fact check out the video below, to see for yourself!
Try it! You'll be shocked (and delighted) too... you might even have the inclination to exclaim "Brilliant, simply brilliant!"
Bon Appétit!

Café Tips for making Buttermilk Biscuits
- If you don't have buttermilk, make your own. Place 1 tablespoon of fresh lemon juice or vinegar in a measuring cup. Fill to 1 cup level with milk and stir well. Allow to sit for 5-10 minutes or until slightly thickened. The mixture may curdle a bit, that's okay! Use in recipes in lieu of buttermilk.
- Don't skip chilling the buttermilk (step 2). It will definitely make a difference. If the buttermilk isn't really cold, the little butter globules won't form.
- I made these biscuits when I was in London visiting my daughter. I learned that all-purpose flour (Plain flour) is a bit different there and it seemed like I needed more, probably closer to 2 ¼ cups.
- These biscuits freeze well, both unbaked and baked. To freeze them unbaked or baked, place biscuits on a sheet pan or a plate spaced at least a half-inch from each other. Freeze till frozen, then transfer biscuits to a ziplock bag or air-tight storage container. If you've frozen them unbaked, bake them as directed in the recipe right from the freezer. Give them a couple extra minutes in the oven to compensate for the fact that they were frozen.
- If you freeze these buttermilk biscuits after baking, allow them to thaw when you're ready to use them and then warm in the oven for 5-8 minutes at 300˚F.
- If I'm feeling a bit pinched for time or just lazy, I'll pat the dough into a 6-inch circle and use a bench scraper to cut the dough into wedges. I either put these wedges on a sheet pan lined with parchment paper or in a 9-inch cake pan lined with parchment.
- Another shortcut is to simply scoop up the dough, right from the bowl onto a sheet pan and bake as directed.
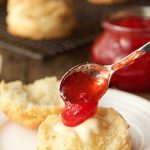
- We love to serve these biscuits with our Easy Strawberry Freezer Jam or this Overnight Raspberry Freezer Jam.
Love these biscuits? Then you'll also go crazy over these Ridiculously Easy Cheddar Chive Biscuits, made with the same easy technique!

Thought for the day:
Show me your ways, Lord,
teach me your paths.
Guide me in your truth and teach me,
for you are God my Savior,
and my hope is in you all day long.
Psalm 25:4&5
What we're listening to for inspiration:
- 1 cup buttermilk
- 9 tablespoons butter divided
- 2 cups all purpose flour more for counter
- 1 tablespoon sugar
- ½ teaspoon baking soda
- 2 teaspoons baking powder
- ¾ teaspoon table salt
-
Adjust oven rack to middle position and heat oven to 450°F. Line a sheet pan with parchment paper or spray a sheet pan with cooking spray.
-
Measure 1 cup of buttermilk and place in the freezer for 10 minutes while prepping other ingredients.
-
Place butter in a microwave-safe bowl, cover and heat on high for 30 seconds. If not completely melted, return to microwave for 10-second intervals till melted. Set aside while prepping other ingredients.
-
Whisk flour, baking powder, baking soda, sugar,and salt in large bowl.
-
After buttermilk has been chilled in the freezer for 10 minutes, combine it with 8 tablespoons of the melted butter. (Reserve the last tablespoon for brushing on the baked biscuits.) Stir with a fork until butter forms small clumps or globules. (See picture in the post.)
-
Add buttermilk mixture to dry ingredients and stir with a rubber spatula just until all flour is incorporated and batter pulls away from sides of the bowl. The dough should be stiff and not super wet. If the dough is wet, add more flour 1 tablespoon at a time, stirring to combine, until fairly stiff.
-
Generously flour a work surface. Dump biscuit dough from bowl onto prepared work surface and turn to coat all surfaces with flour. Knead on counter 5-6 times (about 30 seconds). Flip over on the work surface to coat with flour then pat into a 6-inch square. It should be a 1½-2-inches in height.
-
Cut four biscuits with a 2 ½-inch biscuit cutter. Place biscuits on the prepared sheet pan. Knead scraps a few times till they hold together, then pat into a small rectangle and cut two more biscuits. Transfer last two biscuits to the sheet pan, spacing about 1 ½ inches apart. (See Café Tips in the post for an even easier cutting technique).
-
Place in oven and bake until tops are golden brown and crisp, 8 to 18 minutes. (start checking them after 8 minutes as ovens vary. You want them to be a nice golden brown, but not too brown - check the pictures above for correct color.)
-
Re-melt remaining tablespoon of butter in the microwave, if necessary and brush tops of hot biscuits with melted butter. Serve and enjoy!

Brian Peterson says
How thick are you rolling the dough out to?
Chris Scheuer says
Hi Brian, I roll the dough about 1½ inches thick.
Linda Youens says
Do you think this recipe would work w self rising flour and then using the cold buttermilk and melted butter as in the recipe? Trying this one tonite.
Chris Scheuer says
Hi Linda, I cannot guarantee success with using SR flour for this recipe as the leavening agents' proportions will be off. That being said, I did have a reader report using SR flour with good results. If that's all you have, it's worth trying although the biscuits may have a little different texture.
Dawn says
I’ve used this recipe twice and both times they were so delicious! I doubled the recipe the second time and ended up with 15 big biscuits. So easy and so yummy! Tastes great alone and with sausage gravy!
Chris Scheuer says
So happy you enjoyed them, Dawn!
Ch'rista Brooks says
Does the recipe cause for regular butter or unsalted?
Chris Scheuer says
Hi Ch’rista, I use salted butter.
Abi says
Awesome and super easy!
Chris Scheuer says
Yay! Thanks, Abi.
Ally says
Hi, could I use kefir instead of buttermilk? I typically have kefir in the fridge and use it successfully in other buttermilk-based recipes, particularly pancakes and waffles. Thanks!
Chris Scheuer says
Hi Ally, that should work fine!
Debra J Shevelin says
These biscuits are wonderful!!! Easy and quick. I've been using the same recipe for years, this one is now my "go to" biscuit recipe.
Thank you
Chris Scheuer says
Thanks so much, Debra! So happy you've been enjoying this recipe 💕
Lucy Diamond says
Wow! I made these for NY day breakfast for my husband. First time ever making biscuits. The melted butter in the freezer-cold buttermilk is GENIUS. Totally worked! These were super flaky and delicious. My husband declares this recipe a "keeper". I concur. Extremely well written and easy to follow. Thanks so much-I am so happy my first time wasn't a disaster.
Chris Scheuer says
Yay! So happy you enjoyed them, Lucy! Thanks so much for sharing your results! Now you're the resident biscuit-maker!
Rose says
These biscuits...heaven. The butter into cold milk is genius! I made one batch yesterday with cow’s milk (using the vinegar method) raisins and they turned out beautifully. I had to add quite a bit more flour to get to the consistency for cutting and baked them for 13 minutes. Today, I made a double batch using plant based milk (macadamia), orange zest and dried cranberries. Beautiful. Wishing you all the best for 2021 Chris, and thank you so very much for bringing so much sweetness and joy into the lives of so many tummies!
Chris Scheuer says
Thanks, Rose! Yes, it's a pretty cool trick! So happy you enjoyed them. And I love that you tried plant based milk with good success! Happy New Year!
Rose says
Yes, I’m a vegetarian, Chris, so I often sub tofu, beans or faux meat in your recipes. And your recipes are so great that they hold up to the swap! So if there are any other veg heads out there, or in the circle of people you love to cook for, I’d encourage you to take a good look at some of Chris’ recipes that seem meat centric and change it up with a substitute. You’ll be surprised at how delicious it turns out!
Chris Scheuer says
Thanks for your confidence and encouragement, Rose. This is great as it will be so helpful to others! I might have to add you to my team 💕
Kathleen says
Amazing biscuits and so easy
Chris Scheuer says
Thanks, Kathleen!
Rose says
Hi Chris...Enjoy your blog and all your recipes... I tried these biscuits and they took way longer than 15 minutes kept checking after 8 minutes..I did them on convection ..thinking I should have just done them on bake!,
Sad to say they where a dud!! I ‘m an avid baker and bread maker..but nobody’s perfect all the time..
Will try again on conventional bake.. thanks again...Happy New Yeae to you and Sxott!
Chris Scheuer says
Hi Rose, sorry you had trouble with these. I would definitely try again as they are so good!
Suzelle says
Hi Chris, I never grew up eating biscuits, though I remember hearing my grandmother liked to make them. Do you mainly make them for a snack or in what other instances do people eat them? When would you typically make them?
Thanks,
Suzelle
Chris Scheuer says
Hi Suzelle, biscuits are wonderful any time of the day. They're great for breakfast, served warm with butter and jam or sliced horizontally for an egg or bacon and egg or ham breakfast sandwich. They're also wonderful with soups and salads and are a nice alternative to rolls for dinner.
Sunnysewsit says
I can't wait to make these biscuits. I have to use gluten-free flour, so wish me luck. I was like you in the past - my biscuits never came out to my satisfaction, but this method looks like it will work!
Chris Scheuer says
Let us know how they come out with the GF flour! Hope you have great results!
Diane Staes says
Oh, my goodness, these are fantastic! Best I've ever made. Everyone loves them.
Chris Scheuer says
👏🙌👏 Thanks so much for sharing your results, Diane! So happy you enjoyed them!
Tara says
Thanks for this super-easy biscuit recipe! I will make these again! Mine were not as fluffy as I would like, but were still delicious. I haven't made homemade biscuits in a long time, and was glad to have an easy recipe to get back into it.
Chris Scheuer says
Thanks, Tara!
Amy says
Oh my oh my... So easy yet so delicious! Thanks so very much for sharing . Light and fluffy with a nice crust top and bottom. I cooked on silpat but used your wonderful instructions.
You don't say salted or unsalted butter I used salted which is unusual for me but what was on hand. They weren't too salty.
Chris Scheuer says
Yay! That's so great to hear, Amy! Thanks for taking the time to share your results.
Regarding the butter, I am a bit of a rebel when it comes to butter. I have always used salted butter and totally agree with Christopher Kimbal (the creator of Cook's Illustrated and now Milk Street). https://www.177milkstreet.com/discussion/discussion/73/salted-vs-unsalted-butter
Heather says
Would this work with self rising flour?
Chris Scheuer says
Hi Heather, I wouldn't make these with SR flour as the proportions of leavening and flour would be incorrect.
Dina Anderson says
I just made this recipe today with self-rising flour and omitted the baking powder and baking soda, and it worked fine. I also modified the flour to make it more like cake flour (like White Lily flour, a staple for biscuits in the south) - I substituted 2 tablespoons of corn starch in each cup of flour. This lowers the protein content of the flour which means less gluten develops and you get a lighter biscuit that's not cakey. Worked for me!
Chris Scheuer says
Thanks, Dina! I don't recommend switching SR flour for the all-purpose as the leavening agents amounts will be different but I'm happy this worked well for you!
Crabby says
P.S. Forgot - Since I really like the tang of the buttermilk, next time I will omit the sugar, or lower it to 1 teaspoon.
Crabby says
I make new buttermilk biscuits all the time, looking for that "perfect biscuit." And I finally found it. What an ingenious method!!! I really dislike having to cut butter in with a pastry cutter or my hands. I did do one thing different. When the dough came together, it was a little shaggy, so I turned it out onto plastic wrap and brought the opposite edges together to squish and unify the dough, Then, using the plastic wrap, kneaded it by turning it over on itself several times which gives it lots of layers. Still in plastic, I patted it into a square and cut it into 9 tall squares using the bench scraper. They were so good, I ate 3 of them! Thank you so much for sharing!!!
Chris Scheuer says
Haha, I totally get what you mean, Crabby. I don't think I even told anyone how many I ate the first time I made them 😂 Thanks so much for sharing your review and helpful tips!
Mary Richardson says
This technique was amazing! Worked perfectly! Whenever I think of making biscuits, I usually pass because of the hassle of cutting in the butter.
Chris Scheuer says
It was a game changer for me too, Mary! Thanks for leaving your review!
Danielle says
Haven’t made biscuits from scratch in years. These are delicious and my family loved them. I especially appreciated that there isn’t shortening in this recipe. Thank you for sharing.
Merry Christmas!
Chris Scheuer says
You may become the family biscuit-maker now, Daniell@
Mary Richardson says
This technique was amazing! I often want to make biscuits but don't want to go to the trouble of cutting in the butter. This method was so easy and yielded fluffy flaky biscuits. Thanks! Will make these often.
carly w says
the absolute best ( i use the drop method) and I now use the same technique with making butter milk pancakes.
This was a real find, thank you!
Chris Scheuer says
You're welcome, Carly! We love this technique too!
Tami says
I've made these biscuits several times, and they are beyond delicious! I made two dozen for my son's Friendsgiving, and they were devoured! Such a great and easy recipe!!
Abrianna says
I love this recipe it is absolutely delicious
But I have always needed more flour than the recipe calls for
THANK YOU SO MUCH FOR THIS RECIPE,
Chris Scheuer says
Thanks, Abrianna!