This post may contain affiliate links. For more information, see our privacy policy.
These one-bowl, no-mixer Watermelon Shortbread Cookies are fun, whimsical, super DELICIOUS and have an amazingly easy decorating technique! The free printable labels for gifting are the icing on the cake cookie!
Hold on just a minute! I'm going to run and get a glass of cold milk and one of these Watermelon Shortbread Cookies and savor it for a few minutes... just so I can truly describe how fun and delicious they are! It's hard having a job like this, truly a labor of love, haha!

Seriously, I love my job and love to be able to use the unique skills God has blessed me with regarding all things culinary. Scott (laughingly) calls me "a full-service gas station". He explains that, while some chefs enjoy cooking and others excel in baking, I am fascinated with ALL of it. I love creating healthy meals, baking, making jams and jellies, grilling, bread making, appetizers, desserts, salads... And, being a little lazy, I'm always looking for easier ways to do things... as long as the results are great.
Here, there and everywhere!
My inspirations come from so many different sources... enjoying a meal out, a visit to a charming little bakery, an email that comes through my inbox, cookbooks, magazine articles, travel in foreign countries, and on and on it goes.
The idea for these Watermelon Shortbread Cookies came one day when I was trying to take a nap. We'd been up early and had worked all morning. After lunch, we both thought that a siesta sounded really nice. Scott was quietly purring within minutes. Me? Not so much. The inspiration for these cookies started rolling around in my head and that was the end of the nap. I got up, headed straight to the kitchen and started "playing".

No need to reinvent the wheel
I used my quick, easy, failproof shortbread recipe for the cookie itself. I've been using this basic recipe for years and it's a dream to work with. The dough is stirred together in one bowl with a spatula or sturdy spoon. There's no chilling necessary before rolling and the scraps can be re-rolled over and over without becoming tough or difficult to work with. But even better than all of that, these crisp, buttery cookies are melt-in-your-mouth delicious!
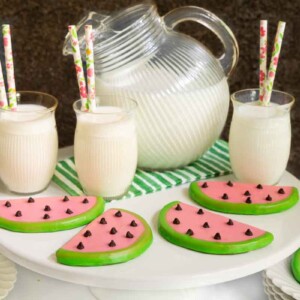
A large round cookie cutter was all I needed to achieve the watermelon shape. I cut each circle in half, transferred the semicircles to a sheet pan and into the oven they went. While the cookies were baking, I got out powdered sugar, half-and-half and my trusty little box of food colors.
By the time Scott got up, the house was smelling like a fine little bakeshop and I was almost finished with the Watermelon Shortbread Cookies. I used my Dip, Drip and Flip technique to achieve the whimsical watermelon decorations.

We've utilized this easy decorating method with our Christmas Shortbread Cookies, our Valentine Shortbread Cookies, our Red, White and Blue Shortbread Cookies and SO many others over the years. I love using it because I'm a pretty pathetic cookie decorator, but this technique makes me look like a pro!

Because we use this easy decorating technique so much, my daughter-in-law, Lindsay made a video to demonstrate exactly how it's done. Check it out:
See what I mean? Super easy. It's also really fun, making it a perfect activity to do with kids. Our youngest grandson, Hayes, spent the night with us earlier this week. I let him test out the Dip, Drip and Flip technique for these Watermelon Shortbread Cookies. As you can see, he was quite pleased with himself...

And he definitely LOVED the finished product!

Once all the cookies got their pink dipping, I used mini chocolate chips for the "watermelon seeds". It's easy to just gently push them into the icing.

Figuring out how to achieve the green rind for these Watermelon Shortbread Cookies was a little tricky. I tried several options but ended up allowing the first layer of icing to dry then simply running the round edge of the cookie through some green-hued icing. Here's a picture to explain that a little better.

After the entire edge is dipped with the green, pull it out and let it drip. Then, use your finger along the back edge to wipe off any excess icing.

A delightful gift!
Know someone who needs a little cheering up or encouragement? Imagine the smiles these Watermelon Shortbread Cookies will elicit from family, friends, neighbors, teachers, co-workers, etc. If you enjoy giving gifts from the kitchen, we've created some free printable labels to dress up your gifts.

To receive a PDF for these festive labels, simply let us know in the comment section at the bottom of this post. We'll email you the labels with instructions on how to print them.

Whether you give these Watermelon Shortbread Cookies away, take them to a picnic or party or serve them for a delicious dessert for family and friends, they are sure to make an ordinary day quite festive and fun!

Café Tips for making these Watermelon Shortbread Cookies
- Because this recipe doesn't require a mixer, the butter needs to be nice and soft. You can let the butter sit out at room temperature, but if the air is chilly in your house, it won't get soft enough. Here are some easy ways to soften butter:
- You can soften the butter in the microwave on the lowest power level (10%). It works like magic! You'll need to experiment a bit with your microwave though, as they're all different. Start with 1 minute. Add 20 to 30-second increments until you learn how long your microwave will take to get the butter nice and soft, but not melted.
- Another technique I often use to soften butter is to put it in the microwave for a few hours with the light on. To keep the light on in the microwave I put a folded paper towel in the door.
- Boil a cup of water in the microwave for 3-4 minutes and get things nice and steamy. Leave the water cup in the microwave, add the butter and close the door. The warmth from the steamy water will help to quickly soften the butter.
- Cutting the butter into small pieces helps it soften quicker.
- The fastest way to soften butter is to put cold butter in the microwave for 10 seconds. Turn it to the opposite side and microwave for another 10 seconds. It might be ready at this point, but if it's not completely soft, add one or two more 5-second stints.
- I use salted butter for these cookies. If you use unsalted butter, add a half teaspoon of kosher salt to the dough.
- Don't be intimidated by the instructions for these cookies. It's a fun and simple technique but I do like to explain it in detail to ensure success.
- I am horrible at rolling dough to an even thickness but I discovered a magical rolling pin several years ago that helps me roll my dough to a perfect, consistent thickness. This Joseph Joseph adjustable rolling pin is a cutout cookie maker's dream come true. It has removable rings that allow you to roll dough in 4 different thicknesses.
- Although this dough does not require to be chilled before rolling, the cutout dough needs a stint in the refrigerator before baking. Allow at least an hour and up to 24 chilling time.
- I use the largest round cutter (3.5 inches) from this set to cut out my cookies. You can make the cookies with any size round biscuit or cookie cutter.
- These cookies are fun and easy to decorate but it's super important to allow the pink icing to dry for a few hours before adding the green (rind) icing.
- I use Wilton gel food coloring for my icing, pink for the watermelon and leaf green for the rind but any pink and green food coloring will work.
- I like to let these Watermelon Shortbread Cookies sit out overnight before storing them in an airtight container. They can be layered or stacked with parchment paper in between when completely dry.
- If you're in the market for sheet pans, I love these OXO Good Grips Pans. They're super sturdy and hold up well.
- These pre-cut parchment paper sheets are the perfect size for sheet pans. They save lots of time when baking cookies, rolls, bread, etc.
- If you live outside of the U.S., you might not be familiar with half-and-half. Half-and-half is an American convenience product, often used as a coffee creamer. It's simply a combination of half milk and half cream.
Thought for the day:
When I consider Your heavens,
the work of Your fingers,
the moon and the stars,
which You have set in place,
what is mankind that You are mindful of them,
human beings that You care for them?
Psalm 8:3-4
What we're listening to for inspiration:
Majestic

If you enjoy this recipe, please come back and leave a star rating and review! It's so helpful to other readers to hear your results, adaptations, and ideas for variations.
Scroll Down for the Recipe - or Save It to Your Inbox
We’ll email you the recipe so it’s easy to save, print, or share.
Watermelon Shortbread Cookies
Ingredients
For the cookies:
- 8 ounces very soft butter, two sticks, I used salted butter
- ¾ cup powdered sugar
- 1 teaspoon vanilla extract
- 1 ¾ cups all-purpose flour
- ¼ cup cornstarch
For the pink icing:
- 2 cups powdered sugar
- 4-5 tablespoons half and half
- ¼- ½ teaspoon vanilla extract
- ¼ teaspoon almond extract, optional
- pink gel or liquid food color
For the “watermelon seeds”:
- mini chocolate chips
For the green (rind) icing:
- 2 cups powdered sugar
- 3-4 tablespoons half and half
- ½ teaspoon vanilla extract
- green gel or liquid food color
Instructions
For the prep:
- Line two sheet pans with parchment paper. Set aside.
For the dough:
- Place soft butter in a medium-size mixing bowl. Stir with a wooden spoon or sturdy spatula until nice and smooth. Add powdered sugar and vanilla. Mix together by hand for about 30 seconds until well blended.
- Add the flour and cornstarch. Stir until dry ingredients are incorporated. The dough will be a little shaggy but will start to come together.
- Turn the dough out onto a floured work surface and gather into a ball. Knead 5-6 times until smooth and all the small pieces are worked in. If the dough seems sticky, knead it again with a tablespoon or two of extra flour on your work surface. Form the dough into a ball again and flatten it with your hand to form a flat disk.
- Turn the disk to coat both sides with flour. Roll out the dough to an approximate ¼-inch thickness (see Café Tips above in the post). Keep your work surface, dough and rolling pin lightly dusted with flour.
- With a round cookie cutter, cut out circles then cut each one in half with a knife or dough scraper. Transfer the semicircles to the prepared pans with a thin, metal spatula. Re-roll scraps as many times as needed to use up the dough.
- Place cutouts in the refrigerator, uncovered, for at least one hour or up to 24 hours.
When ready to bake:
- Preheat oven to 350˚F. Remove the cutouts from the refrigerator and bake for 12-18 minutes, or until just beginning to turn golden at the edges. Repeat with the second pan of cutouts. Cool completely on a wire rack before icing.
For the pink icing:
- Combine powdered sugar, 4 tablespoons half-and-half, vanilla extract and almond extract (if using) in a medium-size bowl. Mix until smooth. The glaze should be fairly thick, but pourable. Add a little more half-and-half if too thick. Add more powdered sugar if it’s too thin. (See the picture above in the post.)
- Add a bit of pink gel food coloring (I use a toothpick) or a few drops of pink liquid food coloring and stir well to combine. Add more food color if needed to achieve the desired color.
- Transfer the glaze to a small shallow bowl (a little larger than your cookies).
- Hold onto the edges of a cookie and dip the top surface into the glaze, being sure all of the surface touches the glaze. Pull the cookie straight up out of the glaze and allow the excess glaze to drip into the bowl for about 15-20 seconds. (You can gently shake the cookie back and forth and up and down to get it to drip a little faster.)
- Then quickly flip the cookie to the right side up and give it a gentle jiggle to allow the glaze to flow evenly over the surface.
- Repeat with the remaining cookies. Gently press 6-10 of the mini chocolate chips into the icing randomly or in a pattern.
- Place cookies on a wire cooling rack to dry for at least 3-4 hours before adding the green (rind) icing.
- See pictures and a video in the post above, demonstrating this Dip, Drip and Flip technique.
For the green (rind) icing:
- Combine powdered sugar, 3 tablespoons half-and-half and vanilla extract in a medium-size bowl. Mix until smooth. This glaze should be a little thicker than the pink icing. Add a little more half-and-half if too thick. Add more powdered sugar if it’s too thin. (See a picture above in the post.)
- Add a bit of green gel food coloring (I use a toothpick) or a few drops of green liquid food coloring and stir well to combine. Add more food color if needed to achieve the desired color.
- Transfer the glaze to a small shallow bowl (a little larger than your cookies).
- Hold onto a cookie with one corner of the rounded edge facing down. Dip the rounded corner into the icing and slowly turn the cookie in the icing to coat the entire rounded edge with the green icing. See the pictures in the post above of this technique.
- Pull the cookie up out of the glaze and allow the excess glaze to drip back into the bowl for about 15-20 seconds.
- Run your finger along the back edge of the cookie several times to remove any excess icing then lay the cookie on a wire cooling rack to dry completely before storing in an airtight container.
For storage:
- I like to let these cookies sit out for 12-24 hours before layering or stacking them in an airtight container. If gifting these cookies, I also let them dry for 12-24 hours before stacking them between parchment paper in a gift box.
- See pictures in the post above demonstrating this (rind) technique.
Notes
If you prefer to use Metric measurements there is a button in each of our recipes, right above the word “Instructions”. Just click that button to toggle to grams, milliliters, etc. If you ever come across one of our recipes that doesn’t have the Metric conversion (some of the older recipes may not), feel free to leave a comment and I will add it. Makes 20-24 cookies, depending on the size of your cookie cutter. I use salted butter. If you use unsalted, add ½ teaspoon of salt to the dough.
Nutrition
Shop Our Café Loves
We’ve gathered our favorite kitchen tools, tableware, and entertaining treasures in one place, the Café Loves store. It’s a wonderful spot to find something special for yourself or the cooks and hosts you love!


I cannot wait to make these adorable cookies with my grandkids this summer! Thank you for the inspiration. Yes, please send the labels!
Thanks for the great review, Pab! We hope that you and your grandkids have a blast making this recipe together! The labels are on the way to your inbox - Enjoy!
Oh, I must have the labels for these Watermelon Shortbread Cookies. Such fun for Summer. I really have been enjoying your site!
Hi Laura, Thanks for your kind comments! It's encouraging to hear how much you're enjoying our recipes. The labels are on the way to your inbox - Enjoy!
These are adorable and I love your recipes! Please send the labels! Thank you so much!
Please, oh please, send the labels for the Watermelon Shortbread Cookies.
Sure, Cynthia!
These look amazing and I am intrigued that they are a shortbread dough vs sugar cookie dough which I'm not fond of. Please email me the pdf labels. Thank You.
Sending them your way, Squirl!
Would love to have the watermelon cookie labels!! So fun! Thanks! Barbara
Sure, Barbara!
May I have the labels for the Watermelon Shortbread cookies please? Thank you
Sure, Judy!
I am looking forward to making these cookies, especially when the weather is dreary and cold, to bring sunshine to friends and loved ones. May I please have the pdf for the labels? Thank you.
Sending them your way, Aunt B!
What a great recipe! I would love to have the info for printing the labels. Thank you SO MUCH!
Thanks, Jan! Sending them your way!
Another of your amazing cookie recipes! I would like the PDF file for the labels. Thank you in advance!
Sending them your way, Donna!
I would love the app for the labels's Thank you
We will email you the pdf. Enjoy, Kathy!
I would love the pdf file to go with these lovely little cookies!
Thank you.
Sending them your way, Jean!
I'm looking forward to making the watermelon cookies for our family reunion. I sure would appreciate receiving the pdf of the labels. Your labels really do dress up the presentation of your cookies. Thank you for your contribution to my success as a baker for my family and friends.
Thank you for the kind comment, Caryn! Sending the labels your way!
These cookies are beautiful. I’d love the labels so I can give to all my friends. Thank you
Thanks, Anne! Sending them your way.
Looking forward to making these watermelon cookies! I scoured the internet for recipes and this one looks amazing! I would love to have the labels! Thank you!
Thanks, Amy! Sending them your way.
Made these this past weekend. There were so fun to make. I made a double recipe and took to the police station and to work. Everyone loved them. Not only are they so cute and easy to make but they are delicious too.
That's great, Kristin! Thank you for your review!
Love these! Can you please send the label?
Thanks, Teresa! Sending them your way.
Thanks for this amazing recipe. I can't wait to send it in a care package to a child who needs to feel loved. This will delight her.
Also, thanks for sharing the adorable labels. You have the best job in the world!
Sending them your way, Leah!
Fun to make, yummy to eat and amazing to share! Great recipe. I really have enjoyed this one as I have many others of yours!
Thanks so much for letting us know, Bonnie!
I just decided to bake these for a party next wee-end. Can I freeze them, if so how? And How best to thaw them and when? thanks again. I have used your blueberry muffin recipe as well, also another 5star! It's become my go to for any kind of muffin.
Hi Bonnie, you can freeze them, however, they keep well in an airtight container for a week to 10 days.
These are so cute. Could you please send me the labels? Thanks so much!
Sure, Sheli!
Please share your watermelon shortbread cookie labels with me. Love baking with my grandchildren. Thank you!
Sending them your way, Mimi!
I would love to have the labels! Thank you!
Sure, Summer!
These look amazing! I cannot wait to make them for my family. Please send me the labels. Thanks so much!
Thanks, Helen! Sending them your way.
I plan to make these cookies for a family reunion picnice. Love the technique. Would appreciate the label template. thanks for everything.
Caryn
That will be fun! Sending the labels now!
Hi Chris, These cookies are so cute! Looking forward to making them for an upcoming family gathering in August. I love your shortbread cookies and all of your other recipes.
Please send me the pdf for the labels. Thank you for being so generous in sharing with all of us.
Bernice P
Sending them your way, Bernice!
Please forward labels. I have made a lot of your recipes always with success. Thank you.
Thanks, Bonnie! Sending the labels now.
Thank you Chris. These look perfect to make for my friend who just had surgery. They will make her smile I am sure. I would love the labels too please. 😊🌻
Aww, that's so sweet, Sheila! Just sent the labels.
What cute cookies! My grandkids will love baking these cookies and decorating them. I would love the watermelon cookie label PDF.
Thanks
Sending them your way, Candace!
These watermelon cookies are so cute! I would love to have the labels to go with them! I plan to make a batch of these this evening.
Thank you for all the delicious recipes you share!
Susan
You're welcome, Susan! The labels should be in your email shortly!
I would love the watermelon cookie labels. They are as cute as the cookie.
Thanks, Jean! Sending them now.
Would you please send me the labels? I love your posts and the Thought For the Day! Thank You.
Thanks, Donna! Happy to send the labels. I love that you love the thoughts for the day 🥰
Would you kindly send me these adorable coolie labels. These will be our next cookie project with the grand kids. Thank you
The grandkids will love it, Nana! Sending the labels your way!
Hi, these cookies would be wonderful as a gift to my Florida neighbors for watching our house for us while we were out of the country. And it looks like something I could actually pull off! Could you please email me the pdf for the labels. And can you please say where to get that perfect box to put them in?
Also, your grandson is sooooo cute!
Hi Cyndy, sending the labels now. There's a link in the email regarding the boxes.
Yes, he is a cutie!
I am so excited to make these!! You continue to amaze me, Chris, but I will continue to thank you. I just wish I had a cute little guy close enough to me to help with the decoration! Please do send me the labels for these sweet summer cookies. Thank you.
Thank you for your very kind words, Nikki. The labels are coming your way.
I couldn't wait to try these watermelon cookies - oh my - they are delish and the family loves them.
Please send me the pdf for the adorable labels. I will share the cookies with everyone.
Thank you so much. Btw, your grandson is adorable and he's awfully lucky to have such loving grandparents.
I also love that the size of these labels is so perfect for small boxes. I'm dreaming of Christmas cookies now.......
Haha! I love that you already made these cookies, Jane! You are very speedy! So happy you love them as much as we do! Happy to send the labels.
Forgot to say - what a handsome young man! He's lucky to have you as I am sure that you are lucky to have him!
Thanks so much, Cathy. He is a honey!
Such a "happy" cookie!
Could I please have the labels?
Blessings!
They do make me smile! Sending the labels now, Cathy!
Hi,
I would love to have the labels for these cute watermelon cookies! I love all of your recipes and simple ideas for cookies. Thank you,
Verna
Hi Verna, happy to send the labels. ENJOY!
These are so cute!!! I would love to have the labels! Thank you!
Thanks, Debbie! Sending the labels now!